2012 SUBARU FORESTER audio
[x] Cancel search: audioPage 225 of 438

5-52Audio
! Deleting the callback data
1. Select the “CALLBACK ”menu.
2. Select the phone number by operating the “TUNE/TRACK/CH ”dial.
3. Select the “DELETE ”menu.
4. Select the “CONFIRM ”menu. Then
“ DELETED ”is displayed and the selected
callback data is deleted. ! Making a phone call
! Making a phone call by saying name
1. Select the top menu (phone menu).
2. Press the talk switch
.
3. Say “DIAL BY NAME ”.
4. Press the talk switch
again.
5. Say the desired name (voice tag) to be called.
6. Select the “DIAL ”menu.
! Making a phone call by saying number
1. Select the top menu (phone menu).
2. Press the talk switch
.
3. Say “DIAL BY NUMBER ”.
4. Press the talk switch
again.
5. Say the desired phone number to be called.
6. Select the “DIAL ”menu. !
Making a phone call from speed dial
It is possible to select a phone number
from speed dial registered with the in-
vehicle equipment to make a phone call.
1. Select the top menu (phone menu).
2. Press the preset button (from
to) in which the desired number is
registered.
3. Press the OFF hook switch
.
NOTE
When a preset button for which num-
bers are not registered is pressed, an
error message is indicated on the audioscreen. ! Redial
1. Select the “REDIAL ”menu.
2. Press the OFF hook switch
.
3. Select the desired number by turning the “TUNE/TRACK/CH ”dial.
4. Perform either of the following proce-dures. –Press the OFF hook switch
.
– Press the “TUNE/TRACK/CH ”dial,
then select the “DIAL ”menu.
! Callback
1. Select the “CALL BACK ”menu.
2. Press the OFF hook switch
. 3. Select the desired number by turning the
“TUNE/TRACK/CH ”dial.
4. Perform either of the following proce-dures. –Press the OFF hook switch
.
– Press the “TUNE/TRACK/CH ”dial,
then select the “DIAL ”menu.
! Making a phone call from list name
It is possible to select a phone number
from the list name registered with the in-
vehicle equipment to make a phone call.
For details, refer to “List names function ”
F 5-50.
! Top redial
1. Select the top menu (phone menu).
2. Press the OFF hook switch
and
load the outgoing call history.
3. Select the “DIAL ”menu.
! Taking a phone call and declining
an incoming call
To take a phone call: Press the OFF
hook switch
.
To put an incoming call on hold: Press
the ON hook switch
briefly.
To decline an incoming call: Press and
hold the ON hook switch
for more
than 1.5 seconds.
Page 226 of 438

!Ending a call
Press the ON hook switch
.
! Volume control
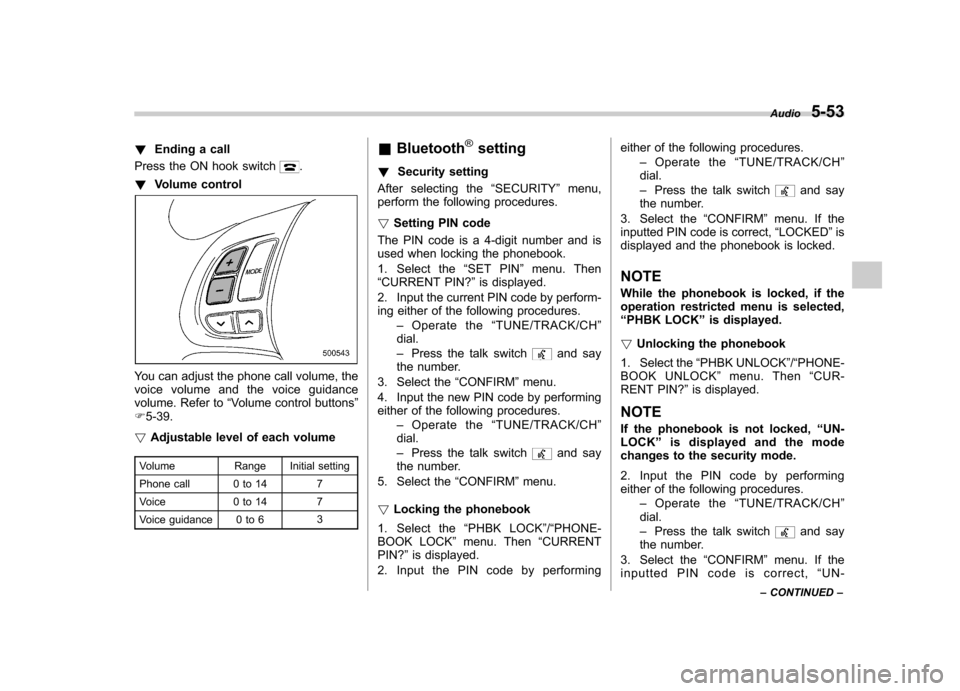
You can adjust the phone call volume, the
voice volume and the voice guidance
volume. Refer to “Volume control buttons ”
F 5-39.
! Adjustable level of each volume
Volume Range Initial setting
Phone call 0 to 14 7
Voice 0 to 14 7
Voice guidance 0 to 6 3&
Bluetooth
®setting
! Security setting
After selecting the “SECURITY ”menu,
perform the following procedures. ! Setting PIN code
The PIN code is a 4-digit number and is
used when locking the phonebook.
1. Select the “SET PIN ”menu. Then
“ CURRENT PIN? ”is displayed.
2. Input the current PIN code by perform-
ing either of the following procedures. –Operate the “TUNE/TRACK/CH ”
dial. – Press the talk switch
and say
the number.
3. Select the “CONFIRM ”menu.
4. Input the new PIN code by performing
either of the following procedures. –Operate the “TUNE/TRACK/CH ”
dial. – Press the talk switch
and say
the number.
5. Select the “CONFIRM ”menu.
! Locking the phonebook
1. Select the “PHBK LOCK ”/“ PHONE-
BOOK LOCK ”menu. Then “CURRENT
PIN? ”is displayed.
2. Input the PIN code by performing either of the following procedures.
–Operate the “TUNE/TRACK/CH ”
dial. – Press the talk switch
and say
the number.
3. Select the “CONFIRM ”menu. If the
inputted PIN code is correct, “LOCKED ”is
displayed and the phonebook is locked.
NOTE
While the phonebook is locked, if the
operation restricted menu is selected,“ PHBK LOCK ”is displayed.
! Unlocking the phonebook
1. Select the “PHBK UNLOCK ”/“ PHONE-
BOOK UNLOCK ”menu. Then “CUR-
RENT PIN? ”is displayed.
NOTE
If the phonebook is not locked, “UN-
LOCK ”is displayed and the mode
changes to the security mode.
2. Input the PIN code by performing
either of the following procedures.
–Operate the “TUNE/TRACK/CH ”
dial. – Press the talk switch
and say
the number.
3. Select the “CONFIRM ”menu. If the
inputted PIN code is correct, “UN-
Audio
5-53
– CONTINUED –
Page 227 of 438

5-54Audio
LOCKED ”is displayed and the phone-
book is unlocked. ! Phone setup
After selecting the “PHONE SETUP ”
menu, perform the following procedures. ! Setting pair phone
Refer to “Preparation for using the Hands-
free system ”F 5-45.
! Selecting phone
To select the registered cell phone for
connecting to the in-vehicle equipment,
perform the following procedure.
1. Select the “SELECT PHONE ”menu. If
no cell phones are registered, “EMPTY ”is
displayed and the mode changes to the “ PHONE SETUP ”mode.
2. Select the cell phone by performing
either of the following procedures. –Operate the “TUNE/TRACK/CH ”
dial. – Press the talk switch
and say
the voice tag.
3. Select the “CONFIRM ”menu (only
after saying the voice tag). “SELECTED ”
is displayed, the selected cell phone is
connected to the in-vehicle equipment and
the mode changes to the “PHONE SET-
UP ”mode. !
Changing the voice tag of the cellphone
1. Select the “CHANGE NAME ”menu. If
no cell phones are registered, “EMPTY ”is
displayed and the mode changes to the“ PHONE SETUP ”mode.
2. Select the cell phone by performing
either of the following procedures. –Operate the “TUNE/TRACK/CH ”
dial. – Press the talk switch
and say
the voice tag.
3. Register the voice tag. For details,
refer to “Preparation for using the Hands-
free system ”F 5-45.
! List phones function
The cell phone voice tags saved in the cell
phone list are spoken by using the list
phones function.
1. Select the “LIST PHONES ”menu. If
no cell phones are registered, “EMPTY ”is
displayed and the mode changes to the “ PHONE SETUP ”mode.
2. Registered cell phones are displayed
on the saved side. While displayed, if the“ TUNE/TRACK/CH ”dial is turned, the
next registered cell phone is displayed.
Press the ON hook button
to close the
Hands-free menu.
3. Select a cell phone by performing either of the following procedures.
–Operate the “TUNE/TRACK/CH ”
dial. – Press the talk switch
.
4. After “SELECTED ”is displayed, select
the following menus. . “SELECT PHONE ”to connect the
selected cell phone . “CHANGE NAME ”to change the voice
tag. “DELETE ”to delete the selected cell
phone from the list . “GO BACK ”to go back to the “PHONE
SETUP ”mode
! Setting passkey
1. Select the “SET PASSKEY ”menu.
After the currently set passkey is dis-
played, a new passkey can be entered.
2. Input the new passkey by performing
either of the following procedures.
–Operate the “TUNE/TRACK/CH ”
dial. – Press the talk switch
and say
the passkey.
3. Select the “CONFIRM ”menu. The new
passkey is displayed, the passkey is
changed and the mode changes to the“ PHONE SETUP ”mode.
Page 228 of 438

!Deleting registered cell phone from
the list
1. Select the “DELETE ”menu.
2. Select a cell phone to be deleted by
performing either of the following proce-dures. –Operate the “TUNE/TRACK/CH ”
dial. – Press the talk switch
and say
the voice tag.
3. Select the “CONFIRM ”menu. “DE-
LETED ”is displayed, the data is deleted
and the mode changes to the “PHONE
SETUP ”mode.
! System setup
After selecting the “SYSTEM SETUP ”
menu, perform the following procedures.
You can select the following menus only
by operating the “TUNE/TRACK/CH ”dial.
! Setting guidance volume
To set the guidance volume, perform the
following procedure.
1. Select the “GUIDANCE VOL ”/“ GUI-
DANCE VOLUME ”menu.
2. Set the guidance volume by operating the “TUNE/TRACK/CH ”dial. !
Initializing the registered data
To initialize the registered data, perform
the following procedure.
1. Select the “INITIALIZE ”menu.
2. Select the “CONFIRM ”menu. First
“ PLEASE WAIT ”, then “INITIALIZED ”is
displayed. The registered data is initia-
lized and the mode changes to the lastmode. ! Selecting language
To select the language, perform the
following procedure.
1. Select the “SEL LANGUAGE ”/“ SE-
LECT LANGUAGE ”menu.
2. Select the desired language by oper-
ating the “TUNE/TRACK/CH ”dial. Screensaver (type D audio)
If the following operations are not per-
formed for more than 30 seconds while
the audio is ON, the screensaver will bedisplayed. .
Operate any button or dial
. Shift the shift lever/select lever to the
“ R ”position
. A cell phone registered in the Hands-
free system is called
If one of the following operations is
performed, the screensaver turns off and
the operation screen will be displayed. . A cell phone registered in the Hands-
free system is called. The update for satellite radio starts.
. The update for satellite radio stops.
If one of the following operations is
performed, the screensaver turns off.
However, the operation screen will not
be displayed. . Operate any button or any dial in a
condition other than the following condi- tions
–Pressing the
button while a
mode other than the CD mode is selected – Pressing the volume control buttons
of the audio control buttons Audio
5-55
– CONTINUED –
Page 229 of 438

5-56Audio
– Pressing the power switch
. Insert a CD (except reloading a CD)
. Connect a USB storage device or an
iPod
®
NOTE
The screensaver is not displayed under
the following conditions. . While the ignition switch is in the
“ LOCK ”position
. While the audio is OFF
. While the screen is OFF
. While talking on a cell phone regis-
tered in the Hands-free system . While setting the audio
. While seek tuning, PTY group tun-
ing, scan tuning or auto-storing while
the FM/AM radio is on.. While in the category search mode
of the satellite radio. While the rear view camera is being
used & Downloading picture
Perform the following procedure to down-
load a picture to be used as screensaver.
1. Connect a USB storage device. Refer to “Connecting USB storage device /
iPod
®” F 5-33.
2. Select the “Picture Download ”menu
by operating the “TUNE/TRACK/CH ”dial. For details, refer to
“Audio settings (type D
audio) ”F 5-10.
3. Select the preferred JPEG file by
operating the “TUNE/TRACK/CH ”dial.
4. Select “Wide ”or “Normal ”by operating
the “TUNE/TRACK/CH ”dial.
NOTE . JPEG files that are 10 MB or less can
be saved. . If the file name is too long, the file
may not be saved.. Up to two JPEG files can be saved in
the in-vehicle equipment.. If the aspect ratio of the displayed
picture is 16:9, “Wide ”cannot be
selected.. If the aspect ratio of the displayed
picture is 4:3, “Normal ”cannot be
selected.
& Selecting picture
1. Select the “Picture Select ”menu by
operating the “TUNE/TRACK/CH ”dial. For
details, refer to “Audio settings (type D
audio) ”F 5-10. If no pictures are saved,
“ No Data ”is displayed. Press thebutton to return to the “Screen Saver ”
mode.
2. Select the preferred picture by operat-
ing the “TUNE/TRACK/CH ”dial. &
Erasing picture
1. Select the “Picture Erase ”menu by
operating the “TUNE/TRACK/CH ”dial. For
details, refer to “Audio settings (type D
audio) ”F 5-10. If no pictures are saved,
“ No Data ”is displayed. Press the
button to return to the “Screen Saver ”
mode.
2. Select the preferred picture by operat-
ing the “TUNE/TRACK/CH ”dial.
3. Operate the “TUNE/TRACK/CH ”dial
to select “OK ”to erase the picture or
“ Cancel ”to cancel the operation.
Page 237 of 438

6-8Interior equipment
Cup holders
CAUTION
Take care to avoid spills. Beverages,
if hot, might burn you or your
passengers. Spilled beverages may
also damage upholstery, carpets or
audio equipment.
& Front passenger ’s cup holder
CAUTION
Do not pick up a cup from the cup
holder or put a cup in the holder
while you are driving, as this may
distract you and lead to an accident.A dual cup holder is built in the center
console, beside the parking brake lever.
The cup holder rear partition can be
removed and placed on the front partition.
This space can be used to store smallitems. &
Rear passenger ’s cup holder
(if equipped)
A dual cup holder is located on the rear
seat center table.
Page 246 of 438

Rear view camera (if equipped)
A rear view camera is attached to the rear
gate. When the ignition switch is“ON ”and
the shift lever (MT models) or select lever
(AT models) is set to “R ”, the rear view
camera automatically displays the rear
view image behind the vehicle on the
navigation monitor or the display of the
type D audio (if equipped).
WARNING
. Since the rear view camera uses
a wide-angle lens, the image on
the monitor is different from the
actual view in terms of distance.
. Since the range of the image on the monitor is limited, you should
always check the rear view and
the surrounding area with your
eyes and mirrors, and move
backward at a slow speed. Mov-
ing backward only by checking
the rear view image from the
camera could cause an accident.
. Do not disassemble or modify the
camera, switch or wiring. If
smoke comes out or you smell
a strange odor, stop using the
rear view camera immediately.
Contact your SUBARU dealer
for an inspection. Continued use
may result in accident, fire or
electric shock.
CAUTION
. If your vehicle is washed with a
high-pressure washer, do not
allow water to contact the camera
directly. Entry of water in the
camera lens may result in con-
densation, malfunction, fire or
electric shock.
. Since the camera is a precision
device, do not subject it to strong
impacts. Otherwise, malfunction,
fire or electric shock may occur. .
If mud or snow sticks to or is
frozen on the camera, you must
be very careful removing it.
Otherwise, damage to the camera
may cause a fire or electric
shock. Pour water or lukewarm
water over the camera to remove
mud and ice, and wipe it with a
soft, dry cloth.
. Do not put a flame close to the
camera or wiring. Otherwise, da-
mage or fire may occur.
. When replacing the fuse, be sure
to use a fuse with the specified
rating. Use of a fuse with a
different rating may result in amalfunction.
. If the rear view camera is used for
a long time while the engine is
not operated, the battery may
become completely discharged.
NOTE . Do not wipe the camera with alcohol,
benzine or paint thinner. Otherwise,
discoloration may occur. To remove
contamination, wipe the camera with a
cloth moistened with a diluted neutral
detergent and then wipe it with a soft,
dry cloth.. When waxing the vehicle, be careful Interior equipment
6-17
– CONTINUED –
Page 334 of 438

Exterior care....................................................... 10-2
Washing ............................................................. 10-2
Waxing and polishing ......................................... 10-3
Cleaning aluminum wheels ................................. 10-3
Corrosion protection .......................................... 10-4
Most common causes of corrosion ..................... 10-4
To help prevent corrosion ................................... 10-4 Cleaning the interior
.......................................... 10-5
Seat fabric ......................................................... 10-5
Leather seat materials ........................................ 10-5
Synthetic leather upholstery ............................... 10-5
Climate control panel, audio panel, instrument panel, console panel, and switches .................. 10-5
Monitor (if equipped) .......................................... 10-6
Cargo tray (if equipped) ..................................... 10-6
Appearance care
10