Page 345 of 438
11-6Maintenance and service
WARNING
Always check that the hood is
properly locked before you start
driving. If it is not, it might fly open
while the vehicle is moving and
block your view, which may cause
an accident and serious bodily in-
jury.
Page 346 of 438
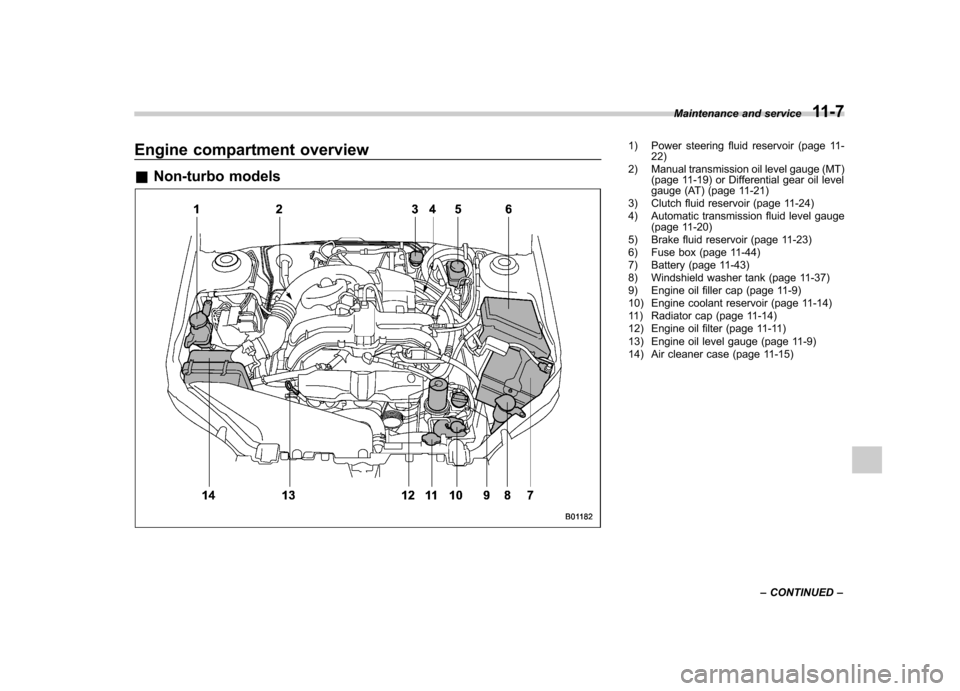
Engine compartment overview &Non-turbo models1) Power steering fluid reservoir (page 11-
22)
2) Manual transmission oil level gauge (MT) (page 11-19) or Differential gear oil level
gauge (AT) (page 11-21)
3) Clutch fluid reservoir (page 11-24)
4) Automatic transmission fluid level gauge (page 11-20)
5) Brake fluid reservoir (page 11-23)
6) Fuse box (page 11-44)
7) Battery (page 11-43)
8) Windshield washer tank (page 11-37)
9) Engine oil filler cap (page 11-9)
10) Engine coolant reservoir (page 11-14)
11) Radiator cap (page 11-14)
12) Engine oil filter (page 11-11)
13) Engine oil level gauge (page 11-9)
14) Air cleaner case (page 11-15) Maintenance and service
11-7
– CONTINUED –
Page 347 of 438
11-8Maintenance and service
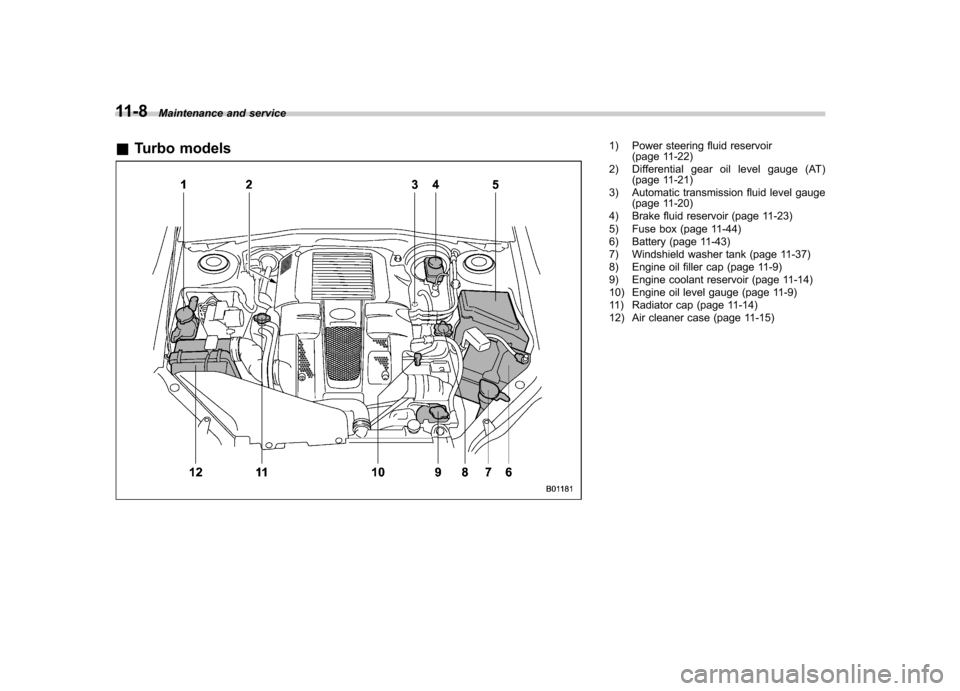
& Turbo models
1) Power steering fluid reservoir
(page 11-22)
2) Differential gear oil level gauge (AT) (page 11-21)
3) Automatic transmission fluid level gauge (page 11-20)
4) Brake fluid reservoir (page 11-23)
5) Fuse box (page 11-44)
6) Battery (page 11-43)
7) Windshield washer tank (page 11-37)
8) Engine oil filler cap (page 11-9)
9) Engine coolant reservoir (page 11-14)
10) Engine oil level gauge (page 11-9)
11) Radiator cap (page 11-14)
12) Air cleaner case (page 11-15)
Page 348 of 438

Engine oil NOTE .The engine oil consumption rate is
not stabilized, and therefore cannot be
determined until the vehicle has tra-
veled at least several thousand miles
(kilometers). Even after break-in, when
the vehicle is used under severe driv-
ing conditions such as those men-
tionedintheWarrantyandMainte-
nance Booklet, engine oil is consumed
or deteriorated more quickly than un-
der normal driving conditions. If you
drive your vehicle under these severe
conditions, you should check the oil
level at least at every second fuel fill-up
time, and change the oil more fre-
quently. Please refer to the Warranty
and Maintenance Booklet for more de-tails.. If the oil consumption rate seems
abnormally high after the break-in
period, for example more than 1 quart
per 1,200 miles (1 liter per 2,000 kilo-
meters), contact your SUBARU dealer. &
Checking the oil level
Check the engine oil level at each fuelstop.
1. Park the vehicle on a level surface and
stop the engine. Wait a few minutes for the
oil to drain back into the oil pan.
Turbo models
1) Oil level gauge
2) Oil filler cap
Non-turbo models
1) Oil level gauge
2) Oil filler cap
3) Oil filter
2. Pull out the level gauge, wipe it clean,
and insert it again. Maintenance and service
11-9
– CONTINUED –
Page 349 of 438

11-10Maintenance and service
Turbo models
1) Notch
2) Full level
3) Low level
4) Approximately 1.1 US qt (1.0 liter, 0.9
Imp qt) from low level to full levelNon-turbo models
1) Full level
2) Low level
3) Approximately 1.1 US qt (1.0 liter, 0.9
Imp qt) from low level to full level
3. Be sure the level gauge is correctly
inserted until it stops. For turbo models,
the graphic symbol “
”on the top of the
gauge should be positioned as shown in
the illustration.
4. Pull out the oil level gauge again.5. Non-turbo models:
Check the oil levels on both sides of the
level gauge. The engine oil level must be
judged by the lowest of the two levels. If
the oil level is below the low level mark,
add oil so that the full level is reached. Turbo models:
Check the oil level on the gauge. If the oil
level is below the low level mark, add oil
so that the full level is reached.
CAUTION
. For non-turbo models, be careful
not to touch the engine oil filter
when removing the oil filler cap.
Doing so may result in a burn, a
pinched finger, or may cause
some other injury.
. Use only engine oil with the
recommended grade and vis-
cosity.
. Be careful not to spill engine oil
when adding it. If oil touches the
exhaust pipe, it may cause a bad
smell, smoke, and/or a fire. If
engine oil gets on the exhaust
pipe, be sure to wipe it off.
To add engine oil, remove the engine oil
filler cap and slowly pour engine oil
through the filler neck. After pouring oil
into the engine, you must use the level
gauge to confirm that the oil level iscorrect.
Page 350 of 438

NOTE .Just after driving or while the engine
is warm, the engine oil level reading
may be in a range between the full level
and the notch mark (turbo models).
This is caused by thermal expansion of
the engine oil.. To prevent overfilling the engine oil,
do not add any additional oil above the
full level when the engine is cold. & Changing the oil and oil filter
CAUTION
. If you change your own oil, be
sure to drain all the oil from the
filter before disposal.
. Do not dispose of used engine oil
by placing it in the trash, or by
pouring it onto the ground, into
sewers, or into any body of water.
Check with your local govern-
ment office for the proper dis-
posal options available to you.
Change the oil and oil filter according to
the maintenance schedule in the “War-
ranty and Maintenance Booklet ”.
The engine oil and oil filter must be
changed more frequently than listed in
the maintenance schedule when driving on dusty roads, when short trips are
frequently made, or when driving in
extremely cold weather.
1. Warm up the engine by letting the
engine idle for approximately 10 minutes
to ease draining the engine oil.
2. Park the vehicle on a level surface and
stop the engine.
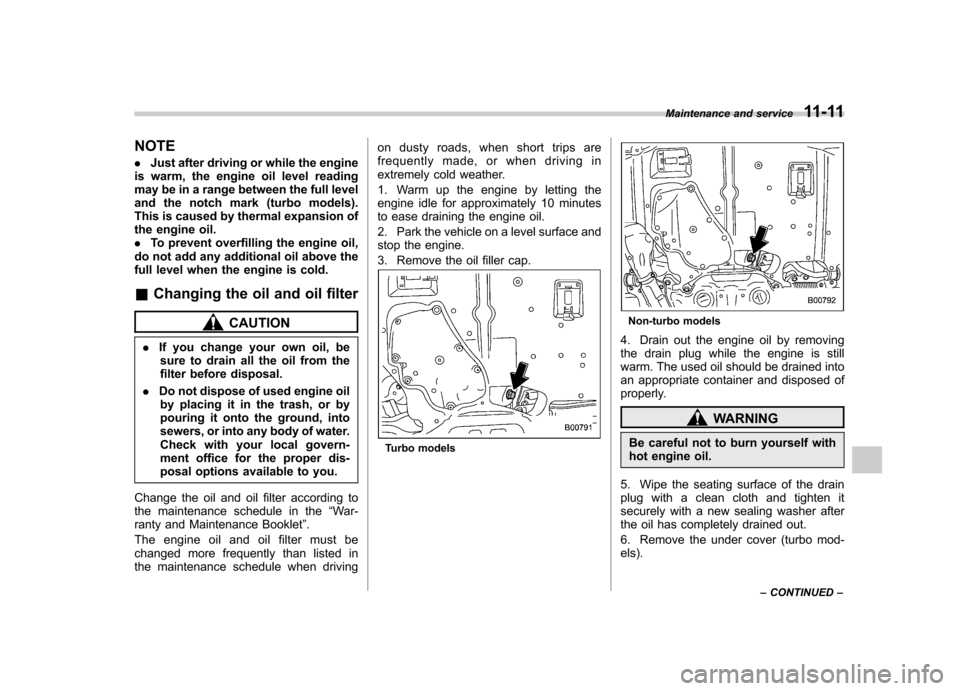
3. Remove the oil filler cap.
Turbo models
Non-turbo models
4. Drain out the engine oil by removing
the drain plug while the engine is still
warm. The used oil should be drained into
an appropriate container and disposed of
properly.
WARNING
Be careful not to burn yourself with
hot engine oil.
5. Wipe the seating surface of the drain
plug with a clean cloth and tighten it
securely with a new sealing washer after
the oil has completely drained out.
6. Remove the under cover (turbo mod- els). Maintenance and service
11-11
– CONTINUED –
Page 351 of 438

11-12Maintenance and service
Non-turbo models
Turbo models
7. Remove the oil filter with an oil filter wrench.
8. Before installing a new oil filter, apply a
thin coat of engine oil to the seal. 9. Clean the seal seating area. Screw on
the oil filter by hand until its seal contacts
the seating surface. Be careful not to twist
or damage the seal.
10. Tighten the oil filter further by the
amount indicated in the following table.
Turbo models
Oil filter color Part number Amount of
rotation
Black 15208AA100 1 rotation
Blue 15208AA12A 7/8
rotation
Non-turbo models Oil filter color Part number Amount of
rotation
Black 15208AA130 3/4 rotation
15208AA160
1 rotation
CAUTION
. Never over tighten the oil filter
because that can result in an oil leak.
. Thoroughly wipe off any engine
oil that has spilled over the
exhaust pipe and/or under-cover.
If spilled oil is not promptly
wiped up, the oil could cause afire. 11. Reinstall under cover (turbo models).
12. Pour engine oil through the filler neck.
For the oil capacity guideline, refer to “
Engine oil ”F 12-5.
The oil quantity indicated above is onlyguideline.
The necessary quantity of oil depends on
the quantity of oil that has been drained.
The quantity of drained oil differs slightly
depending on the temperature of the oil
and the time the oil is left flowing out. After
refilling the engine with oil, therefore, you
must use the level gauge to confirm that
the level is correct.
13. Start the engine and make sure that no
oil leaks appear around the filter ’s rubber
seal and drain plug.
14. Run the engine until it reaches the
normal operating temperature. Then stop
the engine and wait a few minutes to allow
the oil drain back. Check the oil level
again and if necessary, add more engineoil.
CAUTION
Be careful not to spill engine oil
when adding it. If oil touches the
exhaust pipe, it may cause a bad
smell, smoke, and/or a fire.
Page 352 of 438

&Recommended grade and viscosity
CAUTION
Use only engine oil with the recom-
mended grade and viscosity.
Refer to “Engine oil ”F 12-5.
NOTE
Engine oil viscosity (thickness) affects
fuel economy. Oils of lower viscosity
provide better fuel economy. However,
in hot weather, oil of higher viscosity is
required to properly lubricate the en-gine. & Synthetic oil
You should use synthetic engine oil that
meets the same requirements given for
conventional engine oil. When using
synthetic oil, you must use oil of the same
classification, viscosity and grade shown
in this Owner ’s Manual. Refer to “Engine
oil ”F 12-5. Also, you must follow the oil
and filter changing intervals shown in the
Warranty and Maintenance booklet. NOTE
Synthetic oil of the grade and viscosity
noted in chapter 12 is the recom- mended engine oil for optimum engine
performance. Conventional oil may be
used if synthetic oil is unavailable.
Cooling systemWARNING
Never attempt to remove the radia-
tor cap until the engine has been
shut off and has cooled down
completely. Since the coolant is
under pressure, you may suffer
serious burns from a spray of boil-
ing hot coolant when the cap isremoved.
CAUTION
. Vehicles are filled at the factory
with SUBARU Super Coolant that
does not require the first change
for 11 years/137,500 miles (11
years/220,000 km). This coolant
should not be mixed with any
other brand or type of coolant
during this period. Mixing with a
different coolant will reduce the
life of the coolant. Should it be
necessary to top up the coolant
for any reason, use only
SUBARU Super Coolant.
If the SUBARU Super Coolant is
diluted with another brand or
type, the maintenance interval is Maintenance and service
11-13
– CONTINUED –