2012 SUBARU FORESTER replace
[x] Cancel search: replacePage 145 of 438

3-34Instruments and controls
Refer to “Windshield washer
fluid ”F 11-37.
Also, when driving the vehicle in
freezing temperature, use non-
freezing type wiper blades.
. Do not clean the wiper blades
with gasoline or a solvent, such
as paint thinner or benzine. This
will cause deterioration of the
wiper blades.
NOTE . The wipers operate only when the
ignition switch is in the “ON ”or “Acc ”
position. . The front wiper motor is protected
against overload by a circuit breaker. If
the motor operates continuously under
an unusually heavy load, the circuit
breaker may trip to stop the motor
temporarily. If this happens, park your
vehicle in a safe place, turn off the
wiper switch, and wait for approxi-
mately 10 minutes. The circuit breaker
will reset itself, and the wipers will
again operate normally.. Clean your wiper blades and win-
dow glass periodically with a washer
solution to prevent streaking, and to
remove accumulations of road salt or
road film. Keep the washer button depressed at least for 1 second so that
washer solution will be sprinkled all
over the windshield or rear window..
Grease, wax, insects or other mate-
rial on the windshield or the wiper
blade results in jerky wiper operation
and streaking on the glass. If you
cannot remove those streaks after
operating the washer or if the wiper
operation is jerky, clean the outer sur-
face of the windshield or rear window
and the wiper blades using a sponge or
soft cloth with a neutral detergent or
mild abrasive cleaner. After cleaning,
rinse the window glass and wiper
blades with clean water. The glass is
clean if no beads form on the glass
when you rinse with water.. If you cannot eliminate the streaking
even after following this procedure,
replace the wiper blades with new
ones. For replacement instructions,
refer to “Replacement of wiper blades ”
F 11-39. &
Windshield wiper and washer switches
The wipers operate only when the ignition
switch is in the “ON ”or “Acc ”position.
! Windshield wipers
OFF: Off: Intermittent
LO: Low speed
HI: High speed
To turn the wipers on, push the wiper
control lever down.
To turn the wipers off, return the lever to the “OFF ”position.
Page 152 of 438
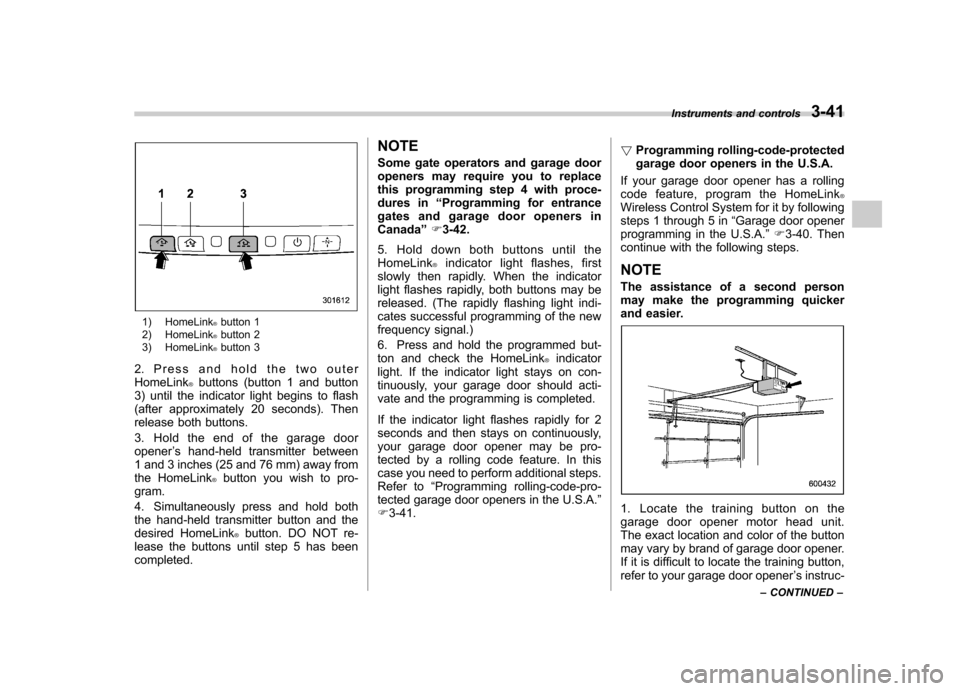
1) HomeLink®button 1
2) HomeLink®button 2
3) HomeLink®button 3
2. Press and hold the two outer HomeLink
®buttons (button 1 and button
3) until the indicator light begins to flash
(after approximately 20 seconds). Then
release both buttons.
3. Hold the end of the garage door opener ’s hand-held transmitter between
1 and 3 inches (25 and 76 mm) away from
the HomeLink
®button you wish to pro-
gram.
4. Simultaneously press and hold both
the hand-held transmitter button and the
desired HomeLink
®button. DO NOT re-
lease the buttons until step 5 has beencompleted. NOTE
Some gate operators and garage door
openers may require you to replace
this programming step 4 with proce-
dures in
“Programming for entrance
gates and garage door openers inCanada ”F 3-42.
5. Hold down both buttons until the
HomeLink
®indicator light flashes, first
slowly then rapidly. When the indicator
light flashes rapidly, both buttons may be
released. (The rapidly flashing light indi-
cates successful programming of the new
frequency signal.)
6. Press and hold the programmed but-
ton and check the HomeLink
®indicator
light. If the indicator light stays on con-
tinuously, your garage door should acti-
vate and the programming is completed.
If the indicator light flashes rapidly for 2
seconds and then stays on continuously,
your garage door opener may be pro-
tected by a rolling code feature. In this
case you need to perform additional steps.
Refer to “Programming rolling-code-pro-
tected garage door openers in the U.S.A. ”
F 3-41. !
Programming rolling-code-protected
garage door openers in the U.S.A.
If your garage door opener has a rolling
code feature, program the HomeLink
®Wireless Control System for it by following
steps 1 through 5 in “Garage door opener
programming in the U.S.A. ”F 3-40. Then
continue with the following steps. NOTE
The assistance of a second person
may make the programming quicker
and easier.
1. Locate the training button on the
garage door opener motor head unit.
The exact location and color of the button
may vary by brand of garage door opener.
If it is difficult to locate the training button,
refer to your garage door opener ’s instruc-
Instruments and controls
3-41
– CONTINUED –
Page 170 of 438

heated interior. This results in quicker
cooling by the air conditioner. Keep the
windows closed during the operation of
the air conditioner for maximum cooling
efficiency. &Lubrication oil circulation in
the refrigerant circuit
Operate the air conditioner compressor at
a low engine speed (at idle or low driving
speeds) a few minutes each month during
the off-season to circulate its oil. & Checking air conditioning
system before summer sea-son
Check the air conditioner unit for refriger-
ant leaks, hose conditions, and proper
operation each spring. Have the air con-
ditioning system checked by your
SUBARU dealer. & Cooling and dehumidifying in
high humidity and low tem-
perature weather conditions
Under certain weather conditions (high
relative humidity, low temperatures, etc.) a
small amount of water vapor emission
from the air outlets may be noticed. This
condition is normal and does not indicate
any problem with the air conditioning system.
& Air conditioner compressor
shut-off when engine is
heavily loaded
To improve acceleration and gas mileage,
the air conditioner compressor is designed
to temporarily shut off during air condi-
tioner operation whenever the accelerator
pedal is fully depressed such as during
rapid acceleration or when driving on a
steep upgrade. & Refrigerant for your climate
control system
Your air conditioner uses ozone friendly
refrigerant HFC134a. Therefore, the meth-
od of adding, changing or checking the
refrigerant is different from the method for
CFC12 (freon). Consult your SUBARU
dealer for service. Repairs needed as a
result of using the wrong refrigerant are
not covered under warranty. Air filtration system
Replace the filter element according to the
replacement schedule as follows. This
schedule should be followed to maintain
the filter
’s dust collection ability. Under
extremely dusty conditions, the filter
should be replaced more frequently. It is
recommended that you have your filter
checked or replaced by your SUBARU
dealer. For replacement, use only a
genuine SUBARU air filter kit.
Replacement schedule: Every 12 months or 7,500 miles (12,000
km) whichever comes first
CAUTION
Contact your SUBARU dealer if the
following occurs, even if it is not yet
time to change the filter. – Reduction of the airflow through
the vents.
– Windshield gets easily fogged ormisted.
NOTE
The filter can influence the air condi-
tioning, heating and defroster perfor- Climate control
4-11
– CONTINUED –
Page 171 of 438

4-12Climate control
mance if not properly maintained. &Replacing an air filter
1. Remove the glove box. (1) Open the glove box.
(2) Remove the damper shaft from the
glove box.
(3) While pushing the stoppers on
both sides of the glove box, swing
the glove box down and remove it.
2. Remove the air filter.
3. Replace the air filter element with a
new one.
CAUTION
The arrow mark on the filter must
point UP.
Page 190 of 438

&Station preset
! How to preset stations
1. Press the “FM/AM ”button to select the
preferred reception mode.
2. Select the preferred station.
3. Press and hold one of the preset
buttons (from
to) for more
than 1.5 seconds to store the frequency. If
the button is pressed and held for less
than 1.5 seconds, the preceding selection
will remain in memory. NOTE . Up to six stations for each reception
mode may be preset. . If the connection between the radio
and battery is broken for any reason
such as vehicle maintenance or radio
removal, all stations stored in the
preset buttons are cleared. If this
occurs, it is necessary to reset the
preset buttons.. If a cell phone is placed near the
radio, it may cause the radio to emit
noise when it receives calls. This noise
does not indicate a radio malfunction. ! Selecting preset stations
1. Press the “FM/AM ”button to select the
preferred reception mode. 2. Press the preferred preset button (from
to) briefly.
! Auto-store (type D audio)
Using the Auto-store function, you can
automatically store 6 stations on the
current waveband (FM-AS or AM-AS) by
pressing and holding the
button for
1.5 seconds or longer. Use Auto-store to
quickly find the strongest stations, for
example when traveling through different
reception areas. NOTE . When the HD Radio function is
turned on, Auto-store cannot be used
while receiving the broadcasting sta-
tion with SPS (Supplemental ProgramService).. When you use Auto-store, the new
stations replace any stations pre-
viously stored.. Interrupting Auto-store: If you acci-
dentally press the
(Auto-store)
button, you can cancel the Auto-store
function before it has been completed
as follows.
–Switching to the other source
mode – Pressing the
button
– Switching to the other band
– Turning the “TUNE/TRACK/CH ”dial –
Pressing the “SCAN ”button
! Displaying and selecting preset
stations (type D audio)
1. Press and hold the
button for 1.5
seconds or longer during AM/FM recep-
tion to display the radio screen.
2. Operate the “TUNE/TRACK/CH ”dial
to select the stations. Audio
5-17
Page 263 of 438

7-12Starting and operating
Pressing the brake pedal repeatedly will
toggle the feature ON or OFF each time.
7. To exit the remote transmitter and
feature programming mode, turn the igni-
tion switch to the “LOCK ”position, remove
the key from the ignition switch and test
operation of the remote transmitter(s) and
horn confirmation feature. & System maintenance
! Changing the remote control bat- teries
CAUTION
. Do not let dust, oil or water get on
or in the remote engine start
transmitter when replacing the
battery.
. Be careful not to damage the
printed circuit board in the re-
mote engine start transmitter
when replacing the battery.
. Be careful not to allow children to
touch the battery and any re-
moved parts; children could
swallow them.
. There is a danger of explosion if
an incorrect replacement battery
is used. Replace only with the
same or equivalent type of bat- tery.
. Batteries should not be exposed
to excessive heat such as sun-
shine, fire or the like.
The two 3-volt lithium batteries (modelCR-1220 ) supplied in your remote control
should last approximately 3 years, de-
pending on usage. When the batteries
begin to weaken, you will notice a
decrease in range (distance from the
vehicle that your remote control operates).
Follow the instructions below to change
the remote control batteries.1. Carefully pry the remote control halves
apart using a small flat-head screwdriver.
Page 264 of 438

2. Remove the circuit board from the
bottom half of the case and slide the white
plastic battery holder out from under the
battery tab releasing the batteries. Re-
move the old batteries and replace with
new ones. Be sure to observe the (+) sign
on the old batteries before removing them
to ensure that the new batteries are
inserted properly (battery“+ ” should be
pointed away from the transmitter circuit
board on both batteries).
3. Carefully snap the case halves back
together, then test the remote control.
CAUTION
FCC WARNING
Changes or modifications not ex-
pressly approved by the party re- sponsible for compliance could void
the user
’s authority to operate the
equipment.
NOTE
This device complies with Part 15 of
the FCC Rules and RSS-Gen of IC
Rules. Operation is subject to the
following two conditions: (1) this de-
vice may not cause harmful interfer-
ence, and (2) this device must accept
any interference received, including
interference that may cause undesiredoperation. Manual transmission
The manual transmission is a fully syn-
chromeshed, 5-forward-speed and 1-re-
verse-speed transmission.
The shift pattern is shown on the shift
lever knob. When shifting from 5th gear to
reverse gear, first return the shift lever to
the neutral position then shift into reverse
gear.
To change gears, fully depress the clutch
pedal, move the shift lever, and gradually
let up on the clutch pedal.
If it is difficult to shift into gear, put the
transmission in neutral, release the clutch
pedal momentarily, and then try again.Starting and operating
7-13
– CONTINUED –
Page 266 of 438
transmission components.
When it is necessary to reduce vehicle
speed due to slow traffic, turning corners,
or driving up steep hills, downshift to a
lower gear before the engine starts to
labor.
On steep downgrades, downshift the
transmission to 4th, 3rd or 2nd gear as
necessary; this helps to maintain a safe
speed and to extend brake pad life.
In this way, the engine provides a braking
effect. Remember, if you“ride ”(over use)
the brakes while descending a hill, they
may overheat and not work properly.
The engine may, on rare occasions, knock
when the vehicle rapidly accelerates or
rapidly pulls away from a standstill. This
phenomenon does not indicate a malfunc-tion. Automatic transmission
The automatic transmission is electroni-
cally controlled and provides 4 forward
speeds and 1 reverse speed. Also, it has a
manual mode and a SPORT mode.
WARNING
Do not shift from the “P ” or “N ”
position into the “D ” or “R ” position
while depressing the accelerator
pedal. This may cause the vehicle
to jump forward or backward.
CAUTION
. Shift into the “P ” or “R ” position
ONLY after the vehicle is comple-
tely stopped. Shifting while the
vehicle is moving may cause
damage to the transmission.
. Do not race the engine for more
than 5 seconds in any position
except the “N ” or “P ” position
when the brake is set or when
chocks are used in the wheels.
This may cause the automatic
transmission fluid to overheat.
. Avoid shifting from one of the
forward driving positions into the “
R ” position or vice versa until
the vehicle has completely
stopped. Such shifting may
cause damage to the transmis-sion.
. When parking the vehicle, first
securely apply the parking brake
and then place the select lever inthe “P ” position. Avoid parking
for a long time with the select
lever in any other position as
doing so could result in a dead
battery.
NOTE . When the engine coolant tempera-
ture is still low, the automatic transmis-
sion will upshift at higher engine
speeds than when the coolant tempera-
ture is sufficiently high in order to
shorten the warm-up time and improve
driveability. The gearshift timing will
automatically return to the normal tim-
ing after the engine has warmed up.. Immediately after ATF (automatic
transmission fluid) is replaced, you
may feel that the automatic transmis-
sion operation is somewhat unusual.
This results from invalidation of data
which the on-board computer has
collected and stored in memory to Starting and operating
7-15
– CONTINUED –