2012 SUBARU FORESTER gas type
[x] Cancel search: gas typePage 108 of 438

&Initialization of power win-
dow (type A)
If the vehicle ’s battery is disconnected due
to situations such as battery or fuse
replacement, the following functions aredeactivated. . One-touch auto up/down function
. Anti-entrapment function
Initialize the power window using the
following procedure to reactivate thesefunctions.
1. Close the driver ’s door.
2. Turn the ignition switch to the “ON ”
position.
3. Open the driver ’s side window halfway
by pushing down the power window switch.
4. Pull up the power window switch and
close the window completely. Continue
pulling up the switch for approximately 1
second after the window is closed com-
pletely. Rear gate
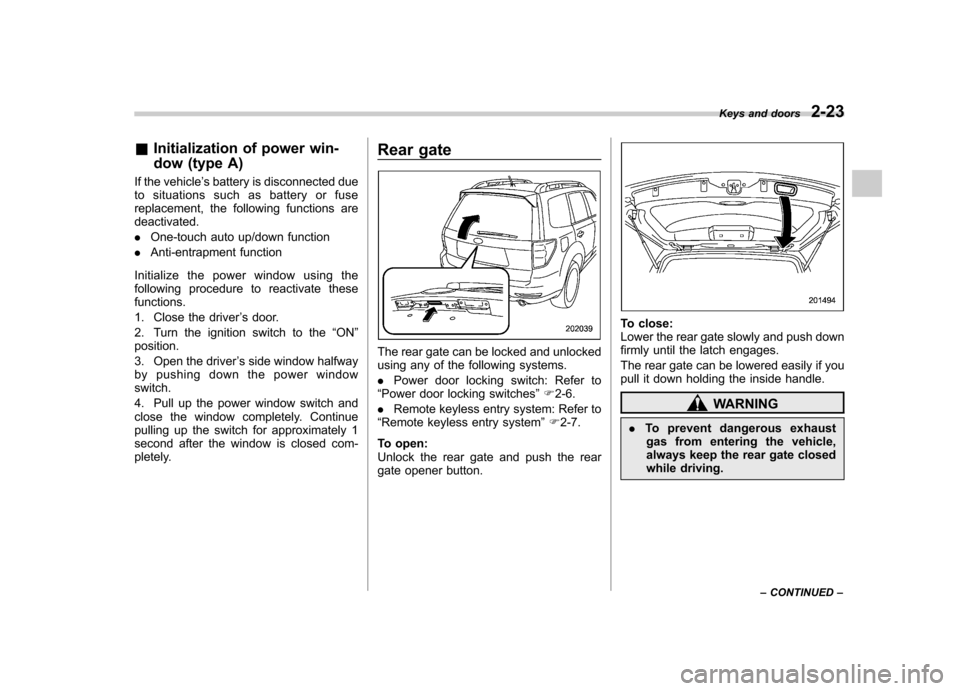
The rear gate can be locked and unlocked
using any of the following systems. .
Power door locking switch: Refer to
“ Power door locking switches ”F 2-6.
. Remote keyless entry system: Refer to
“ Remote keyless entry system ”F 2-7.
To open:
Unlock the rear gate and push the rear
gate opener button.
To close:
Lower the rear gate slowly and push down
firmly until the latch engages.
The rear gate can be lowered easily if you
pull it down holding the inside handle.
WARNING
. To prevent dangerous exhaust
gas from entering the vehicle,
always keep the rear gate closed
while driving. Keys and doors
2-23
– CONTINUED –
Page 145 of 438

3-34Instruments and controls
Refer to “Windshield washer
fluid ”F 11-37.
Also, when driving the vehicle in
freezing temperature, use non-
freezing type wiper blades.
. Do not clean the wiper blades
with gasoline or a solvent, such
as paint thinner or benzine. This
will cause deterioration of the
wiper blades.
NOTE . The wipers operate only when the
ignition switch is in the “ON ”or “Acc ”
position. . The front wiper motor is protected
against overload by a circuit breaker. If
the motor operates continuously under
an unusually heavy load, the circuit
breaker may trip to stop the motor
temporarily. If this happens, park your
vehicle in a safe place, turn off the
wiper switch, and wait for approxi-
mately 10 minutes. The circuit breaker
will reset itself, and the wipers will
again operate normally.. Clean your wiper blades and win-
dow glass periodically with a washer
solution to prevent streaking, and to
remove accumulations of road salt or
road film. Keep the washer button depressed at least for 1 second so that
washer solution will be sprinkled all
over the windshield or rear window..
Grease, wax, insects or other mate-
rial on the windshield or the wiper
blade results in jerky wiper operation
and streaking on the glass. If you
cannot remove those streaks after
operating the washer or if the wiper
operation is jerky, clean the outer sur-
face of the windshield or rear window
and the wiper blades using a sponge or
soft cloth with a neutral detergent or
mild abrasive cleaner. After cleaning,
rinse the window glass and wiper
blades with clean water. The glass is
clean if no beads form on the glass
when you rinse with water.. If you cannot eliminate the streaking
even after following this procedure,
replace the wiper blades with new
ones. For replacement instructions,
refer to “Replacement of wiper blades ”
F 11-39. &
Windshield wiper and washer switches
The wipers operate only when the ignition
switch is in the “ON ”or “Acc ”position.
! Windshield wipers
OFF: Off: Intermittent
LO: Low speed
HI: High speed
To turn the wipers on, push the wiper
control lever down.
To turn the wipers off, return the lever to the “OFF ”position.
Page 253 of 438

7-2Starting and operating
Fuel
CAUTION
Use of a fuel which is low in quality
or use of an inappropriate fuel
additive may cause engine damage.
& Fuel requirements
! Non-turbo models
The engine is designed to operate using
unleaded gasoline with an octane rating
of 87 AKI (90 RON) or higher .
! Turbo models
The engine is designed to operate usingpremium unleaded gasoline with an
octane rating of 91 AKI (95 RON) or
higher . If premium unleaded gasoline is
not available, regular unleaded gasoline
with an octane rating of 87 AKI (90 RON)
or higher may be temporarily used. For
optimum engine performance and drive-
ability, it is required that you use premium
grade unleaded gasoline. NOTE
Be sure to use premium unleaded
gasoline of 91 AKI (95 RON) or higher
for turbo engine models. If other gaso- line (lower than 91 AKI (95 RON)) is
used, knocking, reduced output and
poor acceleration will result. !
Fuel octane rating
This octane rating is the average of the
Research Octane and Motor Octane
numbers and is commonly referred to as
the Anti Knock Index (AKI).
Using a gasoline with a lower octane
rating can cause persistent and heavy
knocking, which can damage the engine.
It is normal if your vehicle sometimes
knocks lightly when you drive up a hill or
when you accelerate, but contact your
SUBARU dealer if your vehicle knocks
heavily or persistently even though you
are using a fuel with the specified octanerating. ! Unleaded gasoline
The neck of the fuel filler pipe is designed
to accept only an unleaded gasoline filler
nozzle. Under no circumstances should
leaded gasoline be used because it will
damage the emission control system and
may impair driveability and fuel economy. ! Gasoline for California-certified LEV
If your vehicle was certified to California ’s
low emission vehicle (LEV) standards as
indicated on the underhood tune-up label, it is designed to optimize engine and
emission performance with gasoline that
meets the clean burning low-sulfur Cali-
fornia gasoline specifications. Gasoline
sold outside California is permitted to
have higher sulfur levels. It can be used
but it may affect the performance of your
vehicle
’s catalytic converter and may
produce a sulfur exhaust odor or smell.
SUBARU recommends that you try a
different brand of unleaded gasoline hav-
ing lower sulfur to determine if the problem
is fuel related before returning your
vehicle to an authorized SUBARU dealer
for service. ! MMT
Some gasoline contains an octane-en-
hancing additive called MMT (Methylcy-
clopentadienyl Manganese Tricarbonyl). If
you use such fuels, your emission control
system performance may deteriorate and
the CHECK ENGINE warning light/Mal-
function indicator light may turn on. If this
happens, contact an authorized SUBARU
dealer for service. If it is determined that
the condition is caused by the type of fuel
used, repairs may not be covered by your
warranty.
Page 338 of 438

Cleaning the interior
Use a soft, damp cloth to clean the climate
control panel, audio equipment, instru-
ment panel, center console, combination
meter panel, and switches. (Do not use
organic solvents.) &Seat fabric
Remove loose dirt, dust or debris with a
vacuum cleaner. If the dirt is caked on the
fabric or hard to remove with a vacuum
cleaner, use a soft brush then vacuum it.
Wipe the fabric surface with a tightly
wrung cloth and dry the seat fabric
thoroughly. If the fabric is still dirty, wipe
using a solution of mild soap and luke-
warm water then dry thoroughly.
If the stain does not come out, try a
commercially available fabric cleaner. Use
the cleaner on a hidden place and make
sure it does not affect the fabric adversely.
Use the cleaner according to its instruc-tions. NOTE
When cleaning the seat, do not use
benzine, paint thinner, or any similarmaterials. &
Leather seat materials
The leather used by SUBARU is a high
quality natural product which will retain its
distinctive appearance and feel for many
years with proper care.
Allowing dust or road dirt to build up on the
surface can cause the material to become
brittle and to wear prematurely. Regular
cleaning with a soft, moist, natural fiber
cloth should be performed monthly, taking
care not to soak the leather or allow water
to penetrate the stitched seams.
A mild detergent suitable for cleaning
woolen fabrics may be used to remove
difficult dirt spots, rubbing with a soft, dry
cloth afterwards to restore the luster. If
your SUBARU is to be parked for a long
time in bright sunlight, it is recommended
that the seats and headrests be covered,
or the windows shaded, to prevent fading
or shrinkage.
Minor surface blemishes or bald patches
may be treated with a commercial leather
spray lacquer. You will discover that each
leather seat section will develop soft folds
or wrinkles, which is characteristic of
genuine leather. &
Synthetic leather upholstery
The synthetic leather material used on the
SUBARU may be cleaned using mild soap
or detergent and water, after first vacuum-
ing or brushing away loose dirt. Allow the
soap to soak in for a few minutes and wipe
off with a clean, damp cloth. Commercial
foam-type cleaners suitable for synthetic
leather materials may be used when
necessary. NOTE
Strong cleaning agents such as sol-
vents, paint thinners, window cleaner
or gasoline must never be used on
leather or synthetic interior materials. & Climate control panel, audio
panel, instrument panel,
console panel, and switches
Use a soft, damp cloth to clean the climate
control panel, audio equipment, instru-
ment panel, center console, combination
meter panel, and switches. NOTE
Do not use organic solvents such as
paint thinners or gasoline, or strong
cleaning agents that contain thosesolvents. Appearance care
10-5
– CONTINUED –
Page 353 of 438

11-14Maintenance and service
shortened to that of the mixing coolant.
. Do not splash the engine coolant
over painted parts. The alcohol
contained in the engine coolant
may damage the paint surface.
& Cooling fan, hose and con- nections
Your vehicle employs an electric cooling
fan which is thermostatically controlled to
operate when the engine coolant reaches
a specific temperature.
If the radiator cooling fan does not operate
even when the following conditions occur,
the cooling fan circuit may be defective. . The engine coolant temperature gauge
exceeds the normal operating range (if
equipped). Refer to “Temperature gauge
(models with type A combination meter) ”
F 3-11.
. The coolant temperature high warning
light blinks or illuminates in RED(if
equipped). Refer to “Coolant temperature
low indicator light/Coolant temperature
high warning light ”F 3-16.
Check the fuse and replace it if necessary.
If the fuse is not blown, have the cooling
system checked by your SUBARU dealer. Refer to
“Fuses ”F 11-44 and “Fuse panel
located in the engine compartment ”F 12-
13.
If frequent addition of coolant is neces-
sary, there may be a leak in the engine
cooling system. It is recommended that
the cooling system and connections be
checked for leaks, damage, or looseness.
& Engine coolant
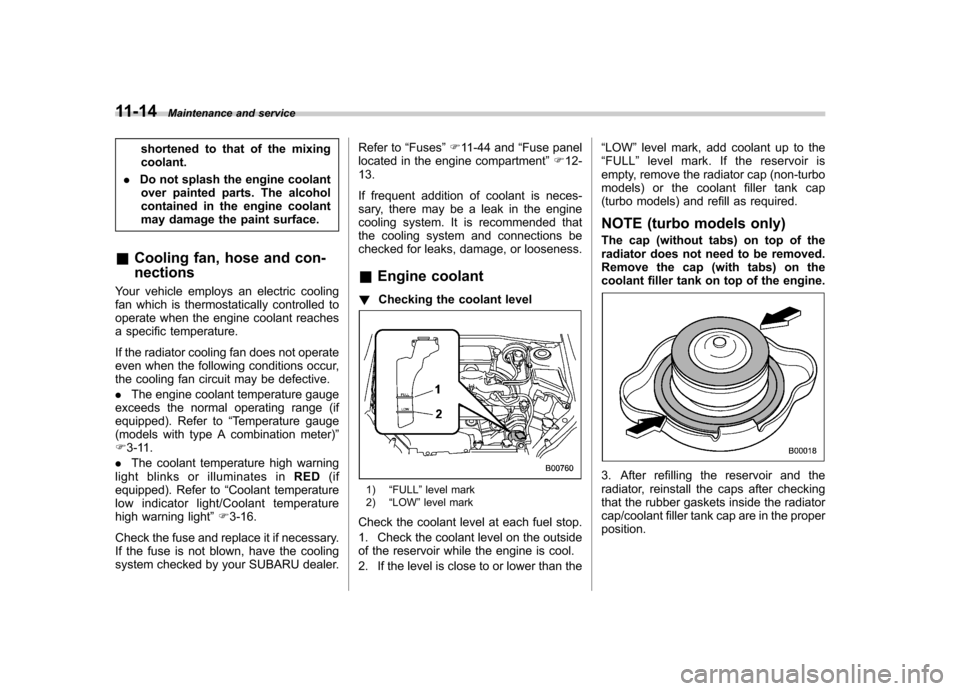
! Checking the coolant level
1) “FULL ”level mark
2) “LOW ”level mark
Check the coolant level at each fuel stop.
1. Check the coolant level on the outside
of the reservoir while the engine is cool.
2. If the level is close to or lower than the “
LOW ”level mark, add coolant up to the
“ FULL ”level mark. If the reservoir is
empty, remove the radiator cap (non-turbo
models) or the coolant filler tank cap
(turbo models) and refill as required.
NOTE (turbo models only)
The cap (without tabs) on top of the
radiator does not need to be removed.
Remove the cap (with tabs) on the
coolant filler tank on top of the engine.
3. After refilling the reservoir and the
radiator, reinstall the caps after checking
that the rubber gaskets inside the radiator
cap/coolant filler tank cap are in the properposition.
Page 394 of 438

&Engine
Engine model FB25
(2.5-liter, DOHC, non-turbo) EJ255
(2.5-liter, DOHC, turbo)
Engine type Horizontally opposed, liquid cooled 4 cylinder, 4-stroke gasoline engine
Displacement cc (cu-in) 2,498 (152)2,457 (150)
Bore 6Stroke in (mm) 3.7 63.5 (94.0 690.0) 3.9 63.1 (99.5 679.0)
Compression ratio 10.0 : 18.4 : 1
Firing order 1
–3–2 –4
& Electrical system
Battery type and capacity (5HR) MT 12V-48AH (55D23L)
AT 12V-52AH (65D23L)
Alternator 12V-110A
Spark plugs Non-turbo engine SILZKAR7B11 (NGK)
Turbo engine SILFR6A (NGK)
AT: Automatic transmission
MT: Manual transmission Specifications
12-3
– CONTINUED –
Page 416 of 438

.Passenger car tire
A tire intended for use on passen-
ger cars, multipurpose passenger
vehicles, and trucks, that have a
gross vehicle weight rating (GVWR)
of 10,000 lbs (4,535 kg) or less. . Ply
A layer of rubber-coated parallel cords.. Ply separation
A parting of rubber compound
between adjacent plies.. Pneumatic tire
A mechanical device made of rub-
ber, chemicals, fabric and steel or
other materials, that, when
mounted on an automotive wheel,
provides the traction and contains
the gas or fluid that sustains theload. . Production options weight
The combined weight of those
installed regular production options
weighing over 5.1 lbs (2.3 kg) in
excess of those standard items
which they replace, not previously
considered in curb weight or acces- sory weight, including heavy duty
brakes, ride levelers, roof rack,
heavy duty battery, and special trim.
. Radial ply tire
A pneumatic tire in which the ply
cords that extend to the beads are
laid at substantially 90 degrees to
the centerline of the tread. . Recommended inflation pres-
sure
The cold inflation pressure recom-
mended by a vehicle manufacturer. . Reinforced tire
A tire designed to operate at higher
loads and at higher inflation pres-
sures than the corresponding stan-
dard tire. . Rim
A metal support for a tire or a tire
and tube assembly upon which the
tire beads are seated. . Rim diameter
Nominal diameter of the bead seat. . Rim size designation
Rim diameter and width. .
Rim type designation
The industry of manufacturer ’s des-
ignation for a rim by style or code. . Rim width
Nominal distance between rim flanges. . Section width
The linear distance between the
exteriors of the sidewalls of an
inflated tire, excluding elevations
due to labeling, decoration, or
protective bands. . Sidewall
That portion of a tire between the
tread and bead.. Sidewall separation
The parting of the rubber com-
pound from the cord material in
the sidewall.. Test rim
The rim on which a tire is fitted for
testing, and it may be any rim listed
as appropriate for use with that tire.. Tread
That portion of a tire that comes
into contact with the road.
Consumer information and Reporting safety defects
13-7
– CONTINUED –