2012 SUBARU FORESTER Engine
[x] Cancel search: EnginePage 299 of 438

8-12Driving tips
caused to your vehicle by use of a
traction device is not covered under
warranty.
Make certain that any traction device
you use is an SAE class S device, and
use it on the front wheels only. Always
use the utmost care when driving with
a traction device. Overconfidence be-
cause you are using a traction device
could easily lead to a serious accident. &Rocking the vehicle
If you must rock the vehicle to free it from
snow, sand, or mud, depress the accel-
erator pedal slightly and move the shift
lever/select lever back and forth between“ 1 ”/“ D ”and “R ”repeatedly. Do not race the
engine. For the best possible traction,
avoid spinning the wheels when trying to
free the vehicle.
When the road surface is extremely
slippery, you can obtain better traction by
starting the vehicle with the transmission
in 2nd than 1st (both for MT and AT).
If your vehicle is an AT model, for
information about holding the transmission
in the 2nd position, refer to “Selection of
manual mode ”F 7-19. Loading your vehicle
WARNING
Never allow passengers to ride on a
folded rear seatback or in the cargo
area. Doing so may result in serious
injury in the event of a sudden stop,
sharp turn or an accident.
WARNING
. Never stack luggage or other
cargo higher than the top of the
seatback because it could tumble
forward and injure passengers in
the event of a sudden stop or
accident. Keep luggage or cargo low, as close to the floor aspossible.
. When you carry something inside
the vehicle, secure it whenever
you can to prevent it from being
thrown around inside the vehicle
during sudden stops, sharp turns
or in an accident.
. Do not pile heavy loads on the
roof. These loads raise the vehi-cle ’s center of gravity and make it
more prone to tip over.
. Secure long items properly to
prevent them from shooting for-
ward and causing serious injury
during a sudden stop.
. Never exceed the maximum load
limit. If you do, some parts on
your vehicle can break, or the
driveability of your vehicle may
be adversely affected. This could
result in loss of control and
cause personal injury. Also, over-
loading can shorten the life of
your vehicle.
Page 305 of 438

8-18Driving tips
watercraft. &When you do not tow a trailer
. Remove the ball mount from the hitch
receiver tube and insert the receiver cover
onto the hitch receiver tube. . Place the dust cap over the four-pin
connector of the hitch wire harness to
protect against possible damage. . Occasionally lubricate terminals of the
four-pin connector using terminal grease. Trailer towing
Your vehicle is designed and intended to
be used primarily as a passenger-carrying
vehicle. Towing a trailer puts additional
loads on your vehicle
’s engine, drivetrain,
brakes, tires and suspension and has an
adverse effect on fuel economy.
If you do decide to tow a trailer, your safety
and satisfaction depend upon proper use
of correct equipment and cautious opera-
tion of your vehicle. Seek the advice of
your SUBARU dealer to assist you in
purchasing a hitch and other necessary
towing equipment appropriate for your
vehicle. In addition, be sure to follow the
instructions on correct installation and use
provided by the trailer and other towing
equipment manufacturers.
SUBARU assumes no responsibility for
injuries or vehicle damage that result from
trailer towing equipment, or from any
errors or omissions in the instructions
accompanying such equipment or for your
failure to follow the proper instructions.
& Warranties and maintenance
SUBARU warranties do not apply to
vehicle damage or malfunction caused
by trailer towing. If you use your vehicle to
tow a trailer, more frequent maintenance
will be required due to the additional load. (Refer to
“Maintenance schedule under
severe driving conditions ”in the “Warranty
and Maintenance Booklet ”.)
Under no circumstances should a trailer
be towed with a new vehicle or a vehicle
with any new powertrain component (en-
gine, transmission, differential, wheel
bearings, etc.) for the first 1,000 miles
(1,600 km) of driving.
& Maximum load limits
WARNING
Never exceed the maximum load
limits explained in the following.
Exceeding the maximum load limits
could cause personal injury and/or
vehicle damage.
CAUTION
. Adequate size trailer brakes are
required when the trailer and its
cargo exceed 1,000 lbs (453 kg)
total weight.
. Before towing a trailer, check the
trailer total weight, GVW, GAWs
and tongue load. Make sure the
load and its distribution in your
vehicle and trailer are accepta-
Page 311 of 438

8-24Driving tips
! Before starting out on a trip
. Check that the vehicle and vehicle-to-
hitch mounting are in good condition. If
any problems are apparent, do not tow the
trailer. . Check that the vehicle sits horizontally
with the trailer attached. If the vehicle is
tipped sharply up at the front and down at
the rear, check the total trailer weight,
GVW, GAWs and tongue load again, then
confirm that the load and its distribution
are acceptable. . Check that the tire pressures are
correct.. Check that the vehicle and trailer are
connected properly. Confirm that:
–The trailer tongue is connected
properly to the hitch ball. – The trailer lights connector is con-
nected properly and trailer ’s brake
lights illuminate when the vehicle ’s
brake pedal is pressed, and that the trailer ’s turn signal lights flash when
the vehicle ’s turn signal lever is oper-
ated. – The safety chains are connected
properly.– All cargo in the trailer is secured
safely in position.– The side mirrors provide a good
rearward field of view without a sig- nificant blind spot.
. Sufficient time should be taken to learn
the “feel ”of the vehicle/trailer combination
before starting out on a trip. In an area free
of traffic, practice turning, stopping and
backing up. ! Driving with a trailer
. You should allow for considerably more
stopping distance when towing a trailer.
Avoid sudden braking because it may
result in skidding or jackknifing and loss ofcontrol. . Avoid abrupt starts and sudden accel-
erations. If your vehicle has a manual
transmission, always start out in first gear
and release the clutch at moderate enginerevolution. . Avoid uneven steering, sharp turns and
rapid lane changes.. Slow down before turning. Make a
longer than normal turning radius because
the trailer wheels will be closer than the
vehicle wheels to the inside of the turn. In
a tight turn, the trailer could hit yourvehicle. . Crosswinds will adversely affect the
handling of your vehicle and trailer, caus-
ing sway. Crosswinds can be due to
weather conditions or the passing of large
trucks or buses. If swaying occurs, firmly
grip the steering wheel and slow down immediately but gradually. .
When passing other vehicles, consid-
erable distance is required because of the
added weight and length caused by
attaching the trailer to your vehicle.
1) Left turn
2) Right turn
. Backing up with a trailer is difficult and
takes practice. When backing up with a
trailer, never accelerate or steer rapidly.
When turning back, grip the bottom of the
steering wheel with one hand and turn it to
the left for a left turn, and turn it to the right
for a right turn. . If the ABS warning light illuminates
while the vehicle is in motion, stop towing
the trailer and have repairs performed
immediately by the nearest SUBARU
dealer.
Page 312 of 438

!Driving on grades
. Before going down a steep hill, slow
down and shift into lower gear (if neces-
sary, use 1st gear) in order to utilize the
engine braking effect and prevent over-
heating of your vehicle ’s brakes. Do not
make sudden downshifts. . When driving uphill in hot weather, the
air conditioner may turn off automatically
to protect the engine from overheating. . When driving uphill in hot weather, pay
attention to the following indicators be-
cause the engine and transmission are
relatively prone to overheating.
–Temperature gauge (if equipped)
– Coolant temperature high warning
light (if equipped) – AT OIL TEMP warning light (AT
models)
. If any of the following conditions occur,
immediately turn off the air conditioner and
stop the vehicle in the nearest safe
location. Refer to “If you park your vehicle
in case of an emergency ”F9-2 and
“ Engine overheating ”F 9-13.
– Temperature gauge needle ap-
proaches the OVERHEAT zone (if
equipped). Refer to “Temperature
gauge (models with type A combina-
tion meter) ”F 3-11.
– Coolant temperature high warning
light illuminates (if equipped). Refer to “
Coolant temperature low indicator
light/Coolant temperature high warn-
ing light ”F 3-16.
– AT OIL TEMP warning light illumi-
nates (AT models). Refer to “AT OIL
TEMP warning light (AT models) ”F 3-
18.
. If your vehicle has an automatic trans-
mission, avoid using the accelerator pedal
to stay stationary on an uphill slope
instead of using the parking brake or foot
brake. That may cause the transmission
fluid to overheat. . If your vehicle has an automatic trans-
mission, place the select lever as follows.
Uphill slopes: “D ”position
Downhill slopes: A low-speed gear posi-
tion to use engine braking ! Parking on a grade
Always block the wheels under both
vehicle and trailer when parking. Apply
the parking brake firmly. You should not
park on a hill or slope. But if parking on a
hill or slope cannot be avoided, you
should take the following steps.
1. Press and hold the brake pedal.
2. Have someone place chocks under
both the vehicle and trailer wheels.
3. When the chocks are in place, release
the brake pedal slowly until the chocks
absorb the load. 4. Press the brake pedal fully and then
apply the parking brake; slowly release
the brake pedal.
5. Shift into 1st or reverse gear (manual
transmission models) or the
“P ” position
(automatic transmission models) and shut
off the engine. Driving tips
8-25
Page 314 of 438

If you park your vehicle in case of anemergency ........................................................ 9-2
Temporary spare tire (if equipped) .................... 9-2
Precautions for AWD models with automatic transmission ..................................................... 9-3
Maintenance tools ............................................... 9-4
Tool bag. ............................................................. 9-4
Under the cargo area ........................................... 9-5
Flat tires ............................................................... 9-6
Changing a flat tire .............................................. 9-6
Tire pressure monitoring system (TPMS) (U.S.-spec. models) ........................................... 9-9
Jump starting ..................................................... 9-10
How to jump start ............................................... 9-11 Engine overheating
........................................... 9-13
If steam is coming from the engine compartment ................................................... 9-13
If no steam is coming from the engine compartment ................................................... 9-13
Towing ................................................................ 9-14
Towing and tie-down hooks. ............................... 9-14
Using a flat-bed truck. ........................................ 9-17
Towing with all wheels on the ground ................. 9-17
Rear gate –if the rear gate cannot be
opened ............................................................. 9-18
Moonroof –if the moonroof cannot be
closed .............................................................. 9-19 In case of emergency
9
Page 316 of 438

install the conventional tire as soon as possible.
Check the inflation pressure of the tem-
porary spare tire periodically to keep the
tire ready for use. The correct pressure is
60 psi (420 kPa, 4.2 kg/cm
2).
When using the temporary spare tire, note
the following. . Do not exceed 50 mph (80 km/h).
. Do not put a tire chain on the temporary
spare tire. Because of the smaller tire size,
a tire chain will not fit properly. . Do not use two or more temporary
spare tires at the same time.. Do not drive over obstacles. This tire
has a smaller diameter, so road clearance
is reduced.
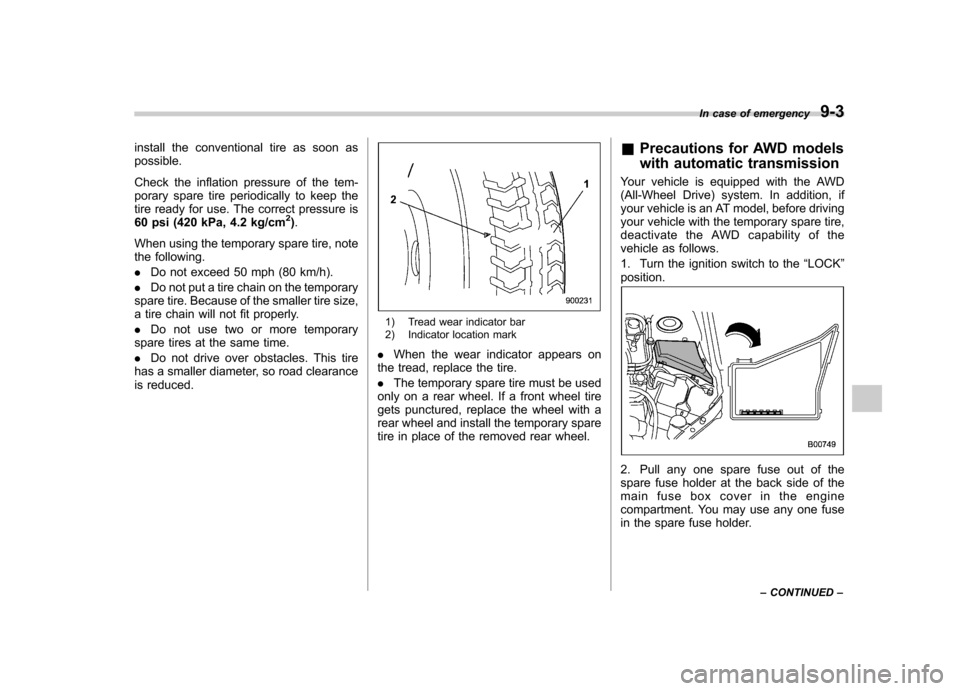
1) Tread wear indicator bar
2) Indicator location mark
. When the wear indicator appears on
the tread, replace the tire. . The temporary spare tire must be used
only on a rear wheel. If a front wheel tire
gets punctured, replace the wheel with a
rear wheel and install the temporary spare
tire in place of the removed rear wheel. &
Precautions for AWD models
with automatic transmission
Your vehicle is equipped with the AWD
(All-Wheel Drive) system. In addition, if
your vehicle is an AT model, before driving
your vehicle with the temporary spare tire,
deactivate the AWD capability of the
vehicle as follows.
1. Turn the ignition switch to the “LOCK ”
position.
2. Pull any one spare fuse out of the
spare fuse holder at the back side of the
main fuse box cover in the engine
compartment. You may use any one fuse
in the spare fuse holder. In case of emergency
9-3
– CONTINUED –
Page 319 of 438

9-6In case of emergency
Flat tires
If you have a flat tire while driving, never
brake suddenly; keep driving straight
ahead while gradually reducing speed.
Then slowly pull off the road to a safeplace. &Changing a flat tire
WARNING
. Do not jack up the vehicle on an
incline or a loose road surface.
The jack can come out of the
jacking point or sink into the
ground and this can result in a
severe accident.
. Use only the jack provided with
your vehicle. The jack supplied
with the vehicle is designed only
for changing a tire. Never get
under the vehicle while support-
ing the vehicle with this jack. .
Always turn off the engine before
raising the flat tire off the ground
using the jack. Never swing or
push the vehicle supported with
the jack. The jack can come out
of the jacking point due to a jolt
and this can result in a severeaccident.
1. Park on a hard, level surface, when-
ever possible, then stop the engine.
2. Apply the parking brake securely and
shift the shift lever in reverse (MT models)
or the select lever in the “P ”(Park) position
(AT models).
3. Turn on the hazard warning flasher
and have everyone get out of the vehicle.
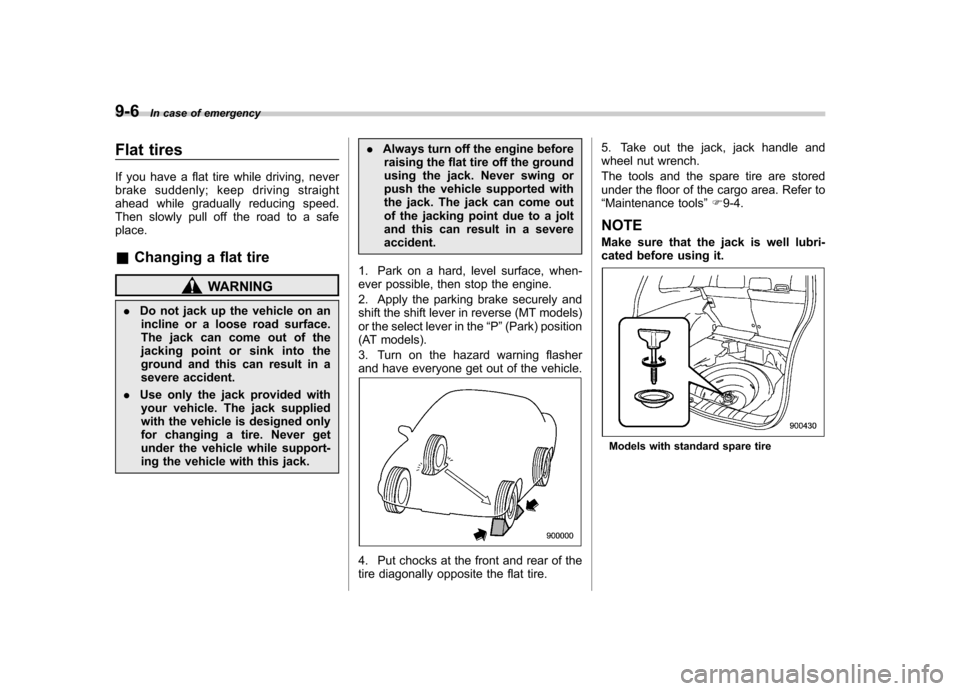
4. Put chocks at the front and rear of the
tire diagonally opposite the flat tire. 5. Take out the jack, jack handle and
wheel nut wrench.
The tools and the spare tire are stored
under the floor of the cargo area. Refer to“
Maintenance tools ”F 9-4.
NOTE
Make sure that the jack is well lubri-
cated before using it.
Models with standard spare tire
Page 323 of 438

9-10In case of emergency
it with a spare tire as soon as possible.
When a spare tire is mounted or a
wheel rim is replaced without the
original pressure sensor/transmitter
being transferred, the low tire pres-
sure warning light will illuminate
steadily after blinking for approxi-
mately one minute. This indicates
the TPMS is unable to monitor all
four road wheels. Contact your
SUBARU dealer as soon as possible
for tire and sensor replacement and/
or system resetting.
Do not inject any tire liquid or
aerosol tire sealant into the tires,
as this may cause a malfunction of
the tire pressure sensors.
If the light illuminates steadily after
blinking for approximately one min-
ute, promptly contact a SUBARU
dealer to have the system inspected. Jump starting
WARNING
. Battery fluid is SULFURIC ACID.
Do not let it come in contact with
the eyes, skin, clothing or thevehicle.
If battery fluid gets on you,
thoroughly flush the exposed
area with water immediately. Get
medical help if the fluid has
entered your eyes.
If battery fluid is accidentally
swallowed, immediately drink a
large amount of milk or water,
and obtain immediate medicalhelp.
Keep everyone including chil-
dren away from the battery.
. The gas generated by a battery
explodes if a flame or spark is
brought near it. Do not smoke or
light a match while jump starting.
. Never attempt jump starting if the
discharged battery is frozen. It
could cause the battery to burst
or explode.
. Whenever working on or around
a battery, always wear suitable eye protectors, and remove metal
objects such as rings, bands or
other metal jewelry.
. Be sure the jumper cables and
clamps on them do not have
loose or missing insulation.
Do not jump start unless cables
in suitable condition are avail-able.
. A running engine can be danger-
ous. Keep your fingers, hands,
clothing, hair and tools away
from the cooling fan, belts and
any other moving engine parts.
Removing rings, watches and
ties is advisable.
. Jump starting is dangerous if it
done incorrectly. If you are un-
sure about the proper procedure
for jump starting, consult a com-
petent mechanic.
When your vehicle does not start due to a
run down (discharged) battery, the vehicle
may be jump started by connecting your
battery to another battery (called the
booster battery) with jumper cables.