Page 139 of 715
02-30000-00
2232-01 Fuel Filter Assembly
- Changed fuel filter
2112-02 PWM Cooling Fan
- To increase the cooling performance,
PWM cooling fan has been introduced.
Newly Installed Equipment
Water detection
sensor
Priming pump
Front RHFront LH
Electric fan
Front RHFront LH
PWM electric fan
1990-01 Engine Mounting Insulator
- Changed design according to installation
of new engine
2330-01 Intercooler
- To increase the cooling performance,
made the cooling capacity bigger and
changed the design.
Page 146 of 715
01-4
2. MAJOR COMPONENTS
Front view ▶
Vacuum pump
Camshaft position sensor
Oil filter assembly
Power steering pump pulley
Oil pressure switch
Water pump pulley
Idler pulley No. 22
Alternator pulley
Auto tensioner
Idler pulley No. 1
A/C compressor pulley
Rear view ▶
E-EGR valve
Fuel temperature sensor
Fuel HP pump assembly
Coolant temperature sensor
Crankshaft position sensorIMV valve
Isolation damper
Page 149 of 715
01-70000-00
1) Service Interval
DescriptionDaily
inspectionWeekly
inspectionService interval
Engine oil & oil
filterInspection - EU Change every 20,000 km or 12
months (The service interval should
be shortened under severe
conditions)
General Change every 15,000 km or 12
months (The service interval should
be shortened under severe
conditions)
Coolant Inspection - Change every 200,000 km or 5 years
Air cleaner
element- Inspection Diesel EU Change every 20,000 km
(The service interval should
be shortened under severe
conditions)
General Change every 15,000 km
(The service interval should
be shortened under severe
conditions)
Gasoline Clean every 15,000 km, replace every
60,000 km (The service interval should
be shortened under severe
conditions)
Fuel filter - - EU Change every 40,000 km (Draining
water from fuel filter: whenever
replacing the engine oil)
General Change every 45,000 km (Draining
water from fuel filter: whenever
replacing the engine oil)
Page 152 of 715

01-10
(3) Cautions before service
Prolonged exposure to the engine oil make cause a skin cancer or an irritation.
Used engine cotains the hazardous material that may cause the skin cancer. Do not allow the
used engine to make contact with your skin.
Make sure to wear the protection gloves and goggle when handling the engine oil. If contact
happens, rinse affected areas immediately with plenty of water. Do not wash it with gasoline or
solvent. If irritation persists, consult a doctor.
Improperly disposed engine oil can pollute the environment. Dispose used engine oil in
accordance with local environmental regulations. -
-
-
(5) Tightening the fastener
If fine dust or foreign material enters into DI engine's fuel system, there can be serious
damages between HP pump and injectors. So, be sure to cover removed fuel system
components with cap and protect removed parts not to be contaminated with dirt. (Refer to
cleanness in this manual while working on DI engine fuel system)
When working on the fuel line between priming pump and injector (including return line),
always plug the openings with caps to prevent foreign materials or dust from entering to the
openings and connections.
The HP fuel supply pipe (HP pump to fuel rail) and HP fuel pipe (Fuel rail to injector) should
be replaced with new ones when removed. 1.
2.
3. Scalding hot coolant and steam could be blown out under pressure, which could cause serious
injury. Never remove the coolant reservoir cap when the engine and radiator are hot.
(4) Lubrication system
3) Fuel and Oil System
If work on the fluid system such as fuel and oil, working area should be well ventilated and
smoking should be prohibited.
Gasket or seal on the fuel/lubrication system should be replaced with new ones and bolts and
nuts should be tightened as specified. -
-Clean the mating surfaces before tightening.
Place the marks with paint to tighten by angle if the angle wrench is not available. 1.
2.
Page 156 of 715
01-14
Name SizeNumbers of
fastenerTightening
torque (Nm)Note (total
tightening
torque)
Idler pulley/tensioner
pulley1 45±4.5Nm -
Glow plug M5 4 20±2Nm -
Vacuum pumpM8×25 3 10±1Nm -
Timing gear case coverM6×40 7 10±1Nm -
M6×45 1 10±1Nm -
M6×50 3 10±1Nm -
Cylinder head coverM6×35 21 10±1Nm -
Oil dipstick gauge coverM6×16 1 10±1Nm -
Oil filter cap 1 25±2.5Nm -
Fuel railM8×25 2 25±2.5Nm -
Injector clamp boltM6×44 2 9±1.0Nm
130˚±10˚ -
High pressure pipe
(between high pressure
pump and fuel rail
assembly)M17 1 30±3Nm -
High pressure pipe
(between fuel rail
assembly and injector)M17 4 30±3Nm -
Crankshaft position sensorM5×14 1 8±0.4Nm -
Main wiringM6×16 5 10±1Nm -
Intake ductM8×25 3 25±2.5Nm -
Power steering pumpM8×100 3 25±2.5Nm -
Cylinder head front coverM6×10 5 10±1Nm -
Ladder frameM8×16 5 30±3Nm -
Page 163 of 715
02-6
Cylinder head coverM6×352110±1Nm-
Oil gauge tubeM6×16110±1Nm-
Oil filter cap 125±2.5Nm-
Fuel railM8×25225±2.5Nm-
Injector clamp boltM6×4429±1.0Nm
130˚±10˚-
High pressure pipe
(between HP pump and
fuel rail)M17 130±3Nm-
High pressure pipe
(between fuel rail and
injector)M17 430±3Nm-
Crank position sensorM5×1418±0.4Nm-
Main wiringM6×16510±1Nm-
Intake ductM8×25325±2.5Nm-
Power steering pumpM8×100325±2.5Nm-
Cylinder head front
coverM6×10510±1Nm-
Ladder frame M8x16 530±3Nm-
Component SizeBolt
QuantitySpecified torque
(Nm)Remark
(Total torque)
Glow plug M5 420±2Nm-
Vacuum pumpM8×25310±1Nm-
Timing gear case coverM6×40710±1Nm-
M6×45110±1Nm-
M6×50310±1Nm-
Page 164 of 715

02-70000-00
3. CHECK AND INSPECTION
1) Cylinder
(1) Compression pressure test
Specified value ▶
Compression ratio16.5 : 1
Test conditionat normal operating temperature (80˚C)
Compression pressur
eStandard32 bar
Minimum18 bar
Differential limit between cylindersMaximum 3 bar
The compression pressure test is to check the conditions of internal components (piston, piston
ring, intake and exhaust vale, cylinder head gasket). This test provides current engine operating
status.
Measurement ▶
<007e0088009900940047009b008f008c0047008c0095008e00900095008c0047009c00970047009b00960047009500960099009400880093004700960097008c00990088009b00900095008e0047009b008c00940097008c00990088009b009c0099008c00
47004f005f005700b6006a00500055>
Disconnect the fuel rail pressure sensor connector to cut off the fuel injection.
Remove the air cleaner duct and glow plugs. -
-
-
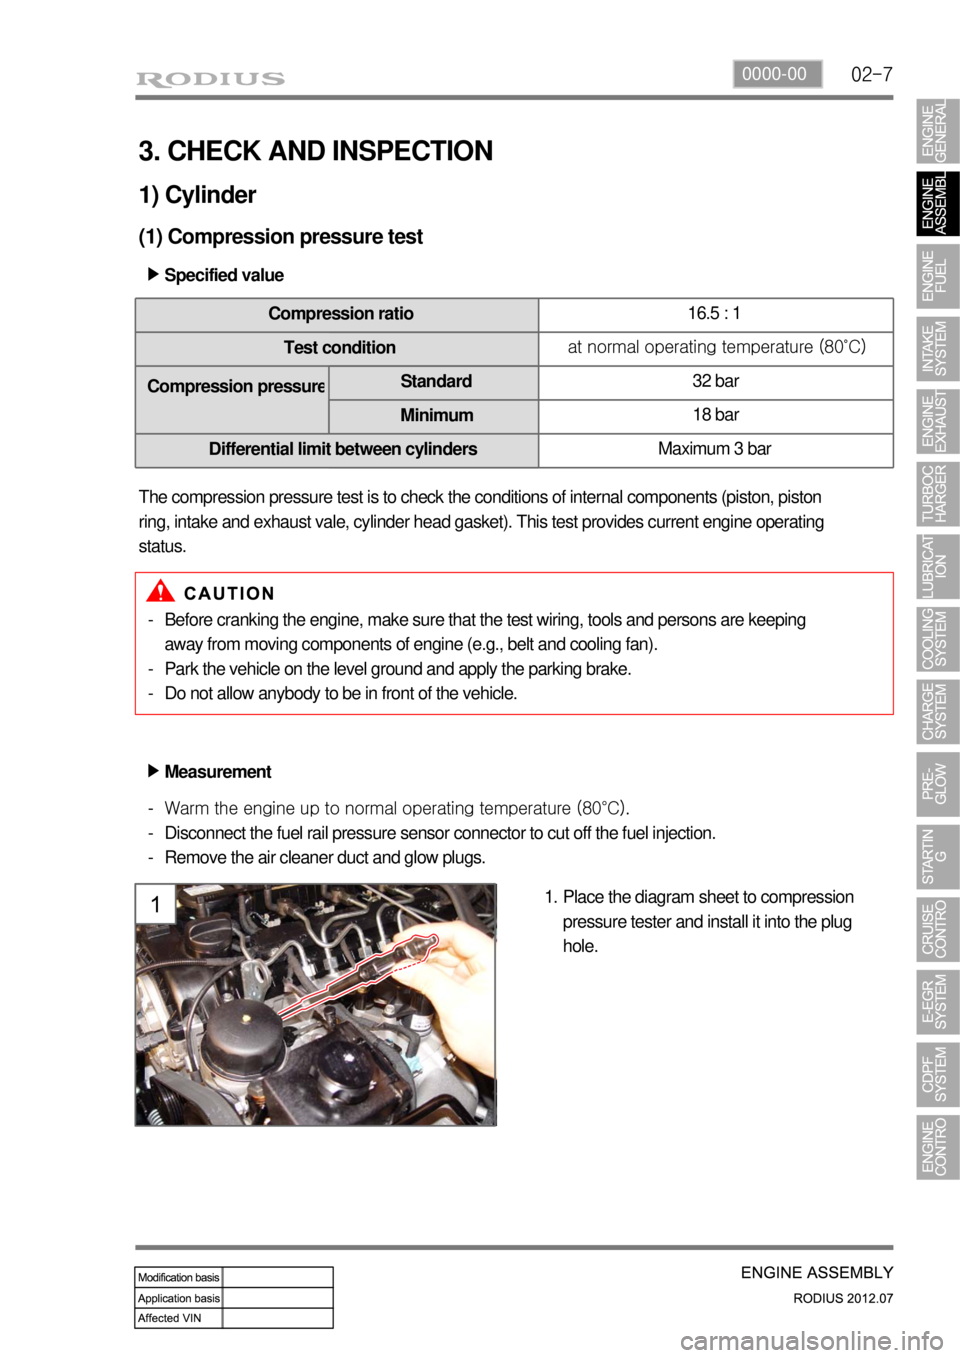
Place the diagram sheet to compression
pressure tester and install it into the plug
hole. 1. Before cranking the engine, make sure that the test wiring, tools and persons are keeping
away from moving components of engine (e.g., belt and cooling fan).
Park the vehicle on the level ground and apply the parking brake.
Do not allow anybody to be in front of the vehicle. -
-
-
Page 168 of 715

02-110000-00
4. GUIDELINES ON ENGINE SERVICE
To prevent personal injuries and vehicle damages that can be caused by mistakes during engine
and unit inspection/repair and to secure optimum engine performance and safety after service
works, basic cautions and service work guidelines that can be easily forgotten during engine
service works are described in.
Cautions before service works
For safe and correct works, you must observe the working procedures and instructions in this
manual. And, use the designated tools as follow:
Engine stand / Heavy duty engine jack
To prevent the engine from starting abruptly, do not allow anybody to get in the vehicle while
servicing in engine compartment.
Before work on engine and each electrical equipment, be sure to disconnect battery negative
(-) terminal.
Before service works, be sure to prepare the works by cleaning and aligning work areas.
Do not allow the foreign material get into the fuel injection system.
When removing the engine, use only the safety hook on engine and engine hanger. Do not
support the bottom of oil pan with a jack.
Engine and accessories
Completely drain the engine oil, coolant and fuel from engine before removal.
Before disassembling/assembling the engine components, carefully read the working
procedures in this manual.
Make sure to keep the specified tightening torques during installation.
Clean and properly lubricate the parts before reassembly.
Carefully check that there are not any interference while servicing. ▶
-
-
-
-
-
-
▶
-
-
-
-
-