2012 SKODA CITIGO service
[x] Cancel search: servicePage 3 of 157

Preface
You have opted for a ŠKODA – our sincere thanks for your confidence in us.
You have received a vehicle with the latest technology and range of amenities. Please read this Owner's
Manual carefully, because the operation in accordance with these instructions is a prerequisite for proper use
of the vehicle.
If you have any questions about your vehicle, please contact a ŠKODA Service Partner.
We wish you much pleasure with your ŠKODA and pleasant motoring at all times.
Your ŠKODA AUTO a.s. (hereinafter referred to as ŠKODA) £
Page 4 of 157

The on-board literature
The on-board literature for your vehicle consists of this
“Owner's Manual” as well
as a “Service schedule” and the “Help on the road” brochure.
Depending on the vehicle model and equipment, other additional operating man-
uals and instructions may be provided (e.g. an operating manual for the radio).
If one of the publications listed above is missing, please contact a ŠKODA Service
Partner.
The Owner's Manual
These operating instructions describe all possible equipment variants without
identifying them as special equipment, model variants or market-dependent
equipment.
Consequently, this vehicle does not need to contain all of the equipment compo-
nents described in this Owner's manual.
The level of equipment of your vehicle refers to your purchase contract of the ve-
hicle. For more information, contact your local ŠKODA retailer.
The illustrations can differ in minor details from your vehicle; they are only inten-
ded for general information.
The Service Plan:
› includes vehicle data including information on service work performed;
› is a record of services provided;
› is provided for entries relating to the mobility warranty (valid only for some
countries);
› serves as warranty certificate of the ŠKODA dealer.
The service records are one of the conditions for warranty claims.
Please always present the Service schedule when you take your car to a ŠKODA
specialist garage.
If the Service Schedule is missing or worn, please contact the ŠKODA specialist
garage that regularly services your car. You will receive a duplicate, in which the
previously carried out service work is confirmed by the ŠKODA specialist garage.
The Help on the Road brochure
The brochure contains the important emergency telephone numbers as well as
telephone numbers and contact addresses of ŠKODA Service Partners in different
countries.
Page 10 of 157

Instruments and warning lights
Instrument cluster
ä
Introduction
This chapter contains information on the following subjects:
Overview of the Instrument cluster 8
Speedometer 9
Fuel gauge 9
Engine revolutions counter 9
Counter for distance driven 10
Service Interval Display 10
Recommended gear 10
WARNING
■ Concentrate fully at all times on your driving! As the driver you are fully re-
sponsible for the operation of your vehicle.
■ Never operate the controls in the instrument cluster while driving, only
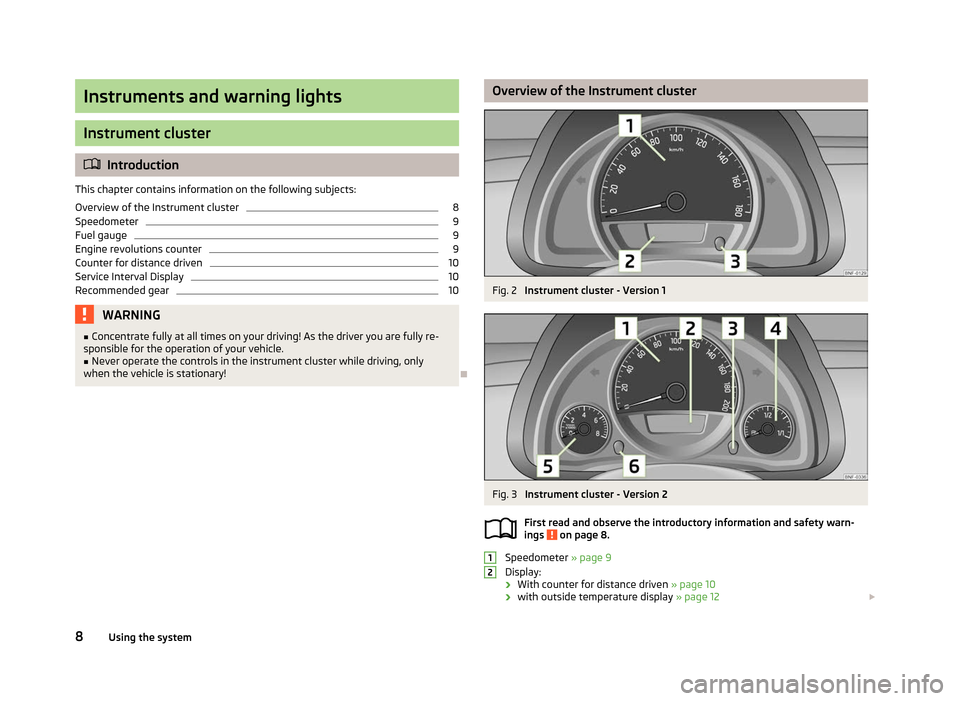
when the vehicle is stationary! Ð Overview of the Instrument cluster
Fig. 2
Instrument cluster - Version 1 Fig. 3
Instrument cluster - Version 2
First read and observe the introductory information and safety warn-
ings on page 8.
Speedometer » page 9
Display:
› With counter for distance driven
» page 10
› with outside temperature display
» page 12 £
ä 1
2
8
Using the system
Page 11 of 157

›
With service interval display
» page 10
› With multifunction display
» page 11
Reset button for the display of the daily trip counter
(trip) » page 10
Fuel gauge » page 9
Engine revolutions counter » page 9
Adjust button for the clock » page 12. ÐSpeedometer
First read and observe the introductory information and safety warn-
ings on page 8.
The speed is shown in km/h or mph and km/h depending on the vehicle.
ÐFuel gauge
Fig. 4
Fuel gauge Fig. 5
Fuel gauge - CNG 3
4
5
6
ä
First read and observe the introductory information and safety warn-
ings on page 8.
Vehicles running on petrol
The fuel gauge
» Fig. 4 only operates if the ignition is switched on.
The fuel tank has a capacity of about 35 litres. If the fuel gauge in the fuel tank
reaches the reserve capacity level, the warning symbol » Fig. 4 - will appear
in the Instrument cluster. or the symbol will flash for 10 seconds together with
the remaining segments in the instrument cluster display » Fig. 4 - . There are
now about 4 litres of fuel remaining in the tank. This symbol is a reminder for you,
that you must refuel .
An audible signal sounds as a warning signal.
Vehicles running on CNG (compressed natural gas)
The fuel gauge » Fig. 5 only operates if the ignition is switched on.
When the vehicle runs on petrol, the pointer of the fuel gauge is in the range 1
» Fig. 5. When the vehicle runs on CNG, the pointer of the fuel gauge is in the
range 2
.
If the fuel level in the fuel tank for petrol reaches the reserve level, the warning
symbol will appear in the instrument cluster. The pointer is in the red range of
the gauge 1
» Fig. 5. There are now about 5 litres of fuel remaining in the tank.
If the fuel level in the fuel tank for CNG reaches the reserve level, the warning
symbol will appear in the instrument cluster. The pointer is in the red range of
the gauge 2
» Fig. 5. There are now about 1.5
kg of fuel remaining in the tank. Ð Engine revolutions counter
First read and observe the introductory information and safety warn-
ings on page 8.
The red scale of the rev counter 5
» Fig. 3 on page 8 indicates the range in which
the engine control unit begins to limit the engine speed. The engine control unit
restricts the engine speed to a steady limit.
Before reaching the red zone of the rev counter scale, shift up into the next high-
er gear.
To maintain the optimum motor speed, observe the gearshift indica-
tor » page 10. £
ä
ä 9
Instruments and warning lights
Page 12 of 157

Avoid high engine speeds during the running-in period and before the engine has
warmed up to the operating temperature . For the sake of the environment
Shifting to a higher gear in good time helps to lower fuel consumption, minimises
operating noise levels, protects the environment and contributes to a longer life
and reliability of the engine. ÐCounter for distance driven
First read and observe the introductory information and safety warn-
ings on page 8.
The distance which you have driven with your vehicle is shown in kilometres (km).
In some countries the measuring unit
“mile” is used.
Reset button
To toggle between the odometer and the daily trip counter, briefly press the but-
ton 3
» Fig. 2 on page
8 or » Fig. 3 on page 8.
To reset the display of the daily trip counter, press button 3
for longer.
Daily trip counter (trip)
The daily trip counter indicates the distance which you have driven since it was
last reset - in steps of 100 metres or 1/10 of a mile.
Odometer
The odometer indicates the total distance in kilometres or miles which the vehicle
has been driven. ÐService Interval Display
First read and observe the introductory information and safety warn-
ings on page 8.
Before the next service interval, the message
appears for some seconds and
the remaining kilometres are indicated after switching on the ignition.
At the time of the service, an acoustic signal will sound and the message
ap-
pears for a few seconds after switching on the ignition. ä
ä Resetting Service Interval Display
The ŠKODA specialist garage:
› Resets the memory of the display after the appropriate inspection
› Adds an entry to the Service Schedule
› Affixes the sticker with the entry of the following service interval to the side of
the dashboard on the driver's side Note
■ Information is retained in the Service Interval Display even after the vehicle bat-
tery is disconnected. ■ If the instrument cluster is exchanged after a repair, the correct values must be
entered in the counter for the Service Interval Display. This work is carried out by
a ŠKODA specialist garage. ■ For more information on the service intervals » Service Plan. Ð Recommended gear
First read and observe the introductory information and safety warn-
ings on page 8.
An information for the engaged gear is shown in the display of the instrument
cluster.
In order to minimise the fuel consumption, a recommendation for shifting into an-
other gear is indicated in the display.
Show Importance
Optimal gear.
Recommends that you shift to a higher gear.
Recommends that you shift to a lower gear. CAUTION
The driver is always responsible for selecting the correct gear in different driving
situations, such as overtaking. Ð
ä
10 Using the system
Page 22 of 157

Unlocking and locking
Vehicle key
Introductory information
Fig. 8
Key without remote control/key with remote control (remote control
key)
Two keys are provided with the vehicle. Depending on the equipment, your vehi-
cle can be equipped with keys without radio remote control » Fig. 8 – or with
radio remote control»
Fig. 8 – . WARNING
■ Always withdraw the key whenever you leave the vehicle – even if it is only
for a short time. This is particularly important if children are left in the vehicle.
The children might otherwise start the engine or operate electrical equipment
(e.g. power windows) – risk of injury!
■ Do not withdraw the ignition key from the ignition lock until the vehicle has
come to a stop. The steering lock might otherwise engage unintentionally –
risk of accident! CAUTION
■ Each key contains electronic components; therefore it must be protected
against moisture and severe shocks.
■ Keep the groove of the keys absolutely clean. Impurities (textile fibres, dust,
etc.) have a negative effect on the functionality of the locking cylinder and igni-
tion lock. Note
Please contact a ŠKODA Service Partner if you lose a key as they can obtain a new
one for you. Ð Replacing the battery in the remote control key
Fig. 9
Remote control key: Remove cover/remove battery
Each remote control key contains a battery which is housed under the cover B
» Fig. 9. The battery needs replacing if red warning light
» Fig. 8 on page 20 –
does not go on when you press a button on the remote control key. We recom-
mend that you ask a ŠKODA
Service Partner to replace the key battery. However,
if you would like to replace the discharged battery yourself proceed as follows.
› Flip out the key.
› Press off the battery cover with your thumb or using a flat screwdriver in the
region of arrows 1
» Fig. 9.
› Remove the discharged battery from the key by pressing the battery down-
wards in the region of arrow 2
.
› Insert the new battery. Ensure that the “+” symbol on the battery is facing up-
wards. The correct polarity is shown on the battery cover.
› Place the battery cover on the key and press it down until it clicks into place.
£
20 Using the system
Page 23 of 157

CAUTION
■ Pay attention to the correct polarity when changing the battery.
■ The replacement battery must have the same specification as the original bat-
tery. For the sake of the environment
Dispose of the used battery in accordance with national legal provisions. Note
■ Please contact a ŠKODA Service Partner if you lose a key as they can obtain a
new one for you. ■ The system has to be synchronised, if the vehicle cannot be unlocked or locked
with the remote control key after replacing the battery » page 24.ÐChild safety lock
Fig. 10
Child safety locks on the rear
doors
The child safety lock prevents the rear door from being opened from the inside.
The door can only be opened from the outside.
You can switch the child safety lock on and off using the vehicle key.
Switching on › Turn the slot of the lock on the left-hand door clockwise
»
Fig. 10 – do the same
anti-clockwise on the right-hand door.
Switching off
› Turn the slot of the lock on the left-hand door anti-clockwise – do the same
clockwise on the right-hand door. Ð Central locking system
Introductory information
When using central locking or unlocking, all doors are locked or unlocked simulta-
neously. The luggage compartment lid is then unlocked. You can then open the
luggage compartment lid by pressing the button » page 25.
Automatic locking and unlocking
All the doors and the luggage compartment lid are locked automatically once the
car reaches a speed of about 15
km/h.
If the ignition key is withdrawn, the car is then automatically unlocked again. In
addition, it is possible for the driver to unlock the car by pressing the central lock-
ing button » page 23.
The doors can be unlocked and opened from the inside by a single pull on the
opening lever of the respective door.
Upon request you can have automatic locking and unlocking activated by a
ŠKODA Service Partner. WARNING
Locked doors prevent unwanted entry into the vehicle from outside, for exam-
ple at road crossings. Locked doors do, however, make it more difficult for res-
cuers to get into the vehicle in an emergency – danger to life! Note
■ In the event of an accident in which the airbags are deployed, the locked doors
are automatically unlocked in order to enable rescuers to gain access to the vehi-
cle. ■ Only the driver's door can be unlocked or locked using the key if the central
locking system fails » page 22. The other doors and the luggage compartment
lid can be manually locked or unlocked. ■ Emergency locking of the door » page 25.
■ Emergency unlocking of the luggage compartment lid » page 26.Ð
21
Unlocking and locking
Page 25 of 157

Unlocking
›
Open the door by pulling the door opening lever once against the direction of
the arrow » Fig. 12. ÐVehicle locking/unlocking from the inside
Fig. 13
Central locking button
If the vehicle was not locked from the outside, you can also unlock and lock it
with the button » Fig. 13 without the ignition switched on.
Locking all doors and the luggage compartment lid › Press the button
» Fig. 13.
Unlocking all doors and the luggage compartment lid
› Press the button
.
The following applies if your vehicle has been locked using the central locking
button.
› It is not possible to open the doors or the luggage compartment lid from the
outside (safety feature, e.g. when stopping at traffic lights etc.).
› The doors can be unlocked and opened from the inside by a single pull on the
opening lever of the respective door.
› If at least one door has been opened, the vehicle cannot be locked.
› In the event of an accident in which the airbags are deployed, the locked doors
are automatically unlocked from the inside in order to enable rescuers to gain
access to the vehicle. WARNING
The central locking system also operates if the ignition is switched off. Chil-
dren should never be left unattended in the vehicle since it is difficult to pro-
vide assistance from the outside when the doors are locked. Locked doors
make it difficult for rescuers to get into the vehicle in an emergency – hazard! Note
If the safe securing system is activated » page 22, the door opening lever and the
central locking buttons do not operate. Ð Remote control
Introductory information
You can use the remote control key to:
› unlock and lock the vehicle,
› unlock the luggage compartment lid.
The transmitter with the battery is housed in the handle of the remote control
key. The receiver is located in the interior of the vehicle. The operating range of
the remote control key is approx. 30 m. But this range of the remote control can
be reduced if the batteries are weak.
The key has a fold-open key bit which can be used for unlocking and locking the
car manually and also for starting the engine.
If a lost key is replaced or if the receiver unit has been repaired or replaced, the
system must be initialised by a ŠKODA
Service Partner. Only then can the remote
control key be used again. Note
■ The remote control is automatically deactivated when the ignition is switched
on. ■ The operation of the remote control may temporarily be affected by interfer-
ence from transmitters close to the car and which operate in the same frequency
range (e.g. mobile phone, TV transmitter). £
23
Unlocking and locking