2012 Seat Leon 5D change key battery
[x] Cancel search: change key batteryPage 67 of 289

66Instruments and warning/control lamps
Reading a service notification
With the ignition switched on, the engine off and the vehicle at a standstill,
the current service notification can be read:
Press and hold the button ⇒ Fig. 36 4
for more than 5 seconds to consult
the service message.
When the service date has past , a minus sign is displayed in front of the
number of kilometres or days. In vehicles with text messages the following
is displayed: Service --- km (miles) or --- days ago .
The time can also be set via the
key and Setup function button in the
Easy Connect system ⇒ page 79.
The service interval display is reset
If the service was not carried out by a SEAT dealership, the display can be
reset as follows:
● To reset the service interval display, turn the ignition off and press and
hold the button ⇒ Fig. 36 4
.
● Switch the ignition back on.
● Release the button 4
and press the button 4 again for the next 20
seconds.
Note
● The service message disappears after a few seconds, when the engine is
started or when OK/RESET
is pressed on the windscreen wiper lever, or OKon the multifunction steering wheel.
●
In vehicles with the LongLife system in which the battery has been dis-
connected for a long period of time, it is not possible to calculate the date
of the next service. Therefore the service interval display may not be correct.
In this case, please check the maximum permitted service intervals ⇒ Book-
let Maintenance Programme. Rev counter
The rev counter indicates the number of engine revolutions
per minute.
Together with the gear-change indicator, the rev counter offers you the pos-
sibility of using the engine of your vehicle at a suitable speed.
The start of the red zone on the dial indicates the maximum engine speed
which may be used briefly when the engine is warm and after it has been
run in properly. Before reaching this range, you should change to a higher
gear for vehicles with a manual gearbox or for automatic gearboxes put the
selector lever in “D” or take your foot off the accelerator pedal.
We recommend that you avoid high revs and that you follow the recommen-
dations on the gear-change indicator. Consult the additional information in
⇒ page 68, Gear-change indicator.
CAUTION
Never allow the rev counter needle 1 ⇒ Fig. 36 to go into the red zone on
the scale for more than a very brief period, otherwise, there is a risk of en-
gine damage.
For the sake of the environment
Changing up a gear early will help you to save fuel and minimise engine
noise.
Page 89 of 289

88Opening and closing
Vehicle key
Fig. 43 Vehicle key
Fig. 44 Vehicle key with
alarm button
Vehicle key
With the vehicle key the vehicle may be locked or unlocked remotely
⇒ page 86.
The vehicle key includes an emitter and battery. The receiver is in the interi-
or of the vehicle. The range of the vehicle key with remote control and new
battery is several metres around the vehicle. If it is not possible to open or close the vehicle using the remote control key,
this should be re-synchronised
⇒ page 90 or the battery changed
⇒ page 90.
Different keys belonging to the vehicle may be used.
Unfolding and folding the key shaft
Press button 1
⇒ Fig. 43 or ⇒
Fig. 44 to unlock and unfold the key shaft.
To fold the shaft away, press button 1
and fold the key shaft in until it
locks in place.
Alarm button 1)
Only press alarm button 2
in the event of an emergency! When the alarm
button is pressed, the vehicle horn is heard and the turn signals are switch-
ed on for a short time. When the alarm button is pressed again, the alarm is
switched off.
Replacing a key
To obtain a spare key and other vehicle keys, the vehicle chassis number is
required.
Each new key contains a microchip which must be coded with the data from
the vehicle electronic immobiliser. A vehicle key will not work if it does not
contain microchip or the microchip has not been encoded. This is also true
for keys which are specially cut for the vehicle.
The vehicle keys or new spare keys can be obtained from a SEAT Official
Service, a specialised workshop or an approved key service qualified to cre-
ate this kind of key.
New keys or spare keys must be synchronised before use ⇒ page 90.
1)
This system is only available in some markets
Page 91 of 289

90Opening and closing
Changing the battery
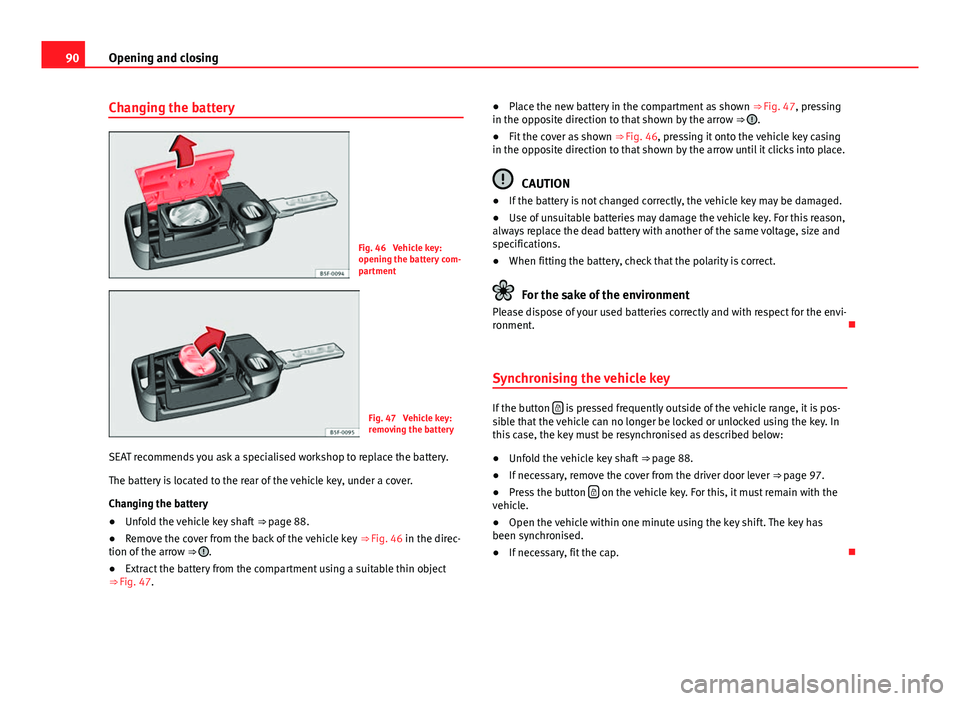
Fig. 46 Vehicle key:
opening the battery com-
partment
Fig. 47 Vehicle key:
removing the battery
SEAT recommends you ask a specialised workshop to replace the battery.
The battery is located to the rear of the vehicle key, under a cover.
Changing the battery
● Unfold the vehicle key shaft
⇒ page 88.
● Remove the cover from the back of the vehicle key
⇒ Fig. 46 in the direc-
tion of the arrow ⇒
.
● Extract the battery from the compartment using a suitable thin object
⇒ Fig. 47. ●
Place the new battery in the compartment as shown ⇒ Fig. 47, pressing
in the opposite direction to that shown by the arrow ⇒
.
● Fit the cover as shown ⇒ Fig. 46, pressing it onto the vehicle key casing
in the opposite direction to that shown by the arrow until it clicks into place.
CAUTION
● If the battery is not changed correctly, the vehicle key may be damaged.
● Use of unsuitable batteries may damage the vehicle key. For this reason,
always replace the dead battery with another of the same voltage, size and
specifications.
● When fitting the battery, check that the polarity is correct.
For the sake of the environment
Please dispose of your used batteries correctly and with respect for the envi-
ronment.
Synchronising the vehicle key
If the button is pressed frequently outside of the vehicle range, it is pos-
sible that the vehicle can no longer be locked or unlocked using the key. In
this case, the key must be resynchronised as described below:
● Unfold the vehicle key shaft
⇒ page 88.
● If necessary, remove the cover from the driver door lever
⇒ page 97.
● Press the button
on the vehicle key. For this, it must remain with the
vehicle.
● Open the vehicle within one minute using the key shift. The key has
been synchronised.
● If necessary, fit the cap.
Page 116 of 289

115
Lights and visibility
Interior and reading lights 1)
Button/
SwitchFunction
Switches interior lights off.
Switches interior lights on.
Switches door contact control on (central position).
The interior lights come on automatically when the vehicle is
unlocked, a door is opened or the key is removed from the ig-
nition.
The lights go off a few seconds after all the doors are closed,
the vehicle is locked or the ignition is switched on.
Turning the reading light on and off
Glove compartment and luggage compartment lighting
When opening and closing the glove compartment on the front passenger
side and the rear lid, the respective light will automatically switch on and
off.
Footwell lighting*
The lights in the footwell area below the dash (driver and front passenger
sides) will switch on when the doors are opened and will decrease in inten-
sity while driving. The intensity of these lights can be adjusted using the ra-
dio menu (see Easy Connect > Adjusting Lighting > Interior lighting⇒ page 81).
Ambient light*
The ambient light in the door panel changes colour (white or red) depend-
ing on the driving mode. The intensity of these lights can be adjusted using the radio menu (see Easy Connect > Adjusting Lights > Interior lighting
⇒ page 81).
Note
The reading lights switch off when the vehicle is locked using a key or after
several minutes if the key is removed from the ignition. This prevents the
battery from discharging.
Sun blind Introduction
WARNING
Folded sun blinds can reduce visibility.
● Always store sun blinds and visors in their housing when not in use.
1)
Depending on the level of equipment fitted in the vehicle, LEDs can be used for the follow-
ing interior lights: front courtesy light, rear courtesy light, footwell light and sun visor light.
Safety FirstOperating instructionsPractical TipsTechnical specifications
Page 146 of 289

145
Driving
Start-Stop System*
If the vehicle is stopped and the Start-Stop system* switches off the engine,
the ignition remains switched on.
Automatic gearbox: Before leaving the vehicle, make sure that the ignition
is switched off and the selector lever is in position P.
Driver messages on the instrument panel display
Press the clutch This message appears on vehicles with a manual gearbox if the driver tries
to start the engine without having the clutch pedal pressed. The engine will
only start if you press the clutch pedal.
Press the brake
This message appears on vehicles with an automatic gearbox if the driver
tries to start the engine without having the brake pedal pressed.
Select N or P
This message appears if you try to start or stop the engine when the selec-
tor lever of the automatic gearbox is not in position P or N. The engine can
only start or stop in these positions.
Engage position P; the vehicle can move; doors can only close in position P. For safety reasons, this driver message appears and an audible warning
sounds if the selector lever of the automatic gearbox is not in position P af-
ter you switch off the ignition. Otherwise the vehicle could move.
Gear change: selector lever in the drive position! This driver message is displayed and a buzzer is sounded when the selector
lever is not in the position P when the driver door is opened. Put the selec-
tor lever in position P; otherwise the vehicle can roll away.
Ignition is switched onThis driver message is displayed and a buzzer is sounded when the driver
door is opened with the ignition switched on.
WARNING
● Never run the engine in confined spaces, as the exhaust gases are
poisonous.
● Never remove the key from the ignition if the vehicle is in motion.
Otherwise, the steering could suddenly lock, making it impossible to
steer the vehicle: risk of accident!
● Always take the key with you when you leave the vehicle. This is par-
ticularly important if there are children in the vehicle, as they might oth-
erwise be able to start the engine or use power-operated equipment (e.g.
the electric windows), which could cause injuries.
CAUTION
Avoid high engine speeds, full throttle and extreme load conditions until
the engine has reached its normal operating temperature, otherwise this
can damage the engine.
For the sake of the environment
Do not warm up the engine by running it with the car stationary. You should
drive off as soon as you start the engine. This will help avoid unnecessary
exhaust emissions.
Note
● If it is difficult to turn the ignition key to the position 1, turn the steer-
ing wheel to both sides to release the steering lock.
● When starting from cold, the engine may be a little noisy for the first few
seconds until oil pressure has built up in the hydraulic valve lifters. This is
quite normal, and no cause for concern.
● If the vehicle battery is disconnected and reconnected, the key must re-
main in the position 1
for around 5 seconds before starting up.
● Vehicles with automatic gearbox: After switching off the ignition, you
can only remove the ignition key if the selector lever is in position “P” (park-
ing lock). Next, the selector lever is locked.
Safety FirstOperating instructionsPractical TipsTechnical specifications
Page 219 of 289

218Checking and refilling levels
FunctionReprogrammingOne-touch function of the electric
windows⇒ page 101, One-touch opening and
closing*
Remote control keyIf the vehicle does not respond to the
key, they should be synchronised
⇒ page 90
Digital clock⇒ page 63
ESC warning lampAfter driving for a few metres, the
warning lamp goes out again.
If the vehicle is not used for long periods
The vehicle has a system for monitoring the current consumption when the
engine is left unused for long periods of time ⇒ page 187. Some functions,
such as the interior lights, or the remote door opening, may be temporarily
disabled to prevent the battery from running flat. These functions will come
back on as soon as the ignition is switched on and the engine started.
Winter conditions
During the winter, the starting power may be reduced, and if necessary, the
battery should be charged ⇒
in Important safety warnings for handling a
vehicle battery on page 218
Important safety warnings for handling a vehicle battery
All work on batteries requires specialist knowledge. Please refer to a SEAT
Official Service or a workshop specialising in batteries: risk of burns or ex-
ploding battery!
The battery must not be opened. Never try to change the fluid level of the
battery. Explosive gas is released from the battery that could cause an ex-
plosion.
Wear eye protection.
Battery acid is very corrosive and caustic. Wear protective gloves
and eye protection. In the event of electrolyte splashes, rinse off
with plenty of water.
Fires, sparks, open flames and smoking are prohibited.
The battery should only be charged in a well-ventilated zone. Risk
of explosion!
Keep children away from acid and batteries!
WARNING
● When repairing or working on the electrical system, proceed as fol-
lows:
● 1. Remove the key from the ignition. The negative cable on the bat-
tery must be disconnected.
● 2. When the repair is finished, reconnect the negative pole of the bat-
tery.
● Switch off all electrical consumers before reconnecting the battery.
Reconnect first the positive cable and then the negative cable. Never re-
verse the polarity of the connections. This could cause an electrical fire.
● Ensure that the vent hose is always connected to the battery.
● Never use damaged batteries. This could cause an explosion! Replace
a damaged battery immediately.
CAUTION
● Never disconnect the battery if the ignition is switched on or if the en-
gine is running. This could damage the electrical system or electronic com-
ponents.
Page 220 of 289

219
Checking and refilling levels
Charging the battery
Terminals for charging the battery are fitted in the engine
compartment.
– Note the warnings ⇒
in Important safety warnings for han-
dling a vehicle battery on page 218 and ⇒ .
– Switch off all electrical equipment. Remove the ignition key.
– Raise the bonnet ⇒ page 210.
– Open the battery cover.
– Connect the charger clamps as described to the positive pole of
the battery (+) and, exclusively to an earth on the bodywork
(–).
– Only use a charger which is compatible for use with 12 V nomi-
nal voltage batteries. The charge must not exceed a voltage of
15 V.
– Now connect the battery charger to the power socket and switch
on.
– After charging the battery: switch off the battery charger and
disconnect the power socket cable.
– Finally disconnect the charger cables from the battery.
– Replace the battery cover correctly.
– Close the bonnet ⇒ page 210.
Important: Before you charge the battery make sure you read the manufac-
turer's instructions for using the battery charger.
WARNING
Never charge a battery that has frozen: replace battery! Failure to do so
may lead to an explosion.
Note
Use only the terminals in the engine compartment to charge the battery.
Replacing the battery
The new battery should have the same specifications (am-
perage, load and voltage) as the used battery.
Your vehicle is equipped with an intelligent power management system to
control the distribution of electrical energy ⇒ page 187. The power manage-
ment function ensures that the battery is charged much more efficiently
than on vehicles without a power management system. To maintain this
function after replacing the battery, we recommend that the replacement
battery used is of the same make and type as the original fitted battery. To
make proper use of the power management function after the battery has
been changed, have the battery coded to the power management mode at a
specialised workshop.
CAUTION
● Some vehicles, for example those with the Start-Stop system* are fitted
with a special battery (AGM-type or EFB-type battery). If any other type of
battery is fitted, the Start-Stop function may be considerably reduced and
the vehicle may not stop on repeated occasions.
● Make sure that the vent hose is always attached to the original opening
on the side of the battery. Gases or battery acid can otherwise escape and
possibly cause damage.
● The battery holder and clamps must always be correctly secured.
Safety FirstOperating instructionsPractical TipsTechnical specifications