2012 Seat Ibiza 5D technical specifications
[x] Cancel search: technical specificationsPage 209 of 280
207
Checking and refilling levels
Changing the rear wiper blade
A good rear wiper blade is essential for clear rear vision.
Damaged wiper blades should be replaced immediately.
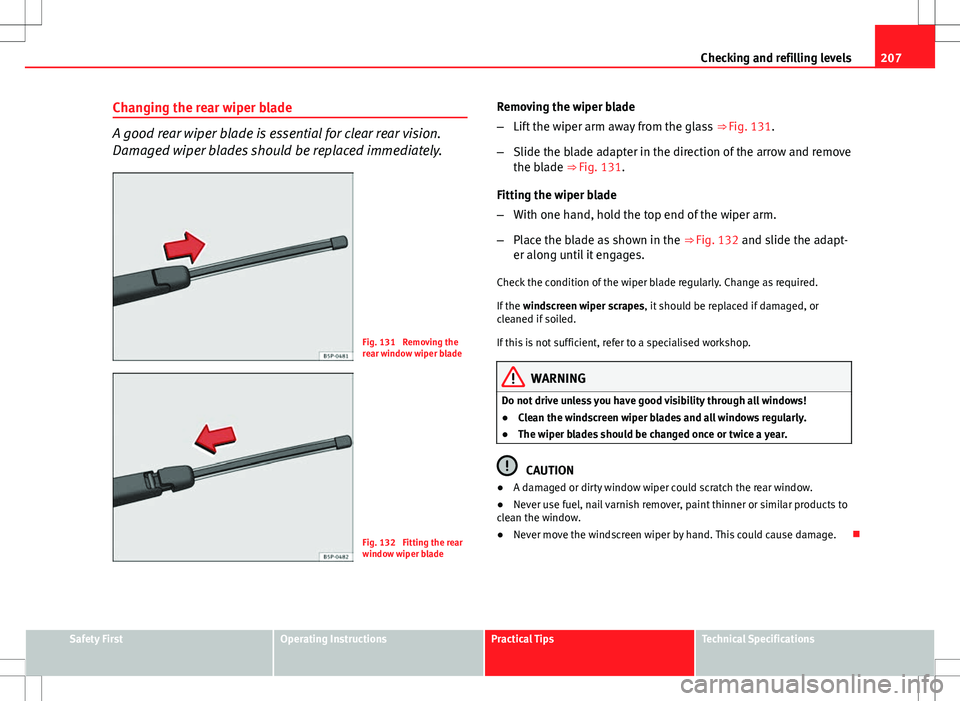
Fig. 131 Removing the
rear window wiper blade
Fig. 132 Fitting the rear
window wiper blade Removing the wiper blade
–
Lift the wiper arm away from the glass ⇒ Fig. 131.
– Slide the blade adapter in the direction of the arrow and remove
the blade ⇒ Fig. 131.
Fitting the wiper blade
– With one hand, hold the top end of the wiper arm.
– Place the blade as shown in the ⇒ Fig. 132 and slide the adapt-
er along until it engages.
Check the condition of the wiper blade regularly. Change as required.
If the windscreen wiper scrapes, it should be replaced if damaged, or
cleaned if soiled.
If this is not sufficient, refer to a specialised workshop.
WARNING
Do not drive unless you have good visibility through all windows!
● Clean the windscreen wiper blades and all windows regularly.
● The wiper blades should be changed once or twice a year.
CAUTION
● A damaged or dirty window wiper could scratch the rear window.
● Never use fuel, nail varnish remover, paint thinner or similar products to
clean the window.
● Never move the windscreen wiper by hand. This could cause damage.
Safety FirstOperating InstructionsPractical TipsTechnical Specifications
Page 211 of 280
209
Checking and refilling levels
WARNING
Brake fluid is poisonous. Old brake fluid impairs the braking effect.
● Before opening the bonnet to check the brake fluid level, read and ob-
serve the warnings ⇒ page 195.
● Brake fluid should be stored in the closed original container in a safe
place out of reach of children. There is a toxic risk.
● Complete the brake fluid change according to the Maintenance Pro-
gramme. Heavy use of the brakes may cause a vapour lock if the brake
fluid is left in the brake system for too long. This would seriously affect
the effectiveness of the brakes and the safety of the vehicle. This may
cause an accident.
CAUTION
Brake fluid damages the vehicle paintwork. Wipe off any brake fluid from
the paintwork immediately.
For the sake of the environment
The brake pads and brake fluid must be collected and disposed of accord-
ing the applicable regulations. The SEAT Technical Service network has the
necessary equipment and qualified personnel for collecting and disposing
of this waste material. Vehicle battery
Warnings on handling the battery
Wear eye protection
Battery acid is extremely corrosive. Wear protective gloves and
eye protection!
Fires, sparks, open flames and smoking are prohibited!
A highly explosive mixture of gases is released when the battery
is under charge.
Keep children away from acid and batteries!
WARNING
Always be aware of the danger of injury and chemical burns as well as
the risk of accident or fire when working on the battery and the electrical
system:
● Wear eye protection. Protect your eyes, skin and clothing from acid
and particles containing lead.
● Battery acid is extremely corrosive. Wear protective gloves and eye
protection. Do not tilt the batteries. This could spill acid through the
vents. Rinse battery acid from eyes immediately for several minutes with
clear water. Then seek medical care immediately. Neutralise any acid
splashes on the skin or clothing with a soapy solution, and rinse off with
plenty of water. If acid is swallowed by mistake, consult a doctor immedi-
ately.
Safety FirstOperating InstructionsPractical TipsTechnical Specifications
Page 213 of 280
211
Checking and refilling levels
There are two different colours:
● Black: correct charge status.
● Transparent/clear yellow: the battery must be replaced. Contact a speci-
alised workshop.
Charging and changing the vehicle battery
The battery is maintenance-free and is checked during the
inspection service. All work on the vehicle battery requires
specialist knowledge.
If you often drive short distances or if the vehicle is not driven for long peri-
ods, the battery should be checked by a specialised workshop between the
scheduled services.
If the battery has discharged and you have problems starting the vehicle,
the battery might be damaged. If this happens, we recommend you have
the vehicle battery checked by a Technical Service where it will be re-charg-
ed or replaced.
Charging the battery
The vehicle battery should be charged by a specialised workshop only, as
batteries using special technology have been installed and they must be
charged in a controlled environment.
Replacing a vehicle battery
The battery has been developed to suit the conditions of its location and
has special safety features.
Genuine SEAT batteries fulfil the maintenance, performance and safety
specifications of your vehicle.
WARNING
● We recommend you use only maintenance-free or cycle free leak-proof
batteries which comply with standards T 825 06 and VW 7 50 73. This
standard applies as of August 2001.
● Before starting any work on the batteries, you must read and observe
the warnings ⇒
in Warnings on handling the battery on page 209.
For the sake of the environment
Batteries contain toxic substances such as sulphuric acid and lead. They
must be disposed of appropriately and must not be disposed of with ordi-
nary household waste.
Wheels
General notes
Avoiding damage
– If you have to drive over a kerb or similar obstacle, drive very
slowly and at a right angle.
– Keep grease, oil and fuel off the tyres.
– Inspect the tyres regularly for damage (cuts, cracks or blisters,
etc.). Remove any foreign objects embedded in the treads.
Storing tyres
– When you remove the tyres, mark them in order to maintain the
same direction of rotation when they are installed again.
Safety FirstOperating InstructionsPractical TipsTechnical Specifications
Page 215 of 280
213
Checking and refilling levels
Tyre useful life
The useful life of tyres is dependent on tyre pressure, driving
style and fitting.
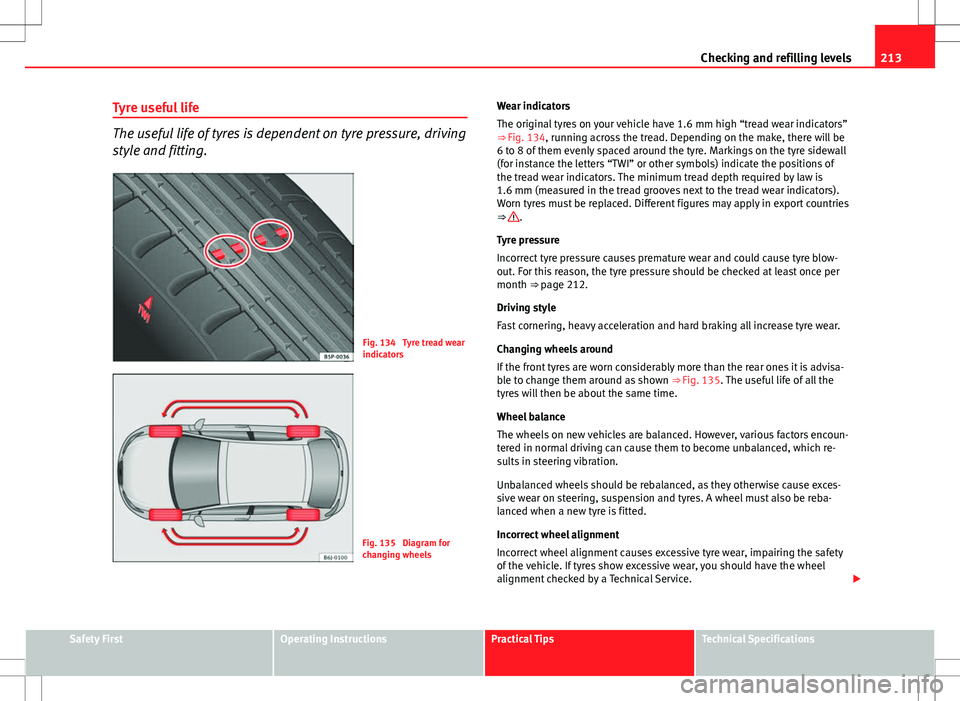
Fig. 134 Tyre tread wear
indicators
Fig. 135 Diagram for
changing wheels Wear indicators
The original tyres on your vehicle have 1.6 mm high “tread wear indicators”
⇒ Fig. 134, running across the tread. Depending on the make, there will be
6 to 8 of them evenly spaced around the tyre. Markings on the tyre sidewall
(for instance the letters “TWI” or other symbols) indicate the positions of
the tread wear indicators. The minimum tread depth required by law is
1.6 mm (measured in the tread grooves next to the tread wear indicators).
Worn tyres must be replaced. Different figures may apply in export countries
⇒
.
Tyre pressure
Incorrect tyre pressure causes premature wear and could cause tyre blow-
out. For this reason, the tyre pressure should be checked at least once per
month ⇒ page 212.
Driving style
Fast cornering, heavy acceleration and hard braking all increase tyre wear.
Changing wheels around
If the front tyres are worn considerably more than the rear ones it is advisa-
ble to change them around as shown ⇒ Fig. 135. The useful life of all the
tyres will then be about the same time.
Wheel balance
The wheels on new vehicles are balanced. However, various factors encoun-
tered in normal driving can cause them to become unbalanced, which re-
sults in steering vibration.
Unbalanced wheels should be rebalanced, as they otherwise cause exces-
sive wear on steering, suspension and tyres. A wheel must also be reba-
lanced when a new tyre is fitted.
Incorrect wheel alignment
Incorrect wheel alignment causes excessive tyre wear, impairing the safety
of the vehicle. If tyres show excessive wear, you should have the wheel
alignment checked by a Technical Service.
Safety FirstOperating InstructionsPractical TipsTechnical Specifications
Page 217 of 280
215
Checking and refilling levels
WARNING
● We recommend that you use only wheels and tyres which have been
approved by SEAT for your model. Failure to do so could impair vehicle
handling. Risk of accident.
● Avoid running the vehicle on tyres that are more than 6 years old. If
you have no alternative, you should drive slowly and with extra care at all
times.
● Never use old tyres or those with an unknown history of use.
● If wheel trims are retrofitted, you must ensure that the flow of air to
the brakes is not restricted. This could cause the brake system to over-
heat.
● All four wheels must be fitted with radial tyres of the same type, size
(rolling circumference) and the same tread pattern.
For the sake of the environment
Old tyres must be disposed of according to the laws in the country con-
cerned.
Note
● For technical reasons, it is not generally possible to use the wheels from
other vehicles. This can also apply to wheels of the same model. The use of
wheels or tyres which have not been approved by SEAT for use with your
model may invalidate the vehicle's type approval for use on public roads.
● If the spare wheel is not the same as the tyres that are mounted on the
vehicle (e.g. winter tyres) you should only use the spare tyre for a short peri-
od of time and drive with extra care. Refit the normal road wheel as soon as
possible. Wheel bolts
Wheel bolts must be tightened to the correct torque.
The design of wheel bolts is matched to the rims. If different wheel rims are
fitted, the correct wheel bolts with the right length and correctly shaped
bolt heads must be used. This ensures that wheels are fitted securely and
that the brake system functions correctly.
In certain circumstances, you should not use wheel bolts from a different
vehicle, even if it is the same model ⇒ page 185.
WARNING
If the wheel bolts are not tightened correctly, the wheel could become
loose while driving. Risk of accident.
● The wheel bolts must be clean and turn easily. Never apply grease or
oil to them.
● Use only wheel bolts which belong to the wheel.
● If the prescribed torque of the wheel bolts is too low, they could loos-
en whilst the vehicle is in motion. Risk of accident! If the tightening tor-
que is too high, the wheel bolts and threads can be damaged.
CAUTION
The prescribed tightening torque for wheel bolts for steel and alloy wheels
is 120 Nm.
Safety FirstOperating InstructionsPractical TipsTechnical Specifications
Page 219 of 280
217
Checking and refilling levels
CAUTION
Remove the snow chains to drive on roads without snow. Otherwise they
will impair handling, damage the tyres and wear out very quickly.
Note
In some countries, the speed limit for using snow chains is 50 km/h
(30 mph). The legal requirements of the country should be followed.
Safety FirstOperating InstructionsPractical TipsTechnical Specifications
Page 221 of 280

219
If and when
If you have a puncture on one of the front wheels when using snow chains,
fit the compact temporary spare wheel in place of one of the rear wheels.
You can then attach the snow chains to the wheel taken from the rear and
use this wheel to replace the punctured front wheel.
WARNING
● The tyre pressures must be checked and corrected as soon as possi-
ble after fitting the temporary spare wheel.
● Do not drive faster than 80 km/h (50 mph). Higher speeds can cause
an accident.
● Avoid heavy acceleration, hard braking and fast cornering. Risk of ac-
cident.
● Never use more than one temporary spare wheel at the same time,
risk of accident.
● No other type of tyre (normal summer or winter tyre) may be fitted on
the compact temporary spare wheel rim.
Tyre repair kit*
The tyre repair kit (for vehicles not including a temporary
spare wheel) is stored under the floor panel in the luggage
compartment. In the event of a punctured tyre, your vehicle is equipped with the Tyre Mo-
bility System (tyre repair kit).
The tyre repair kit consists of a container with sealing product to repair the
puncture and a compressor to generate the required tyre pressure. The kit
will reliably seal punctures up to a size of about 4 mm caused by the pene-
tration of a foreign body into the tyre.
Note
● Seek professional assistance if the repair of a tyre puncture is not possi-
ble with the sealing product.
Wheel change Preparation work
What you must do before changing a wheel.
– If you have a flat tyre or puncture, park the vehicle as far away
from the flow of traffic as possible. Choose a location that is as
level as possible.
– All vehicle occupants should leave the vehicle. They should
wait in a safe area (for instance behind the roadside crash barri-
er).
– Switch the engine off. Switch the hazard warning lights on and
place the warning triangles in position.
– Apply the handbrake firmly.
– Engage the first gear , or put the selector lever to position P for
those vehicles with an automatic gearbox.
– If you are towing a trailer, unhitch it from your vehicle.
– Take the vehicle tools and the spare wheel out of the luggage
compartment.
Safety FirstOperating InstructionsPractical TipsTechnical Specifications
Page 223 of 280
221
If and when
Wheel covers*
The wheel covers must be removed for access to the wheel
bolts
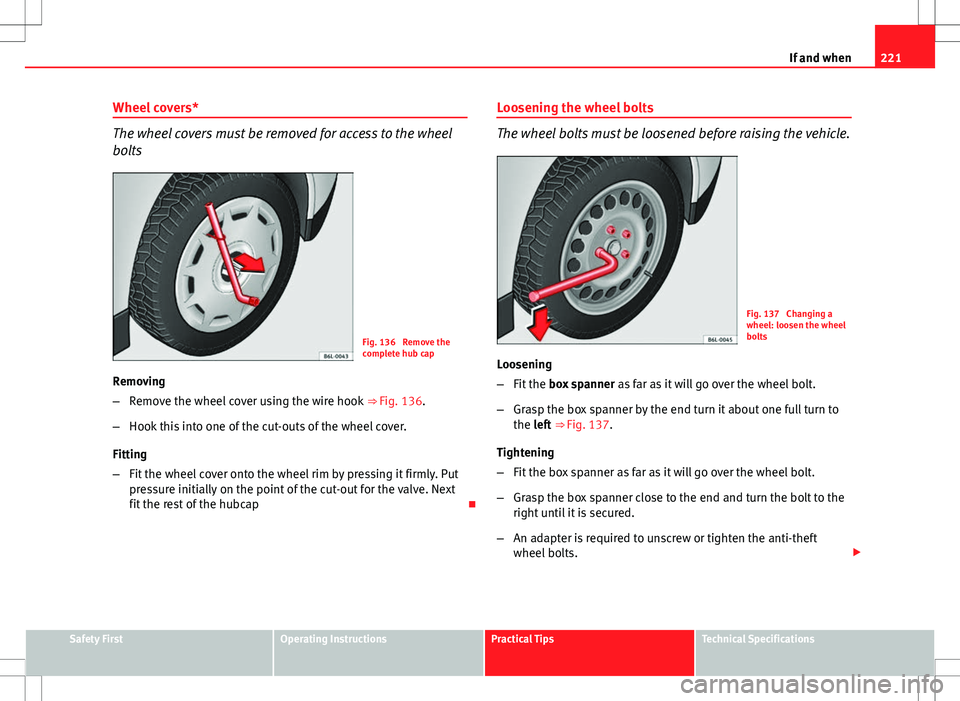
Fig. 136 Remove the
complete hub cap
Removing
– Remove the wheel cover using the wire hook ⇒ Fig. 136.
– Hook this into one of the cut-outs of the wheel cover.
Fitting
– Fit the wheel cover onto the wheel rim by pressing it firmly. Put
pressure initially on the point of the cut-out for the valve. Next
fit the rest of the hubcap Loosening the wheel bolts
The wheel bolts must be loosened before raising the vehicle.
Fig. 137 Changing a
wheel: loosen the wheel
bolts
Loosening
– Fit the box spanner as far as it will go over the wheel bolt.
– Grasp the box spanner by the end turn it about one full turn to
the left ⇒ Fig. 137.
Tightening
– Fit the box spanner as far as it will go over the wheel bolt.
– Grasp the box spanner close to the end and turn the bolt to the
right until it is secured.
– An adapter is required to unscrew or tighten the anti-theft
wheel bolts.
Safety FirstOperating InstructionsPractical TipsTechnical Specifications