2012 RENAULT KOLEOS LED
[x] Cancel search: LEDPage 128 of 233

3.8
ENG_UD20983_3
Conditionnement d’air automatique bizone (X45 - H45 - Renault)
ENG_NU_977-2_H45_Ph2_Renault_3
Jaune NoirNoir texte
AuToMATIc clIMATE coNTRol (2/6)
Automatic mode
Press the automatic mode button 3 .
The indicator light on the button comes
on.
The automatic climate control system
ensures, in most cases, a comfortable
temperature in the passenger compart-
ment, while maintaining good visibility
and optimising fuel consumption.
This is the recommended mode of
use. To reach and keep the chosen comfort
level and to maintain good visibility, the
system controls:
–
ventilation speed;
– air distribution;
– air conditioning start/stop;
– air temperature.
o nly the temperatures and the indi -
cator light on the button 3 are lit up.
In automatic mode (with the indi -
cator light lit up on button 3 ), the
system automatically controls all the
functions.
When you modify certain functions,
the indicator light on button 3 goes
out. Only the modified function stops
being controlled by the system.
3
Page 131 of 233
JauneNoirNoir texte
3.11
ENG_UD20983_3
Conditionnement d’air automatique bizone (X45 - H45 - Renault)
ENG_NU_977-2_H45_Ph2_Renault_3
AuT oMATIc clIMATE coNTRol (5/6)
Distribution of air in the
passenger compartment
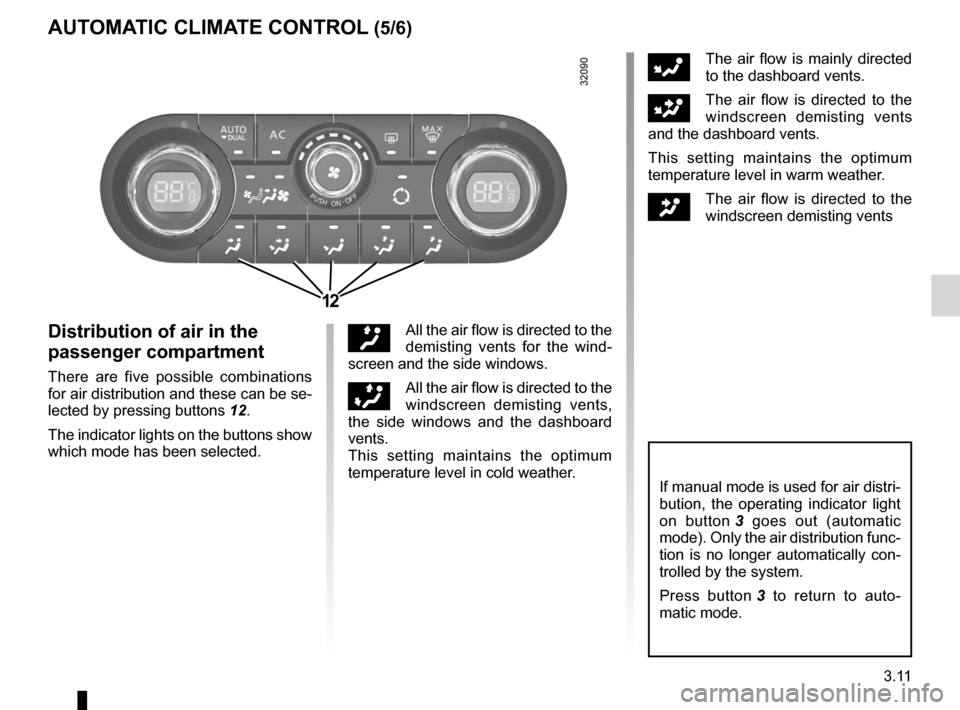
There are five possible combinations
for air distribution and these can be se-
lected by pressing buttons 12.
The indicator lights on the buttons show
which mode has been selected.
õ All the air flow is directed to the
demisting vents for the wind -
screen and the side windows.
÷All the air flow is directed to the
windscreen demisting vents,
the side windows and the dashboard
vents.
This setting maintains the optimum
temperature level in cold weather.
FThe air flow is mainly directed
to the dashboard vents.
GThe air flow is directed to the
windscreen demisting vents
and the dashboard vents.
This setting maintains the optimum
temperature level in warm weather.
JThe air flow is directed to the
windscreen demisting vents
If manual mode is used for air distri-
bution, the operating indicator light
on button 3 goes out (automatic
mode). Only the air distribution func-
tion is no longer automatically con-
trolled by the system.
Press button 3 to return to auto -
matic mode.
12
Page 132 of 233

3.12
ENG_UD20983_3
Conditionnement d’air automatique bizone (X45 - H45 - Renault)
ENG_NU_977-2_H45_Ph2_Renault_3
AuT oMATIc clIMATE coNTRol (6/6)
Setting the air recirculation
mode
Pressing button 11 activates air recircu-
lation mode (the symbol lights up on the
display).
During recirculation, air is taken from
the passenger compartment and is re-
cycled, with no air being taken from out-
side the vehicle.
Air recirculation allows the passenger
compartment to be isolated from the
outside air (when driving in polluted
areas, etc.). Prolonged use of this position may lead
to odours, caused by non-renewal of
air, and the formation of condensation
on the windows.
We therefore advise you to return to
normal mode (external air or automatic
recirculation) as soon as air recircula
-
tion is no longer needed, by pressing
button 11.
Flow of air from rear air
vents.
(depending on vehicle)
Repeatedly pressing buttons 13 or 17
enables the ventilation speed in the
rear seats to be modified, according to
three different settings:
– slow speed (indicator lights 14
and 18 on);
– fast speed (indicator lights 15 and 16
on);
– park.
1415
1311
16
17
18
Page 166 of 233

brake fluid .............................................................. (current page)
levels: brake fluid ........................................................ (current page)
tanks and reservoirs brake fluid ........................................................ (current page)
4.8
ENG_UD20999_4
Niveaux / filtres (X45 - H45 - Renault)
ENG_NU_977-2_H45_Ph2_Renault_4
Jaune NoirNoir texte
brake fluid
LeVeLS (2/3)
2
Brake fluid level
This should be checked frequently,
and immediately if you notice even the
slightest loss in braking efficiency.
The level should be read with the engine
switched off and on level ground. Level 2
It is normal for the level to drop as
the linings become worn, but it should
never drop below the “
MIn” warning
line.
If you wish to check the disc and drum
wear yourself, you should obtain the
document explaining the checking pro-
cedure from our network or from the
manufacturer’s website. t
opping up
After any operation on the hydraulic cir-
cuit, a specialist must replace the fluid.
Only use fluids approved by our
Technical Department (and taken from
a sealed container).
Replacement intervals
Refer to the Maintenance Service
Booklet for your vehicle.
The engine may be hot
when carrying out opera -
tions in close proximity. In
addition, the engine cooling
fan can come on at any moment.
Risk of injury.
Consult your approved dealer at
once if you notice an abnormal or
repeated drop in any of the fluid
levels.
Page 167 of 233

levels:windscreen washer reservoir ........................... (current page)
windscreen washer ................................................ (current page)
filter air filter ............................................................. (current page)
filter passenger compartment filter .......................... (current page)
filter diesel filter ........................................................ (current page)
tanks and reservoirs: windscreen washer .......................................... (current page)
JauneNoirNoir texte
4.9
ENG_UD20999_4
Niveaux / filtres (X45 - H45 - Renault)
ENG_NU_977-2_H45_Ph2_Renault_4
windscreen/headlight washer reservoir
Filters
LeVeLS (3/3)/FIL teRS
note
Depending on the vehicle, to find
out the fluid level, open cap 3 , pull
out the dipstick and read the level
again.
3
Windscreen/headlight washer
reservoir
t opping up
Open cap 3 , fill until you can see the
fluid, then refit the cap. Liquid
Screen wash product (product with an-
tifreeze in winter).
Jets
Use a tool such as a needle to adjust
the height of the windscreen washer
jets.
Filters
The replacement of filter elements (air
filter, passenger compartment filter,
diesel filter, etc.) is scheduled in the
maintenance operations for your vehi
-
cle.
Replacement intervals for filter el -
ements: refer to the Maintenance
Service Booklet for your vehicle.
The engine may be hot
when carrying out opera -
tions in close proximity. In
addition, the engine cooling
fan can come on at any moment.
Risk of injury.
Page 171 of 233

JauneNoirNoir texte
4.13
ENG_UD22865_9
Entretien de la carrosserie (X45 - H45 - J77 - X81 - X85 - B85 - C85 - S85 - X91 - B91 - K91 - D91 - X83 - X61 - X77 ph2 - K85 - X95 - B95 - D95 - K95 - J95 - R95 - L38 -
ENG_NU_977-2_H45_Ph2_Renault_4
– Before going through a roller type car
wash, return the windscreen wiper
stalk to the Park position (refer to
the information on the “Windscreen
wash/wipe” in Section 1). Check the
mounting of external accessories,
additional lights and mirrors, and
ensure that the wiper blades are se-
cured with adhesive tape.
Remove the radio aerial mast if your
vehicle is fitted with this equipment.
Remember to remove the tape and
refit the antenna after washing.
– Spray mechanical components,
hinges, etc. with products approved
by our Technical Department to
protect them after they have been
cleaned.
BODyWORk MAIntenAnCe (2/2)
We have selected special products
to care for your vehicle and you can
obtain these from the manufactur -
er’s accessory outlets.
y ou should
– Observe the vehicle stopping dis -
tances when driving on gravelled
surfaces to prevent paint damage.
– Repair, or have repaired quickly,
areas where the paint has been
damaged, to prevent corrosion
spreading.
– Remember to visit the body shop
periodically if your vehicle has an
anti-corrosion warranty. Refer to the
Maintenance Service Booklet.
– Respect local regulations about
washing vehicles (e.g. do not wash
your vehicle on a public highway). –
Wash your car frequently, with the
engine off , with cleaning products
recommended by our Technical
Department (never use abrasive
products) and be sure to jet-rinse off:
– spots of tree resin and industrial
grime;
– bird droppings , which cause a
chemical reaction with the paint
that rapidly discolours paint -
work and may even cause the
paint to peel off;
Wash the vehicle immediately to
remove these marks since it is im-
possible to remove them by pol -
ishing;
– salt, particularly in the wheel
arches and underneath the body
after driving in areas where the
roads have been gritted;
– mud in the wheel arches and un-
derneath the body which forms
damp patches.
Page 204 of 233

5.30
ENG_UD21017_3
Anomalies de fonctionnement (X45 - H45 - X95 - J95 - R95 - Renault)
ENG_NU_977-2_H45_Ph2_Renault_5
Jaune NoirNoir texte
OPeratIng F aults (2/5)
the starter is activated POssIBle causeswhat tO DO
The instrument panel indicator lights
are weak or fail to light up and the
starter does not turn. Battery terminals not tight,
battery terminals discon
-
nected or oxidised. Retighten or reconnect the terminals, or clean
them if they are oxidised.
Discharged battery or not
operational. Connect another battery to the faulty battery.
Refer to information on “Battery: troubleshooting”
in Section 5 or replace the battery if necessary.
Do not push the vehicle if the steering column is
locked.
The engine will not start. Starting conditions are not
fulfilled.Refer to the information on “Starting/stopping the
engine” in Section 2.
The RENAULT “hands-free”
card does not work. Insert the card in the card reader in order to start
the engine.
Refer to the information on “Starting/stopping the
engine” in Section 2.
The engine cannot be switched off. Card not detected.Insert the card in card reader.
Electronic fault. Press the starter button quickly five times.
The steering column remains locked. Steering wheel locked.Move the steering wheel while pressing the engine
start button (refer to the information on “Starting
the engine” in Section 2).
Page 206 of 233
5.32
ENG_UD21017_3
Anomalies de fonctionnement (X45 - H45 - X95 - J95 - R95 - Renault)
ENG_NU_977-2_H45_Ph2_Renault_5
Jaune NoirNoir texte
OPeratIng F aults (4/5)
On the road POssIBle causeswhat tO DO
Steering becomes heavy. Assistance overheating.Consult an approved dealer.
The engine is overheating. The cool-
ant temperature indicator is in the
warning zone and warning light
® comes on. Engine cooling fan not working.
Stop the vehicle, switch off the engine and
contact an approved dealer.
Coolant leaks. Check the coolant reservoir: it should con-
tain fluid. If there is no coolant, consult an
approved dealer as soon as possible.
radiator: If there is a significant lack of coolant, remember that it must never be topped up using cold coolant while
the engine is very warm. After any procedure on the vehicle which has involved even partial draining of the cooling
system, it must be refilled with a new mixture prepared in the correct proportions. Reminder: only products approved
by our Technical Department may be used for this purpose.