2012 RENAULT ESPACE height
[x] Cancel search: heightPage 47 of 267

steering wheeladjustment ...................................... (up to the end of the DU)
1.41
ENG_UD15381_2
Volant de direction (X81 - Renault)
ENG_NU_932-3_X81ph3_Renault_1
Power-assisted steering
With the engine running, do not leave
the steering wheel at full lock while sta-
tionary as this may damage the power -
assisted steering pump.
Steering wheel
sTeerInG WHeeL/POWer-assIsTed sTeerInG
steering wheel
Height and reach adjustment
Pull lever 1 and place the steering
wheel in the required position; push the
lever to lock the steering wheel in place.
Make sure that the steering wheel is
correctly locked.
For safety reasons, only
adjust the steering wheel
when the vehicle is station-
ary.
1
Never switch off the igni -
tion when travelling down -
hill, and avoid doing so in
normal driving (assistance
is not provided).
With the engine switched off, or if
there is a system fault, it is still pos-
sible to turn the steering wheel. The
force required will be greater.
Page 49 of 267

JauneNoirNoir texte
1.43
ENG_UD24086_2
Poste de conduite à gauche (X81 - J81 - Renault)
ENG_NU_932-3_X81ph3_Renault_1
drIVer’s POsITIOn, LefT-Hand drIVe (continued)
1 Electric controls for:
– windows;
– door mirrors.
2 Side air vent.
3 Heating and ventilation controls.
4 Stalk for:
– direction indicator lights;
– exterior lights;
– front fog lights;
– rear fog lights.
5 Horn.
Location for driver’s air bag.
6 Left-hand upper storage compart -
ment;
location of fuses.
7 Radio remote control.
8 Controls for:
– windscreen and rear screen
wash/wipe;
– trip computer and warning
system information readout.
9 Instrument panel.
10 Centre air vents.
11 Upper centre storage compartment
(split into one or several compart-
ments, depending on the vehicle,
integrating the audio system and
the audio connection sockets).
12 Right-hand upper storage com -
partment.
13 Passenger air bag location.
14 Air vent.
15 Heating and ventilation controls.
16 Side air vent.
17 Passenger glove box.
18 Lower centre storage compart -
ment.
19 Gear lever.
20 RENAULT card reader. 21 Multimedia equipment controls
(depending on the vehicle).
22 Cigar lighter.
23 Engine Start/Stop button.
24 Location for cup holder and/or ash-
tray.
25 Control for adjusting steering
wheel height and reach.
26 Controls for:
– electric beam height adjust -
ment;
– lighting dimmer for control in -
struments;
– Electronic Stability Program
(ESP);
– parking distance control;
– cruise control and speed limiter.
27 Assisted parking brake.
28 Bonnet release control.
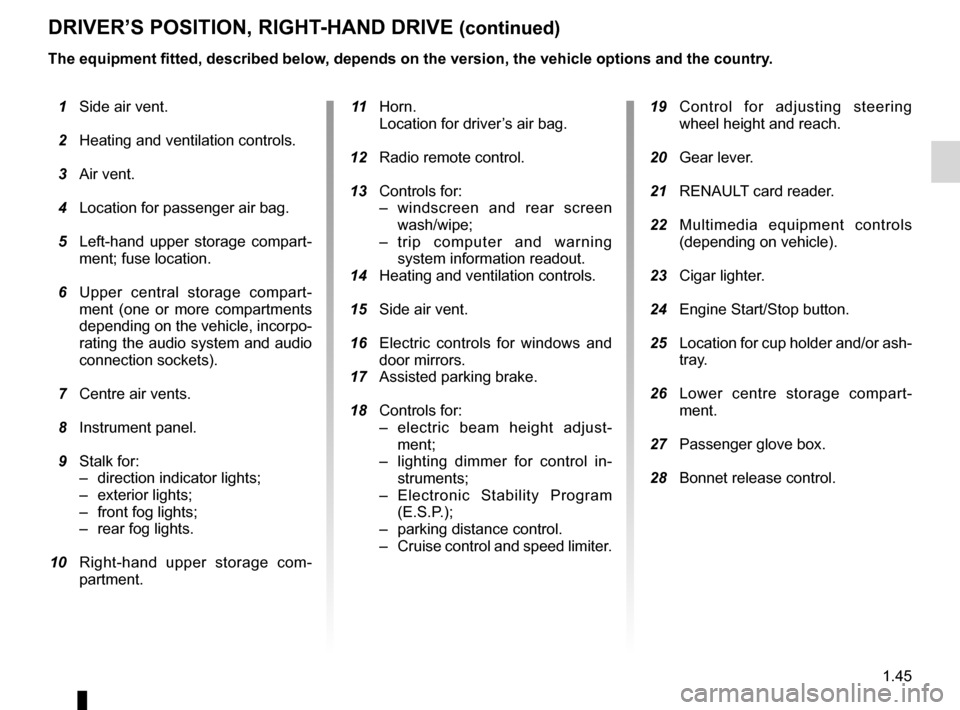
The equipment fitted, described below, depends on the version, the vehicle options and the country.
Page 51 of 267

accessories socket ................................................ (current page)
JauneNoirNoir texte
1.45
ENG_UD24087_2
Poste de conduite à droite (X81 - J81 - Renault)
ENG_NU_932-3_X81ph3_Renault_1
drIVer’s POsITIOn, rIGHT-Hand drIVe (continued)
1 Side air vent.
2 Heating and ventilation controls.
3 Air vent.
4 Location for passenger air bag.
5 Left-hand upper storage compart -
ment; fuse location.
6 Upper central storage compart -
ment (one or more compartments
depending on the vehicle, incorpo -
rating the audio system and audio
connection sockets).
7 Centre air vents.
8 Instrument panel.
9 Stalk for:
– direction indicator lights;
– exterior lights;
– front fog lights;
– rear fog lights.
10 Right-hand upper storage com -
partment.
11 Horn.
Location for driver’s air bag.
12 Radio remote control.
13 Controls for:
– windscreen and rear screen
wash/wipe;
– trip computer and warning
system information readout.
14 Heating and ventilation controls.
15 Side air vent.
16 Electric controls for windows and
door mirrors.
17 Assisted parking brake.
18 Controls for:
– electric beam height adjust -
ment;
– lighting dimmer for control in -
struments;
– Electronic Stability Program
(E.S.P.);
– parking distance control.
– Cruise control and speed limiter. 19 Control for adjusting steering
wheel height and reach.
20 Gear lever.
21 RENAULT card reader.
22 Multimedia equipment controls
(depending on vehicle).
23 Cigar lighter.
24 Engine Start/Stop button.
25 Location for cup holder and/or ash-
tray.
26 Lower centre storage compart -
ment.
27 Passenger glove box.
28 Bonnet release control.
The equipment fitted, described below, depends on the version, the vehicle options and the country.
Page 76 of 267

lights:adjusting ......................................... (up to the end of the DU)
lights adjustment ...................................... (up to the end of the DU)
headlight beam adjustment .................. (up to the end of the DU)
signals and lights .................................. (up to the end of the DU)
1.70
ENG_UD1771_1
Réglage électrique de la hauteur des faisceaux (X81 - Renault)
ENG_NU_932-3_X81ph3_Renault_1
Réglage des projecteurs
eLecTrIc BeaM HeIGHT adJUsTMenT
On equipped vehicles, control A allows
you to adjust the height of the beams
according to the load.
Turn control A downwards to lower the
headlights and upwards to raise them.
Adjustment is automatic on other ver -
sions.
examples of the adjustment position of control A
standard chassis Long chassis
5 seater 7 seater5 seater7 seater
driver alone or with front
passenger 0
000
driver with a front passenger
and passengers in the rear 1
111
driver with a front passenger,
all rear passengers 2
222
driver with a front passenger,
all rear passengers and
luggage 3
333
driver with luggage or load
reaching the maximum
permissible all-up weight 4
444
a
Page 148 of 267

electric windows ................................... (up to the end of the DU)
3.26
ENG_UD11568_2
Lève-vitres électriques (X81 - Renault)
ENG_NU_932-3_X81ph3_Renault_3
Jaune NoirNoir texte
Electric windows
ELECTRIC WINDOWS
With the ignition on
– Press the switch to open the window
to the desired height (note: the rear
windows do not open fully);
– lift the switch for the window con -
cerned to raise it to the desired
height.
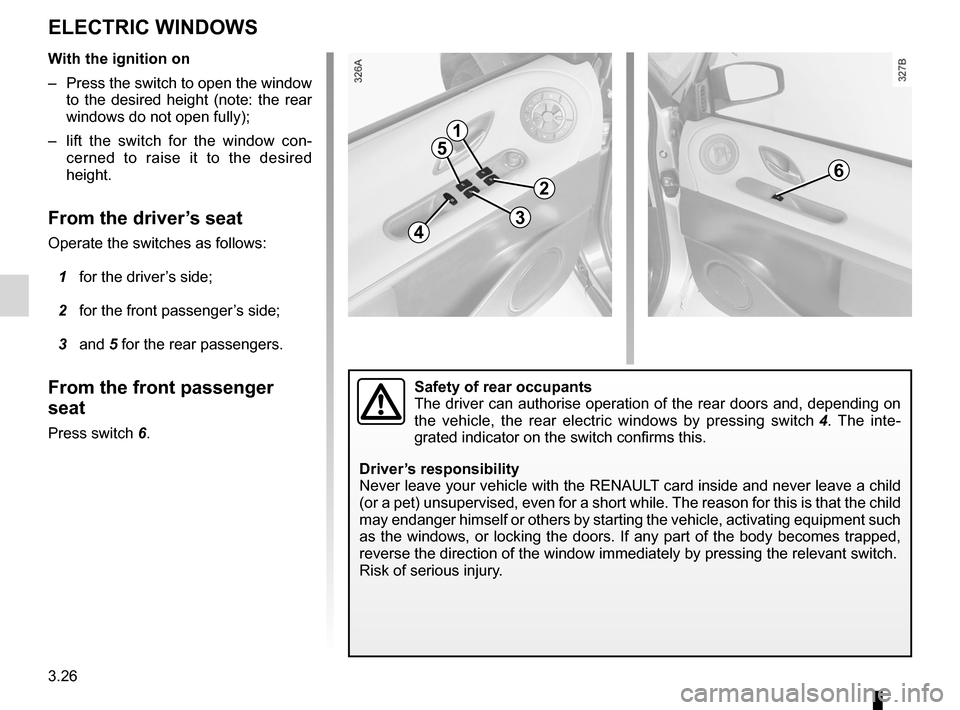
From the driver’s seat
Operate the switches as follows:
1 for the driver’s side;
2 for the front passenger’s side;
3 and 5 for the rear passengers.
From the front passenger
seat
Press switch 6.
1
5
43
2
6
Safety of rear occupants
The driver can authorise operation of the rear doors and, depending on
the vehicle, the rear electric windows by pressing switch 4 . The inte -
grated indicator on the switch confirms this.
Driver’s responsibility
Never leave your vehicle with the RENAULT card inside and never leave a child
(or a pet) unsupervised, even for a short while. The reason for this is that the child
may endanger himself or others by starting the vehicle, activating equipment such
as the windows, or locking the doors. If any part of the body becomes trapped,
reverse the direction of the window immediately by pressing the relevant\
switch.
Risk of serious injury.
Page 151 of 267

JauneNoirNoir texte
3.29
ENG_UD11569_2
Lève-vitres électriques impulsionnels (X81 - Renault)
ENG_NU_932-3_X81ph3_Renault_3
ONE-TOUCH ELECTRIC WINDOWS (continued)
One-touch mode
Briefly press the relevant switch fully:
the window is lowered completely.
Briefly raise the switch concerned
fully: the window is raised completely.
Pressing the switch again while the
window is moving will stop its move -
ment.
Normal mode
Press the switch halfway to lower
the window and release at the desired
height.
Raise the relevant switch halfway to
raise the window and release at the de-
sired height.
Remote control window
closing
(for vehicles fitted with one-touch elec-
tric windows).
When locking the doors, pressing and
holding the RENAULT card's locking
button for more than 2 seconds will
close the windows automatically.
Special note
If the window detects resistance when
closing (e.g. a person’s fingers, an ani-
mal’s paw, the branch of a tree, etc.) it
stops and then lowers again by a few
centimetres.
The system should only be used if the
driver can clearly see that nobody is
inside the vehicle.
Closing windows can cause
serious injury.
Operating faults
If a window cannot be closed or if the
battery is disconnected, the system re-
verts to normal mode: press the switch
concerned as often as necessary to
close the window, then hold the switch
(still on the closure side) for one second
to reinitialise the system. If necessary,
contact an approved Dealer.
Page 164 of 267

rear seats............................................................... (current page)
3.42
ENG_UD20393_1
Sièges arrière : appuis-tête (X81 - J81 - Renault)
ENG_NU_932-3_X81ph3_Renault_3
Rear seats
REAR SEATS: headrests
To refit the headrest
Insert the rods into the sleeves, with the
notches at bottom to the front, and lower
the headrest to the desired height.
Rear headrest storage
position
Press tab 1 on the headrest guide and
lower the headrest completely.
The fully lowered headrest position
is a storage position: it should not be
in this position when a passenger is
seated.
To adjust the height
Slide the headrest slowly while pulling it
towards the front of the vehicle.
The headrest does not lower fully.
To remove the headrest
Press tab 1 on the headrest guide
and lift the headrest. If the headrest is
trapped against the roof of the vehicle,
tilt the seatback.The headrest is a safety
component, check that it
is fitted and in the correct
position. The distance be -
tween your head and the headrest
should be as small as possible. The
top of your head should be in line
with the top of the headrest.
1
Page 165 of 267

child headrest ....................................... (up to the end of the DU)
child safety ............................................ (up to the end of the DU)
children ................................................. (up to the end of the DU)
3.43
ENG_UD20394_1
Appuis-tête convertible enfant (X81 - J81 - Renault)
ENG_NU_932-3_X81ph3_Renault_3
CHILD’S CONVERTIBLE HEADREST
Depending on the vehicle, the child
headrests are fitted to the rear side
seats (for a normal chassis) or the side
seats in the second row of rear seats
(for a long chassis). To adjust the height
Pull the headrest towards you and si
-
multaneously slide it to the recom -
mended height (see Figure A).
The headrest is a safety
component, check that it is
fitted and in the correct po-
sition.
The headrest is approved
only for the vehicle on which
it is originally fitted.
It must not be fitted to an-
other vehicle under any circum -
stances.
To remove the headrest
Press tabs 1 and raise the headrest to
remove it.
To refit the headrest
Insert the headrest rods into the holes,
with the notches to the front, and lower
the headrest to the desired height.
1
A