2012 RENAULT CLIO SPORT TOURER ECU
[x] Cancel search: ECUPage 165 of 264
towing rings .......................................... (up to the end of the DU)
tailgate .................................................. (up to the end of the DU)
3.35
ENG_UD10842_1
Aménagements coffre à bagages (X85 - B85 - C85 - S85 - K85 - Renault)
ENG_NU_853-8_BCSK85_Renault_3
Luggage compartment storage
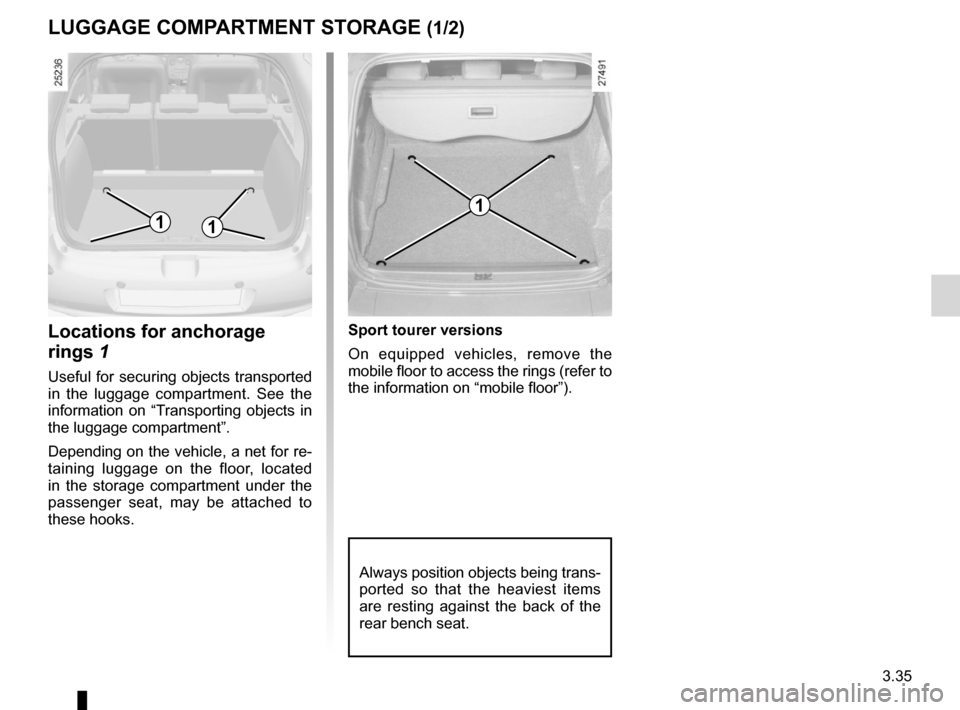
Locations for anchorage
rings 1
Useful for securing objects transported
in the luggage compartment. See the
information on “Transporting objects in
the luggage compartment”.
Depending on the vehicle, a net for re-
taining luggage on the floor, located
in the storage compartment under the
passenger seat, may be attached to
these hooks.
LUGGaGe COMP artMent stOraGe (1/2)
sport tourer versions
On equipped vehicles, remove the
mobile floor to access the rings (refer to
the information on “mobile floor”).
11
1
Always position objects being trans-
ported so that the heaviest items
are resting against the back of the
rear bench seat.
Page 171 of 264
JauneNoirNoir texte
3.41
ENG_UD16851_2
Barres de toit / Becquet (X85 - B85 - C85 - S85 - K85 - Renault)
ENG_NU_853-8_BCSK85_Renault_3
For information on the range of
equipment adapted to your vehi -
cle, we advise you to consult an ap-
proved Dealer.
Refer to the manufacturer’s instruc-
tions for information on how to fit
and use the roof rack bar.
Please keep these instructions with
the rest of the vehicle documenta -
tion.
Maximum permissible load on
roof rack: 80 kg (including the car-
rying device).
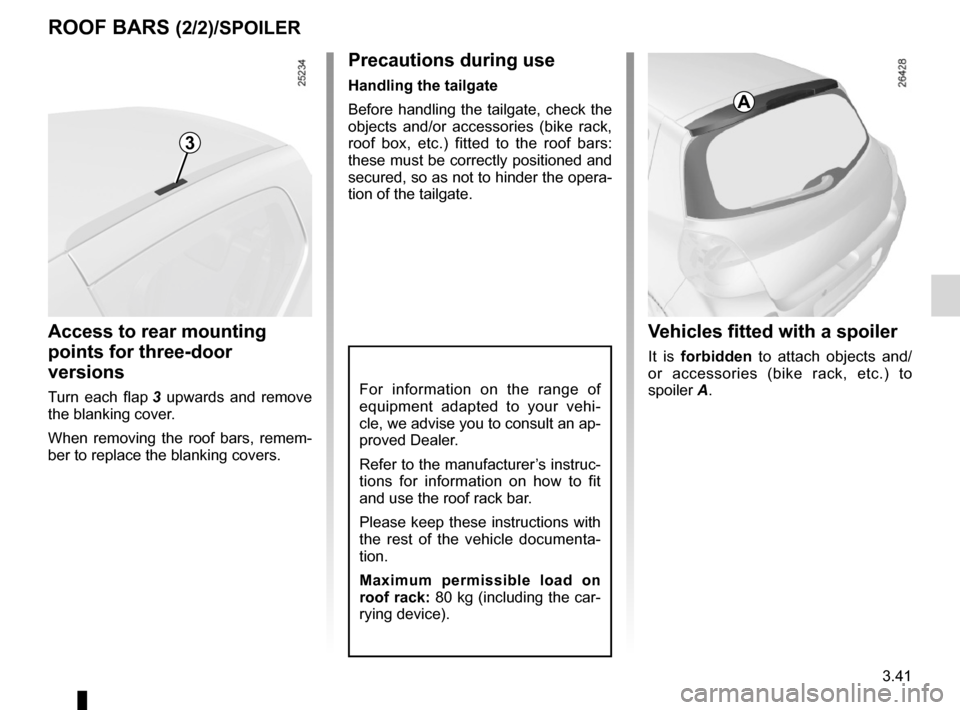
v ehicles fitted with a spoiler
It is forbidden to attach objects and/
or accessories (bike rack, etc.) to
spoiler A.
Precautions during use
Handling the tailgate
Before handling the tailgate, check the
objects and/or accessories (bike rack,
roof box, etc.) fitted to the roof bars:
these must be correctly positioned and
secured, so as not to hinder the opera -
tion of the tailgate.
access to rear mounting
points for three-door
versions
Turn each flap 3 upwards and remove
the blanking cover.
When removing the roof bars, remem-
ber to replace the blanking covers.
rOOF Bars (2/2)/sPOiLer
a
3
Page 179 of 264

ENG_NU_853-8_BCSK85_Renault_4
Engine oil grade
Refer to the Maintenance S")
JauneNoirNoir texte
4.7
ENG_UD24922_4
Niveau huile moteur : appoint, remplissage (X85 - B85 - C85 - S85 - K85\
- Renault)
ENG_NU_853-8_BCSK85_Renault_4
Engine oil grade
Refer to the Maintenance Service
Booklet for your vehicle.
ENGINE OIL LEVEL: topping up/filling (2/2)
Never run the engine in an
enclosed space as exhaust
gases are poisonous.
Engine oil change : if you
are changing the oil when
the engine is hot, be careful
not to scald yourself if the
oil overflows.
Filling: take care when
topping up the oil that
no oil drips onto engine
components - risk of fire.
Remember to refit the cap securely
as there is a risk of fire if oil splashes
onto hot engine components.
When working in the engine
compartment, ensure that
the windscreen wiper stalk
is in the park position.
Risk of injury.
The engine may be hot
when carrying out opera -
tions in close proximity. In
addition, the engine cooling
fan can come on at any moment.
Risk of injury.
Oil changeS e r v i c e i n t e r v a l : r e f e r t o t h e
Maintenance Service Booklet for your
vehicle.
Average capacities for oil change
including oil filter
(for information)
1.2 16V engine : 4.0 litres
1.2 TCE engine: 4.15 litres
1.6 16V engine : 4.7 litres
Engine 1.5 dCi : 4.5 litres
Consult your approved dealer at
once if you notice an abnormal or
repeated drop in any of the fluid
levels.
1
2
Page 186 of 264
 (X44 - X77 - J77 - X85 - \
B90 - X61 - TEST - X77 ph2 - X95 - B95 - D95 - K95 - J95 - R95 - L90 Ph2 - F90 Ph2 - R90\
Ph2 - X62
ENG_NU_8")
4.14
ENG_UD26811_2
Entretien de la carrosserie (peinture mate) (X44 - X77 - J77 - X85 - \
B90 - X61 - TEST - X77 ph2 - X95 - B95 - D95 - K95 - J95 - R95 - L90 Ph2 - F90 Ph2 - R90\
Ph2 - X62
ENG_NU_853-8_BCSK85_Renault_4
Respect local regulations about wash -
ing vehicles (e.g. do not wash your ve-
hicle on a public highway).
Observe the vehicle stopping distances
when driving on gravelled surfaces to
prevent paint damage.
Repair, or have repaired quickly, areas
where the paint has been damaged, to
prevent corrosion spreading.
Remember to visit the body shop pe -
riodically in order to maintain your
anti-corrosion warranty. Refer to the
Maintenance Document.
If it is necessary to clean mechani -
cal components, hinges, etc., spray
them with products approved by our
Technical Department to protect them
after they have been cleaned.
BODyWORK MAINTENANCE (2/2)
We have selected special products
to care for your vehicle and you can
obtain these from the manufactur -
er’s accessory outlets.
Using a roller type car wash
Return the windscreen wiper stalk to
the Park position (refer to the informa-
tion on the “Windscreen washer, wiper”
in Section 1). Check the mounting of
external accessories, additional lights
and mirrors, and ensure that the wiper
blades are secured with adhesive tape.
Remove the radio aerial mast if your
vehicle is fitted with this equipment.
Remember to remove the tape and refit
the antenna after washing.
Cleaning the headlights
As the headlights are made of plastic
“glass”, use a soft cloth or cotton wool
to clean them. If this does not clean
them properly, moisten the cloth with
soapy water, then wipe clean with a soft
damp cloth or cotton wool.
Finally, carefully dry off with a soft dry
cloth.
Cleaning products containing alco -
hol must not be used.
Vehicles with a matte paint
finish
This type of paint requires certain pre-
cautions.
Do not do the following
– use wax-based products (polishing);
– rub hard;
– wash the vehicle in a roller-type car
wash;
– wash the vehicle using a high-pres-
sure device;
– attach stickers to the paintwork (risk
of leaving marks).
y ou should do the following
Wash the vehicle by hand using plenty
of water, using a soft cloth or a gentle
sponge.
Page 193 of 264
JauneNoirNoir texte
5.5
ENG_UD26553_3
Crevaison, roue de secours (X85 - B85 - C85 - S85 - K85 - Renault)
ENG_NU_853-8_BCSK85_Renault_5
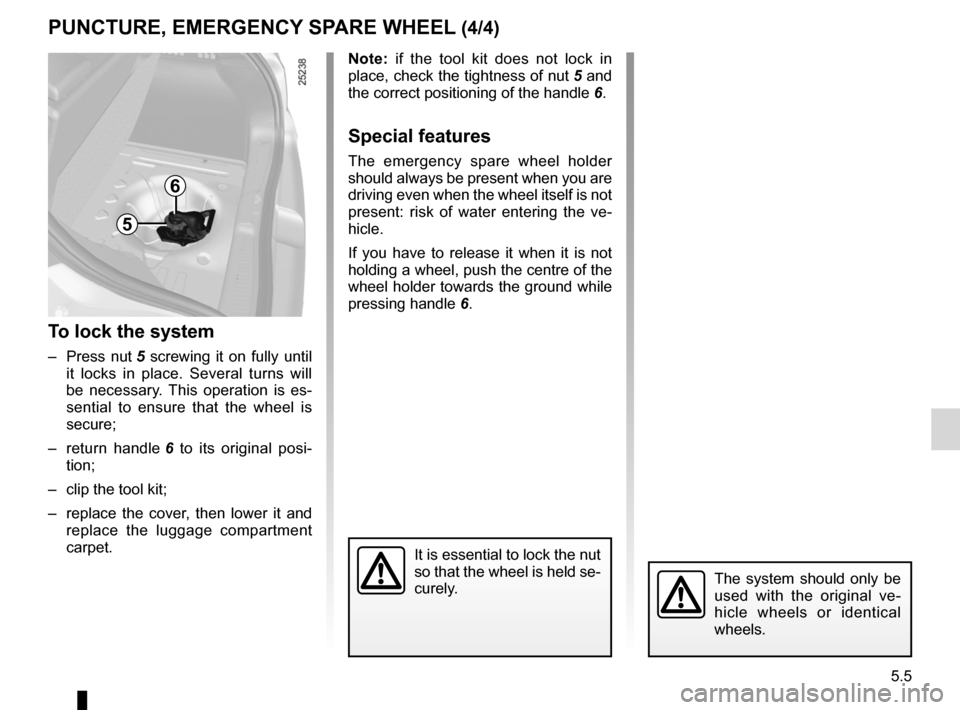
Note: if the tool kit does not lock in
place, check the tightness of nut 5 and
the correct positioning of the handle 6.
Special features
The emergency spare wheel holder
should always be present when you are
driving even when the wheel itself is not
present: risk of water entering the ve -
hicle.
If you have to release it when it is not
holding a wheel, push the centre of the
wheel holder towards the ground while
pressing handle 6.
To lock the system
– Press nut 5 screwing it on fully until
it locks in place. Several turns will
be necessary. This operation is es -
sential to ensure that the wheel is
secure;
– return handle 6 to its original posi -
tion;
– clip the tool kit;
– replace the cover, then lower it and
replace the luggage compartment
carpet.
PUNCTURE, EMERGENCY SPARE WHEEL (4/4)
The system should only be
used with the original ve -
hicle wheels or identical
wheels.
It is essential to lock the nut
so that the wheel is held se-
curely.
6
5
Page 196 of 264

ENG_NU_853-8_BCSK85_Renault_5
TYRE PRESSURE KIT (3/3)
Once the tyre is correctly inflated,
remo")
5.8
ENG_UD26494_1
Kit de gonflage des pneumatiques (X85 - B85 - C85 - S85 - K85 - X98 - R\
enault)
ENG_NU_853-8_BCSK85_Renault_5
TYRE PRESSURE KIT (3/3)
Once the tyre is correctly inflated,
remove the kit: slowly unscrew the in -
flation adapter 2 to prevent any repair
product from escaping and store the
container in plastic packaging to pre -
vent the product from escaping.
– Affix the driving recommendation
label to the dashboard where it can
easily be seen by the driver;
– Put the kit away.
– At the end of this initial inflation op-
eration, air will still escape from the
tyre. You must drive a short distance
in order to seal the hole.
– Start immediately and drive at be -
tween 12 and 40 mph (20 and
60 km/h) in order to distribute the
product evenly in the tyre and, after
driving for 2 miles (3 km), stop and
check the pressure.
– If the pressure is greater than 1.3 bar
but less than the recommended
pressure (refer to the label affixed to
the edge of the driver’s door), read-
just it. Otherwise, please contact an
authorised dealer: the tyre cannot be
repaired.Precautions when using the
kit
The kit should not be operated for more
than 15 consecutive minutes.
Nothing should be placed
around the driver ’s feet
as such objects may slide
under the pedals during
sudden braking manoeuvres and
obstruct their use.
2
Please be aware that a
poorly tightened or miss -
ing valve cap can make the
tyres less airtight and may
lead to pressure loss.
Always use valve caps identical to
those fitted originally and tighten
them fully.
Following repair with the kit,
do not travel further than
120 miles (200 km). In addi -
tion, reduce your speed and
under no circumstances exceed
48 mph (80 km/h). The sticker,
which you must affix in a prominent
position on the dashboard, reminds
you of this.
Depending on the country or local
legislation, a tyre repaired with the
inflation kit may need to be replaced.
Page 197 of 264
tool kit ................................................... (up to the end of the DU)
hubcap tool ........................................... (up to the end of the DU)
jack ....................................................... (up to the end of the DU)
wheelbrace ........................................... (up to the end of the DU)
towing hitch ........................................... (up to the end of the DU)
wheelbrace ........................................... (up to the end of the DU)
puncture ................................................ (up to the end of the DU)
5.9
ENG_UD27474_4
Bloc-outils (X85 - B85 - C85 - S85 - K85 - Renault)
ENG_NU_853-8_BCSK85_Renault_5
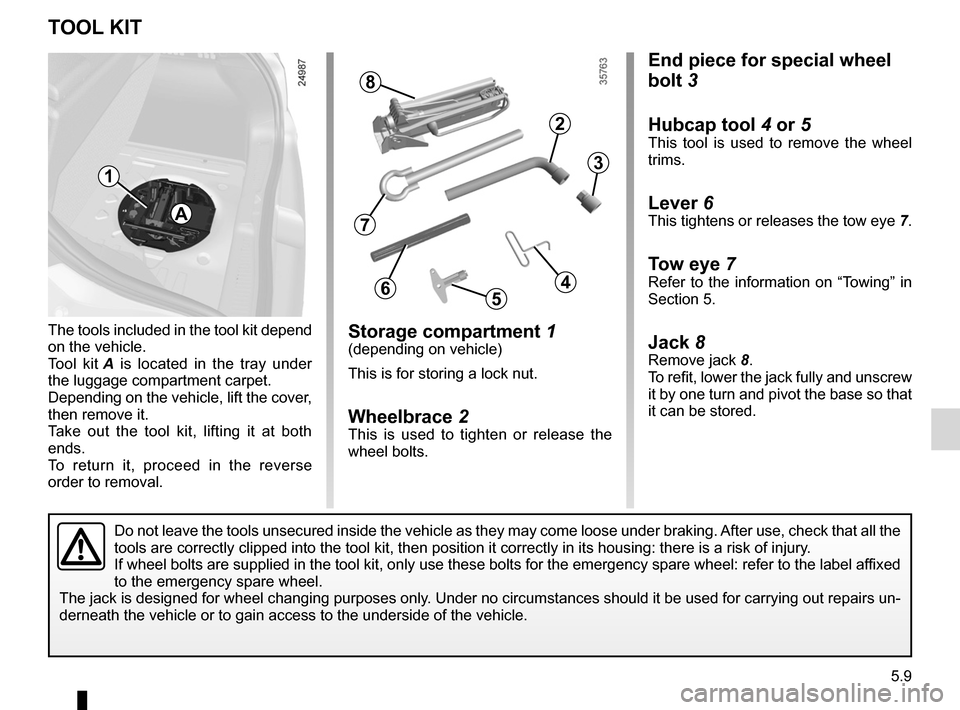
Storage compartment 1(depending on vehicle)
This is for storing a lock nut.
Wheelbrace 2This is used to tighten or release the
wheel bolts.
The tools included in the tool kit depend
on the vehicle.
Tool kit
A is located in the tray under
the luggage compartment carpet.
Depending on the vehicle, lift the cover,
then remove it.
Take out the tool kit, lifting it at both
ends.
To return it, proceed in the reverse
order to removal.
TOOL KIT
Tool kit
1
A
Do not leave the tools unsecured inside the vehicle as they may come loose under braking. After use, check that all the
tools are correctly clipped into the tool kit, then position it correctl\
y in its housing: there is a risk of injury.
If wheel bolts are supplied in the tool kit, only use these bolts for the emergency spare wheel: refer to the label affixed
to the emergency spare wheel.
The jack is designed for wheel changing purposes only. Under no circumstances should it be used for carrying out repairs un-
derneath the vehicle or to gain access to the underside of the vehicle.
8
2
3
456
7
End piece for special wheel
bolt 3
Hubcap tool 4 or 5
This tool is used to remove the wheel
trims.
Lever 6This tightens or releases the tow eye 7.
Tow eye 7Refer to the information on “Towing” in
Section 5.
Jack 8Remove jack 8.
To refit, lower the jack fully and unscrew
it by one turn and pivot the base so that
it can be stored.
Page 206 of 264

ENG_NU_853-8_BCSK85_Renault_5
Additional cornering light
Due to their")
5.18
ENG_UD14672_3
Projecteurs avant avec lampes halogènes : remplacement des lampes (X\
85 - B85 - C85 - S85 - K85 - Renault)
ENG_NU_853-8_BCSK85_Renault_5
Additional cornering light
Due to their reduced accessibility
(sometimes requiring the removal of
bodywork or mechanical components),
we advise you to have your bulbs 7 re-
placed by an approved Dealer.
Bulb type: H7.
Front side light
Remove cover E, then pull bulb holder 6
to access the bulb.
Bulb type: W5W.
Direction indicator lights
Turn bulb holder F a quarter of a turn
and take out the bulb.
Bulb type: orange PY21 W.
Once the bulb has been replaced,
check that it is properly secured.
The bulbs are under pres -
sure and can break when
replaced.
Risk of injury.
HALOGEN HEADLIGHTS: changing bulbs (3/3)
The engine may be hot
when carrying out opera-
tions in close proximity. In
addition, the engine cooling
fan can come on at any moment.
Risk of injury.
To comply with local legislation, or
as a precaution, you can obtain an
emergency kit containing a set of
spare bulbs and fuses from an ap -
proved dealer.
E
6
F
7