2012 Peugeot 508 RXH roof
[x] Cancel search: roofPage 4 of 304

.
.
Contents
Instrument panel 45
Indicator and warning lamps 46
Gauges and indicators 57
Tr ip computer 62
Setting the date and time 65
Instruments and controlsFamiliarisation
Remote control key 66
Alarm 76
Electric windows 78
Boot 80
Motorised tailgate 81
Panoramic sunroof 84
Fuel tank 85
Diesel misfuel prevention 86
Access
Front seats 88
Rear seats 92
Mirrors 94
Steering wheel adjustment 96
Interior fi ttings 97
Boot fi ttings 100
Heating and Ventilation 106
Dual-zone digital air conditioning 108
Quad-zone digital air conditioning 111
Rear screen demist - defrost 116
Programmable Heating / Ventilation 117
Comfort
Electric parking brake 119
6-speed electronic gearbox 126
Hill star t assist 130
Head-up display 131
Speed limiter 134
Cruise control 136
Parking sensors 138
Parking space sensors 140
Driving
Lighting controls 142
LED lamps 145
Automatic illumination of headlamps 147
Headlamp adjustment 150
Directional lighting 151
Wiper controls 152
Automatic rain sensitive wipers 154
Cour tesy lamps 156
Interior mood lighting 157
Visibility Hybrid system
Presentation 22
Starting / switching off 25
Ready lamp 29
HYbrid4 mode selector 29
Energy consumption / generation indicator 32
Display of hybrid power fl ow 33
Eco off 36
Eco-driving 37
Consumption 39
High voltage battery 40
Vehicle recovery 44
Page 5 of 304

.
.
Contents
Child seats 158
ISOFIX child seats 164
Child lock 167
Child safety
Direction indicators 168
Emergency or assistance call 169
Horn 169
ESP system 170
Seat belts 173
Airbags 176
Safety
Te m p o r a ry puncture repair kit 180
Changing a wheel 186
Changing a bulb 191
Changing a fuse 198
12 V battery 202
Energy economy mode 205
Changing a wiper blade 206
Recovering the vehicle 207
Vehicle recovery 209
To w i ng a trailer 210
Fitting roof bars 212
Accessories 213
Practical information
Opening the bonnet 216
Running out of fuel (Diesel) 217
Diesel engine 218
Checking levels 219
Checks 222
Checks
Electric motor 225
Diesel engine 226
Diesel weights 227
Dimensions 228
Identifi cation markings 229
Technical data
Emergency or assistance 231
JBL equipment 233
Peugeot Connect Navigation (RT6) 235
Audio equipment and telematics
Alphabetical index
Visual search
Page 7 of 304

.
5
Familiarisation
For economical driving, caring for the environment
The fuel consumptionof a vehicle varies greatly:
- according to the driver's style of driving
(moderate, aggressive, fast, ...),
- according to the type of journeys
made (urban, main road, motorway, flowing, heavy traffic, …) and the speed.
Main recommendations for driving economically
Hybrid mode selector
To optimise fuel consumption, use the Automodeof the selector whenever possible (the mode is activated
automatically when starting) including for urban journeys.
This mode optimises the use of the energy sources (internal combustion engine and/or electric) contrary to other modes, which are for use in par ticular cases.
Gear lever
Use the automatic
mode A
as much as possible as this optimises gear changes to suit the requirements.
Drive smoothly
Stay in the "eco" zone
displayed in the energy consumption / generation indicator: accelerate gently, drive atsteady speeds using the speed limiter or cruise control as soon as possible. Use the "charge" zone: anticipate the need to slow down by taking your foot off the accelerator rather than
braking. The movement of the energy consumption / generation indicator needle (into the "charge" zone), shows
the level of energy recovery.
Consumption history
See the impact of your style of driving and the type of journey by reviewing the history of your energyconsumption. Refer to the "Multifunction screens" section.
Causes of high consumption and checks
As with any vehicle, limit overloading, wind resistance (windows open above 30 mph (50 km/h), roof rack, loaded
or not, …), the use of power consumers (air conditioning, heated seats, heated rear screen, …).
Obser ve the recommendations on checks (regular check of tyre pressures, correct tyre pressures, …) and routine servicing.
Page 39 of 304

.
37
Hybrid system
Eco-driving
Eco-driving is a range of everyday practices that allow the motorist to optimise their fuel consumption and CO2 emissions.
Optimise the use of your
gearbox
Use automated mode Aas much as possible as this optimises gear changes to suit the
circumstances.
Drive smoothly
Maintain a safe distance between vehicles, use engine braking rather than the brake pedal, and press the accelerator progressively. These practices contribute towards a reduction in fuel consumption and CO2 emissions and also helps reduce thebackground traffic noise.
If your vehicle has cruise control, make use of the system at speeds above 25 mph (40 km/h) when the traffic is flowing well.
Control the use of your
electrical equipment
Before moving off, if the passenger compartment is too warm, ventilate it byopening the windows and air vents before using the air conditioning.
Above 30 mph (50 km/h), close the windowsand leave the air vents open. Remember to make use of equipment that canhelp keep the temperature in the passenger compartment down (sun roof and window blinds...).Switch off the air conditioning, unless it has automatic digital regulation, as soon as the desired temperature is attained.Switch off the demisting and defrosting controls, if not automatic.
Switch off the heated seat as soon as possible.
Switch off the headlamps and front foglampswhen the level of light does not require their use.
Avoid running the Diesel engine when stationary, par ticularly in winter; your vehiclewill warm up much faster while driving.
As a passenger, if you avoid connecting your multimedia devices (film, music, video game...), you will contribute towards limitingthe consumption of electrical energy, and soof fuel.
Disconnect your por table devices beforeleaving the vehicle.
Page 40 of 304

38
Hybrid system
Limit the causes of excess
consumption
Spread loads throughout the vehicle; placethe heaviest items in the bottom of the boot,as close as possible to the rear seats.Limit the loads carried in the vehicle andreduce wind resistance (roof bars, roof rack,bicycle carrier, trailer...). Use a roof box in preference.Remove roof bars and roof racks after use.
At the end of winter, remove snow tyres and refit your summer tyres.
Observe the recommendations
on maintenance
Check the tyre pressures regularly, when cold, referring to the label in the door aper ture, driver's side. Carry out this check in par ticular:
- before a long journey,
- at each change of season,
- after a long period out of use.
Have your vehicle ser viced regularly (engine oil, oil filter, air filter...) and obser ve the schedule of operations recommended by the
manufacturer.
When refuelling, do not continue after the3 rd
cut-off of the nozzle to avoid any overflow.
At the wheel of your new vehicle, it is onlyafter the first 1 800 miles (3 000 kilometres) that you will see the fuel consumption settle down to a consistent average.
Page 72 of 304

70
Access
As a safety measure (children on board),never leave the vehicle without taking your key, even for a shor t period. Guard against theft when the electronic key is in the defined zone with the vehicle unlocked.
Locking is confirmed by fixedlighting of the direction indicators for approximately two seconds.
According to version, the door mirrors fold at the same time.
It is not possible to lock the vehicle if an electronic key is left inside the vehicleor if the ignition is on.
If one of the doors or the boot is stillopen or if an electronic key has been left inside the vehicle, the central
locking does not take place.
When the vehicle is locked, if it isunlocked inadver tently, it will relock automatically after about thir ty seconds unless a door is opened.
The folding and unfolding of the door mirrors by the remote control can be deactivated by a PEUGEOT dealer.
Locking the vehicle
Normal lockin
g
Using the key
�)Turn the key towards the rear of the vehicle
to lock the vehicle completely.
Using the remote control
�)Press the closed padlock to lockthe vehicle completely.
Using the electronic key
�)
With the electronic key in the defined zone,
press with a finger on the door handle (at
the markings) to lock the vehicle. �) From the boot, with the electronic key in
the defined zone, press a button to lock the
vehicle.
Maintaining the locking action (remotecontrol or manual key) automaticallycloses the windows and sunroof.
Page 86 of 304

84
Access
Panoramic sunroof
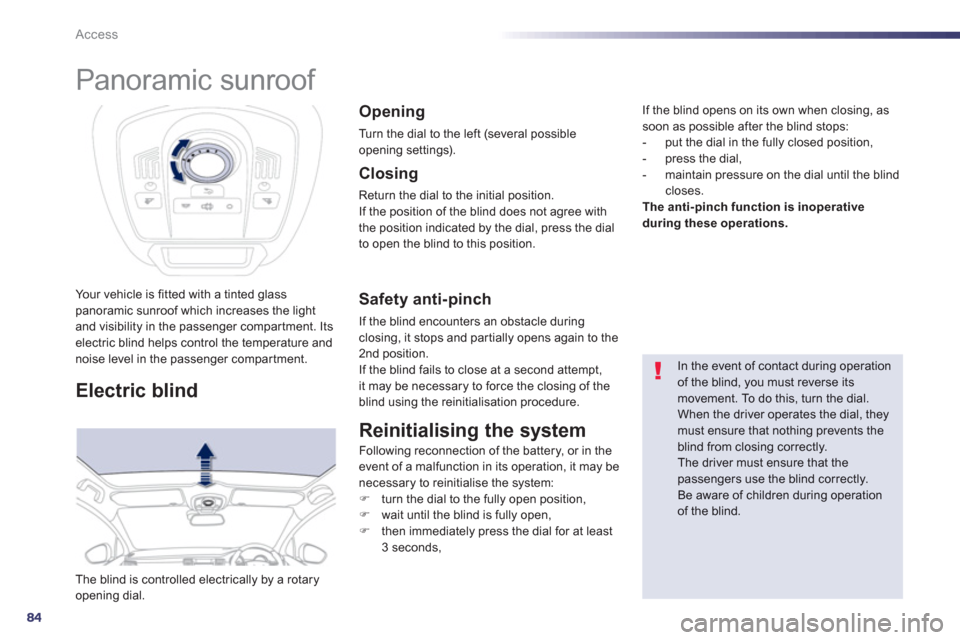
Your vehicle is fitted with a tinted glass panoramic sunroof which increases the lightand visibility in the passenger compartment. Itselectric blind helps control the temperature andnoise level in the passenger compartment.
Electric blind
The blind is controlled electrically by a rotaryopening dial.
Opening
Turn the dial to the left (several possible
opening settings).
In the event of contact during operationof the blind, you must reverse its movement. To do this, turn the dial.
When the driver operates the dial, theymust ensure that nothing prevents theblind from closing correctly. The driver must ensure that the passengers use the blind correctly.
Be aware of children during operationof the blind.
Closing
Return the dial to the initial position.
If the position of the blind does not agree with
t
he position indicated by the dial, press the dialto open the blind to this position.
Safety anti-pinch
If the blind encounters an obstacle duringclosing, it stops and par tially opens again to the 2nd position.
If the blind fails to close at a second attempt,
it may be necessary to force the closing of the blind using the reinitialisation procedure.
Reinitialising the system
Following reconnection of the battery, or in the event of a malfunction in its operation, it may be
necessary to reinitialise the system:
�) turn the dial to the fully open position, �)
wait until the blind is fully open,�)
then immediately press the dial for at least
3 seconds,
If the blind opens on its own when closing, as soon as possible after the blind stops:
- put the dial in the fully closed position,
- press the dial,
- ma
intain pressure on the dial until the blindcloses. The anti-pinch function is inoperative
during these operations.
Page 106 of 304

104
Comfort
High load retaining net
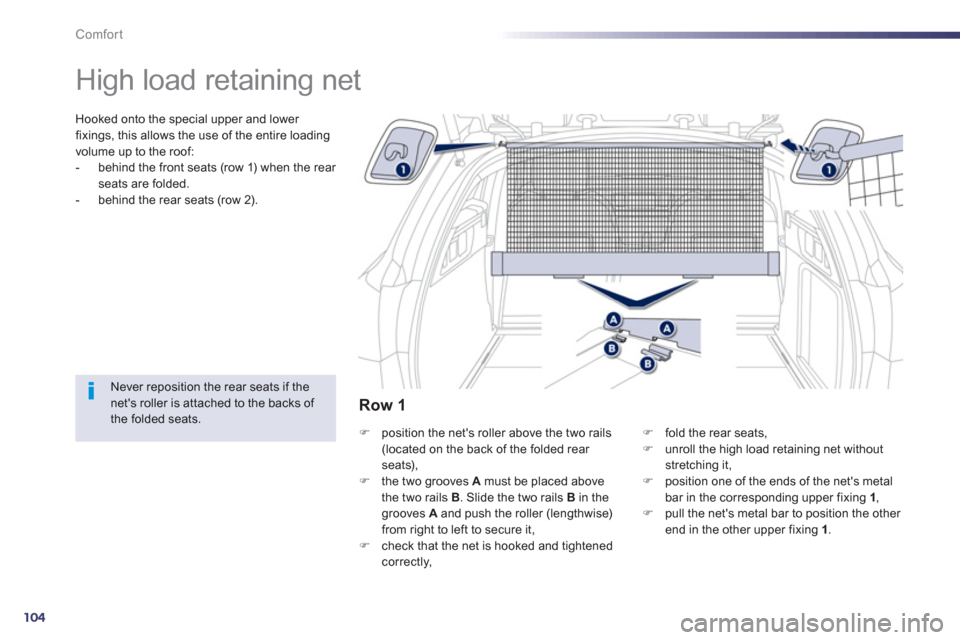
Hooked onto the special upper and lower
fixings, this allows the use of the entire loadingvolume up to the roof:
- behind the front seats (row 1) when the rear seats are folded.
- behind the rear seats (row 2).
Never reposition the rear seats if thenet's roller is attached to the backs of the folded seats. �)
position the net's roller above the two rails (located on the back of the folded rear seats),�)
the two grooves Amust be placed above
the two rails B
. Slide the two rails B
in the grooves A
and push the roller (lengthwise)from right to left to secure it,
�)
check that the net is hooked and tightened correctly,
�)fold the rear seats, �)unroll the high load retaining net withoutstretching it, �)position one of the ends of the net's metal
bar in the corresponding upper fixing 1,�)pull the net's metal bar to position the other end in the other upper fixing 1 .
Row 1