2012 PEUGEOT 107 parking brake
[x] Cancel search: parking brakePage 4 of 140

.
.
Contents
Horn 48
Hazard warning lamps 48
Parking brake 48
Emergency braking assistance 49
ABS, EBFD, CSC systems 49
ASR and ESP systems 50
Seat belts 51
Airbags 54
Safety
Rev counter 19
Instrument panel 19
Warning lamps 20
Distance recorder 23
Indicators 23
Setting the time 25
Instruments and controlsFamiliarisation
Keys / Remote control 26
Doors 28
Electric windows 28
Rear windows 29
Boot 29
Fuel tank 30
Access
Ventilation 33
Heating 34
Air conditioning 35
Mirrors 37
Steering wheel adjustment 37
Front seats 38
Rear seats 39
Comfort Eco-driving
Interior fi ttings 40
Boot fi ttings 41
Fittings
2 Tronic gearbox 42
Driving
Lighting control stalk 44
LED daytime running lamps 45
Headlamp adjustment 46
Courtesy lamp 46
Windscreen wiper stalk 47
Visibility
Page 10 of 140

Familiarisation
8
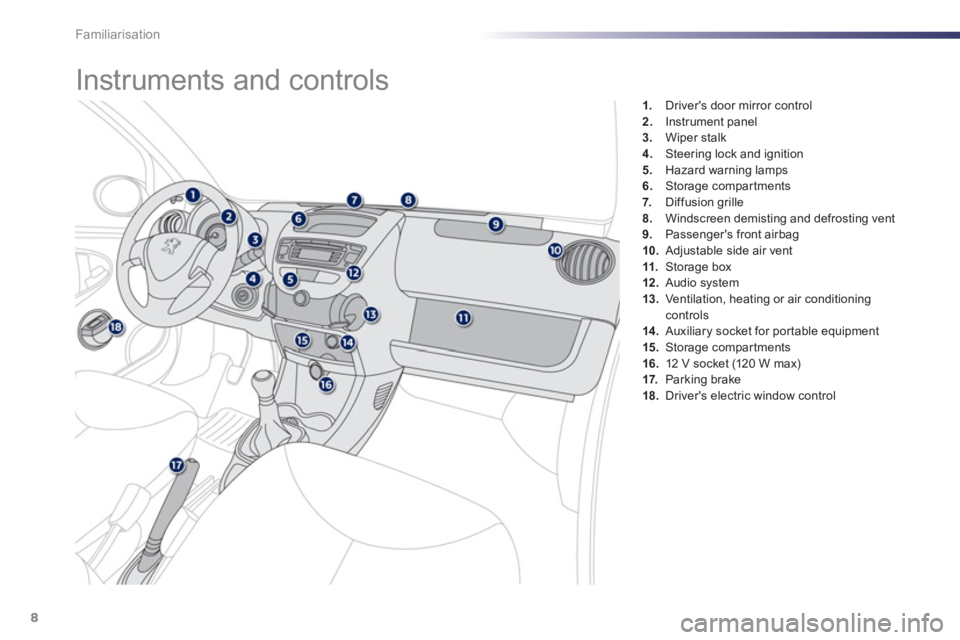
1. Driver's door mirror control 2.Instrument panel3.Wiper stalk 4.
Steering lock and ignition
5. Hazard warning lamps
6.Storage compar tments 7. Diffusion grille 8.Windscreen demisting and defrosting vent
9.
Passenger's front airbag10.Adjustable side air vent 11.
Storage box 12.
Audio system 13.Ventilation, heating or air conditioning controls14 .Auxiliary socket for por table equipment15.Storage compar tments 16.
12 V socket (120 W max)17.Parking brake18.Driver's electric window control
Instruments and controls
Page 18 of 140

Moving off
With the parking brake applied, press the brakepedal then select position N to star t the engine.
With your foot on the brake, select position R , Eor M.Release the parking brake, take your foot off
the brake
pedal, then accelerate. Select position
Eusing the gear lever.
The gear engaged is displayed in the
instrument panel screen.
The gearbox continuously selects the most
suitable gear.
Manual mode
Press the clutch pedal fully when changinggear.
Reverse
To engage reverse gear, push the gear lever fully to the right then towards the rear. Reverse gear can only be engaged when the vehicle is stationary, engine at idle.
Driving safely
EASY mode (automatic mode)Manual gearbox
43
43
42
Place the gear lever in position M
, then changeup or down through the gears by pressing the lever:
- rearwards, "+"to change up,
- forwards, "-"to change down.
You can also use the steering mounted control
paddles.
The gear engaged is displayed in the instrument panel screen.
Familiarisation
16
Page 22 of 140

Instruments and controls
20
Warning lamps
Warning lampis onCauseAction/Observations
Parking brake
fixed. The parking brake is applied or not properly released. With
your foot on the brake pedal, release the parking brake
to switch off the warning lamp.
Observe the safety recommendations.
For more information, refer to the "Parkin
g brake" section.
STOP
fixed, associated
with another warning lamp.It is associated with the en
gine
oil pressure or the engine coolant temperature. Stop as soon as it is safe to do so.
Park, switch off the ignition and call a PEUGEOT dealer or qualified workshop.
Engine oilpressure
fixed, associated
with the STOP warning lamp.The en
gine oilpressure is too low.
Stop as soon it is safe to do so.
Park, switch off the ignition and contact a PEUGEOT dealer or a qualified workshop.
Braking
fixed. The braking system fluid level has dropped significantly. Top up with brake
fluid recommended by PEUGEOT.
If the problem persists, have the system checked by a
PEUGEOT dealer or a qualified workshop.
+
fixed, associated
with the ABSwarning lamp.The braking systemhas a fault. Stop as soon as it is safe to do so. Park, switch off the ignition
and contact a PEUGEOT dealer or a qualified workshop.
Page 44 of 140

42Driving
The position of the gear lever ( R
, N
, Eor M )
and the gear engaged (1 to 5 ) are displayed in
the instrument panel screen.
2 Tronic gearbox
Reverse "R". This gear will beengaged when stationary or at a
speed below approximately 4 mph (6 km/h).
Engagement of reverse gear is accompanied
by an audible signal.
Moving off
With the parking brake applied, press the brakepedal then select position Nto star t the engine.
With your foot on the brake, select position R , Eor M.
Release the parking brake, take your foot off
the brake
pedal, then accelerate. The
five-speed 2 Tronic gearbox gearbox offersa choice between the ease of automated
operation
or the driving pleasure of manual
gear changing.
You can chan
ge from position Eto position Mand vice versa at any time.
Gear lever positions
Select the driving mode by moving the gear
lever.
N eutral "N".
Position the lever to the right inposition N, to star t the engine.
E
asy "E": automatic gear changing.
M
anual (+ / -) "M": manual gear changing.
Steering mounted control
paddles
Press behind the +steering mounted control
paddle to change up.
Press behind the -steering mounted control
paddle to change down.
With the engine running, in these three positions, an audible signal is heard when the driver's door is opened.
Display in the instrument panel
Page 45 of 140

5
43 Driving
EASY mode (automatic
mode)
Select position E
using the gear lever.
The gear engaged is displayed in the
instrument panel screen.
The gearbox continuously selects the mostsuitable gear.
Manual mode
Place the gear lever in position M, then changeup or down using:
- the gear lever, pushing:
- rearwards, "+"to change up,
- forwards, "-"to change down.
- or the steering mounted controls paddles.
The gear engaged is displayed on the
instrument panel screen.
If the engine speed is too low, the gearbox automatically changes down to prevent stalling.
In the event of overheating of the clutch, position N is selected automatically and the
symbol N flashes accompanied by an audible
signal.
Operating fault
Stoppin
g the engine
Before switching off the engine, you can change to position Nto be in neutral.
In all cases, it is essential that you apply the
parking brake to immobilise the vehicle.
With the i
gnition on, illumination
of this warning lamp indicates a gearbox fault.
Contact a PEUGEOT dealer or a qualified
workshop.
Stopping - Moving off on a
slo
pe
The gearbox is an electronically controlledmanual gearbox without a clutch pedal.
To hold the vehicle on a slope, it is necessary
to use the brake pedal or the parkin
g brake and not the accelerator pedal.
When moving off on a slope, accelerateprogressively while releasing the parking brake.
Always press the brake pedal while starting the engine.
Never select neutral N
while the vehicle is moving.In all cases, it is essential to apply the parking brake to immobilise the vehicle.
On a slope, use the brake to immobilisethe vehicle and place the gear lever in position N , E
or R.
Do not keep the vehicle immobilisedusing the accelerator.
If you press the accelerator pedal beyond the point of resistance, the2 Tronic gearbox gearbox changes
down for sharper acceleration.
Te m p o r a r i ly taking control of gear changes
You can temporarily take control of gear changes using the "+"and "-"
steering
mounted controls; if the engine speed allows,
the
gear change command is acted on.
This function allows you to anticipate cer tain
situations such as over taking a vehicle or approaching a corner.
After a few moments with no action on thecontrols, the gearbox returns to automaticcontrol of the gears.
Page 47 of 140

6
45 Visibility
LED daytime running lamps *
On star ting the vehicle, the LED daytime running lamps come on automatically, if the lighting stalk is in the
OFFposition.
If the sidelamps and headlamps are switched on manuall
y or automatically, the LED lamps switch off.
Deactivation/activation
Vehicles fi tted with front
foglamps and a rear foglamp (ring C)
Turn the ring C
:�)forwards a 1 st
time to switch on the front
foglamps, �)forwards a 2nd time to switch on the rear foglamp, �)rearwards a 1 sttime to switch off the rear foglamp, �)rearwards a 2nd
time to switch of the frontfoglamps.
Direction indicators
Left:
stalk downwards. Right:
stalk upwards.
The front foglamps only operate if thesidelamps or dipped beam / main beamheadlamps are on. The rear foglamp only operates if the front foglamps are on.
In countries where exterior lighting by day is nota legal requirement, it is possible to deactivate
the function in the following way.
- Engine stopped, lighting off and parking brake applied, switch on the ignition (key in
the Running position (2nd notch)).
- Within a period of 5 seconds, turn the
lighting control stalk ring Afrom the OFF
position to the Sidelamps
position thenreturn to the OFF
position three times.
An audible signal con
firms the deactivation of
the daytime running lamps.
*
LED: li
ght-emitting diodes.
In countries where daytime running lamps are required by law, this "Daytimerunning lamps" function is alwaysactivated by default and must not dedeactivated.
To reactivate the daytime running lamps, repeat this procedure. An audible signal confirms the
reactivation of the daytime running lamps.
Page 50 of 140

48Safety
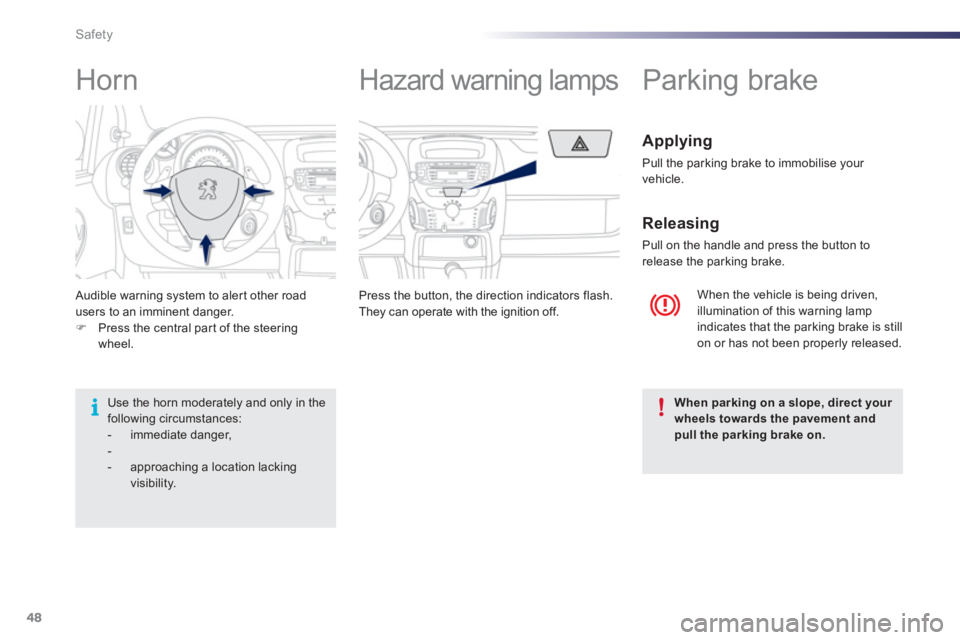
Audible warning system to aler t other road
users to an imminent danger.�)Press the central part of the steering
wheel. Press the button
, the direction indicators flash.
They can operate with the ignition off.
When the vehicle is being driven,illumination of this warning lamp indicates that the parking brake is still
on or has not been properly released.
Parking brake
Applying
Pull the parking brake to immobilise your
vehicle.
Releasing
Pull on the handle and press the button to
release the parking brake.
Horn
Hazard warning lamps
When parking on a slope, direct your wheels towards the pavement and
pull the parking brake on.
Use the horn moderately and only in thefollowing circumstances:
- immediate danger, -
- approaching a location lacking visibility.