Page 106 of 341
To defrost the rear window glass and outside
mirrors (if so equipped) , start the engine and
push the rear window defroster switch on. The
rear window defroster indicator light comes on.
Push the switch again to turn the defroster off.
The rear window defroster automatically turns off
after approximately 15 minutes.
CAUTION
When cleaning the inner side of the rear
window, be careful not to scratch or dam-
age the rear window defroster.
HEADLIGHT CONTROL SWITCH
Lighting
�1When turning the switch to theposi-
tion, the front parking, tail, license plate and
instrument panel lights come on.
�2When turning the switch to theposi-
tion, the headlights come on and all the other
lights remain on.
Type A
LIC0783
Type B
LIC1419
Type A
LIC0706
REAR WINDOW AND OUTSIDE
MIRROR (if so equipped)
DEFROSTER SWITCH HEADLIGHT AND TURN SIGNAL
SWITCH
Instruments and controls2-27
Page 130 of 341

3 Pre-driving checks and adjustments
Keys .............................................3-2NISSAN Vehicle Immobilizer System keys .........3-2
Doors ............................................3-3
Locking with key ................................3-3
Locking with inside lock knob ....................3-3
Locking with power door lock switch .............3-4
Automatic door locks ...........................3-4
Child safety rear door lock .......................3-5
Remote keyless entry system .......................3-5
How to use remote keyless entry system ..........3-6
Hood ............................................3-9
Lift gate ..........................................3-9 Fuel-filler door
................................... 3-10
Opening the fuel-filler lid .......................3-10
Fuel-filler cap . . ............................... 3-10
Steering wheel ................................... 3-12
Tilt operation .................................. 3-12
Sun visors ....................................... 3-12
Vanity mirrors (if so equipped) ...................3-13
Mirrors .......................................... 3-13
Rearview mirror (if so equipped) .................3-13
Automatic anti-glare rearview mirror
(if so equipped) ............................... 3-14
Outside mirrors ............................... 3-14
Page 142 of 341
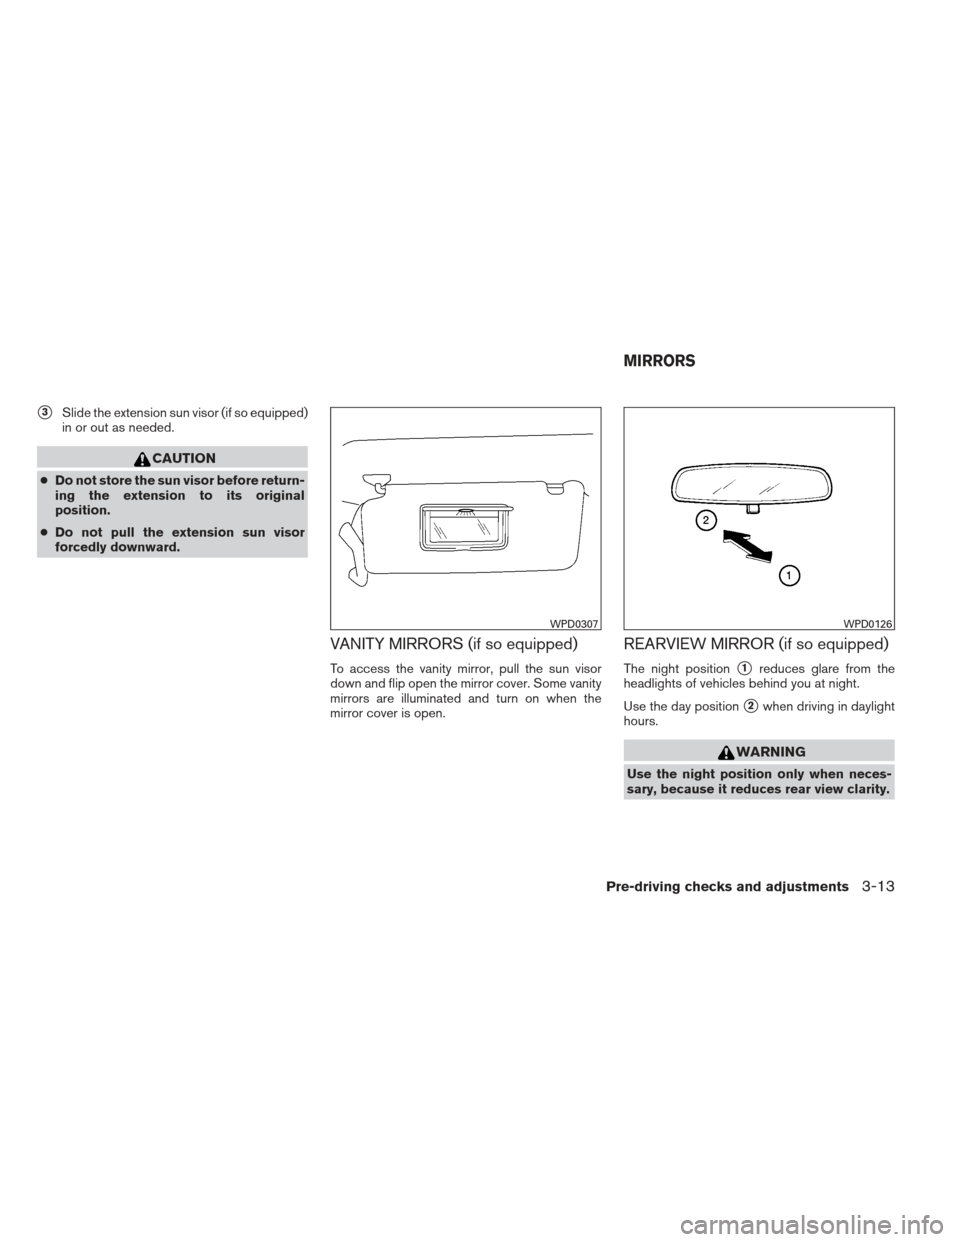
�3Slide the extension sun visor (if so equipped)
in or out as needed.
CAUTION
● Do not store the sun visor before return-
ing the extension to its original
position.
● Do not pull the extension sun visor
forcedly downward.
VANITY MIRRORS (if so equipped)
To access the vanity mirror, pull the sun visor
down and flip open the mirror cover. Some vanity
mirrors are illuminated and turn on when the
mirror cover is open.
REARVIEW MIRROR (if so equipped)
The night position�1reduces glare from the
headlights of vehicles behind you at night.
Use the day position
�2when driving in daylight
hours.
WARNING
Use the night position only when neces-
sary, because it reduces rear view clarity.
WPD0307WPD0126
MIRRORS
Pre-driving checks and adjustments3-13
Page 143 of 341

The inside mirror is designed so that it automati-
cally dims according to the intensity of the head-
lights of the vehicle following you. The aut")
AUTOMATIC ANTI-GLARE
REARVIEW MIRROR (if so equipped)
The inside mirror is designed so that it automati-
cally dims according to the intensity of the head-
lights of the vehicle following you. The automatic
anti-glare feature is activated when the ignition
switch is in the ON position.NOTE:
Do not hang any objects over the sensors
�1or apply glass cleaner to the sensors.
Doing so will reduce the sensitivity of the
sensors, resulting in improper operation.
The indicator light will illuminate when the auto-
matic anti-glare feature is operating.
With the ignition switch in the ON position, press
the
button as described:
● To turn off the anti-glare feature, press
the
button. The indicator light will turn
off.
● To turn on the anti-glare feature, press
the
button again. The indicator light
will turn on.
For more information about the compass
�2and
compass features (if so equipped) , refer to
“Compass display” in the “Instruments and con-
trols” section of this manual.
OUTSIDE MIRRORS
WARNING
● Objects viewed in the outside mirror on
the passenger side are closer than they
appear. Be careful when moving to the
right. Using only this mirror could cause
an accident. Use the inside mirror or
glance over your shoulder to properly
judge distances to other objects.
LPD0446
3-14Pre-driving checks and adjustments
Page 144 of 341
Manual control type (if so equipped)
The outside mirror can be moved in any direction
for a better rear view.
Electric control type (if so equipped)
The outside mirror remote control will operate
only when the ignition switch is placed in the
ACC or ON position.
Move the small switch
�1to select the right or left
mirror. Adjust each mirror to the desired position
using the large switch
�2.
Heated mirrors (Canada only) (if so
equipped)
Some outside mirrors can be heated to defrost,
defog, or de-ice for improved visibility. For addi-
tional information, see “Rear window and outside
mirror defroster switch” in the “Instruments and
controls” section of this manual.
WPD0170LPD0237
Pre-driving checks and adjustments3-15
Page 145 of 341
Foldable outside mirrors
Pull the outside mirror toward the door to fold it.
LPD0259
3-16Pre-driving checks and adjustments
Page 148 of 341
 defroster button
4. Air recirculation button
5. Temperature control dial
6. MAX A/C button")
1. Fan speed control dial
2. Front window defroster button
3. Rear window and outside mirror (if soequipped) defroster button
4. Air recirculation button
5. Temperature control dial
6. MAX A/C button
7. Air flow control buttons
8. Air conditioner buttonCONTROLS
Fan control dial
The fan control dial turns the fan on and off, and
controls fan speed.
Air flow control buttons
The air flow control buttons allow you to select
the air flow outlets.
MAX
A/C — Air flows from center and side
vents with maximum cooling (air
conditioning) .
— Air flows from center and sidevents.
— Air flows from center and sidevents and foot outlets.
— Air flows mainly from foot outlets.
— Air flows from defroster outletsand foot outlets.
— Air flows mainly from defrosteroutlets.
Temperature control dial
The temperature control dial allows you to adjust
the temperature of the outlet air. To lower the
temperature, turn the dial to the left. To increase
the temperature, turn the dial to the right.
Air recirculation button
ON position (Indicator light on):
Interior air is recirculated inside the vehicle.
Press the
button to the on position when:
● driving on a dusty road.
● to prevent traffic fumes from entering pas-
senger compartment.
● for maximum cooling when using the air con-
ditioner.
Type A
WHA1406
Heater, air conditioner, audio and phone systems4-3
Page 149 of 341
:
Outside air is drawn into the passenger compart-
ment and distributed through the selected outlet.
Use the off position for normal heater or air con-
ditioner opera")
OFF position (Indicator light off):
Outside air is drawn into the passenger compart-
ment and distributed through the selected outlet.
Use the off position for normal heater or air con-
ditioner operation.
Air conditioner button
Start the engine, turn the fan control dial to the
desired position and push the
button to
turn on the air conditioner. The indicator light
comes on when the air conditioner is operating.
To turn off the air conditioner, push the
button again.
The air conditioner cooling function oper-
ates only when the engine is running.
Rear window and outside mirror (if so
equipped) defroster switch
For more information about the rear window and
outside mirror (if so equipped) defroster switch,
see “Rear window and outside mirror defroster
switch” in the “Instruments and controls” section
of this manual.
HEATER OPERATION
Heating
This mode is used to direct heated air to the foot
outlets. Some air also flows from the defrost
outlets.
1. Press the
button to the OFF position
for normal heating. The indicator light on
the
button will go off.
2. Press the
air flow control button.
3. Turn the fan control dial to the desired posi- tion.
4. Turn the temperature control dial to the de- sired position between the middle and the
hot position.
Ventilation
This mode directs outside air to the side and
center ventilators.
1. Press the
button to the OFF position.
The indicator light on the
button will
go off.
2. Press the
air flow control button.
3. Turn the fan control dial to the desired posi- tion. 4. Turn the temperature control dial to the de-
sired position.
Defrosting or defogging
This mode directs the air to the defrost outlets to
defrost/defog the windows.
1. Press the defrost/defog button
.
2. Turn the fan control dial to the desired posi- tion.
3. Turn the temperature control dial to the de- sired position between the middle and the
hot position.
● To quickly remove ice or fog from the win-
dows, turn the fan control dial to the highest
setting and the temperature control to the
full HOT position.
● When the
position is selected, the air
conditioner automatically turns on (the indi-
cator light on the
button will come on)
if the outside temperature is more than 36°F
(2°C) . This dehumidifies the air which helps
defog the windshield. The
mode au-
tomatically turns off, allowing outside air to
be drawn into the passenger compartment
to further improve the defogging perfor-
mance.
4-4Heater, air conditioner, audio and phone systems
 , start the engine and
push the rear window defroster switch on. The
rear window defroster indicator light comes on.
Push the swit")

The outside mirror can be moved in any direction
for a better rear view.
Electric control type (if so equipped)
The outside mirror remote control will operate
only")
