Page 1 of 16
Quick RefeRence Guide
2012
VeRSA
hAtchbAck
Page 2 of 16
*See your Owner’s Manual for information.
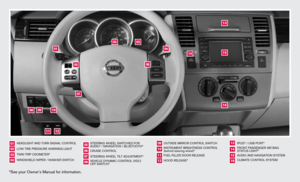
heAdLiGht And tuRn SiGnAL cOntROL
LOW tiRe PReSSuRe WARninG LiGht
tWin tRiP OdOMeteR*
WindShieLd WiPeR / WASheR SWitch SteeRinG WheeL SWitcheS fOR
AudiO* / nAViGAtiOn / bLuetOOth
®
cRuiSe cOntROL
SteeRinG WheeL tiLt AdJuStMent*
VehicLe dYnAMic cOntROL (Vdc)
Off SWitch* OutSide MiRROR cOntROL SWitch
inStRuMent bRiGhtneSS cOntROL
(behind steering wheel)*
fueL-fiLLeR dOOR ReLeASe
hOOd ReLeASe*
iPOd
® / uSb PORt*
fROnt PASSenGeR AiR bAG
StAtuS LiGht*
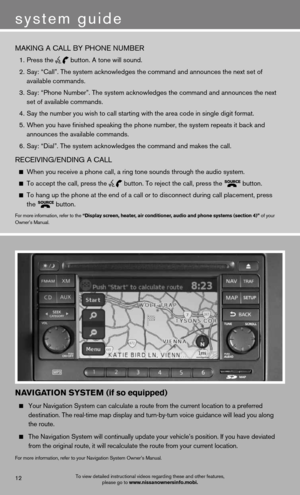
AudiO And nAViGAtiOn SYSteM
cLiMAte cOntROL SYSteM
01020304
05
09
13
06
10
141516
07
11
08
12
02
03
01
04
05
09
15
06
12
16
07
13
08
14
11
10
Page 3 of 16

tAbLe Of cOntentS
• A cellular telephone should not be used for any purpose while
driving so full attention may be given to vehicle operation.
• Always wear your seat belt.
• Supplemental air bags do not replace proper seat belt usage.
• Children 12 and under should always ride in the rear seat
properly secured in child restraints or seat belts according to
their age and weight.
• Do not drink and drive.
for more information, refer to the “Safety — Seats, seat belts and
supplemental restraint system (section 1)”,
“Display screen, heater,
air conditioner, audio and phone systems (section 4)” and “Starting
and driving (section 5)” of your Owner’s Manual.
Additional information about your vehicle is also
available in your Owner’s Manual, navigation System Owner’s Manual and at www.nissanusa.com.
to view detailed
instructional videos, go to
www.nissanownersinfo.mobi/2012/versahatchback or snap this barcode with an appropriate barcode reader.
E SSE ntial i nformation
Loose Fuel Cap . . . . . . . . . . . . . . . . . . . . . . . . . . . . . . . . . . . .\
. . . . . . . . . . . . 2
tire Pressure Monitoring System (tPMS) ...........................2
fir St DrivE fEatur ES
niSSAn intelligent key
® System (if so equipped) .................... 3
Rear Hatch Release (NISSAN Intelligent Key® models only) ........... 3
Seat Adjustments .............................................. 4
Outside Mirror Control Switch .................................... 4
Starting/Stopping the Engine ..................................... 4
headlight control .............................................. 5
Windshield Wiper/Washer Switch ................................ 6
Climate Control (if so equipped) .................................. 6
fM/AM/XM
® Satellite Radio with CD Player (if so equipped) ...........8
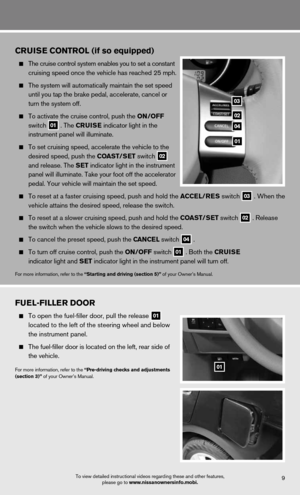
Cruise Control (if so equipped) ................................... 9
fuel-filler door ................................................. 9
Sy StEm GuiDE
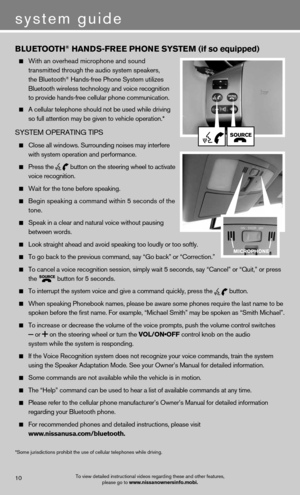
bluetooth
® Hands-free Phone System (if so equipped) ...............10
Navigation System (if so equipped) ............................... 12
Page 4 of 16

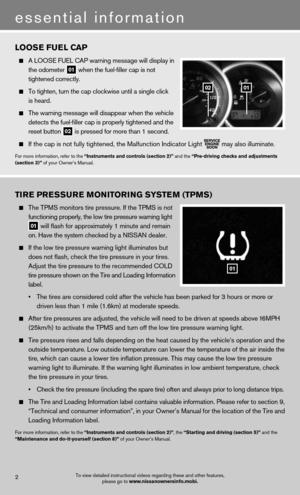
The TPMS monitors tire pressure. If the TPMS is not
functioning properly, the low tire pressure warning light
01 will flash for approximately 1 m")
tirE Pr ESSurE monitorin G SyStE m (tPm S)
The TPMS monitors tire pressure. If the TPMS is not
functioning properly, the low tire pressure warning light
01 will flash for approximately 1 minute and remain
on. Have the system checked by a NISSAN dealer.
If the low tire pressure warning light illuminates but
does not flash, check the tire pressure in your tires.
Adjust the tire pressure to the recommended COLD
tire pressure shown on the Tire and Loading Information
label.
• The tires are considered cold after the vehicle has been parked for 3 hours or more or
driven less than 1 mile (1.6km) at moderate speeds.
After tire pressures are adjusted, the vehicle will need to be driven at speeds above 16MPH
(25km/h) to activate the TPMS and turn off the low tire pressure warning light.
Tire pressure rises and falls depending on the heat caused by the vehicle’s operation and the
outside temperature. Low outside temperature can lower the temperature of the air inside the
tire, which can cause a lower tire inflation pressure. This may cause the low tire pressure
warning light to illuminate. If the warning light illuminates in low ambient temperature, check
the tire pressure in your tires.
• Check the tire pressure (including the spare tire) often and always prior to long distance trips.
The Tire and Loading Information label contains valuable information. Please refer to section 9,
“Technical and consumer information”, in your Owner’s Manual for the location of the Tire and
Loading information label.
for more information, refer to the “instruments and controls (section 2)”, the “Starting and driving (section 5)” and the
“maintenance and do-it-yourself (section 8)” of your Owner’s Manual.
2
essential information
looSE fu El C aP
A LOOSe fueL cAP warning message will display in
the odometer
01 when the fuel-filler cap is not
tightened correctly.
To tighten, turn the cap clockwise until a single click
is heard.
The warning message will disappear when the vehicle
detects the fuel-filler cap is properly tightened and the
reset button
02 is pressed for more than 1 second.
If the cap is not fully tightened, the Malfunction Indicator Light
may also illuminate.
for more information, refer to the “instruments and controls (section 2)” and the “Pre-driving checks and adjustments
(section 3)” of your Owner’s Manual.
To view detailed instructional videos regarding these and other features, please go to www.nissanownersinfo.mobi.
0102
01
Page 5 of 16

the niSSAn intelligent key® System allows you to lock or unlock your vehicle,
open your rear hatch and start the engine.
The operating range o")
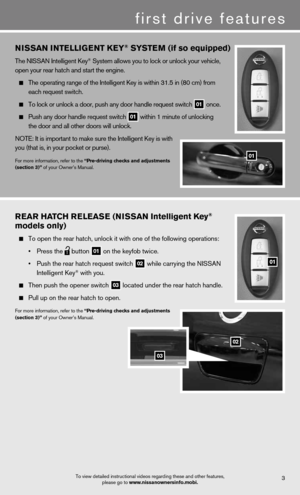
niSSan intE lliGE nt KEy® SyStE m (if so equipped)
the niSSAn intelligent key® System allows you to lock or unlock your vehicle,
open your rear hatch and start the engine.
The operating range of the Intelligent Key is within 31.5 in (80 cm) from
each request switch.
To lock or unlock a door, push any door handle request switch
01 once.
Push any door handle request switch
01 within 1 minute of unlocking
the door and all other doors will unlock.
NOTE: It is important to make sure the Intelligent Key is with
you (that is, in your pocket or purse).
for more information, refer to the “Pre-driving checks and adjustments
(section 3)” of your Owner’s Manual.
first drive features
01
3To view detailed instructional videos regarding these and other features, please go to www.nissanownersinfo.mobi.
rEar Hat CH rElEaSE (ni SSan intelligent Key®
models only)
To open the rear hatch, unlock it with one of the following operations:
• Press the
button
01 on the keyfob twice.
• Push the rear hatch request switch
02 while carrying the NISSAN
intelligent key® with you.
Then push the opener switch
03 located under the rear hatch handle.
Pull up on the rear hatch to open.
for more information, refer to the “Pre-driving checks and adjustments
(section 3)” of your Owner’s Manual.
02
03
Page 6 of 16

(niSSAn inte")
To view detailed instructional videos regarding these and other features, please go to www.nissanownersinfo.mobi.
StartinG/StoPPin G tHE EnG in E
cOntinuOuSLY VARiAbLe tRAnSMiSSiOn (cVt)
(niSSAn intelligent key® models only - if so equipped)
Depress the brake pedal.
Push the ignition switch in.
confirm the intelligent key system warning light is
illuminated green.
Turn the ignition switch to start the engine.
4
first drive features
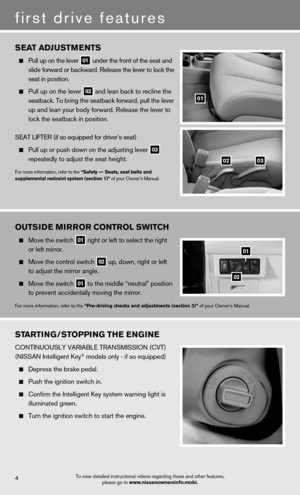
SEat aDJ uStm EntS
Pull up on the lever
01 under the front of the seat and
slide forward or backward. Release the lever to lock the
seat in position.
Pull up on the lever
02 and lean back to recline the
seatback. To bring the seatback forward, pull the lever
up and lean your body forward. Release the lever to
lock the seatback in position.
SeAt LifteR (if so equipped for driver’s seat)
Pull up or push down on the adjusting lever
03
repeatedly to adjust the seat height.
for more information, refer to the “Safety –– Seats, seat belts and
supplemental restraint system (section 1)” of your Owner’s Manual.
01
0203
outS
iDE mirror Control SWit CH
Move the switch
01 right or left to select the right
or left mirror.
Move the control switch
02 up, down, right or left
to adjust the mirror angle.
Move the switch
01 to the middle “neutral” position
to prevent accidentally moving the mirror.
for more information, refer to the “Pre-driving checks and adjustments (section 3)” of your Owner’s Manual.
01
02
Page 7 of 16

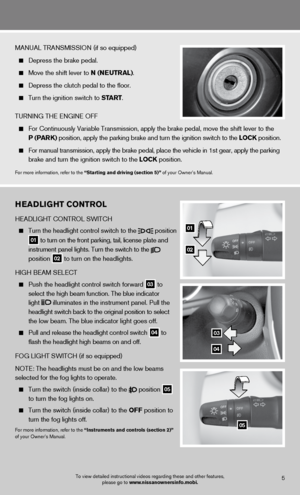
HEaDliGHt Control
heAdLiGht cOntROL SWitch
Turn the headlight control switch to the
position
01 to turn on the front parking, tail, license plate and
instrument panel lights. Turn the switch to the
position
02 to turn on the headlights.
hiGh beAM SeLect
Push the headlight control switch forward
03 to
select the high beam function. The blue indicator
light
illuminates in the instrument panel. Pull the
headlight switch back to the original position to select
the low beam. The blue indicator light goes off.
Pull and release the headlight control switch
04 to
flash the headlight high beams on and off.
FOG LIGHT SWITCH (if so equipped)
nOte: the headlights must be on and the low beams
selected for the fog lights to operate.
Turn the switch (inside collar) to the
position
05
to turn the fog lights on.
Turn the switch (inside collar)
to the off position to
turn the fog lights off.
for more information, refer to the “instruments and controls (section 2)”
of your Owner’s Manual.
To view detailed instructional videos regarding these and other features, please go to www.nissanownersinfo.mobi.5
MANUAL TRANSMISSION (if so equipped)
Depress the brake pedal.
Move the shift lever to n (nE utral).
Depress the clutch pedal to the floor.
Turn the ignition switch to Start.
tuRninG the enGine Off
For Continuously Variable Transmission, apply the brake pedal, move the shift lever to the
P (ParK) position, apply the parking brake and turn the ignition switch to the loCK position.
For manual transmission, apply the brake pedal, place the vehicle in 1st gear, apply the parking
brake and turn the ignition switch to the loCK position.
for more information, refer to the “Starting and driving (section 5)” of your Owner’s Manual.
05
03
04
01
02
Page 8 of 16
 - One sweep operation of the
wipers.
02 interm")
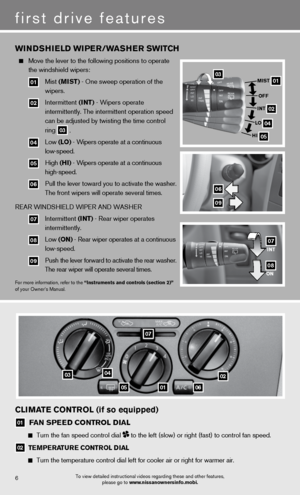
WinDSHiEl D WiPEr/W aSHEr SWitCH
Move the lever to the following positions to operate
the windshield wipers:
01 Mist (miSt) - One sweep operation of the
wipers.
02 intermittent (int) - Wipers operate
intermittently. The intermittent operation speed
can be adjusted by twisting the time control
ring
03 .
04 Low (lo) - Wipers operate at a continuous
low-speed.
05 high (Hi) - Wipers operate at a continuous
high-speed.
06 Pull the lever toward you to activate the washer.
The front wipers will operate several times.
ReAR WindShieLd WiPeR And WASheR
07 intermittent (int) - Rear wiper operates
intermittently.
08 Low (on) - Rear wiper operates at a continuous
low-speed.
09 Push the lever forward to activate the rear washer.
The rear wiper will operate several times.
for more information, refer to the “instruments and controls (section 2)”
of your Owner’s Manual.
To view detailed instructional videos regarding these and other features, please go to www.nissanownersinfo.mobi.
6
first drive features
0301
02
04
05
miSt
off
int
lo
Hi
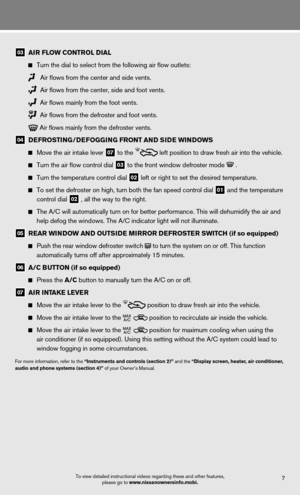
ClimatE Control (if so equipped)
01 fan SPEED Control D
ial
Turn the fan speed control dial to the left (slow) or right (fast) to control fan speed.
02 tE mPE ratur E Control D ial
Turn the temperature control dial left for cooler air or right for warmer air.
01
020304
0506
07
int
on07
06
09
08