2012 NISSAN QASHQAI Reverse light
[x] Cancel search: Reverse lightPage 72 of 297
Downloaded from www.Manualslib.com manuals search engine REAR WINDOW
WARNING
In freezing temperatures the washer solution
may freeze on the rear window and obscure your
vision. Warm the rear window with the rear win-
dow defogger before you wash the rear window.
CAUTION
Do not operate the washer continuously for
more than 15 seconds.
Do not operate the washer if the reservoir
tank is empty or frozen.
The rear window wiper and washer can be oper-
ated when the ignition switch is in the ON position.
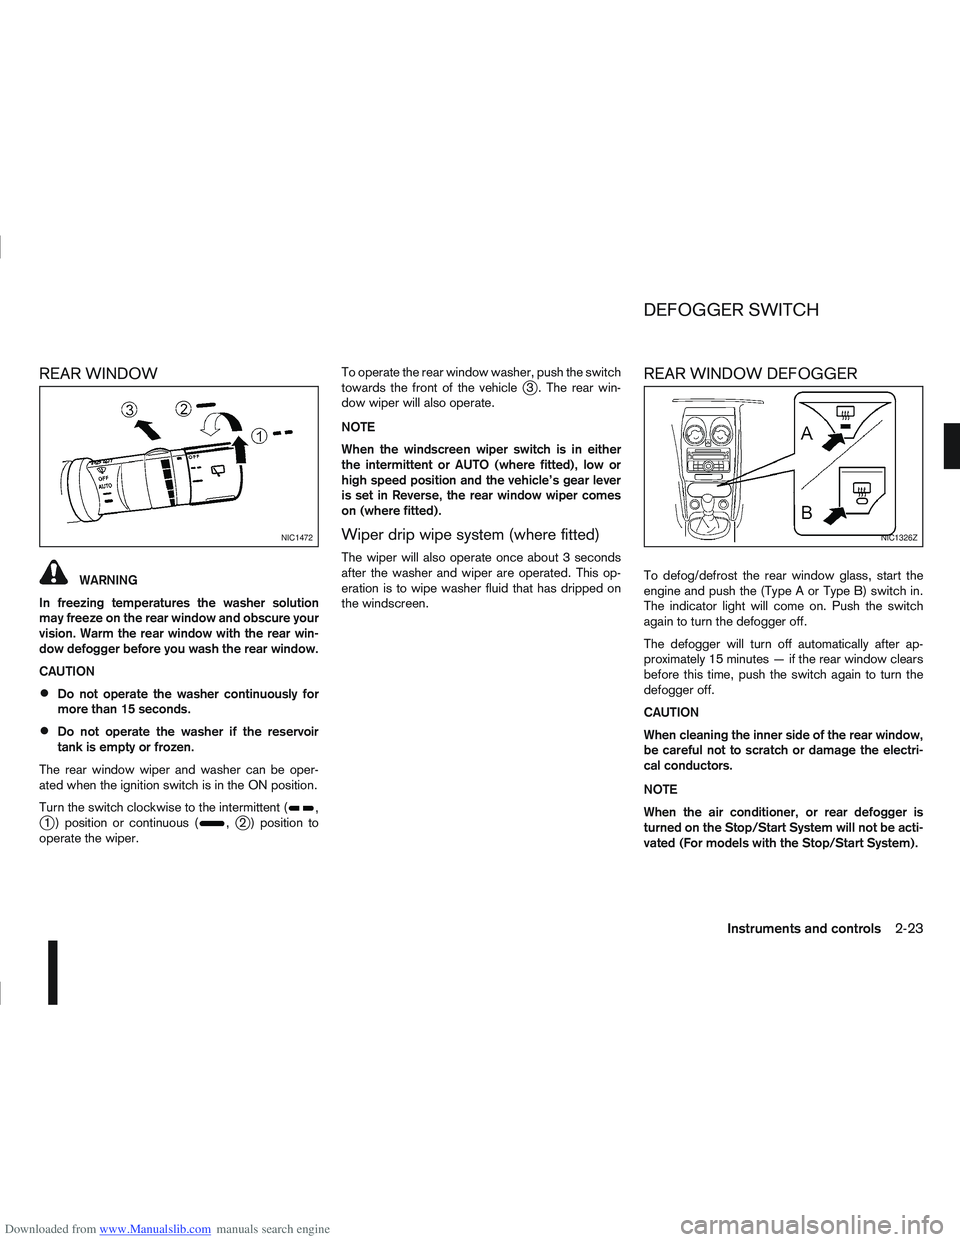
Turn the switch clockwise to the intermittent (
,j1 ) position or continuous (,j2 ) position to
operate the wiper. To operate the rear window washer, push the switch
towards the front of the vehicle
j3 . The rear win-
dow wiper will also operate.
NOTE
When the windscreen wiper switch is in either
the intermittent or AUTO (where fitted), low or
high speed position and the vehicle’s gear lever
is set in Reverse, the rear window wiper comes
on (where fitted).
Wiper drip wipe system (where fitted)
The wiper will also operate once about 3 seconds
after the washer and wiper are operated. This op-
eration is to wipe washer fluid that has dripped on
the windscreen.
REAR WINDOW DEFOGGER
To defog/defrost the rear window glass, start the
engine and push the (Type A or Type B) switch in.
The indicator light will come on. Push the switch
again to turn the defogger off.
The defogger will turn off automatically after ap-
proximately 15 minutes — if the rear window clears
before this time, push the switch again to turn the
defogger off.
CAUTION
When cleaning the inner side of the rear window,
be careful not to scratch or damage the electri-
cal conductors.
NOTE
When the air conditioner, or rear defogger is
turned on the Stop/Start System will not be acti-
vated (For models with the Stop/Start System).
NIC1472NIC1326Z
DEFOGGER SWITCH
Instruments and controls2-23
Page 110 of 297

Downloaded from www.Manualslib.com manuals search engine than they appear. Use the inside mirror or
glance over your shoulder to properly judge
distances to other objects.
The lines which are displayed on the monitor, indi-
cate the vehicle’s clearance and distance between
the obstacle and the bumper
jA.
Displayed lines indicate the distances between the
obstacle and the bumper as follows:
j1 0.5m(1.5ft)–red
j2 1m(3ft)–yellow
j3 2m(7ft)–green
j4 3m(10ft)–green
NOTE
The vehicle clearance lines are wider than the
actual clearance.
The lines are indicated as reference distances
to the obstacle.
REAR-VIEW MONITOR SETTING
For details, see the separately provided NISSAN
Connect Owner’s Manual.
OPERATING TIPS
When the gear (MT) or selector (AT or CVT)
lever is shifted to R (Reverse), the NISSAN Con-
nect display automatically changes to the rear-
view monitor mode.
When the gear (MT) or selector (AT or CVT)
lever is returned to a position other than R (Re- verse), it may take some time until the screen
changes. Objects on the screen may be dis-
torted until they are completely displayed.
When the temperature is extremely high or low,
the screen may not clearly display objects. This
is not a malfunction.
When strong light directly enters the camera
lens, objects may not be displayed clearly. This
is not a malfunction.
Vertical lines may be seen in objects on the
screen. This is due to strong reflected light from
the bumper. This is not a malfunction.
The screen may flicker under fluorescent light.
This is not a malfunction.
The colours of objects on the rear-view monitor
may differ somewhat from those of the actual
object.
Objects on the monitor may not be clear in a
dark place or at night.
If dirt, rain or snow attaches to the transparent
camera cover, the rear-view monitor may not
clearly display objects. Clean the transparent
camera cover.
Do not use alcohol, benzine or thinner to clean
the transparent camera cover. This will cause
discoloration. To clean the transparent camera
cover, wipe with a cloth dampened with diluted
mild cleaning agent and then wipe with a dry
cloth.
Do not damage the transparent camera cover as
the NISSAN Connect display may be adversely
affected.
Do not use body wax on the transparent camera
cover. Wipe off any wax with a clean cloth damp-
ened with mild detergent diluted with water.
Display screen, heater and air conditioner, and audio system4-3
Page 111 of 297
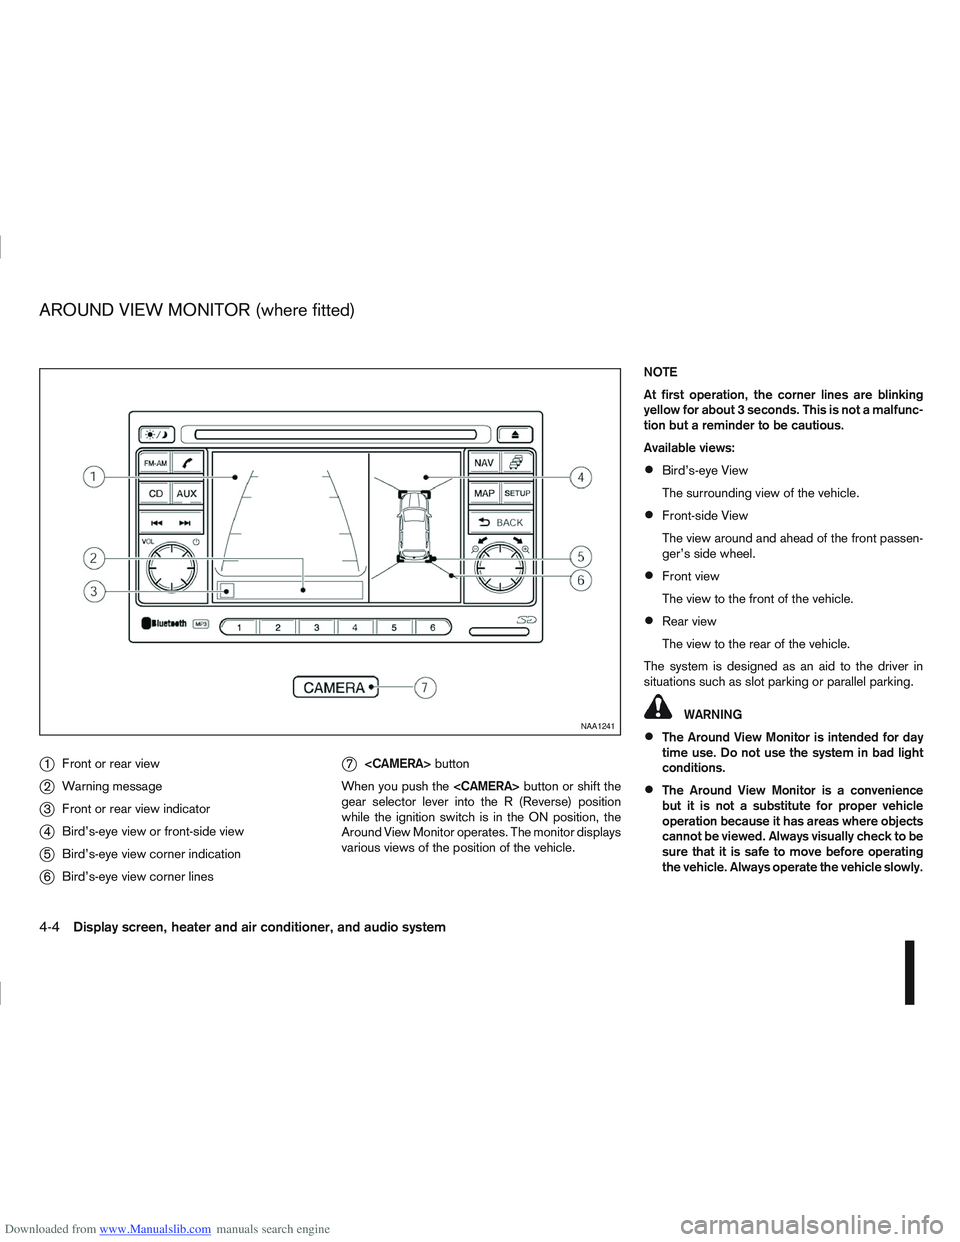
Downloaded from www.Manualslib.com manuals search engine j1Front or rear view
j2Warning message
j3Front or rear view indicator
j4Bird’s-eye view or front-side view
j5Bird’s-eye view corner indication
j6Bird’s-eye view corner lines
j7
button
When you push the
gear selector lever into the R (Reverse) position
while the ignition switch is in the ON position, the
Around View Monitor operates. The monitor displays
various views of the position of the vehicle. NOTE
At first operation, the corner lines are blinking
yellow for about 3 seconds. This is not a malfunc-
tion but a reminder to be cautious.
Available views:
Bird’s-eye View
The surrounding view of the vehicle.
Front-side View
The view around and ahead of the front passen-
ger’s side wheel.
Front view
The view to the front of the vehicle.
Rear view
The view to the rear of the vehicle.
The system is designed as an aid to the driver in
situations such as slot parking or parallel parking.
WARNING
The Around View Monitor is intended for day
time use. Do not use the system in bad light
conditions.
The Around View Monitor is a convenience
but it is not a substitute for proper vehicle
operation because it has areas where objects
cannot be viewed. Always visually check to be
sure that it is safe to move before operating
the vehicle. Always operate the vehicle slowly.
NAA1241
AROUND VIEW MONITOR (where fitted)
4-4Display screen, heater and air conditioner, and audio system
Page 118 of 297
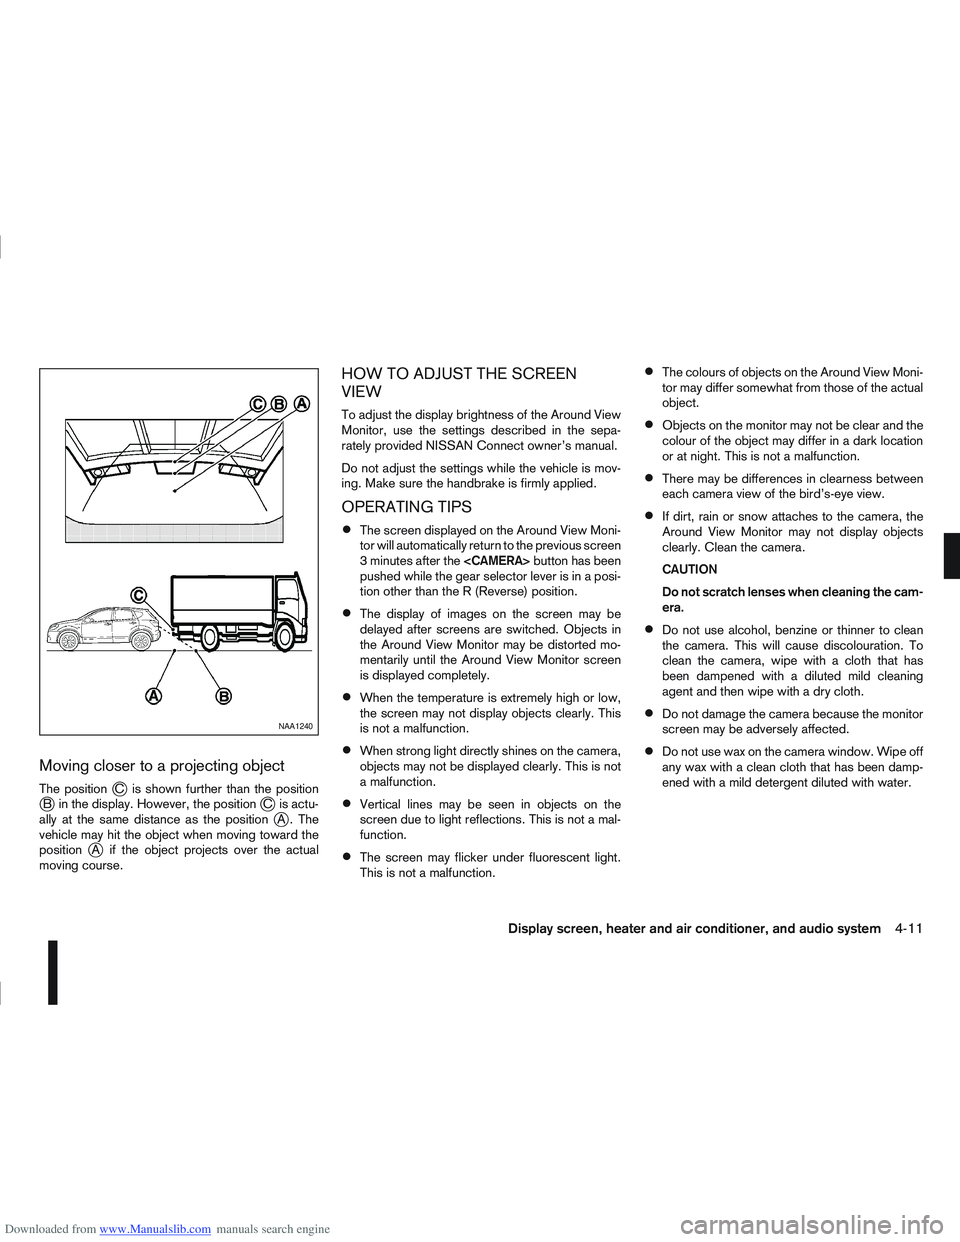
Downloaded from www.Manualslib.com manuals search engine Moving closer to a projecting object
The positionjC is shown further than the positionjB in the display. However, the positionjC is actu-
ally at the same distance as the positionjA . The
vehicle may hit the object when moving toward the
position
jA if the object projects over the actual
moving course.
HOW TO ADJUST THE SCREEN
VIEW
To adjust the display brightness of the Around View
Monitor, use the settings described in the sepa-
rately provided NISSAN Connect owner’s manual.
Do not adjust the settings while the vehicle is mov-
ing. Make sure the handbrake is firmly applied.
OPERATING TIPS
The screen displayed on the Around View Moni-
tor will automatically return to the previous screen
3 minutes after the
pushed while the gear selector lever is in a posi-
tion other than the R (Reverse) position.
The display of images on the screen may be
delayed after screens are switched. Objects in
the Around View Monitor may be distorted mo-
mentarily until the Around View Monitor screen
is displayed completely.
When the temperature is extremely high or low,
the screen may not display objects clearly. This
is not a malfunction.
When strong light directly shines on the camera,
objects may not be displayed clearly. This is not
a malfunction.
Vertical lines may be seen in objects on the
screen due to light reflections. This is not a mal-
function.
The screen may flicker under fluorescent light.
This is not a malfunction.
The colours of objects on the Around View Moni-
tor may differ somewhat from those of the actual
object.
Objects on the monitor may not be clear and the
colour of the object may differ in a dark location
or at night. This is not a malfunction.
There may be differences in clearness between
each camera view of the bird’s-eye view.
If dirt, rain or snow attaches to the camera, the
Around View Monitor may not display objects
clearly. Clean the camera.
CAUTION
Do not scratch lenses when cleaning the cam-
era.
Do not use alcohol, benzine or thinner to clean
the camera. This will cause discolouration. To
clean the camera, wipe with a cloth that has
been dampened with a diluted mild cleaning
agent and then wipe with a dry cloth.
Do not damage the camera because the monitor
screen may be adversely affected.
Do not use wax on the camera window. Wipe off
any wax with a clean cloth that has been damp-
ened with a mild detergent diluted with water.
NAA1240
Display screen, heater and air conditioner, and audio system4-11
Page 148 of 297
Downloaded from www.Manualslib.com manuals search engine
To operate the Bluetooth audio streaming use one
of the following methods:
Press the
Press
lighted, then press
The type of display,
jAorjB , shown on the audio
system can vary depending on the Bluetooth® ver-
sion of the device.
Fast Forward (Cue), Fast
Reverse (Review) buttons:
When the
(Cue) or(Review) button is
pressed continuously, the track will be played at
high speed. When the button is released, the track
will be played at normal playing speed.
Track up/down buttons:
Pressing the
orbutton once, the track will
be skipped forward to the next track or backward to
the beginning of the current played track. Press the
orbutton more than once to skip through
the tracks.
Play/Pause:
Press the
press
mbuttonj5 (Type B display screen
only)
If the song contains music information tags (ID3–
tags), the title of the played song will be displayed.
If tags are not provided then the display will not
show any messages.
When the
j5 button is pressed repeatedly fur-
ther information about the song can be displayed
along with the song title.
A long press on
j5 will turn the display into a
detailed overview which after a few seconds returns
to the main display; or press
j5 briefly.
Bluetooth®mobile phone feature
This system offers a hands-free facility for your mo-
bile telephone with Bluetooth® to enhance driving
safety, and comfort.
For details, see “Mobile phone integration for FM
AM radio with CD player” later in this section.
Display screen, heater and air conditioner, and audio system4-41
Page 180 of 297
Downloaded from www.Manualslib.com manuals search engine Fail-safe
AT models:
When the fail-safe operation occurs, the AT CHECK
indicator light comes on for 2 seconds and the auto-
matic transmission will be locked in the third gear.
Have a NISSAN dealer or qualified workshop check
and repair the transmission.
CVT models:
When the fail-safe operation occurs, the vehicle
speed will be decreased automatically to reduce the
chance of transmission damage. Vehicle speed can
be controlled with the accelerator pedal, but the
engine power may be limited. Have a NISSAN dealer
or qualified workshop check and repair the trans-
mission.
AT or CVT models:
If the vehicle is driven under extreme conditions,
such as excessive wheel spinning and subse-
quent hard braking, the Fail-safe system may be
activated. This will occur even if all electrical cir-
cuits are functioning properly. In this case, turn
the ignition switch “OFF” and wait for 10 sec-
onds. Then turn the key back to the ON position.
The vehicle should return to its normal operating
condition. If it does not return to its normal oper-
ating condition have your NISSAN dealer or quali-
fied workshop check the transmission and have
the transmission repaired by a NISSAN dealer or
qualified workshop, if necessary.WARNING
When the fail safe operation occurs, the vehicle
speed may be lower than other traffic, which
could increase the chance of a collision. Be es-
pecially careful when driving. If necessary, drive
to the side of the road at a safe place and away
from traffic, to allow the transmission to return to
normal operation, or have the transmission re-
paired by a NISSAN dealer or qualified workshop,
if necessary.
DRIVING WITH CONTINUOUSLY
VARIABLE TRANSMISSION (CVT)
(Models without manual shift)
The Continuously Variable Transmission (CVT) in
your vehicle is electronically controlled to produce
maximum power and smooth operation.
The recommended operating procedures for this
transmission are shown on the following pages. Fol-
low these procedures for maximum vehicle perfor-
mance and driving enjoyment.
WARNING
Do not downshift abruptly on slippery roads. This
may cause a loss of control.
CAUTION
The cold engine idle speed is high, so use
caution when shifting the transmission into a
forward or reverse position before the engine
has warmed up.
Avoid revving up the engine while the vehicle
is stopped. This could cause unexpected ve-
hicle movement.
Never shift to either the P (Park) or R (Re-
verse) position while the vehicle is moving.
This could cause serious damage to the trans-
mission.
Start the engine in either the P (Park) or N
(Neutral) position. The engine will not start in
any other position. If it does, have your ve-
hicle checked by a NISSAN dealer or qualified
workshop.
Shift into the P (Park) position and apply the
handbrake when at a standstill for longer than
a short waiting period.
Keep the engine at idling speed while shifting
from the N (Neutral) position to any driving
position.
When stopping the vehicle on an uphill grade,
do not hold the vehicle by depressing the ac-
celerator pedal. The footbrake pedal should
be depressed in this situation.
Starting vehicle
1. After starting the engine, fully depress the foot- brake pedal before moving the selector lever out
of the P (Park) position.
2. Keep the footbrake pedal depressed and move the selector lever to a driving position.
3. Release the handbrake, the footbrake pedal, and then gradually start the vehicle in motion.
Starting and driving5-17
Page 181 of 297
Downloaded from www.Manualslib.com manuals search engine The CVT is designed so the footbrake pedal
MUST be depressed before shifting from the P
(Park) position to any driving position while the
ignition switch is in the ON position.
The selector lever cannot be moved out of the P
(Park) position and into any of the other posi-
tions if the ignition switch is placed in the LOCK,
“OFF” or ACC position or if the key is removed.
CAUTION
DEPRESS THE FOOTBRAKE PEDAL - Shifting
the selector lever to D, R or L without de-
pressing the footbrake pedal causes the ve-
hicle to move slowly when the engine is run-
ning. Make sure the footbrake pedal is de-
pressed fully and the vehicle is stopped before
shifting the selector lever.
MAKE SURE OF THE SELECTOR LEVER POSI-
TION - Make sure the selector lever is in the
desired position. D and L are used to move
forward and R to reverse.
WARM UP THE ENGINE - Due to the higher
idle speeds when the engine is cold, extra
caution must be exercised when shifting the
selector lever into the driving position imme-
diately after starting the engine.
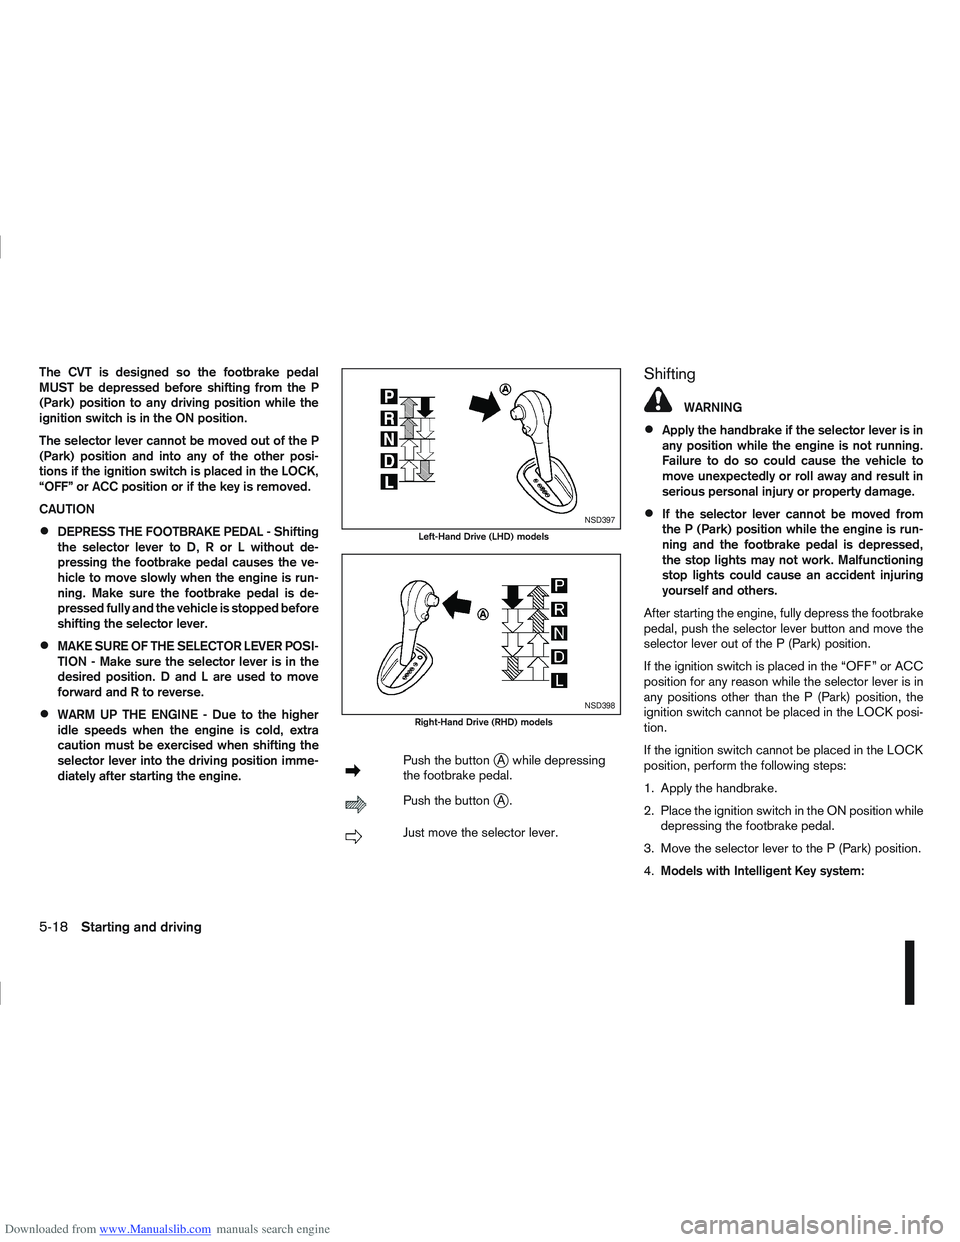
mPush the buttonjA while depressing
the footbrake pedal.
mPush the buttonjA.
mJust move the selector lever.
Shifting
WARNING
Apply the handbrake if the selector lever is in
any position while the engine is not running.
Failure to do so could cause the vehicle to
move unexpectedly or roll away and result in
serious personal injury or property damage.
If the selector lever cannot be moved from
the P (Park) position while the engine is run-
ning and the footbrake pedal is depressed,
the stop lights may not work. Malfunctioning
stop lights could cause an accident injuring
yourself and others.
After starting the engine, fully depress the footbrake
pedal, push the selector lever button and move the
selector lever out of the P (Park) position.
If the ignition switch is placed in the “OFF” or ACC
position for any reason while the selector lever is in
any positions other than the P (Park) position, the
ignition switch cannot be placed in the LOCK posi-
tion.
If the ignition switch cannot be placed in the LOCK
position, perform the following steps:
1. Apply the handbrake.
2. Place the ignition switch in the ON position while depressing the footbrake pedal.
3. Move the selector lever to the P (Park) position.
4. Models with Intelligent Key system:NSD397
Left-Hand Drive (LHD) models
NSD398
Right-Hand Drive (RHD) models
5-18Starting and driving
Page 182 of 297

Downloaded from www.Manualslib.com manuals search engine Place the ignition switch in the “OFF” position.
Models without Intelligent Key system:
Place the ignition switch in the LOCK position.
P (Park):
Use this position when the vehicle is parked or when
starting the engine. Make sure that the vehicle is
completely stopped and move the selector lever
into the P (Park) position. Apply the handbrake.
When parking on a hill, first depress the footbrake
pedal, apply the handbrake, and then move the se-
lector lever into the P (Park) position.
R (Reverse):
Use this position to reverse. Make sure that the
vehicle is completely stopped before selecting the R
(Reverse) position.
When the selector lever is in the R (Reverse) posi-
tion, either the NISSAN Connect monitor (where fit-
ted) or the ultra sonic parking sensor (where fitted)
will be activated. For details, see “Rear-view moni-
tor (where fitted)” or “Around view monitor (where
fitted)” earlier in this section or “Ultrasonic Parking
Sensor (where fitted)” later in this section
N (Neutral):
Neither the forward nor reverse gear is engaged.
The engine can be started in this position. You may
shift to the N (Neutral) position and restart a stalled
engine while the vehicle is moving.
D (Drive):
Use this position for all normal forward driving. L (Low):
Use this position when climbing steep hills slowly or
driving slowly through deep snow, sand or mud, or
for maximum engine braking on steep downhill
grades.
SPORT mode switch
To select the SPORT mode, push the SPORT mode
switch with the selector lever in the D (Drive) posi-
tion. The SPORT mode indicator light
in the
meter panel illuminates. To turn off the SPORT
mode, push the SPORT mode switch again. The
SPORT mode indicator light will turn off. When the
selector lever is shifted to any position other than D,
the SPORT mode will be automatically turned off.
OFF position:
For normal driving and fuel economy, use the OFF
position. ON position:
For driving up or down long slopes where engine
braking is necessary, or for powerful acceleration,
use the ON position. The transmission will automati-
cally select a different gear ratio, allowing the en-
gine to provide high output.
When driving conditions change, push the switch to
turn the SPORT mode off.
Remember not to drive at high speeds for extended
periods of time with the SPORT mode in the ON
position. This reduces fuel economy.
Accelerator downshift
- in the D position -
For passing or climbing hills, depress the accelera-
tor pedal to the floor. This shifts the transmission
down into a lower gear, depending on the vehicle
speed.NSD399
Left-Hand Drive (LHD) model
NSD400
Starting and driving5-19