2012 NISSAN QASHQAI front light
[x] Cancel search: front lightPage 202 of 297

Downloaded from www.Manualslib.com manuals search engine The brake system has two separate hydraulic cir-
cuits. If one circuit malfunctions, you will still have
braking ability with two wheels.
BRAKE PRECAUTIONS
Vacuum assisted brake
The brake booster aids braking by using engine
vacuum. If the engine stops or the drive belt is bro-
ken, you can stop the vehicle by depressing the
brake pedal. However, greater foot pressure on the
brake pedal will be required to stop the vehicle and
the stopping distance will be longer.
Wet brakes
When the vehicle is washed or driven through wa-
ter, the brakes may get wet. As a result, your brak-
ing distance will be longer and the vehicle may pull
to one side during braking.
To dry brakes, drive the vehicle at a safe speed
while lightly pressing the brake pedal to heat up the
brakes. Do this until the brakes return to normal.
Avoid driving the vehicle at high speeds until the
brakes function correctly.
Using the brakes
Avoid resting your foot on the brake pedal while
driving. This will overheat the brakes, wear out the
brake linings and pads faster and reduce fuel
economy performance.
To help reduce brake wear and to prevent the brakes
from overheating, reduce speed and downshift to a
lower gear before going down a slope or long down-hill gradient. Overheated brakes may reduce brak-
ing performance and could result in loss of vehicle
control.
CAUTION
While driving on a slippery surface, be careful
when braking, accelerating or downshifting.
Abrupt braking actions or sudden acceleration
could cause the wheels to skid and result in an
accident.
Be aware that brakes will fade if repeated heavy
brake applications are made.
Driving uphill
When starting on a steep gradient, it is sometimes
difficult to operate the brake (AT or CVT models) or
both the brake and clutch (MT models). Use the
handbrake to hold the vehicle. Do not slip the clutch
(MT models). When ready to start, slowly release
the handbrake while depressing the accelerator
pedal and releasing the clutch (MT models) or de-
pressing the accelerator pedal (AT or CVT models).
Driving downhill
The engine braking action is effective for controlling
the vehicle while descending hills.
The gear lever (MT models) should be placed in a
gear position low enough to obtain sufficient engine
braking.
For the AT or CVT models, a low gear position in
the manual shift mode, low enough to obtain suffi-
cient engine braking, should be selected.
ANTI-LOCK BRAKING SYSTEM (ABS)
WARNING
The Anti-lock Braking System (ABS) is a so-
phisticated device, but it cannot prevent acci-
dents resulting from careless or dangerous
driving techniques. It can help maintain ve-
hicle control during braking on slippery sur-
faces. Remember that stopping distances
may also be longer on rough, gravel or snow
covered roads, or if you are using snow
chains. Always maintain a safe distance from
the vehicle in front of you. Ultimately, the
driver is responsible for safety.
Tyre type and condition may also affect brak-
ing effectiveness.
– When replacing tyres, install the specified
size of tyres on all four wheels.
– When installing a spare tyre, make sure it is the proper size and type as specified on
the tyre placard. See “Vehicle
identification” in the “9. Technical
information” section for the tyre placard
location.
– For detailed information, see “Wheels and tyres” in the “8. Maintenance and
do-it-yourself” section.
The Anti-lock Braking System (ABS) controls the
brakes so that the wheels do not lock during hard
braking or when braking on slippery surfaces. The
system detects the rotation speed at each wheel
BRAKE SYSTEM
Starting and driving5-39
Page 205 of 297

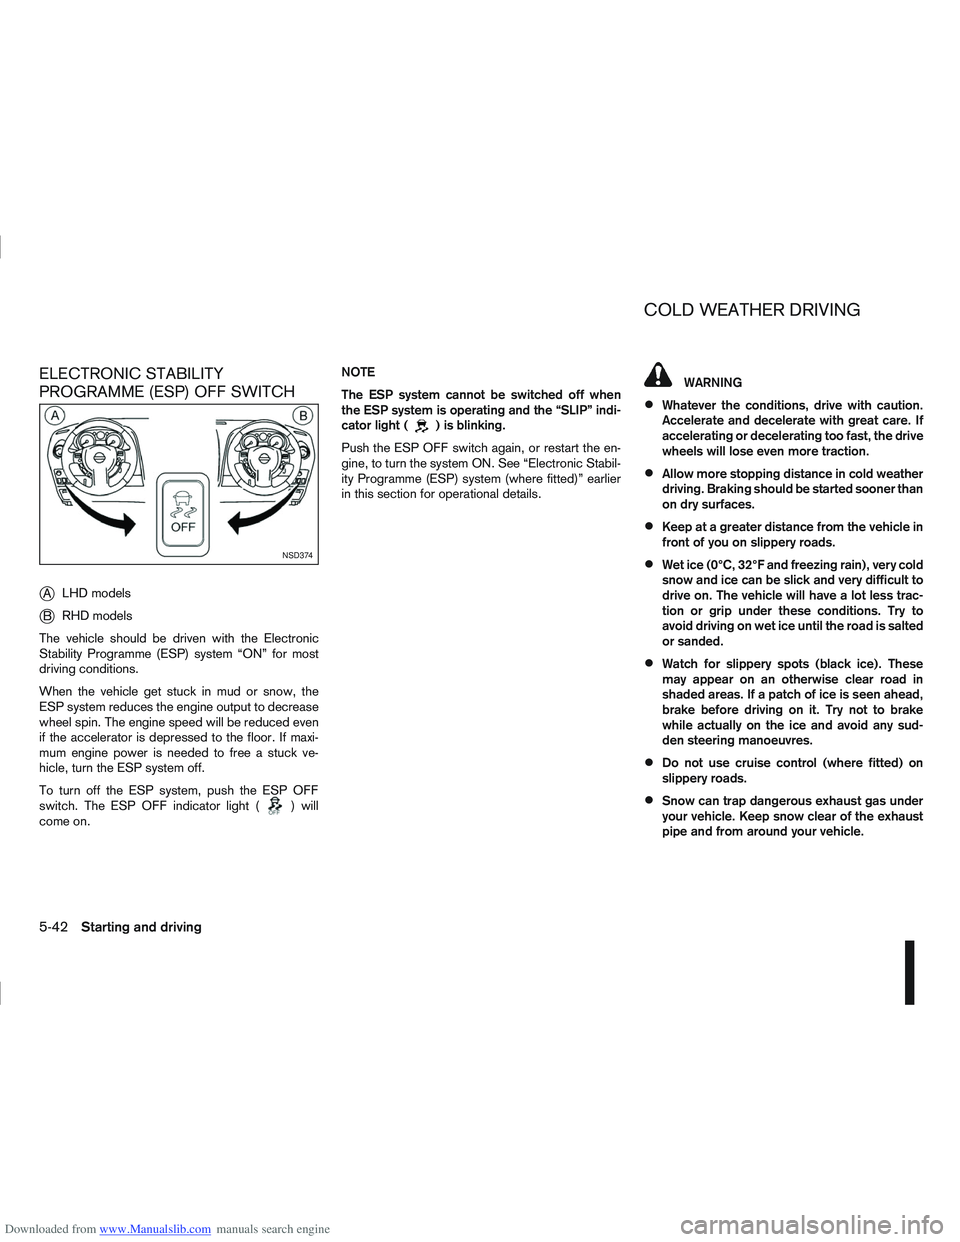
Downloaded from www.Manualslib.com manuals search engine ELECTRONIC STABILITY
PROGRAMME (ESP) OFF SWITCH
j
ALHD models
jB RHD models
The vehicle should be driven with the Electronic
Stability Programme (ESP) system “ON” for most
driving conditions.
When the vehicle get stuck in mud or snow, the
ESP system reduces the engine output to decrease
wheel spin. The engine speed will be reduced even
if the accelerator is depressed to the floor. If maxi-
mum engine power is needed to free a stuck ve-
hicle, turn the ESP system off.
To turn off the ESP system, push the ESP OFF
switch. The ESP OFF indicator light (
) will
come on. NOTE
The ESP system cannot be switched off when
the ESP system is operating and the “SLIP” indi-
cator light (
) is blinking.
Push the ESP OFF switch again, or restart the en-
gine, to turn the system ON. See “Electronic Stabil-
ity Programme (ESP) system (where fitted)” earlier
in this section for operational details.
WARNING
Whatever the conditions, drive with caution.
Accelerate and decelerate with great care. If
accelerating or decelerating too fast, the drive
wheels will lose even more traction.
Allow more stopping distance in cold weather
driving. Braking should be started sooner than
on dry surfaces.
Keep at a greater distance from the vehicle in
front of you on slippery roads.
Wet ice (0°C, 32°F and freezing rain), very cold
snow and ice can be slick and very difficult to
drive on. The vehicle will have a lot less trac-
tion or grip under these conditions. Try to
avoid driving on wet ice until the road is salted
or sanded.
Watch for slippery spots (black ice). These
may appear on an otherwise clear road in
shaded areas. If a patch of ice is seen ahead,
brake before driving on it. Try not to brake
while actually on the ice and avoid any sud-
den steering manoeuvres.
Do not use cruise control (where fitted) on
slippery roads.
Snow can trap dangerous exhaust gas under
your vehicle. Keep snow clear of the exhaust
pipe and from around your vehicle.
NSD374
COLD WEATHER DRIVING
5-42Starting and driving
Page 231 of 297

Downloaded from www.Manualslib.com manuals search engine 8Maintenance and do-it-yourself
Maintenance and do-it-yourself
Maintenance requirements ....................................... 8-2
Scheduled maintenance...................................... 8-2
General maintenance .......................................... 8-2
Where to go for service ...................................... 8-2
General maintenance ............................................... 8-2 Explanation of general maintenance items ........... 8-2
Maintenance precautions ......................................... 8-4
Engine compartment ................................................ 8-5
Engine cooling system ............................................. 8-6 Checking engine coolant level............................. 8-6
Changing engine coolant .................................... 8-6
Engine oil................................................................. 8-8 Checking engine oil level .................................... 8-8
Changing engine oil ............................................ 8-9
Changing engine oil filter .................................... 8-11
Protect the environment ...................................... 8-13
Fuel filter (Diesel engine models) ............................. 8-13 Draining water .................................................... 8-13
Bleeding the fuel system ..................................... 8-14
Automatic transmission fluid (ATF) ........................... 8-14
Continuously variable transmission (CVT) fluid ......... 8-14
Brakes ..................................................................... 8-15 Checking brake pedal......................................... 8-15
Checking handbrake........................................... 8-15
Brake and clutch fluid .............................................. 8-15
Window washer fluid/headlight cleaner fluid
(where fitted) ........................................................... 8-16
Battery..................................................................... 8-17 Vehicle battery .................................................... 8-17
Jump-starting ...................................................... 8-19 Integrated keyfob/Intelligent Key battery
replacement........................................................ 8-19
Drive belts ............................................................... 8-21
Spark plugs (Petrol engine models).......................... 8-21
Air cleaner filter........................................................ 8-21 Viscous paper type ............................................. 8-22
Dry paper type (where fitted) .............................. 8-22
Wiper blades ........................................................... 8-22 Cleaning ............................................................. 8-22
Front window wiper replacement ........................ 8-22
Back door window wiper replacement ................ 8-23
Windscreen washer nozzle ................................. 8-23
Fuses ...................................................................... 8-23 Passenger compartment ..................................... 8-23
Engine compartment ........................................... 8-24
Lights ...................................................................... 8-25 Headlights .......................................................... 8-25
Exterior lights ...................................................... 8-27
Interior lights....................................................... 8-27
Light locations .................................................... 8-27
Wheels and tyres ..................................................... 8-31 Tyre inflation pressure......................................... 8-31
Types of tyres ..................................................... 8-31
Snow chains....................................................... 8-32
Tyre rotation ....................................................... 8-32
Tyre wear and damage ....................................... 8-33
Tyre age ............................................................. 8-33
Changing tyres and wheels ................................. 8-33
Four-wheel drive (4WD) models ......................... 8-33
Wheel balance.................................................... 8-33
Page 257 of 297

Downloaded from www.Manualslib.com manuals search engine Only hold the xenon headlight bulb by the
base.
The bulb is manufactured from high-quality
quartz and is under high pressure.
Damage, soiling, and fingerprints should be
avoided and, if necessary, removed with alco-
hol before installing the bulb.
When the headlights are switched on, the
bulbs produce a certain amount of UV radia-
tion. In order to avoid any impairment of health
(burning and conjunctivitis), the bulb should
only be used in closed headlights with appro-
priate UV–absorbing front glass.
Due to the risk of burning, the bulb should be
left to cool down for 3 minutes after switching
off before touching.
Due to the use of mercury and various salts,
the bulb should be treated as special waste
when discarded.
The bulb may only be operated with a suitable
ballast which produces very high voltages
when switched on and during operation.
Contact with bulb and wires should therefore
be avoided and a safe distance of at least 30
mm should be maintained.
Replacing the halogen headlight bulb
CAUTION
High pressure halogen gas is sealed inside
the halogen bulb. The bulb may break if the
glass envelope is scratched or the bulb is
dropped.
When handling the bulb, DO NOT TOUCH THE
GLASS ENVELOPE.
Use the same number type and wattage as
originally installed.
Aiming is usually not necessary after replac-
ing the bulb. When aiming adjustment is nec-
essary, contact a NISSAN dealer or qualified
workshop.
Do not leave the bulb out of the headlight
reflector for a long period of time as dust,
moisture or smoke may enter the headlight
body and affect the performance of the head-
light.
The headlight is a semi-sealed beam type which
uses a replaceable headlight (halogen) bulb. A bulb
can be replaced from inside the engine compart-
ment without removing the headlight assembly.
Contact a NISSAN dealer or qualified workshop, if
you need assistance for bulb replacement.
1. Open the bonnet. For details, see “Bonnet release” in the “3. Pre-driving checks and
adjustments” section.
2. Disconnect the negative (—) battery cable. 3. When the broken bulb is located in the headlight
assembly under the air duct, carefully remove the
clips and rotate the air duct
jc clockwise a 1/4
of a turn.
4. Remove the cap (
jAorjB ) of the headlight as-
sembly.
5. Turn the connector 1/4 of a turn in the anti clock- wise direction and remove the headlight bulb.
6. Install the new bulb in the reverse order of re- moval and make sure that the cap is securely
sealed with the headlight body.
7. Where removed (step 3.), re-install the air duct
jc and clips in the order of removal.
8. Reconnect the negative (—) battery cable and close the bonnet.
NOTE
Fog may temporarily form inside the lens of the
exterior lights in the rain or in a car wash. The fog
is caused by a temperature difference between
the inside and the outside of the lens. This is not
a malfunction. If large droplets can be seen, then
contact a NISSAN dealer or qualified workshop.
8-26Maintenance and do-it-yourself
Page 258 of 297

Downloaded from www.Manualslib.com manuals search engine EXTERIOR LIGHTS
ItemWattage (W)
Headlight (Low or high beam:
type H7) 55
Front turn signal light 21
Front side light 5
Front fog light (H11 type, where
fitted) *1 55
Side turn signal light 5
Rear combination light Turn signal light 21
Stop/Tail light *1 LED
Reverse light *1 21
High-mounted stop light *1 LED
Number plate light 5
Rear fog light 21
*1: If replacement is required, contact a NISSAN dealer or qualified workshop.
INTERIOR LIGHTS
Item Wattage
(W)
Room light/Map lights (where fitted)
Foot well light (where fitted) 5
3
Room light — rear (where fitted) 5
Reading lights — rear (where fitted) 8
Luggage compartment light (where fitted) 5
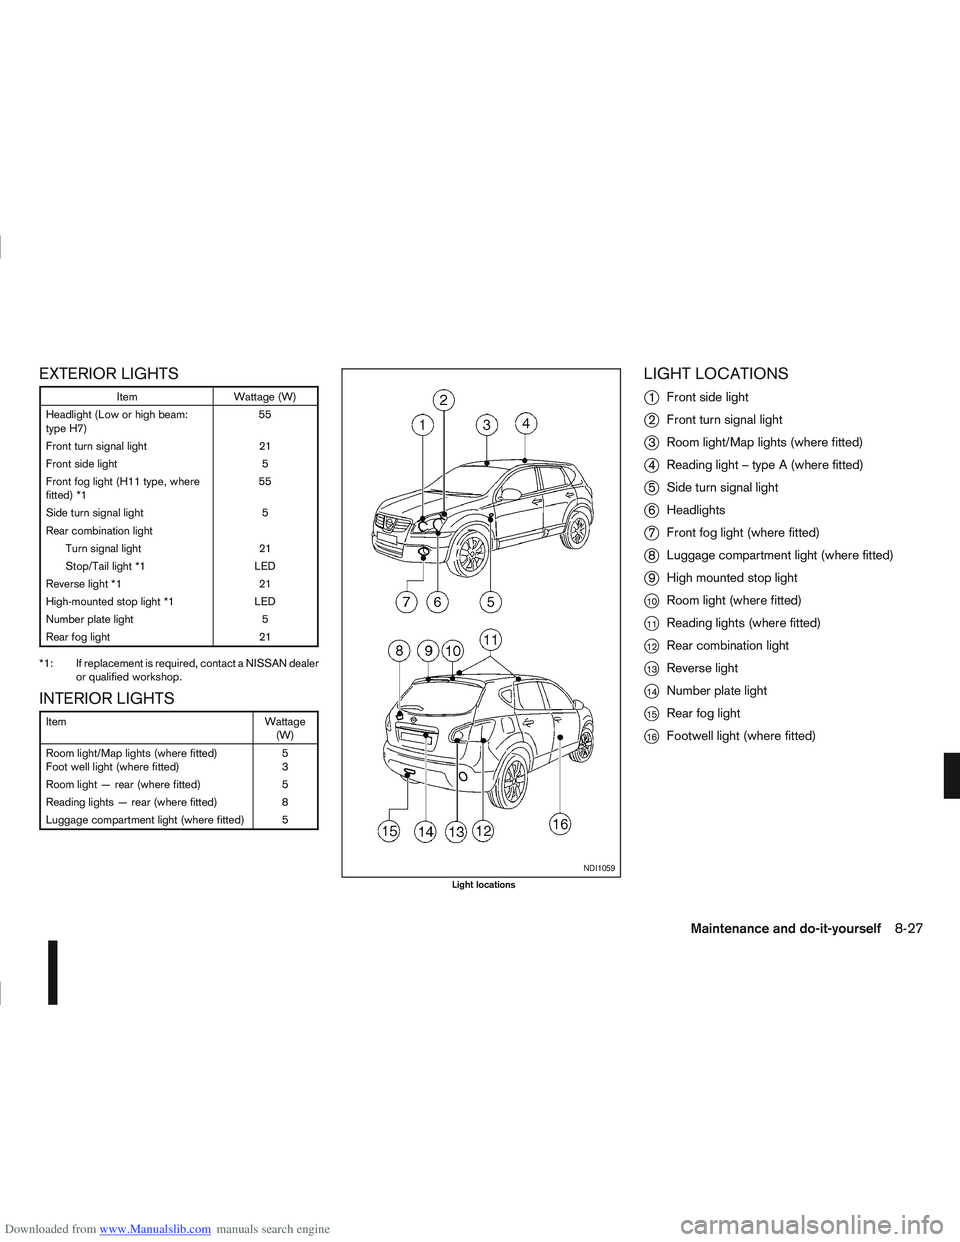
LIGHT LOCATIONS
j
1 Front side light
j2Front turn signal light
j3Room light/Map lights (where fitted)
j4Reading light – type A (where fitted)
j5Side turn signal light
j6Headlights
j7Front fog light (where fitted)
j8Luggage compartment light (where fitted)
j9High mounted stop light
j10Room light (where fitted)
j11Reading lights (where fitted)
j12Rear combination light
j13Reverse light
j14Number plate light
j15Rear fog light
j16Footwell light (where fitted)
NDI1059
Light locations
Maintenance and do-it-yourself8-27
Page 259 of 297

Downloaded from www.Manualslib.com manuals search engine Replacing procedures
m
NDI707
All other lights are either type A, B, C or D.
When replacing a bulb, first remove the lens
and/or cover.
mREMOVE
mINSTALLNDI930
Front side light
NDI931
Front turn signal light
8-28Maintenance and do-it-yourself
Page 264 of 297

Downloaded from www.Manualslib.com manuals search engine Incorrect tyre selection, fitting, care or main-
tenance can affect vehicle safety with risk of
accident and injury. If in doubt, consult a
NISSAN dealer or the tyre manufacturer.
TYRE WEAR AND DAMAGE
Tyres should be periodically inspected for wear,
cracking, bulging or objects caught in the tread. If
excessive wear, cracks, bulging or deep cuts are
found, the tyre should be replaced.
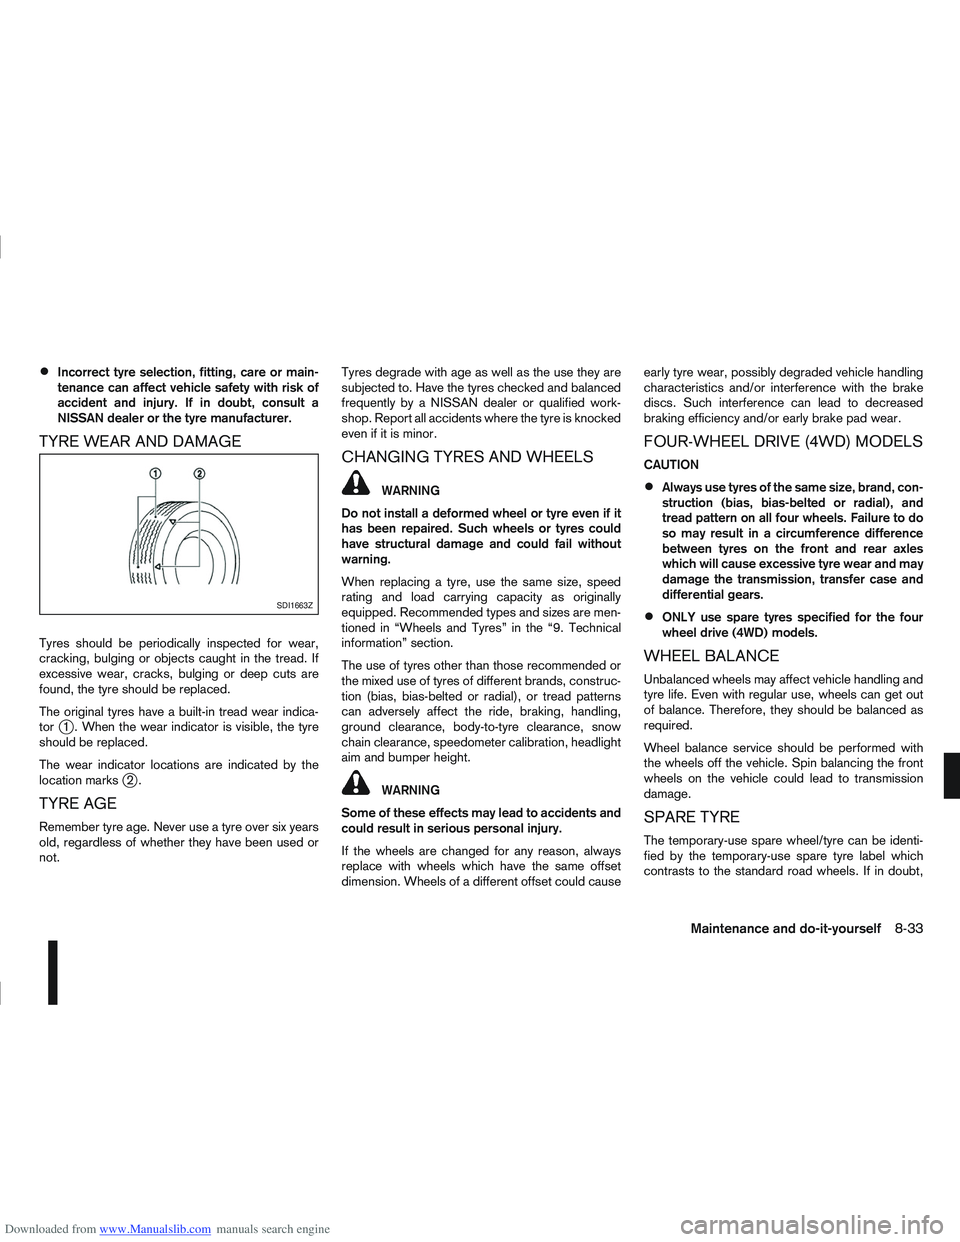
The original tyres have a built-in tread wear indica-
tor
j1 . When the wear indicator is visible, the tyre
should be replaced.
The wear indicator locations are indicated by the
location marks
j2.
TYRE AGE
Remember tyre age. Never use a tyre over six years
old, regardless of whether they have been used or
not. Tyres degrade with age as well as the use they are
subjected to. Have the tyres checked and balanced
frequently by a NISSAN dealer or qualified work-
shop. Report all accidents where the tyre is knocked
even if it is minor.
CHANGING TYRES AND WHEELS
WARNING
Do not install a deformed wheel or tyre even if it
has been repaired. Such wheels or tyres could
have structural damage and could fail without
warning.
When replacing a tyre, use the same size, speed
rating and load carrying capacity as originally
equipped. Recommended types and sizes are men-
tioned in “Wheels and Tyres” in the “9. Technical
information” section.
The use of tyres other than those recommended or
the mixed use of tyres of different brands, construc-
tion (bias, bias-belted or radial), or tread patterns
can adversely affect the ride, braking, handling,
ground clearance, body-to-tyre clearance, snow
chain clearance, speedometer calibration, headlight
aim and bumper height.
WARNING
Some of these effects may lead to accidents and
could result in serious personal injury.
If the wheels are changed for any reason, always
replace with wheels which have the same offset
dimension. Wheels of a different offset could cause early tyre wear, possibly degraded vehicle handling
characteristics and/or interference with the brake
discs. Such interference can lead to decreased
braking efficiency and/or early brake pad wear.
FOUR-WHEEL DRIVE (4WD) MODELS
CAUTION
Always use tyres of the same size, brand, con-
struction (bias, bias-belted or radial), and
tread pattern on all four wheels. Failure to do
so may result in a circumference difference
between tyres on the front and rear axles
which will cause excessive tyre wear and may
damage the transmission, transfer case and
differential gears.
ONLY use spare tyres specified for the four
wheel drive (4WD) models.
WHEEL BALANCE
Unbalanced wheels may affect vehicle handling and
tyre life. Even with regular use, wheels can get out
of balance. Therefore, they should be balanced as
required.
Wheel balance service should be performed with
the wheels off the vehicle. Spin balancing the front
wheels on the vehicle could lead to transmission
damage.
SPARE TYRE
The temporary-use spare wheel/tyre can be identi-
fied by the temporary-use spare tyre label which
contrasts to the standard road wheels. If in doubt,
SDI1663Z
Maintenance and do-it-yourself8-33
Page 283 of 297

Downloaded from www.Manualslib.com manuals search engine – Checking handbrake ..................................................... 8-15
– Handbrake lever ............................................................ 3-16
– Trailer brakes ................................................................ 5-36
Brightness control ............................................................... 2-16C
C-View® ........................................................................\
..... 2-36
– Sunshade (Reinitialisation procedure) ............................ 2-37
– Sunshade operation ...................................................... 2-36
Capacities and recommended fuel/lubricants ......................... 9-2
– Fuel recommendation ...................................................... 9-5
Car phone or CB radio ........................................................ 4-44
Care when driving ................................................................. 5-6
Changing
– Changing engine coolant ................................................. 8-6
– Changing engine oil ......................................................... 8-9
– Changing engine oil filter ............................................... 8-11
– Changing tyres and wheels ........................................... 8-33
Checking
– Checking brake pedal ................................................... 8-15
– Checking engine coolant level ......................................... 8-6
– Checking engine oil level ................................................. 8-8
– Checking handbrake ..................................................... 8-15
Child restraints .................................................................... 1-18
– 5-seater ........................................................................\
. 1-20
– 7-seater ........................................................................\
. 1-20
– Anchor points ................................................................ 1-28
– Installation on front passenger seat ................................ 1-23
– Installation on rear seats ................................................ 1-24
– Top tether strap for child restraint .................................. 1-27
Child safety ........................................................................\
... 1-8
Cleaning
– Alloy wheels .................................................................... 7-3
– Chrome parts .................................................................. 7-3
– Exterior ........................................................................\
.... 7-2 – Glass ....................................................................... 7-3, 7-4
– Interior ........................................................................\
.... 7-4
– Plastic parts .................................................................... 7-4
– Rear-view camera lens .................................................... 7-3
– Removing spots ............................................................... 7-2
– Underbody ...................................................................... 7-3
Clutch fluid ........................................................................\
.. 8-15
Cold weather driving ........................................................... 5-42
Console box ........................................................................\
2-32
Continuously variable transmission
– Continuously variable transmission fluid ......................... 8-14
– Driving with continuously variable transmission (Models with
manual shift) .................................................................. 5-14
– Driving with continuously variable transmission (Models without manual shift) .................................................................. 5-17
Coolant
– Changing engine coolant ................................................. 8-6
– Checking engine coolant level ......................................... 8-6
– Engine coolant ............................................................... 5-43
– Engine coolant temperature gauge ................................... 2-2
– Engine cooling system ..................................................... 8-6
Corrosion protection .................................................... 5-43, 7-5
– Environmental factors ...................................................... 7-5
Cruise control ............................................................ 2-21, 5-29
Cruise control system operations ......................................... 5-30
D
Defogger switch
– Outside mirror defogger ................................................ 2-24
– Rear window defogger .................................................. 2-23
Diesel particulate filter (DPF) ................................................. 5-5
Diesel particulate filter (DPF) warning light ............................. 2-4
Difference between predictive and actual distances ............... 4-9
Dimensions ........................................................................\
... 9-8
10-2Index