2012 NISSAN MAXIMA wheel
[x] Cancel search: wheelPage 2 of 20
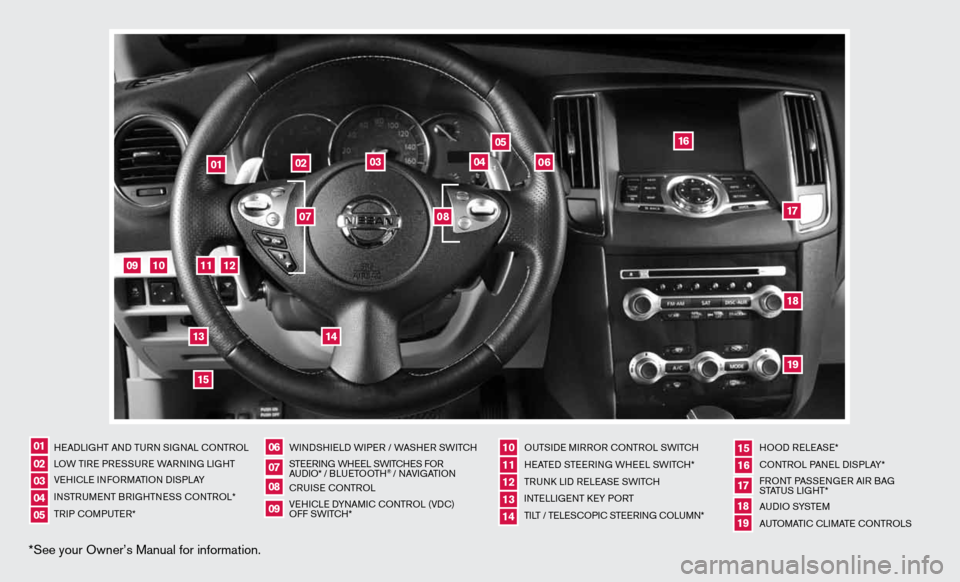
*See your Owner’s Manual for information.
HeAd LiGHT And Tu Rn S iG nAL c OnTROL
LOW T iRe PRe SSuRe WARnin G LiGHT
V e H icL e inf ORMAT iOn diSPLAY
in STR uM enT BR iGHTne SS cOnTROL*
TR iP c OMP uTeR* W
ind SHieL d W iPeR / WASHeR SW iT c H
ST eeRin G WHeeL SW iT c He S f OR
A udi O* / B L u eTO OTH
® / nAVi GATiOn
cR uiSe cOn TROL
Ve Hic Le d YnAM ic cOnTROL (Vdc)
Off SWi TcH* Ou
TSide MiRROR cOn TROL SWiTcH
H eATed STee Rin G WH eeL SW iTc H*
TR unk Lid R eLeAS e SW iTc H
inTe LLiGenT keY PORT
Ti LT / Te LeSc OP ic STee Rin G c OLu Mn* HOO
d ReLeAS e*
cOn TROL PA neL diSPLAY*
f RO nT PASS enGeR Ai R BAG
STATu S LiGHT*
A u d i O SYST eM
A uTOMATic c LiMATe c OnTROLS
07
02
06
0501
08
03
1110121314
1617181915
09
04
02
03
05
04
01
06
09
10
11
14
12
1315
16
171819
07
08
Page 3 of 20
TABLe Of cOnTenTS
Ess Ential i nformation
Loose fuel cap . . . . . . . . . . . . . . . . . . . . . . . . . . . . . . . . . . . .\
. . . . . . . . . . . . 2
Tire Pressure Monitoring System (TPMS) .......................... 2
Heated Steering Wheel (if so equipped) ............................3
first DrivE fEatur Es
ni SSAn intelligent k ey
® System.................................. 4
Trunk Lid Release ............................................... 5
Seat Adjustments .............................................. 5
Automatic drive Positioner (if so equipped) ......................... 6
Outside Mirror control Switch .................................... 6
Starting/Stopping the engine ..................................... 7
Headlight control Switch ........................................ 7
Windshield Wiper/Washer Switch ................................. 8
Automatic climate controls (if so equipped) ........................ 8
f M/AM/XM
® Satellite Radio with cd/ dVd Player (if so equipped) .....10
cruise control ................................................ 11
fuel-filler door ................................................ 11
s yst Em GuiDE
Vehicle information display ...................................... 12
Bluetooth
® Hands-free Phone System (if so equipped) ...............12
System Operating Tips ....................................... 12
Bluetooth
® System without navigation (if so equipped) ............ 13
Bluetooth® System with navigation (if so equipped) ...............15
navigation System (if so equipped) ...............................17
d Vd Player (if so equipped) ..................................... 17
HomeLink
® universal Transceiver (if so equipped) ...................17
• A cellular telephone should not be used for any purpose while
driving so full attention may be given to vehicle operation.
• Always wear your seat belt.
• Supplemental air bags do not replace proper seat belt usage.
• Children 12 and under should always ride in the rear seat
properly secured in child restraints or seat belts according to
their age and weight.
• Do not drink and drive.
f or more information, refer to the “safety –– seats, seat belts and
supplemental restraint system (section 1)”, the “monitor, climate,
audio, phone and voice recognition systems (section 4)” and the
“starting and driving (section 5)” of your Owner’s Manual.
Additional information about your vehicle is also available in your Owner’s Manual, navigation System Owner’s Manual and at www.nissanusa.com. To view detailed
instructional videos, go to
www.nissanownersinfo.mobi/2012/maxima or snap this barcode with an appropriate barcode reader.
Page 5 of 20
To view detailed instructional videos regarding these and other features, please go to www.nissanownersinfo.mobi.3
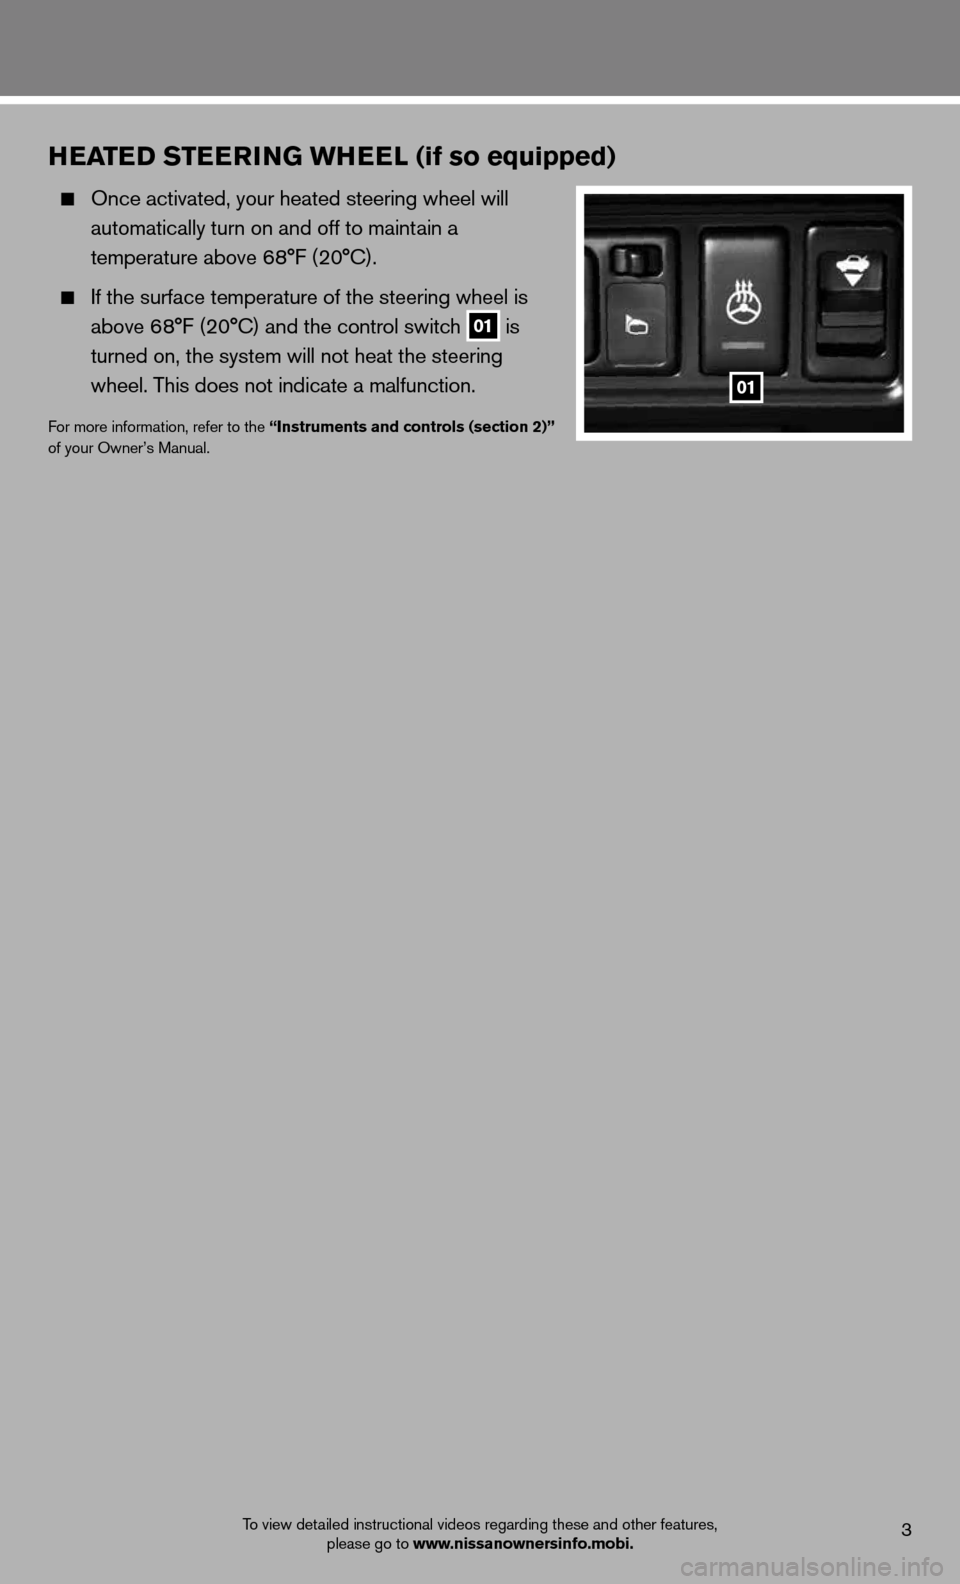
hEatED stEE rinG Wh EEl (if so equipped)
Once activated, your heated steering wheel will
automatically turn on and off to maintain a
temperature above 68°F (20°C).
if the surface temperature of the steering wheel is
above 68°F (20°C) and the control switch
01 is
turned on, the system will not heat the steering
wheel. This does not indicate a malfunction.
for more information, refer to the “instruments and controls (section 2)”
of your Owner’s Manual.
01
Page 7 of 20
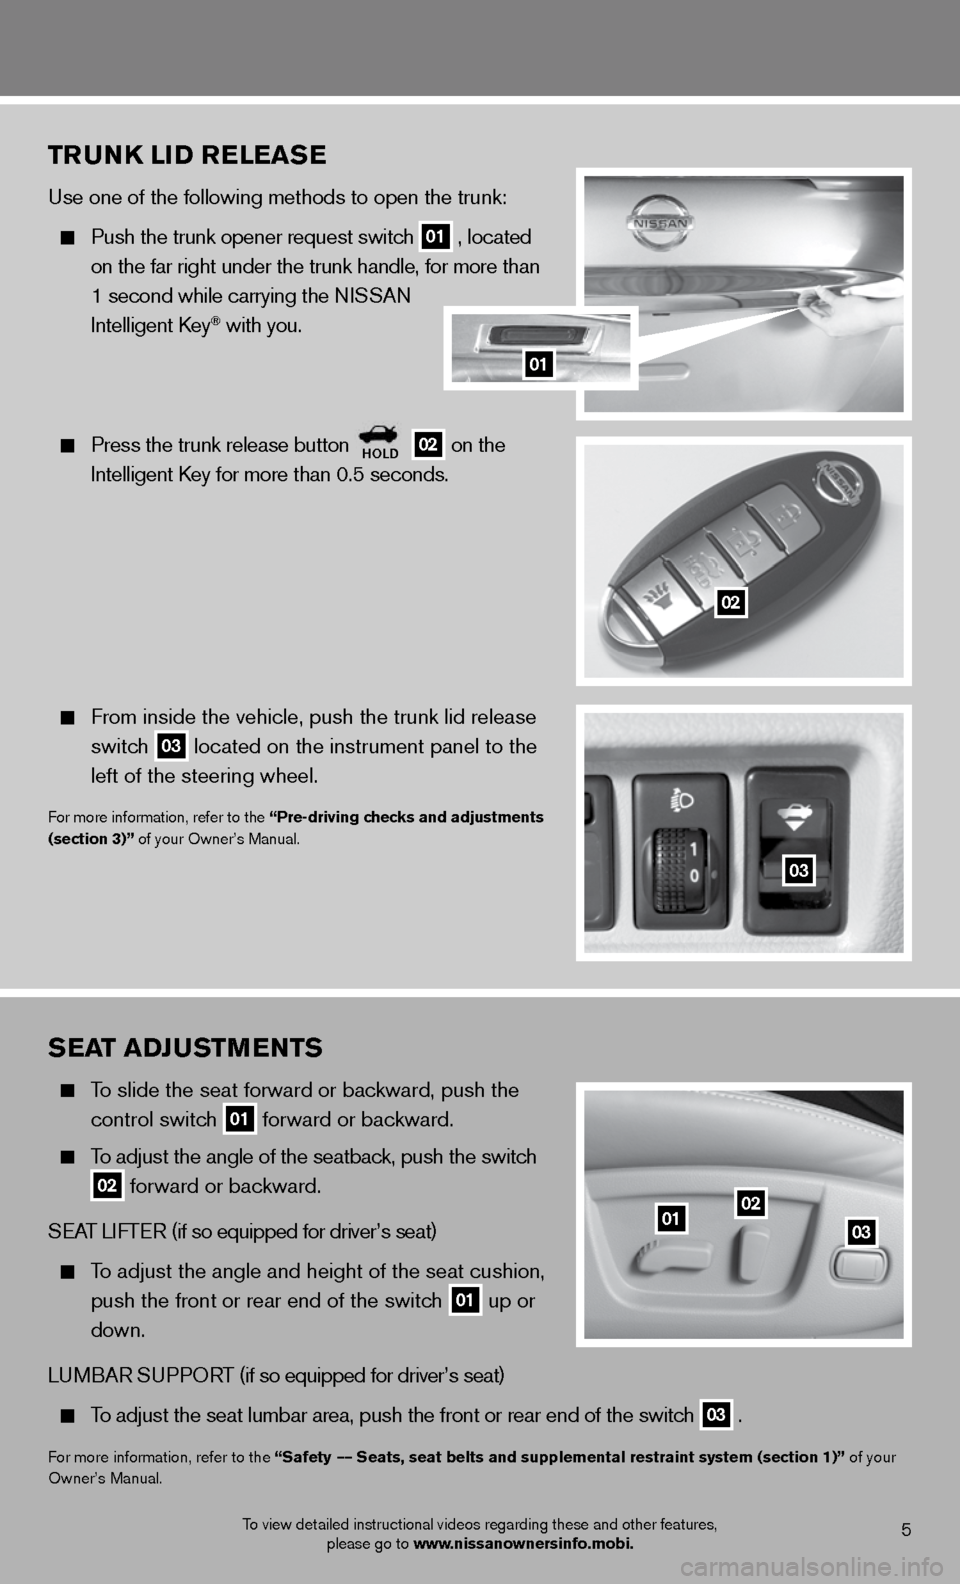
sEat aDJ ustmEnts
To slide the seat forward or backward, push the
control switch
01 forward or backward.
To adjust the angle of the seatback, push the switch
02 forward or backward.
SeAT LifTe R (if so equipped for driver’s seat)
To adjust the angle and height of the seat cushion,
push the front or rear end of the switch
01 up or
down.
Lu MBAR S uPPORT (if so equipped for driver’s seat)
To adjust the seat lumbar area, push the front or rear end of the switch
03 .
f
or more information, refer to the “safety –– seats, seat belts and supplemental restraint system (section 1)” of your
Owner’s Manual.
0102
03
5To view detailed instructional videos regarding these and other features, please go to www.nissanownersinfo.mobi.
trunk liD rElEas E
use one of the following methods to open the trunk:
Push the trunk opener request switch
01 , located
on the far right under the trunk handle, for more than
1 second while carrying the n iSSAn
intelligent k ey
® with you.
Press the trunk release button
holD 02 on the
intelligent k ey for more than 0.5 seconds.
from inside the vehicle, push the trunk lid release
switch
03 located on the instrument panel to the
left of the steering wheel.
for more information, refer to the “Pre-driving checks and adjustments
(section 3)” of your Owner’s Manual.
03
02
01
Page 14 of 20
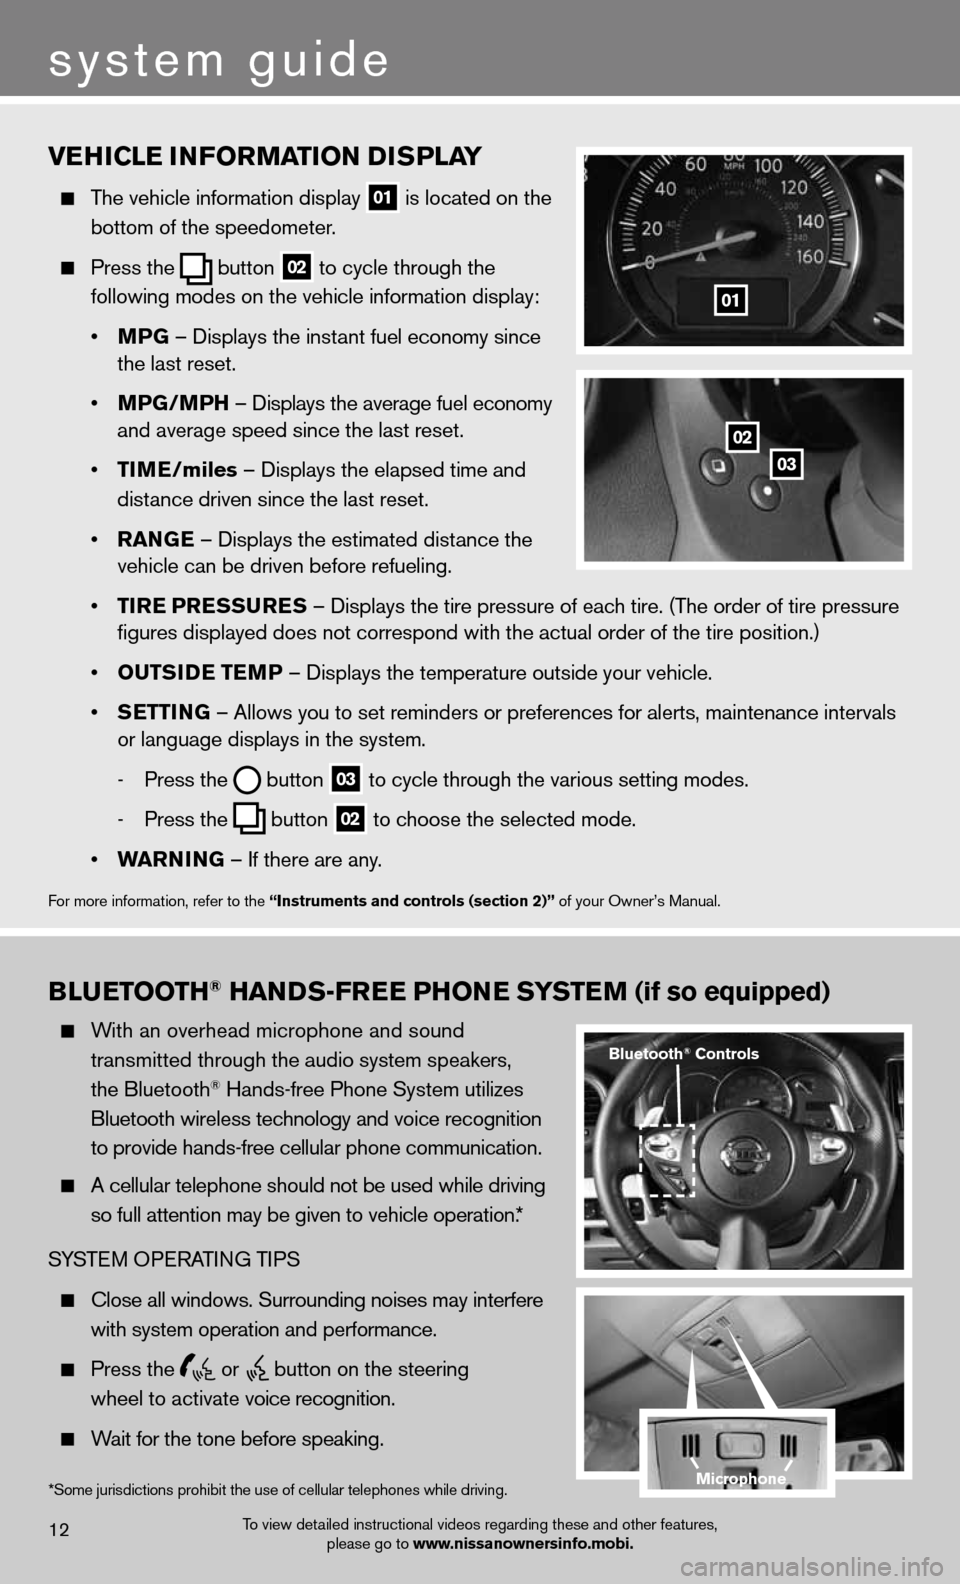
vEhiClE information D isPlay
The vehicle information display
01 is located on the
bottom of the speedometer.
Press the
button
02 to cycle through the
following modes on the vehicle information display:
• mPG – displays the instant fuel economy since
the last reset.
• mPG/mP h – displays the average fuel economy
and average speed since the last reset.
• tim E/miles – displays the elapsed time and
distance driven since the last reset.
• ran GE – displays the estimated distance the
vehicle can be driven before refueling.
• tirE P rEssurEs – displays the tire pressure of each tire. (The order of tire pressure
figures displayed does not correspond with the actual order of the tir\
e position.)
• outsi DE tEmP – displays the temperature outside your vehicle.
• sEttin G – Allows you to set reminders or preferences for alerts, maintenance\
intervals
or language displays in the system.
- Press the
button
03 to cycle through the various setting modes.
- Press the
button
02 to choose the selected mode.
• Warnin G – if there are any.
for more information, refer to the “instruments and controls (section 2)” of your Owner’s Manual.
01
B lu Etooth® han Ds-fr EE Phon E systEm (if so equipped)
With an overhead microphone and sound
transmitted through the audio system speakers,
the Bluetooth
® Hands-free Phone System utilizes
Bluetooth wireless technology and voice recognition
to provide hands-free cellular phone communication.
A cellular telephone should not be used while driving
so full attention may be given to vehicle operation.*
SYSTe M OPeRATin G TiPS
close all windows. Surrounding noises may interfere
with system operation and performance.
Press the
or
button on the steering
wheel to activate voice recognition.
Wait for the tone before speaking.
system guide
To view detailed instructional videos regarding these and other features,
please go to www.nissanownersinfo.mobi.12
*Some jurisdictions prohibit the use of cellular telephones while driving.
Bluetooth® Controls
02
03
microphone
Page 15 of 20
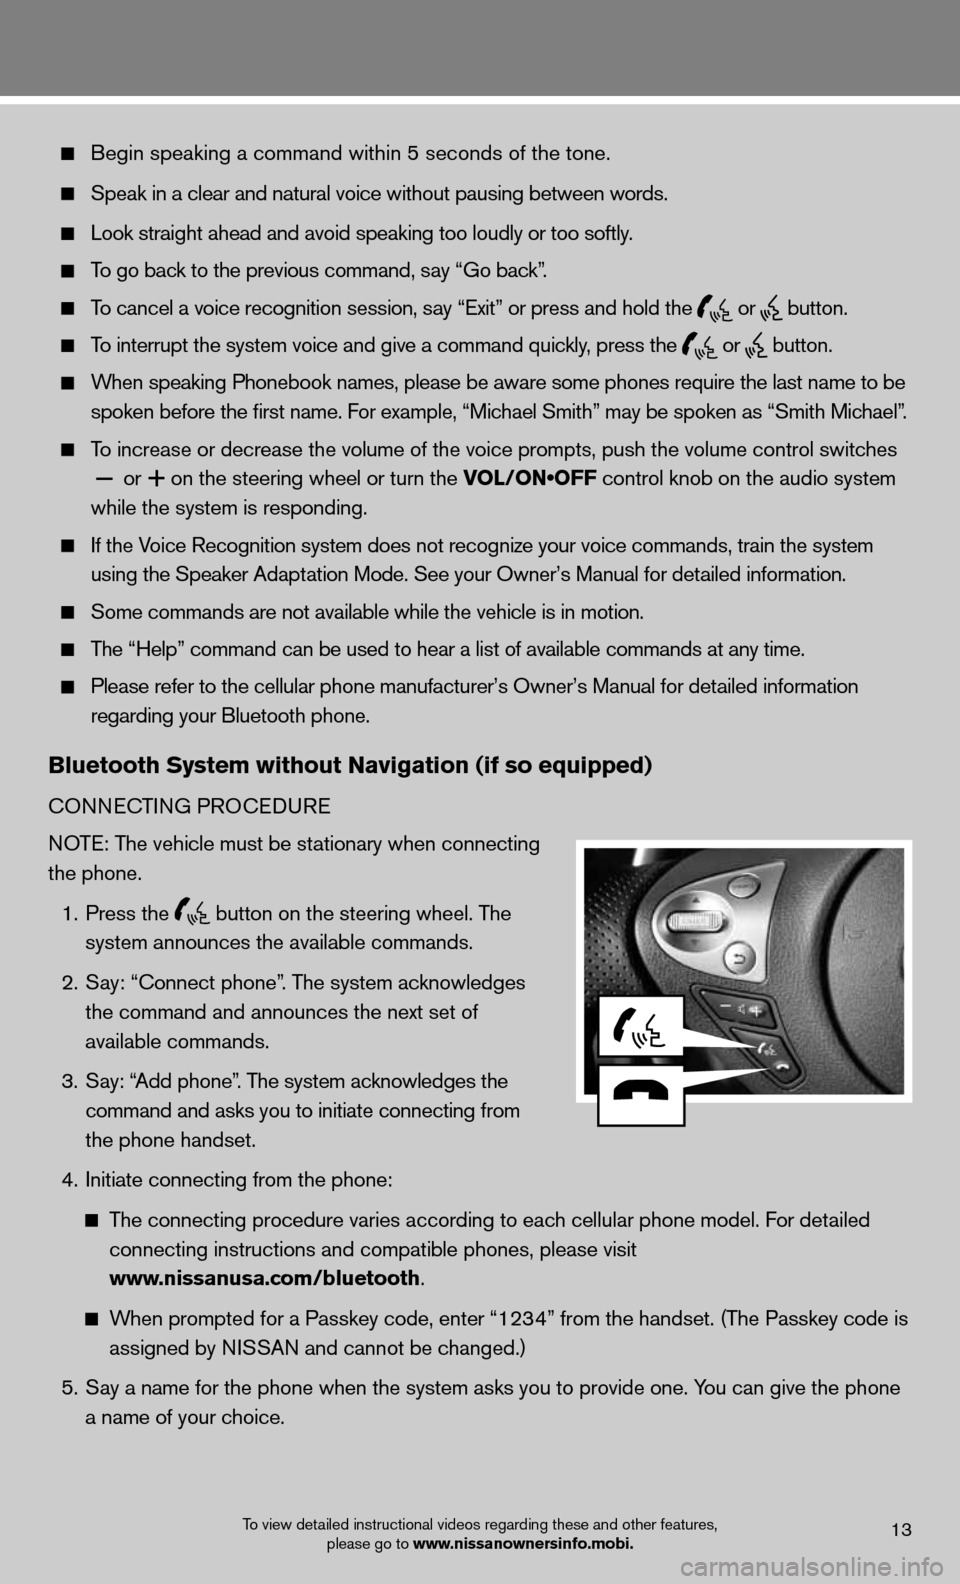
Begin speaking a command within 5 seconds of the tone.
Speak in a clear and natural voice without pausing between words.
Look straight ahead and avoid speaking too loudly or too softly.
To go back to the previous command, say “Go back”.
To cancel a voice recognition session, say “Exit” or press and hold the
or
button.
To interrupt the system voice and give a command quickly, press the
or
button.
When speaking Phonebook names, please be aware some phones require the last name to be
spoken before the first name. For example, “Michael Smith” may be spoken as “Smith Michael”.
To increase or decrease the volume of the voice prompts, push the volume \
control switches
or
+ on the steering wheel or turn the VOL/ON•OFF control knob on the audio system
while the system is responding.
if the Voice Recognition system does not recognize your voice commands, train th\
e system
using the Speaker Adaptation Mode. See your Owner’s Manual for detailed information.
Some commands are not available while the vehicle is in motion.
The “Help” command can be used to hear a list of available commands at any time.
Please refer to the cellular phone manufacturer’s Owner’s Manual f\
or detailed information
regarding your Bluetooth phone.
Bluetooth system without navigation (if so equipped)
cOnnec TinG PROcedu Re
NOTE: The vehicle must be stationary when connecting
the phone.
1. Press the
button on the steering wheel. The
system announces the available commands.
2. Say: “connect phone”. The system acknowledges
the command and announces the next set of
available commands.
3. Say: “Add phone”. The system acknowledges the
command and asks you to initiate connecting from
the phone handset.
4. initiate connecting from the phone:
The connecting procedure varies according to each cellular phone model. f or detailed
connecting instructions and compatible phones, please visit
www.nissanusa.com/bluetooth.
When prompted for a Passkey code, enter “1234” from the handset. (The Passkey code is
assigned by NISSAN and cannot be changed.)
5. Say a name for the phone when the system asks you to provide one. You can give the phone
a name of your choice.
To view detailed instructional videos regarding these and other features,
please go to www.nissanownersinfo.mobi.13
Page 16 of 20
system guide
14To view detailed instructional videos regarding these and other features, please go to www.nissanownersinfo.mobi.
PHOneBOOk SeTu P
depending on your cell phone, the system may automatically download your \
cell phone’s
entire phonebook to the vehicle’s Bluetooth system.
If the phonebook does not download automatically, 40 entries can be individually downloaded.
To manually download entries:
1. Press the
button on the steering wheel.
2. After the tone, say “Phonebook”.
3. After the next tone, say “Transfer Entry”. The system acknowledges the command and
asks you to initiate the transfer from the phone handset. The new contact phone number
will be transferred from the cellular phone to the vehicle.
The transfer procedure varies according to each cellular phone. See your cellular phone’s
owner’s manual for details. You can also visit www.nissanusa.com/bluetooth for
instructions on transferring phone numbers from NISSAN recommended cellular phones.
4. The system repeats the number and prompts you for the next command. When you have
finished entering numbers or transferring an entry, choose “Store.”
5. The system confirms the name, location and number.
MAkin G A cALL fROM TH e PHOneBOO k
1. Press the
button.
2. After waiting for the tone, say “call”.
3. After the next tone, speak a name of a phonebook entry. For example “Michael Smith”.
4. Confirm the correct name is recognized by saying “Dial” after the tone.
NOTE: In some cases, names stored in all UPPERCASE letters may not be recognized by the
voice recognition system.
MAkin G A cALL BY PHO ne nuMBeR
1. Press the
button. A tone will sound.
2. Say: “Call”. The system acknowledges the command and announces the next set of
available commands.
3. Say: “Phone Number”. The system acknowledges the command and announces the next
set of available commands.
4. Say the number you wish to call starting with the area code in single digit format.
5. When you have finished speaking the phone number, the system repeats it back and
announces the available commands.
6. Say: “dial”. The system acknowledges the command and makes the call.
Recei Vin G/endin G A cALL
When you receive a phone call, a ring tone sounds through the audio syste\
m.
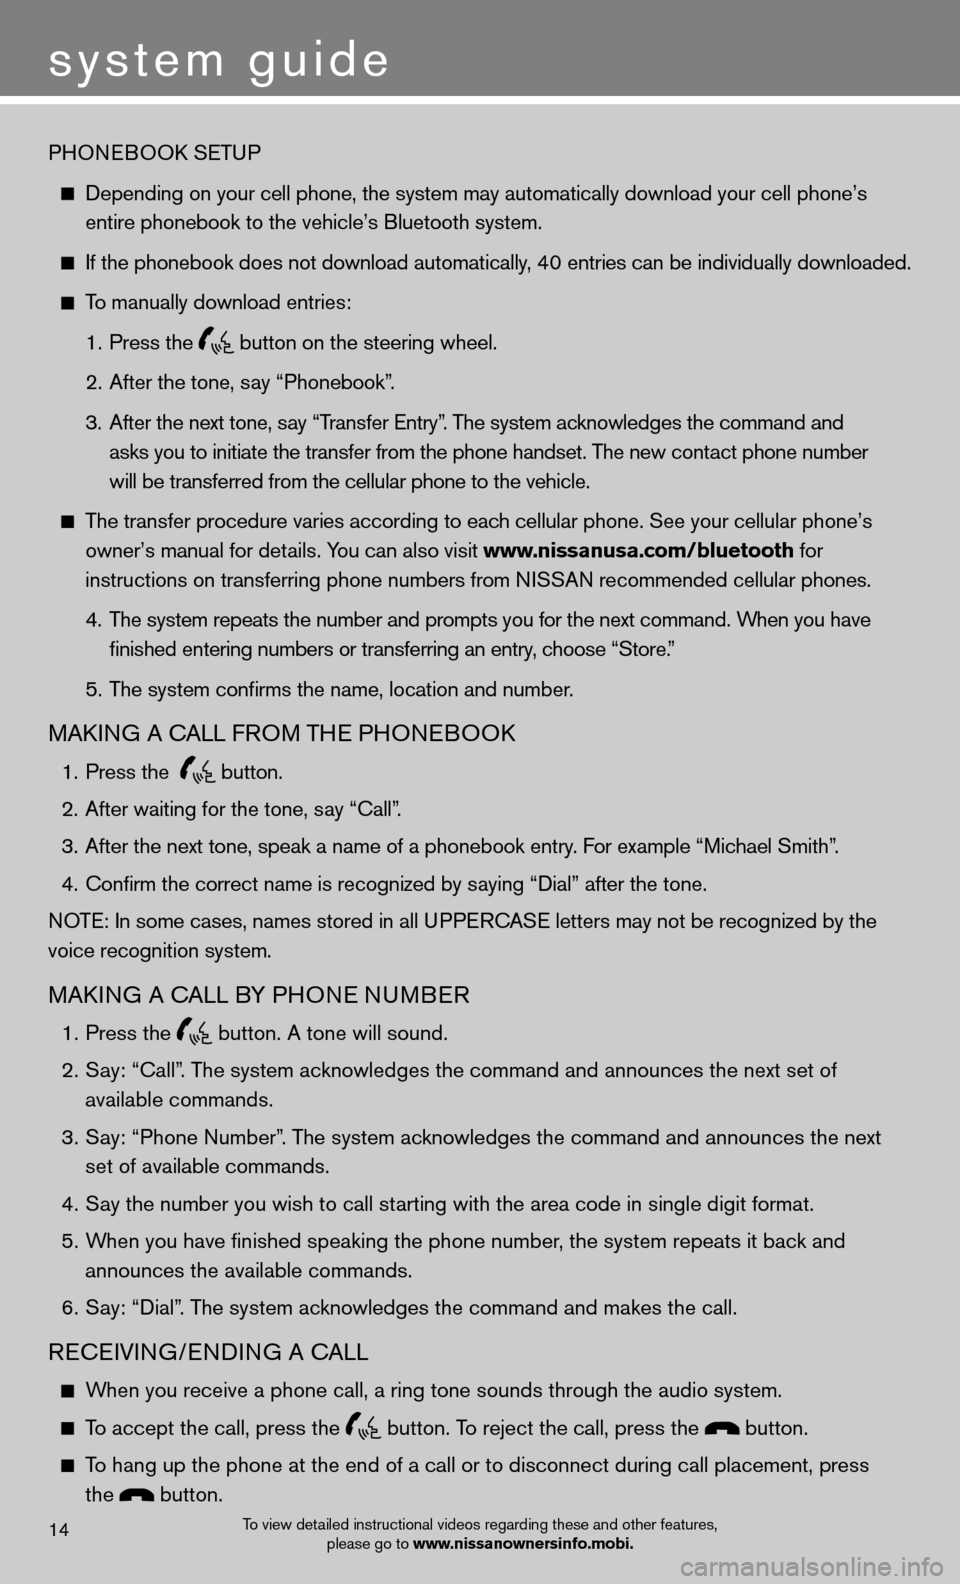
To accept the call, press the button. To reject the call, press the button.
To hang up the phone at the end of a call or to disconnect during call pl\
acement, press
the
button.
Page 18 of 20
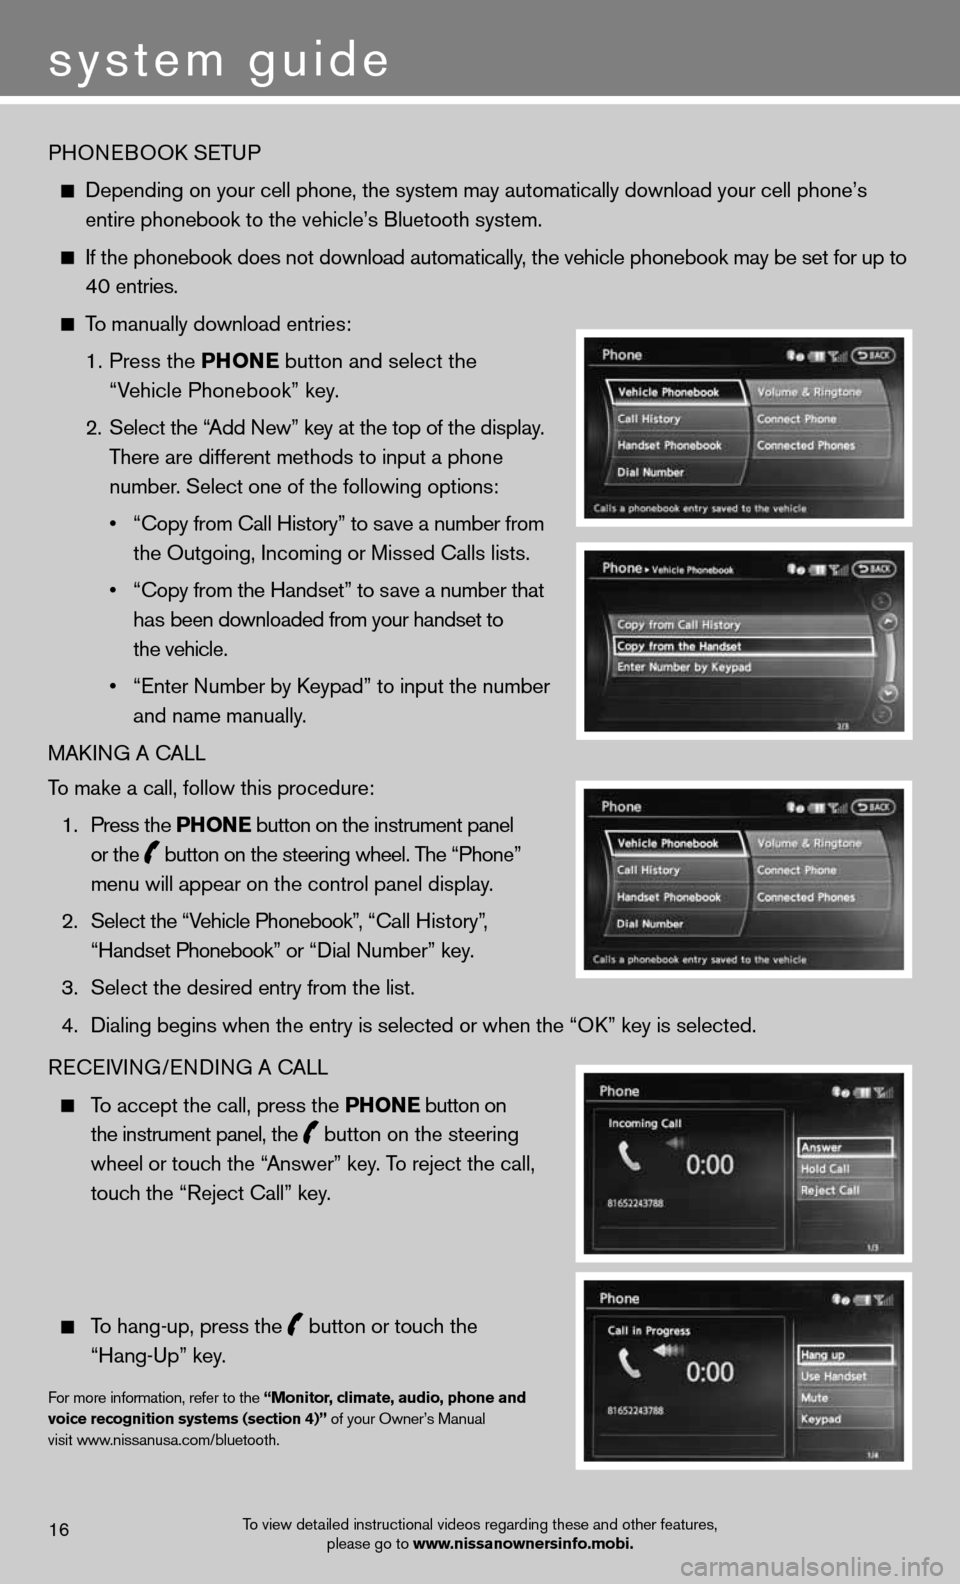
PHOneBOOk SeTu P
depending on your cell phone, the system may automatically download your \
cell phone’s
entire phonebook to the vehicle’s Bluetooth system.
If the phonebook does not download automatically, the vehicle phonebook may be set for up to
40 entries.
To manually download entries:
1. Press the Phon E
button and select the
“Vehicle Phonebook” key.
2. Select the “Add new” key at the top of the display.
There are different methods to input a phone
number. Select one of the following options:
• “Copy from Call History” to save a number from
the Outgoing, incoming or Missed calls lists.
• “Copy from the Handset” to save a number that
has been downloaded from your handset to
the vehicle.
• “Enter Number by Keypad” to input the number
and name manually.
MAkin G A cALL
To make a call, follow this procedure:
1. Press the Phon E button on the instrument panel
or the
button on the steering wheel. The “Phone”
menu will appear on the control panel display.
2. Select the “Vehicle Phonebook”, “Call History”,
“Handset Phonebook” or “Dial Number” key.
3. Select the desired entry from the list.
4. Dialing begins when the entry is selected or when the “OK” key is selected.
Recei Vin G/endin G A cALL
To accept the call, press the Phon E button on
the instrument panel, the
button on the steering
wheel or touch the “Answer” key. To reject the call,
touch the “Reject call” key.
To hang-up, press the
button or touch the
“Hang-up” key.
for more information, refer to the “monitor, climate, audio, phone and
voice recognition systems (section 4)” of your Owner’s Manual
visit www.nissanusa.com/bluetooth.
To view detailed instructional videos regarding these and other features, please go to www.nissanownersinfo.mobi.16
system guide