2012 NISSAN MAXIMA climate control
[x] Cancel search: climate controlPage 3 of 20
TABLe Of cOnTenTS
Ess Ential i nformation
Loose fuel cap . . . . . . . . . . . . . . . . . . . . . . . . . . . . . . . . . . . .\
. . . . . . . . . . . . 2
Tire Pressure Monitoring System (TPMS) .......................... 2
Heated Steering Wheel (if so equipped) ............................3
first DrivE fEatur Es
ni SSAn intelligent k ey
® System.................................. 4
Trunk Lid Release ............................................... 5
Seat Adjustments .............................................. 5
Automatic drive Positioner (if so equipped) ......................... 6
Outside Mirror control Switch .................................... 6
Starting/Stopping the engine ..................................... 7
Headlight control Switch ........................................ 7
Windshield Wiper/Washer Switch ................................. 8
Automatic climate controls (if so equipped) ........................ 8
f M/AM/XM
® Satellite Radio with cd/ dVd Player (if so equipped) .....10
cruise control ................................................ 11
fuel-filler door ................................................ 11
s yst Em GuiDE
Vehicle information display ...................................... 12
Bluetooth
® Hands-free Phone System (if so equipped) ...............12
System Operating Tips ....................................... 12
Bluetooth
® System without navigation (if so equipped) ............ 13
Bluetooth® System with navigation (if so equipped) ...............15
navigation System (if so equipped) ...............................17
d Vd Player (if so equipped) ..................................... 17
HomeLink
® universal Transceiver (if so equipped) ...................17
• A cellular telephone should not be used for any purpose while
driving so full attention may be given to vehicle operation.
• Always wear your seat belt.
• Supplemental air bags do not replace proper seat belt usage.
• Children 12 and under should always ride in the rear seat
properly secured in child restraints or seat belts according to
their age and weight.
• Do not drink and drive.
f or more information, refer to the “safety –– seats, seat belts and
supplemental restraint system (section 1)”, the “monitor, climate,
audio, phone and voice recognition systems (section 4)” and the
“starting and driving (section 5)” of your Owner’s Manual.
Additional information about your vehicle is also available in your Owner’s Manual, navigation System Owner’s Manual and at www.nissanusa.com. To view detailed
instructional videos, go to
www.nissanownersinfo.mobi/2012/maxima or snap this barcode with an appropriate barcode reader.
Page 10 of 20
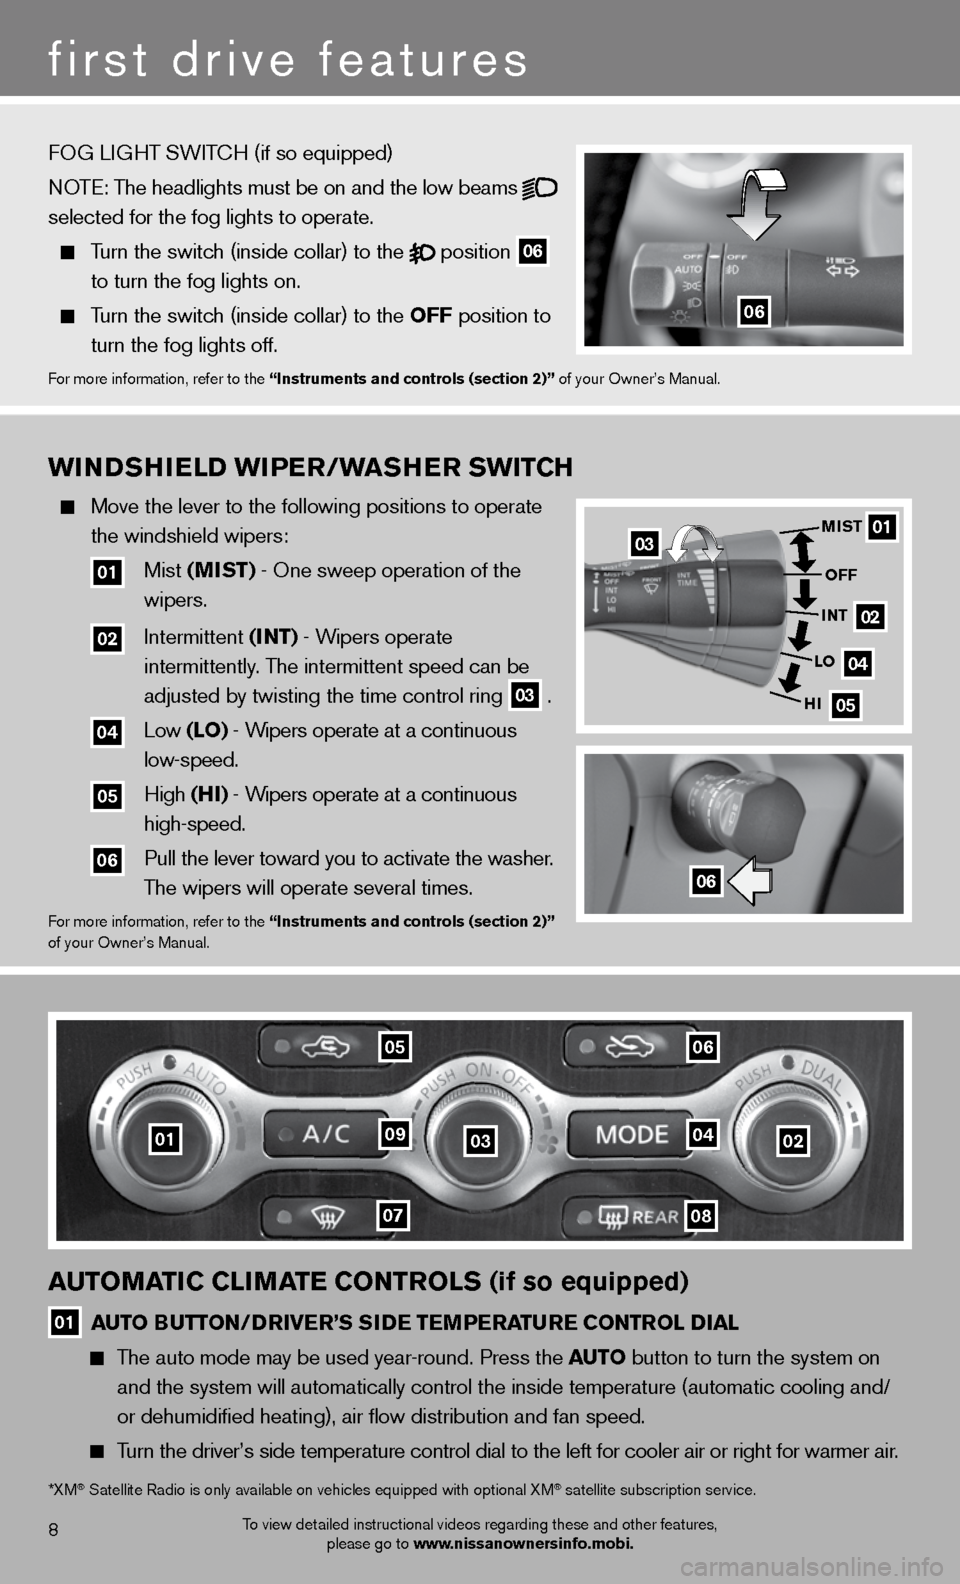
WinDshiEl D WiPEr/W ashEr sW itCh
Move the lever to the following positions to operate
the windshield wipers:
01 Mist (mist) - One sweep operation of the
wipers.
02 intermittent (int) - Wipers operate
intermittently. The intermittent speed can be
adjusted by twisting the time control ring
03 .
04 Low (lo) - Wipers operate at a continuous
low-speed.
05 High (hi) - Wipers operate at a continuous
high-speed.
06 Pull the lever toward you to activate the washer.
The wipers will operate several times.
for more information, refer to the “instruments and controls (section 2)”
of your Owner’s Manual.
01
02
04
05
mist
off
int
lo
hi
06
03
010302
0708
0904
0506
8
first drive features
To view detailed instructional videos regarding these and other features, please go to www.nissanownersinfo.mobi.
automatiC ClimatE Controls (if so equipped)
01 auto B
utton/DrivE r’s si DE tEmPE ratur E Control D ial
The auto mode may be used year-round. Press the auto button to turn the system on
and the system will automatically control the inside temperature (autom\
atic cooling and/
or dehumidified heating), air flow distribution and fan speed.
Turn the driver’s side temperature control dial to the left for cooler\
air or right for warmer air.
*XM® Satellite Radio is only available on vehicles equipped with optional XM® satellite subscription service.
06
fOG Li GHT SW iTc H (if so equipped)
NOTE: The headlights must be on and the low beams
selected for the fog lights to operate.
Turn the switch (inside collar) to the
position
06
to turn the fog lights on.
Turn the switch (inside collar)
to the off position to
turn the fog lights off.
for more information, refer to the “instruments and controls (section 2)” of your Owner’s Manual.
Page 11 of 20
9To view detailed instructional videos regarding these and other features, please go to www.nissanownersinfo.mobi.
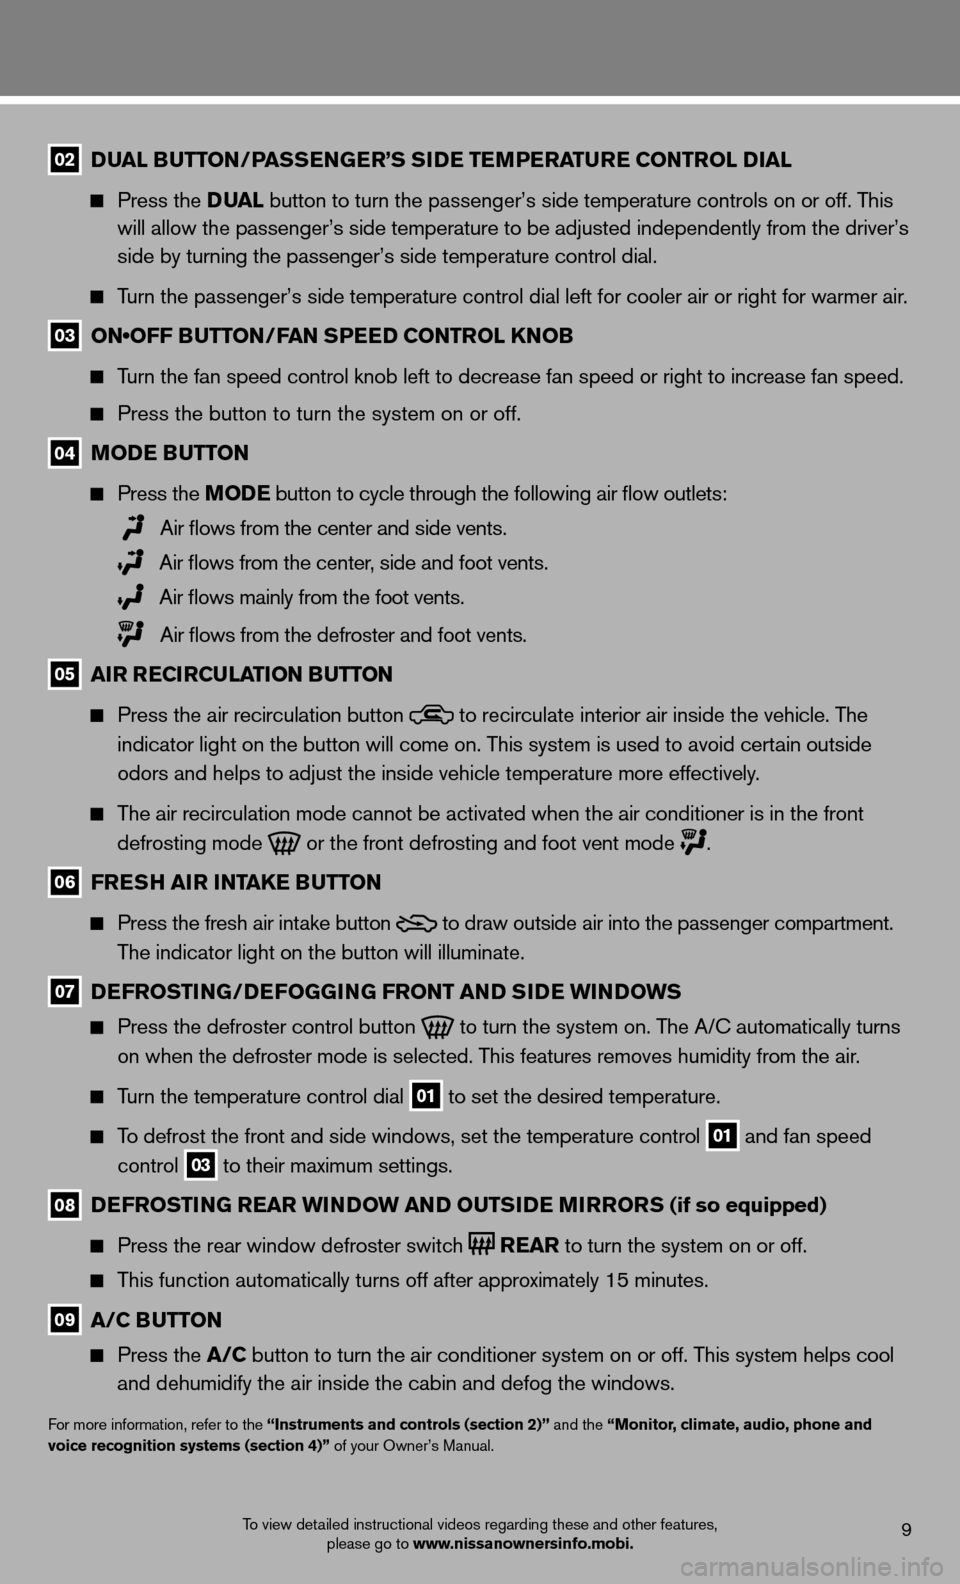
02 D
ual B utton /Pass En GE r’s si DE tEmPE ratur E Control D ial
Press the D ual button to turn the passenger’s side temperature controls on or off. This
will allow the passenger’s side temperature to be adjusted independently from the driver’s
side by turning the passenger’s side temperature control dial.
Turn the passenger’s side temperature control dial left for cooler air\
or right for warmer air.
03 ON•OFF BUTTON/FAN SPEED CONTROL KNOB
Turn the fan speed control knob left to decrease fan speed or right to increase fan speed.
Press the button to turn the system on or off.
04 moDE B utton
Press the moDE button
to cycle through the following air flow outlets:
Air flows from the center and side vents.
Air flows from the center, side and foot vents.
Air flows mainly from the foot vents.
Air flows from the defroster and foot vents.
05 air r ECirCulation B utton
Press the air recirculation button
to recirculate interior air inside the vehicle. The
indicator light on the button will come on. This system is used to avoid certain outside
odors and helps to adjust the inside vehicle temperature more effectivel\
y.
The air recirculation mode cannot be activated when the air conditioner is in the front
defrosting mode
or the front defrosting and foot vent mode
.
06 fr Esh air intak E Button
Press the fresh air intake button
to draw outside air into the passenger compartment.
The indicator light on the button will illuminate.
07 DE frostin G/DEfoGG inG front an D siDE Win Do Ws
Press the defroster control button
to turn the system on. The A/c automatically turns
on when the defroster mode is selected. This features removes humidity from the air.
Turn the temperature control dial 01 to set the desired temperature.
To defrost the front and side windows, set the temperature control 01 and fan speed
control 03 to their maximum settings.
08
DE frostin G rEar Win Do W an D outsi DE mirrors (if so equipped)
Press the rear window defroster switch
r
Ear to turn the system on or off.
This function automatically turns off after approximately 15 minutes.
09 a/C B utton
Press the a/C button to turn the air conditioner system on or off. This system helps cool
and dehumidify the air inside the cabin and defog the windows.
for more information, refer to the “instruments and controls (section 2)” and the “monitor, climate, audio, phone and
voice recognition systems (section 4)” of your Owner’s Manual.
Page 12 of 20
10
first drive features
To view detailed instructional videos regarding these and other features, please go to www.nissanownersinfo.mobi.
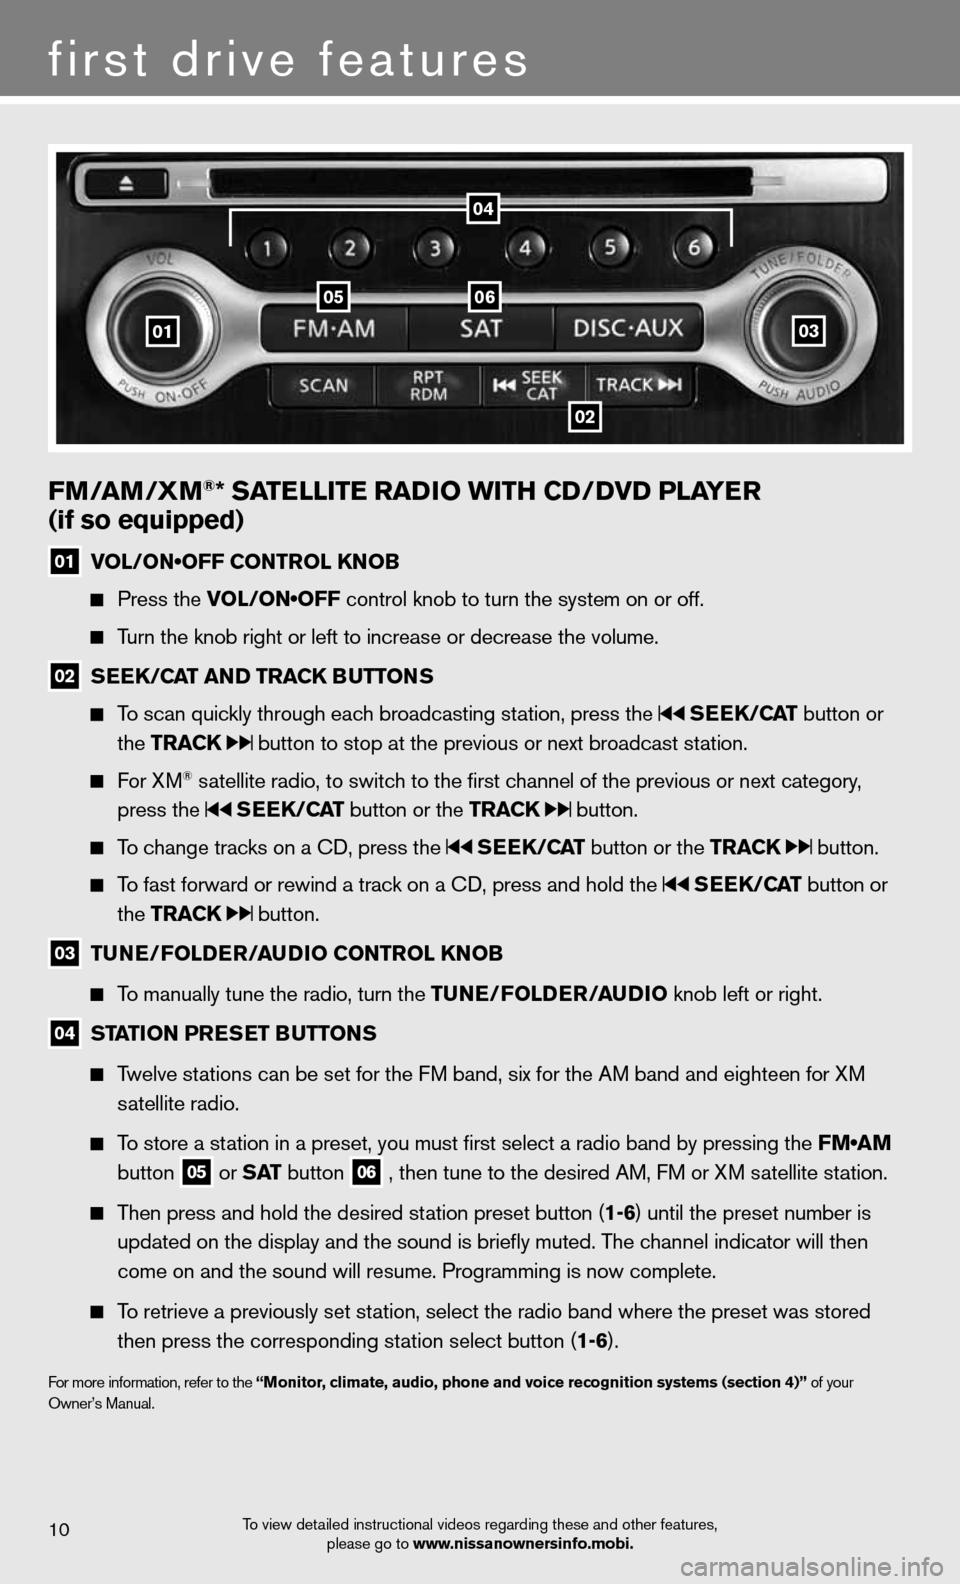
fm/am /Xm®* satE llitE raD io With CD/DvD PlayE r
(if so equipped)
01 VOL/ON•OFF CONTROL KNOB
Press the VOL/ON•OFF control knob to turn the system on or off.
Turn the knob right or left to increase or decrease the volume.
02 s
EE k/C at an D tra Ck Buttons
To scan quickly through each broadcasting station, press the sEEk /Cat button or
the tra Ck
button to stop at the previous or next broadcast station.
f or XM® satellite radio, to switch to the first channel of the previous or next category,
press the
sEEk /Cat button or the tra Ck button.
To change tracks on a cd, press the sEEk /Cat button or the tra Ck button.
To fast forward or rewind a track on a cd, press and hold the sEEk /Cat button or
the tra Ck
button.
03 tun
E/folDE r/au Dio Control knoB
To manually tune the radio, turn the tunE/fol DEr/auDio knob left or right.
04 station Pr
Es Et B uttons
Twelve stations can be set for the FM band, six for the AM band and eighteen for XM
satellite radio.
To store a station in a preset, you must first select a radio band by pressing the FM•AM
button
05 or
s at button
06 , then tune to the desired AM, f
M or XM satellite station.
Then press and hold the desired station preset button (1-6) until the preset number is
updated on the display and the sound is briefly muted. The channel indicator will then
come on and the sound will resume. Programming is now complete.
To retrieve a previously set station, select the radio band where the preset was stored
then press the corresponding station select button (1-6).
for more information, refer to the “monitor, climate, audio, phone and voice recognition systems (section 4)” of your
Owner’s Manual.
01
0506
02
03
04
Page 18 of 20
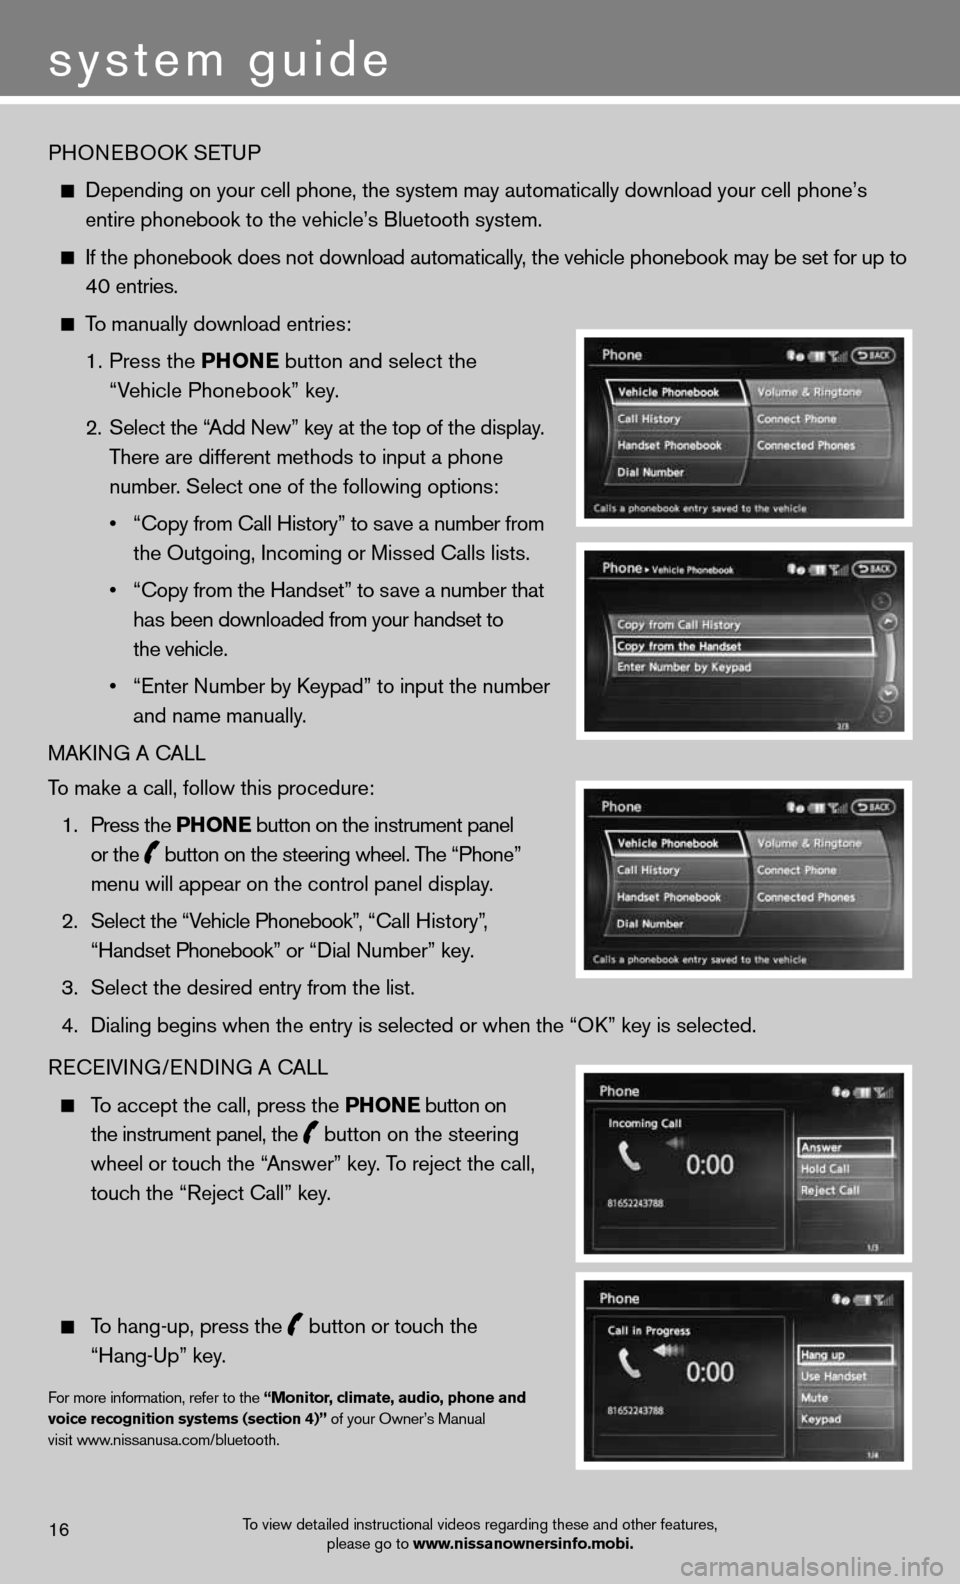
PHOneBOOk SeTu P
depending on your cell phone, the system may automatically download your \
cell phone’s
entire phonebook to the vehicle’s Bluetooth system.
If the phonebook does not download automatically, the vehicle phonebook may be set for up to
40 entries.
To manually download entries:
1. Press the Phon E
button and select the
“Vehicle Phonebook” key.
2. Select the “Add new” key at the top of the display.
There are different methods to input a phone
number. Select one of the following options:
• “Copy from Call History” to save a number from
the Outgoing, incoming or Missed calls lists.
• “Copy from the Handset” to save a number that
has been downloaded from your handset to
the vehicle.
• “Enter Number by Keypad” to input the number
and name manually.
MAkin G A cALL
To make a call, follow this procedure:
1. Press the Phon E button on the instrument panel
or the
button on the steering wheel. The “Phone”
menu will appear on the control panel display.
2. Select the “Vehicle Phonebook”, “Call History”,
“Handset Phonebook” or “Dial Number” key.
3. Select the desired entry from the list.
4. Dialing begins when the entry is selected or when the “OK” key is selected.
Recei Vin G/endin G A cALL
To accept the call, press the Phon E button on
the instrument panel, the
button on the steering
wheel or touch the “Answer” key. To reject the call,
touch the “Reject call” key.
To hang-up, press the
button or touch the
“Hang-up” key.
for more information, refer to the “monitor, climate, audio, phone and
voice recognition systems (section 4)” of your Owner’s Manual
visit www.nissanusa.com/bluetooth.
To view detailed instructional videos regarding these and other features, please go to www.nissanownersinfo.mobi.16
system guide
Page 19 of 20
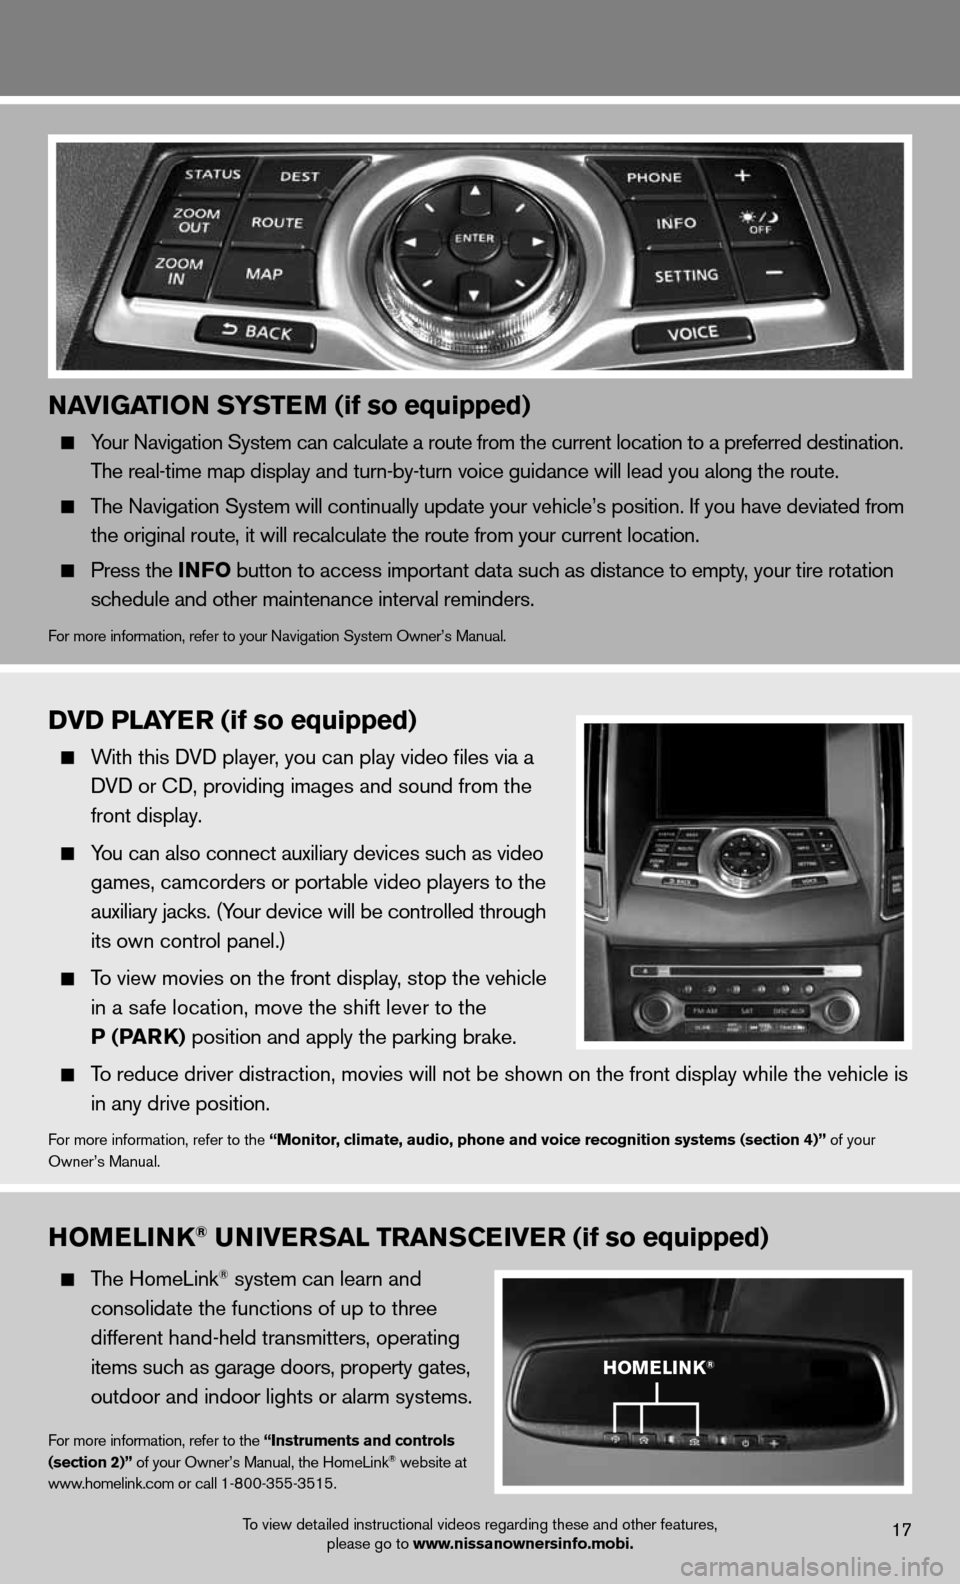
naviGation systE m (if so equipped)
Your navigation System can calculate a route from the current location to a pr\
eferred destination.
The real-time map display and turn-by-turn voice guidance will lead you along the route.
The navigation System will continually update your vehicle’s position. if you have deviated from
the original route, it will recalculate the route from your current loca\
tion.
Press the info button to access important data such as distance to empty, your tire rotation
schedule and other maintenance interval reminders.
for more information, refer to your navigation System Owner’s Manual.
homElink® univE rsal trans CEivE r (if so equipped)
The HomeLink® system can learn and
consolidate the functions of up to three
different hand-held transmitters, operating
items such as garage doors, property gates,
outdoor and indoor lights or alarm systems.
for more information, refer to the “instruments and controls
(section 2)” of your Owner’s Manual, the HomeLink® website at
www.homelink.com or call 1-800-355-3515.
DvD PlayE r (if so equipped)
With this d Vd player, you can play video files via a
d Vd or cd, providing images and sound from the
front display.
You can also connect auxiliary devices such as video
games, camcorders or portable video players to the
auxiliary jacks. (Your device will be controlled through
its own control panel.)
To view movies on the front display, stop the vehicle
in a safe location, move the shift lever to the
P (Park) position and apply the parking brake.
To reduce driver distraction, movies will not be shown on the front display while the vehicle is
in any drive position.
for more information, refer to the “monitor, climate, audio, phone and voice recognition systems (section 4)” of your
Owner’s Manual.
homElink®
To view detailed instructional videos regarding these and other features, please go to www.nissanownersinfo.mobi.17