2012 NISSAN MAXIMA instrument panel
[x] Cancel search: instrument panelPage 7 of 20
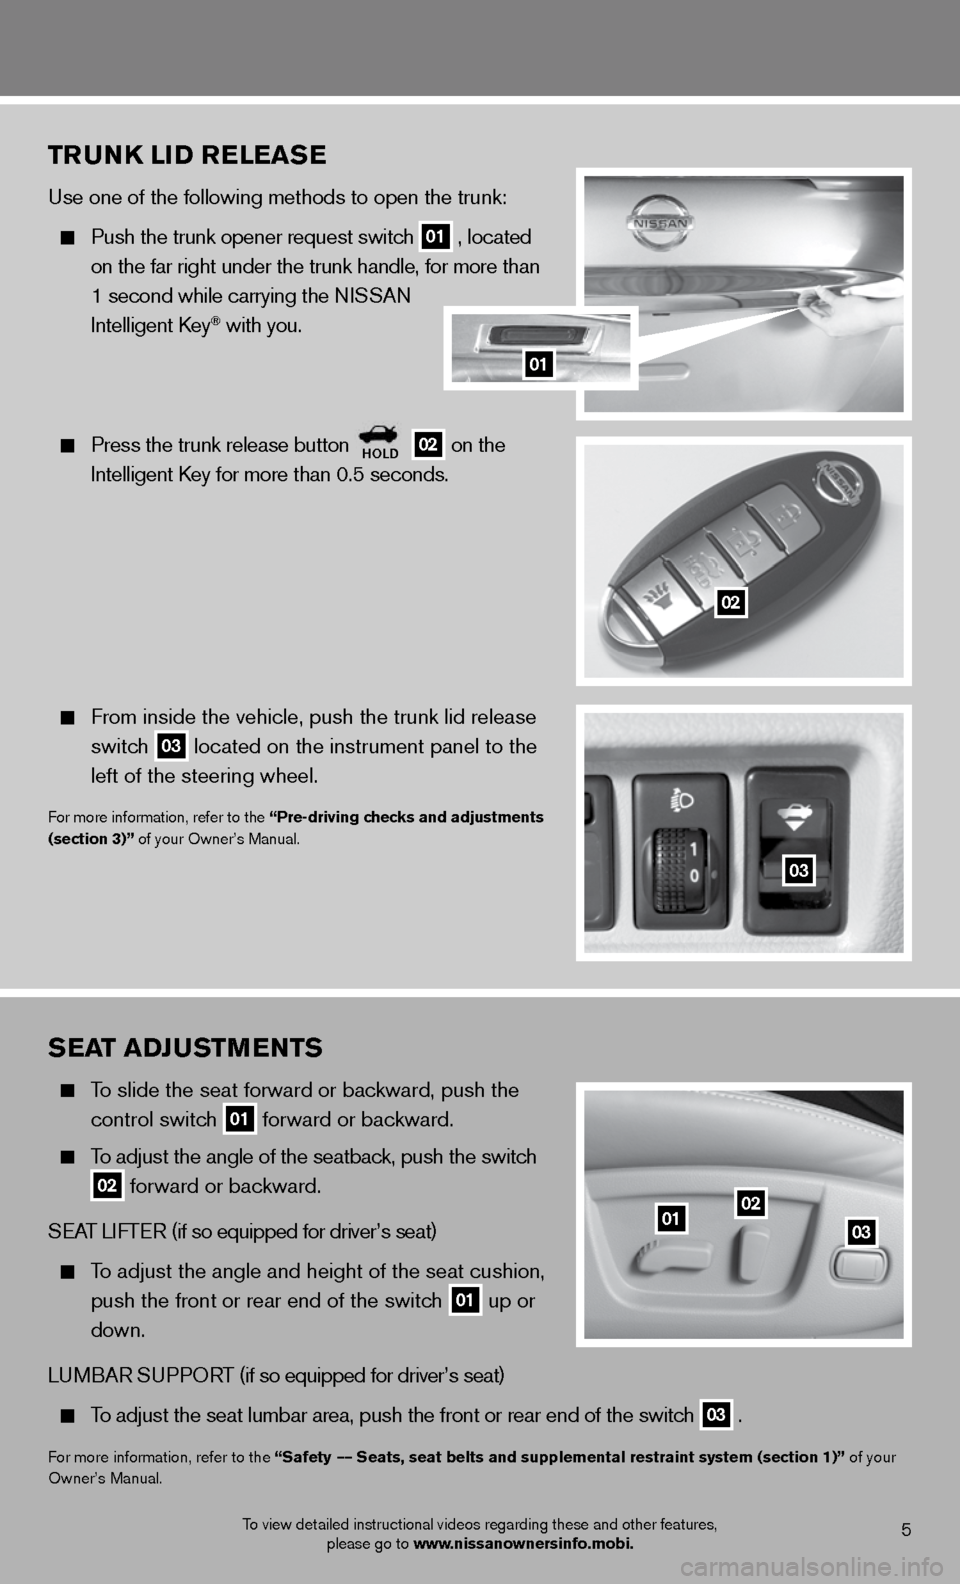
sEat aDJ ustmEnts
To slide the seat forward or backward, push the
control switch
01 forward or backward.
To adjust the angle of the seatback, push the switch
02 forward or backward.
SeAT LifTe R (if so equipped for driver’s seat)
To adjust the angle and height of the seat cushion,
push the front or rear end of the switch
01 up or
down.
Lu MBAR S uPPORT (if so equipped for driver’s seat)
To adjust the seat lumbar area, push the front or rear end of the switch
03 .
f
or more information, refer to the “safety –– seats, seat belts and supplemental restraint system (section 1)” of your
Owner’s Manual.
0102
03
5To view detailed instructional videos regarding these and other features, please go to www.nissanownersinfo.mobi.
trunk liD rElEas E
use one of the following methods to open the trunk:
Push the trunk opener request switch
01 , located
on the far right under the trunk handle, for more than
1 second while carrying the n iSSAn
intelligent k ey
® with you.
Press the trunk release button
holD 02 on the
intelligent k ey for more than 0.5 seconds.
from inside the vehicle, push the trunk lid release
switch
03 located on the instrument panel to the
left of the steering wheel.
for more information, refer to the “Pre-driving checks and adjustments
(section 3)” of your Owner’s Manual.
03
02
01
Page 8 of 20
automatiC DrivE P osition Er (if so equipped)
Two positions for the driver’s seat, steering column
and outside mirrors can be stored in the automatic
drive positioner memory.
follow these procedures to set the memory positions:
• Confirm the shift lever is in the P (P ark) position.
• Push the ignition switch to the on position.
• Adjust the driver’s seat, steering column and outside mirrors to the desired positions using
the adjusting switches for each feature.
• Push the s Et switch and within 5 seconds, push the memory switch (1 or 2) for at least
1 second.
• The indicator light on the memory switch you select will illuminate for approximately
5 seconds.
• The driver’s seat, steering column and outside mirror positions are now set to your preference.
These memorized positions can also be linked to your NISSAN intelligent k ey®.
for more information, refer to the “Pre-driving checks and adjustments (section 3)” of your Owner’s Manual.
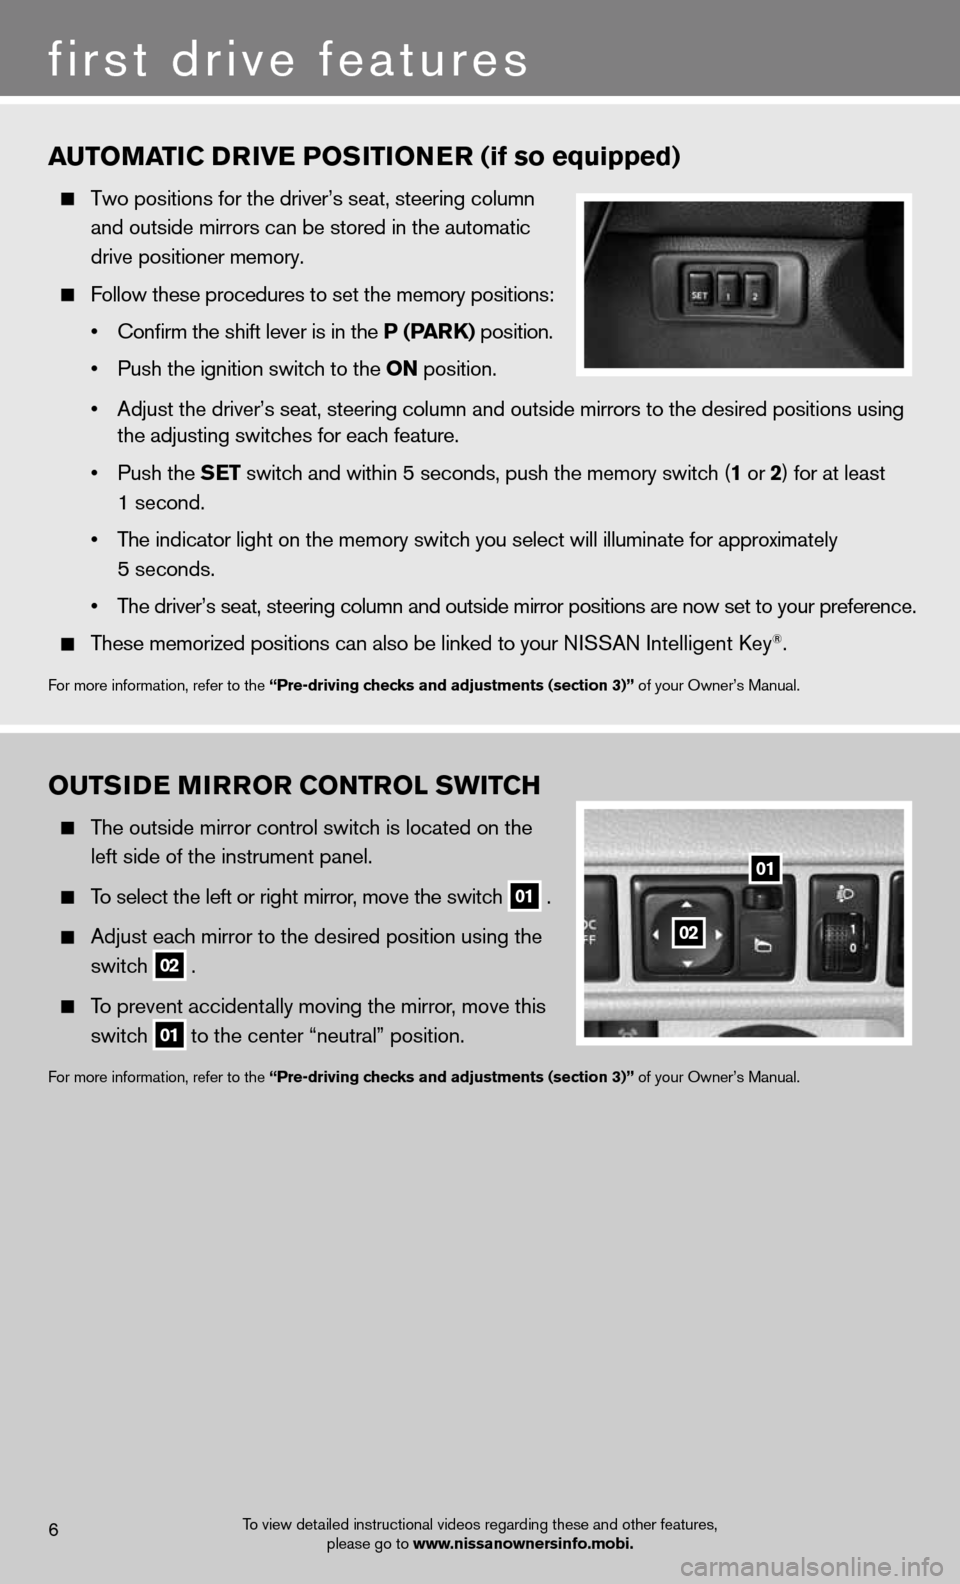
outsi DE mirror Control sWit Ch
The outside mirror control switch is located on the
left side of the instrument panel.
To select the left or right mirror, move the switch
01 .
Adjust each mirror to the desired position using the
switch
02 .
To prevent accidentally moving the mirror, move this
switch
01 to the center “neutral” position.
f
or more information, refer to the “Pre-driving checks and adjustments (section 3)” of your Owner’s Manual.
6
first drive features
To view detailed instructional videos regarding these and other features,
please go to www.nissanownersinfo.mobi.
01
02
Page 9 of 20
7To view detailed instructional videos regarding these and other features, please go to www.nissanownersinfo.mobi.
startinG/stoPPin G thE EnG in E
Depress the brake pedal.
Press the ignition switch start/ stoP button to
start the engine.
n OTe: it is important to make sure the ni SSAn intelligent
key
® is with you (that is, in your pocket or purse).
T uRnin G THe enGine Off
Move the shift lever to the P (P ark) position and apply the parking brake.
Press the ignition switch start/ stoP button to turn the engine off.
eMeRGenc Y enGine SHuT Off
To shut off the engine in an emergency situation while driving, perform o\
ne of the following procedures:
Rapidly push the push-button ignition switch 3 consecutive times, or
Push and hold the push-button ignition switch for more than 2 seconds.
for more information, refer to the “starting and driving (section 5)” of your Owner’s Manual.
h EaD liGht Control sWit Ch
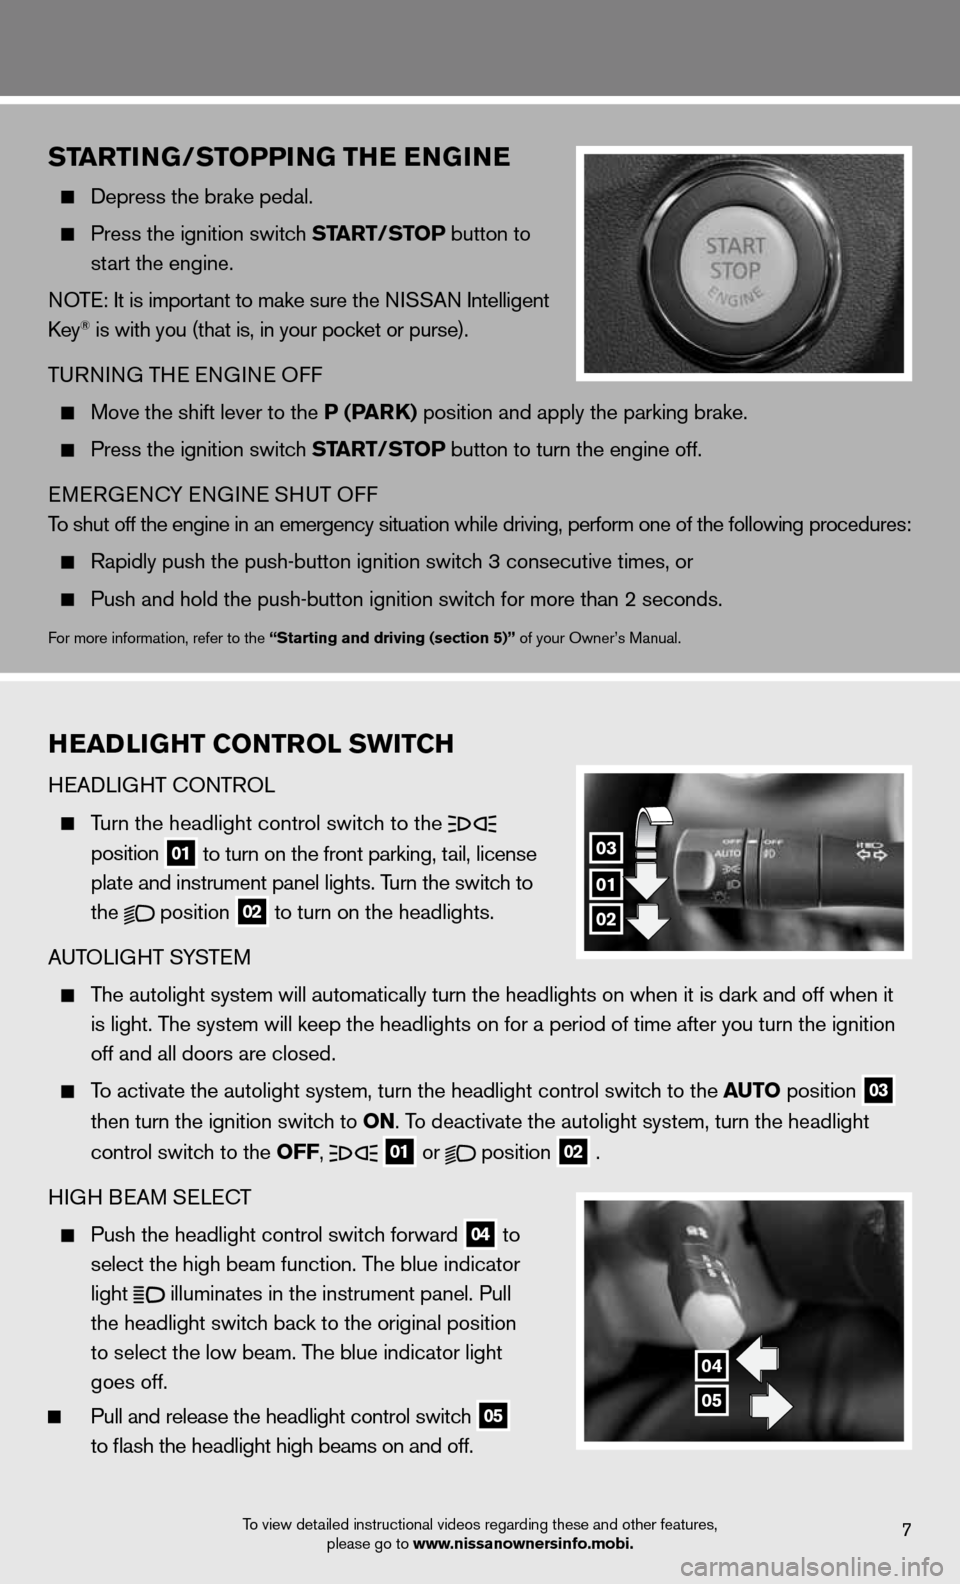
H eAd LiGHT c OnTROL
Turn the headlight control switch to the
position
01 to turn on the front parking, tail, license
plate and instrument panel lights. Turn the switch to
the
position
02 to turn on the headlights.
A uTOLi GHT SYSTe M
The autolight system will automatically turn the headlights on when it is\
dark and off when it
is light. The system will keep the headlights on for a period of time after you tur\
n the ignition
off and all doors are closed.
To activate the autolight system, turn the headlight control switch to the auto position
03
then turn the ignition switch to on. To deactivate the autolight system, turn the headlight
control switch to the off,
01 or
position
02 .
H iGH B eAM S eLec T
Push the headlight control switch forward
04 to
select the high beam function. The blue indicator
light
illuminates in the instrument panel. Pull
the headlight switch back to the original position
to select the low beam. The blue indicator light
goes off.
Pull and release the headlight control switch
05
to flash the headlight high beams on and off.
01
03
02
04
05
Page 13 of 20
To view detailed instructional videos regarding these and other features, please go to www.nissanownersinfo.mobi.
fuEl-fillE r Door
The fuel-filler door is located on the driver’s side of
the vehicle.
When the doors of the vehicle are locked or
unlocked, the fuel-filler door is automatically
locked or unlocked at the same time.
To open the fuel-filler door, once unlocked, push
the right side of the door.
for more information, refer to the “Pre-driving checks and adjustments
(section 3)” of your Owner’s Manual.
11
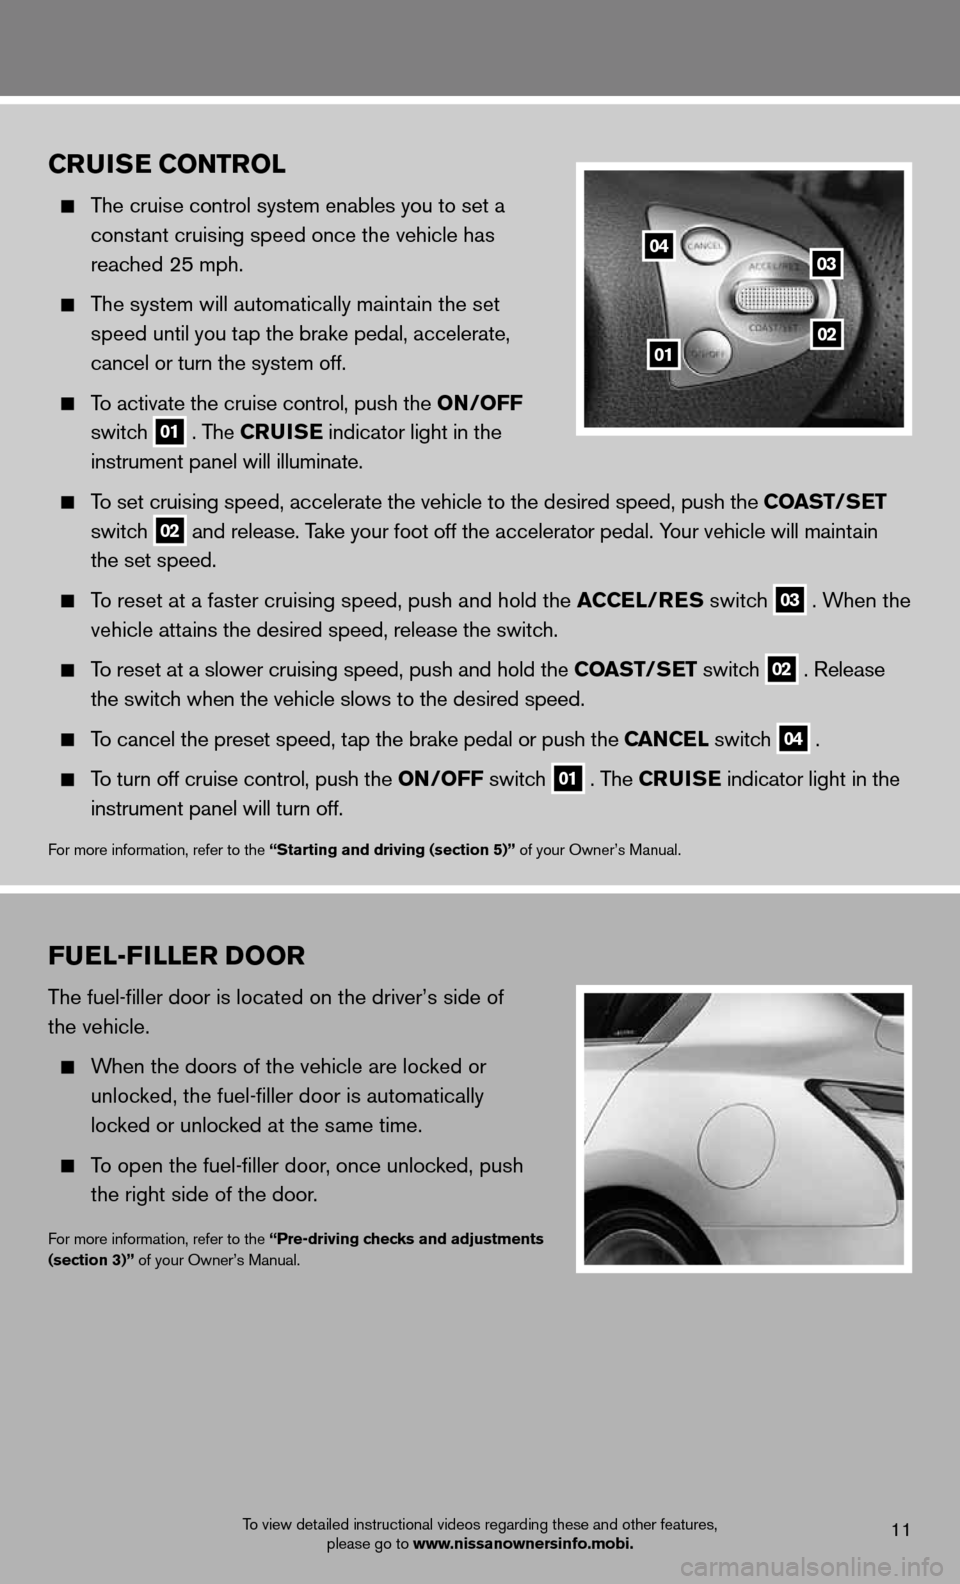
Cruis E Control
The cruise control system enables you to set a
constant cruising speed once the vehicle has
reached 25 mph.
The system will automatically maintain the set
speed until you tap the brake pedal, accelerate,
cancel or turn the system off.
To activate the cruise control, push the on /off
switch
01 . The C
ruisE indicator light in the
instrument panel will illuminate.
To set cruising speed, accelerate the vehicle to the desired speed, push the Coast/ sEt
switch
02 and release. Take your foot off the accelerator pedal. Your vehicle will maintain
the set speed.
To reset at a faster cruising speed, push and hold the a CCEl/rEs switch 03 . When the
vehicle attains the desired speed, release the switch.
To reset at a slower cruising speed, push and hold the Coast/ sEt switch 02 . Release
the switch when the vehicle slows to the desired speed.
To cancel the preset speed, tap the brake pedal or push the C anCEl switch 04 .
To turn off cruise control, push the on /off switch 01 . The C
ruisE indicator light
in the
instrument panel will turn off.
for more information, refer to the “starting and driving (section 5)” of your Owner’s Manual.
04
0102
03
Page 17 of 20
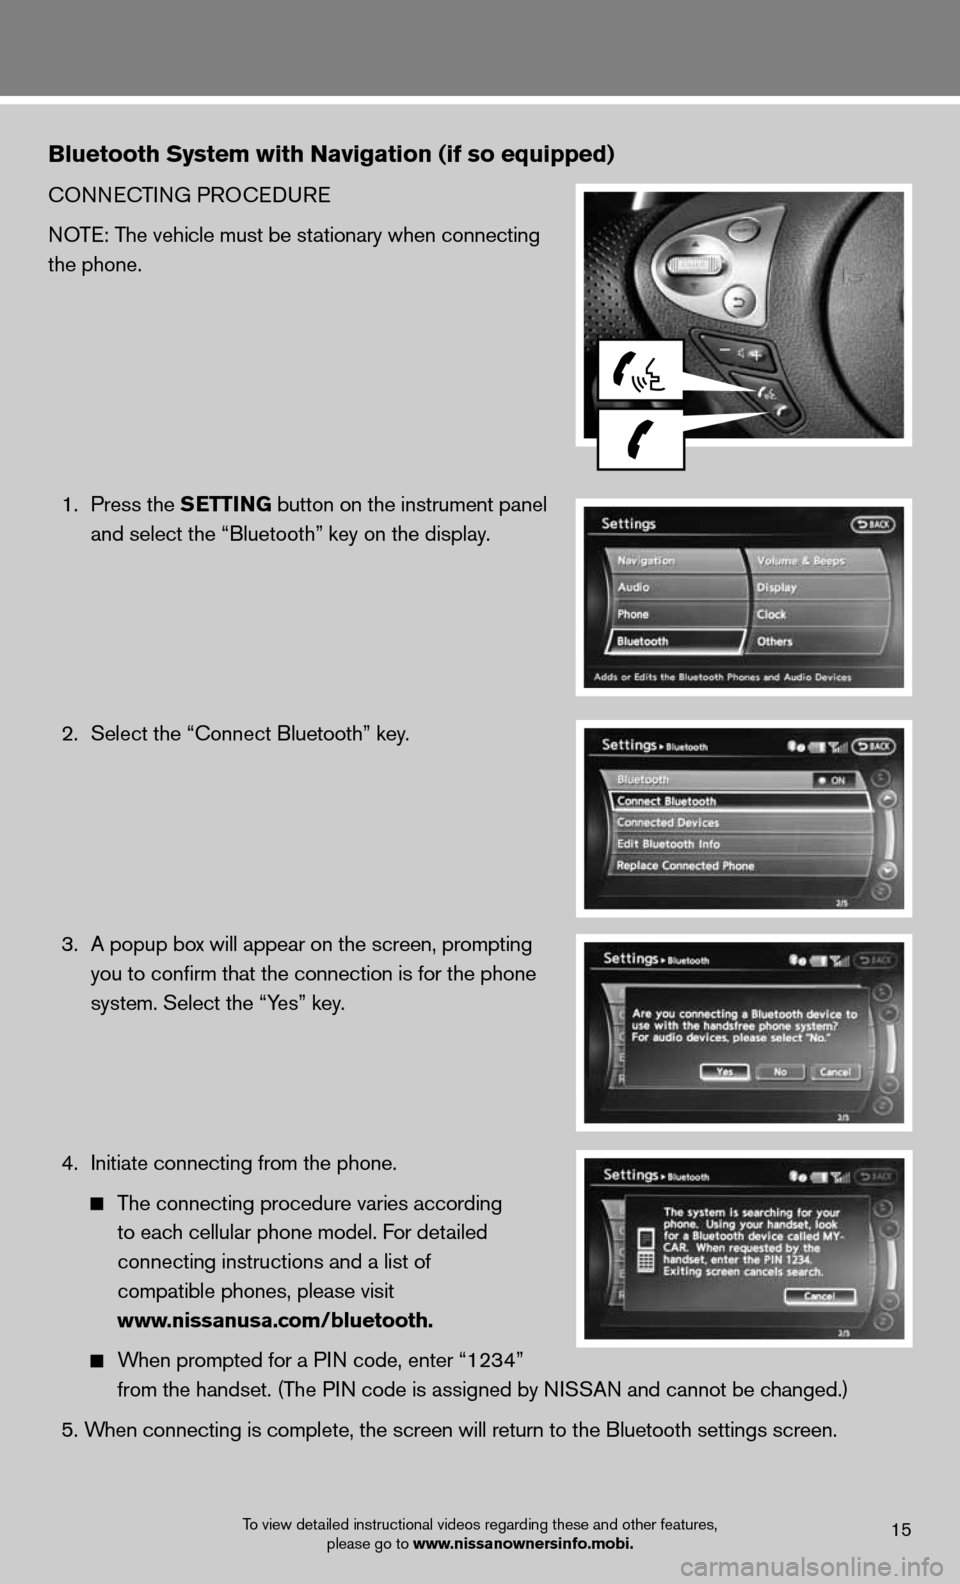
Bluetooth system with navigation (if so equipped)
cOnnecTinG PROcedu Re
NOTE: The vehicle must be stationary when connecting
the phone.
1. Press the s EttinG button on the instrument panel
and select the “Bluetooth” key on the display.
2. Select the “connect Bluetooth” key.
3. A popup box will appear on the screen, prompting
you to confirm that the connection is for the phone
system. Select the “Yes” key.
4. initiate connecting from the phone.
The connecting procedure varies according
to each cellular phone model. f or detailed
connecting instructions and a list of
compatible phones, please visit
www.nissanusa.com/bluetooth.
When prompted for a P in code, enter “1234”
from the handset. (The PIN code is assigned by NISSAN and cannot be changed.)
5. When connecting is complete, the screen will return to the Bluetooth sett\
ings screen.
To view detailed instructional videos regarding these and other features,
please go to www.nissanownersinfo.mobi.15
Page 18 of 20
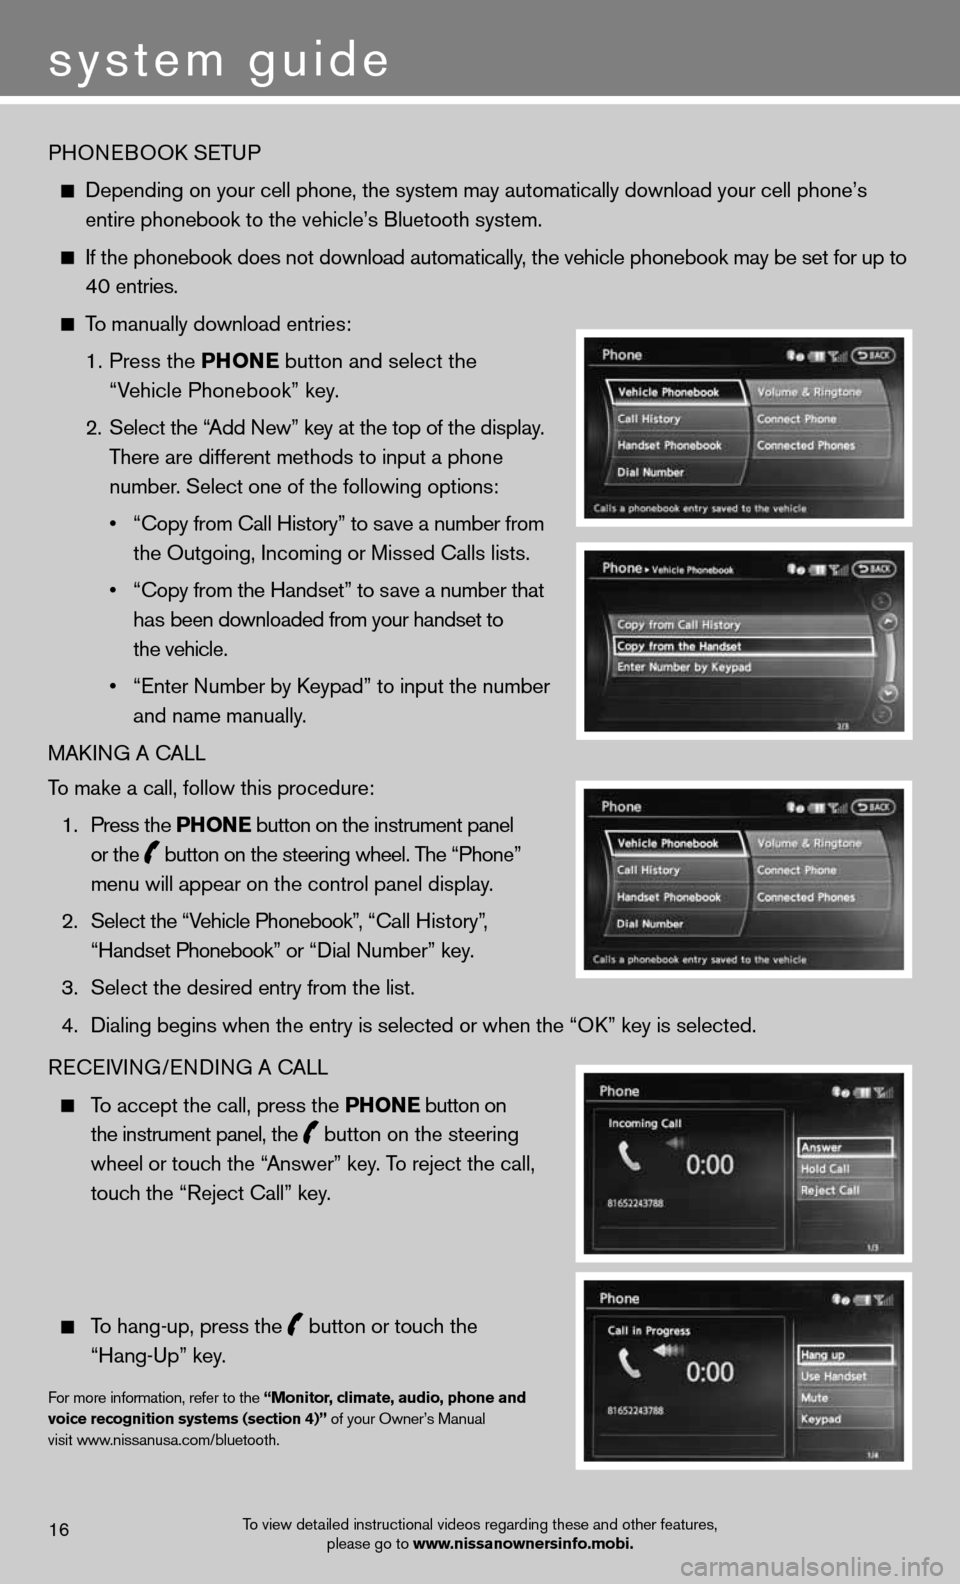
PHOneBOOk SeTu P
depending on your cell phone, the system may automatically download your \
cell phone’s
entire phonebook to the vehicle’s Bluetooth system.
If the phonebook does not download automatically, the vehicle phonebook may be set for up to
40 entries.
To manually download entries:
1. Press the Phon E
button and select the
“Vehicle Phonebook” key.
2. Select the “Add new” key at the top of the display.
There are different methods to input a phone
number. Select one of the following options:
• “Copy from Call History” to save a number from
the Outgoing, incoming or Missed calls lists.
• “Copy from the Handset” to save a number that
has been downloaded from your handset to
the vehicle.
• “Enter Number by Keypad” to input the number
and name manually.
MAkin G A cALL
To make a call, follow this procedure:
1. Press the Phon E button on the instrument panel
or the
button on the steering wheel. The “Phone”
menu will appear on the control panel display.
2. Select the “Vehicle Phonebook”, “Call History”,
“Handset Phonebook” or “Dial Number” key.
3. Select the desired entry from the list.
4. Dialing begins when the entry is selected or when the “OK” key is selected.
Recei Vin G/endin G A cALL
To accept the call, press the Phon E button on
the instrument panel, the
button on the steering
wheel or touch the “Answer” key. To reject the call,
touch the “Reject call” key.
To hang-up, press the
button or touch the
“Hang-up” key.
for more information, refer to the “monitor, climate, audio, phone and
voice recognition systems (section 4)” of your Owner’s Manual
visit www.nissanusa.com/bluetooth.
To view detailed instructional videos regarding these and other features, please go to www.nissanownersinfo.mobi.16
system guide
Page 19 of 20
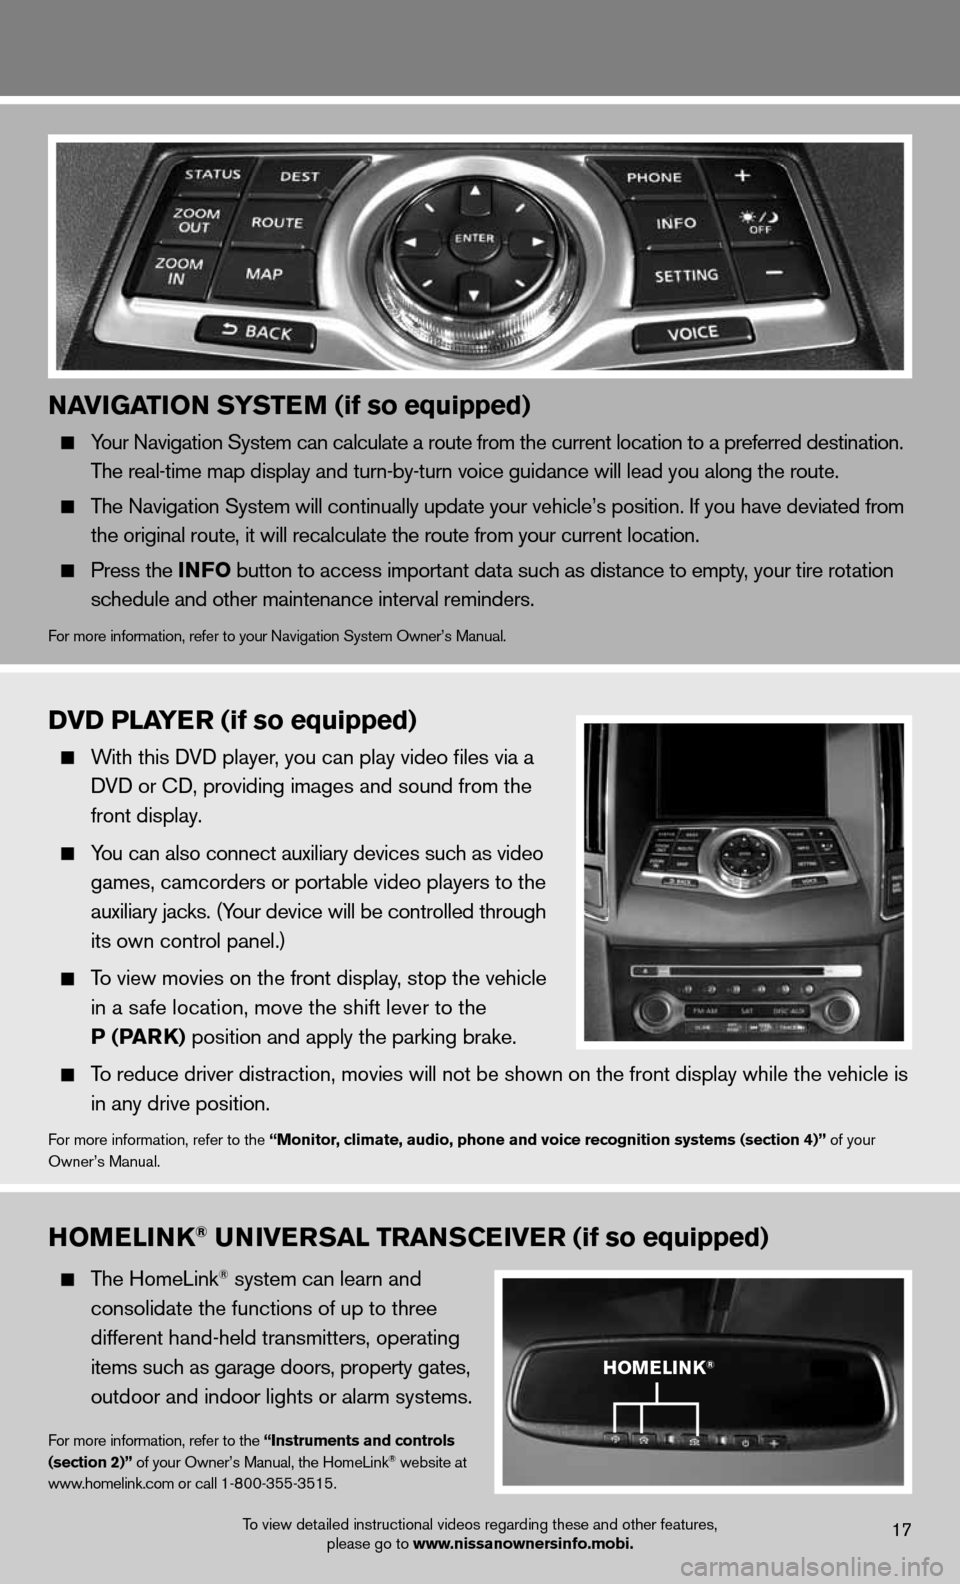
naviGation systE m (if so equipped)
Your navigation System can calculate a route from the current location to a pr\
eferred destination.
The real-time map display and turn-by-turn voice guidance will lead you along the route.
The navigation System will continually update your vehicle’s position. if you have deviated from
the original route, it will recalculate the route from your current loca\
tion.
Press the info button to access important data such as distance to empty, your tire rotation
schedule and other maintenance interval reminders.
for more information, refer to your navigation System Owner’s Manual.
homElink® univE rsal trans CEivE r (if so equipped)
The HomeLink® system can learn and
consolidate the functions of up to three
different hand-held transmitters, operating
items such as garage doors, property gates,
outdoor and indoor lights or alarm systems.
for more information, refer to the “instruments and controls
(section 2)” of your Owner’s Manual, the HomeLink® website at
www.homelink.com or call 1-800-355-3515.
DvD PlayE r (if so equipped)
With this d Vd player, you can play video files via a
d Vd or cd, providing images and sound from the
front display.
You can also connect auxiliary devices such as video
games, camcorders or portable video players to the
auxiliary jacks. (Your device will be controlled through
its own control panel.)
To view movies on the front display, stop the vehicle
in a safe location, move the shift lever to the
P (Park) position and apply the parking brake.
To reduce driver distraction, movies will not be shown on the front display while the vehicle is
in any drive position.
for more information, refer to the “monitor, climate, audio, phone and voice recognition systems (section 4)” of your
Owner’s Manual.
homElink®
To view detailed instructional videos regarding these and other features, please go to www.nissanownersinfo.mobi.17