2012 NISSAN CUBE transmission
[x] Cancel search: transmissionPage 220 of 331
5-16Starting and driving
WARNING
Apply the parking brake if the selector
lever is in any position while the engine
is not running. Failure to do so could
cause the vehicle to move unexpectedly
or roll away and result in serious
personal injury or property damage.
If the ignition switch is placed in the OFF or
ACC position for any reason while the selector
lever is in any positions other than the P (Park) ,
the ignition switch cannot be placed in the
LOCK position.
If the ignition switch cannot be placed in the
LOCK position, perform the following steps:
1. Apply the parking brake when the vehicle is stopped.
2. Place the ignition switch in the ON position while depressing the foot brake pedal.
3. Move the selector lever to the P (Park) position.
4. Models with Intelligent Key system:
Place the ignition switch in the OFF position.
Models without Intelligent Key system:
Place the ignition switch in the LOCK
position.
CAUTION
To prevent transmission damage, move
the selector lever to the P (Park) or R
(Reverse) position only when the vehi-
cle is completely stopped.
P (Park):
Use this selector position when the vehicle is
parked or when starting the engine. Make sure
the vehicle is completely stopped. The brake
pedal must be depressed and the selector
lever button pushed in to move the selec-
tor lever from N (Neutral) or any drive
position to P (Park) . Apply the parking brake.
When parking on a hill, apply the parking brake
first, then move the selector lever to the P (Park)
position.
R (Reverse):
Use this position to back up. Make sure the
vehicle is completely stopped before selecting
the R (Reverse) position. The brake pedal
must be depressed and the selector lever
button pushed in to move the selector
lever from P (Park) , N (Neutral) or any
driving position to R (Reverse) . N (Neutral):
Neither forward nor reverse gear is engaged.
The engine can be started in this position. You
may shift to N (Neutral) and restart a stalled
engine while the vehicle is moving.
D (Drive):
Use this position for all normal forward driving.
L (Low):
Use this position for maximum engine braking on
steep downhill gradients/climbing steep slopes
and whenever approaching sharp bends. Do not
use the L (Low) position in any other circum-
stances.
Page 221 of 331
SSD0863
Overdrive (O/D) OFF switch (if so
equipped)
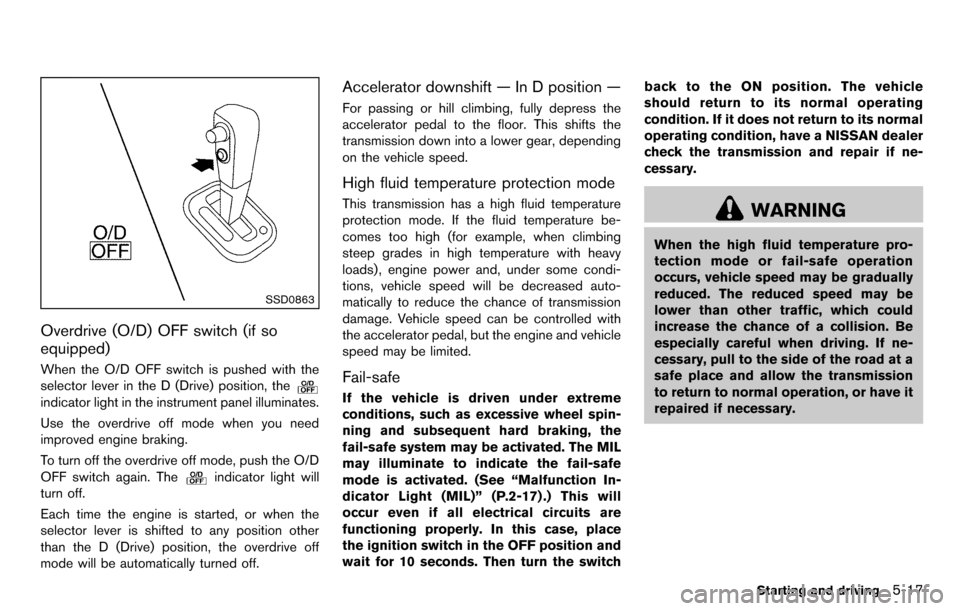
When the O/D OFF switch is pushed with the
selector lever in the D (Drive) position, the
indicator light in the instrument panel illuminates.
Use the overdrive off mode when you need
improved engine braking.
To turn off the overdrive off mode, push the O/D
OFF switch again. The
indicator light will
turn off.
Each time the engine is started, or when the
selector lever is shifted to any position other
than the D (Drive) position, the overdrive off
mode will be automatically turned off.
Accelerator downshift — In D position —
For passing or hill climbing, fully depress the
accelerator pedal to the floor. This shifts the
transmission down into a lower gear, depending
on the vehicle speed.
High fluid temperature protection mode
This transmission has a high fluid temperature
protection mode. If the fluid temperature be-
comes too high (for example, when climbing
steep grades in high temperature with heavy
loads), engine power and, under some condi-
tions, vehicle speed will be decreased auto-
matically to reduce the chance of transmission
damage. Vehicle speed can be controlled with
the accelerator pedal, but the engine and vehicle
speed may be limited.
Fail-safe
If the vehicle is driven under extreme
conditions, such as excessive wheel spin-
ning and subsequent hard braking, the
fail-safe system may be activated. The MIL
may illuminate to indicate the fail-safe
mode is activated. (See “Malfunction In-
dicator Light (MIL)” (P.2-17) .) This will
occur even if all electrical circuits are
functioning properly. In this case, place
the ignition switch in the OFF position and
wait for 10 seconds. Then turn the switch back to the ON position. The vehicle
should return to its normal operating
condition. If it does not return to its normal
operating condition, have a NISSAN dealer
check the transmission and repair if ne-
cessary.
WARNING
When the high fluid temperature pro-
tection mode or fail-safe operation
occurs, vehicle speed may be gradually
reduced. The reduced speed may be
lower than other traffic, which could
increase the chance of a collision. Be
especially careful when driving. If ne-
cessary, pull to the side of the road at a
safe place and allow the transmission
to return to normal operation, or have it
repaired if necessary.
Starting and driving5-17
Page 222 of 331
5-18Starting and driving
SSD0864
Shift lock release
If the battery charge is low or discharged, the
selector lever may not be moved from the P
(Park) position even with the brake pedal
depressed and the selector lever button pushed.
To move the selector lever, perform the following
procedure:
1.Models with Intelligent Key system:
Place the ignition switch in the OFF or
LOCK position.
Models without Intelligent Key system:
Place the ignition switch in the LOCK
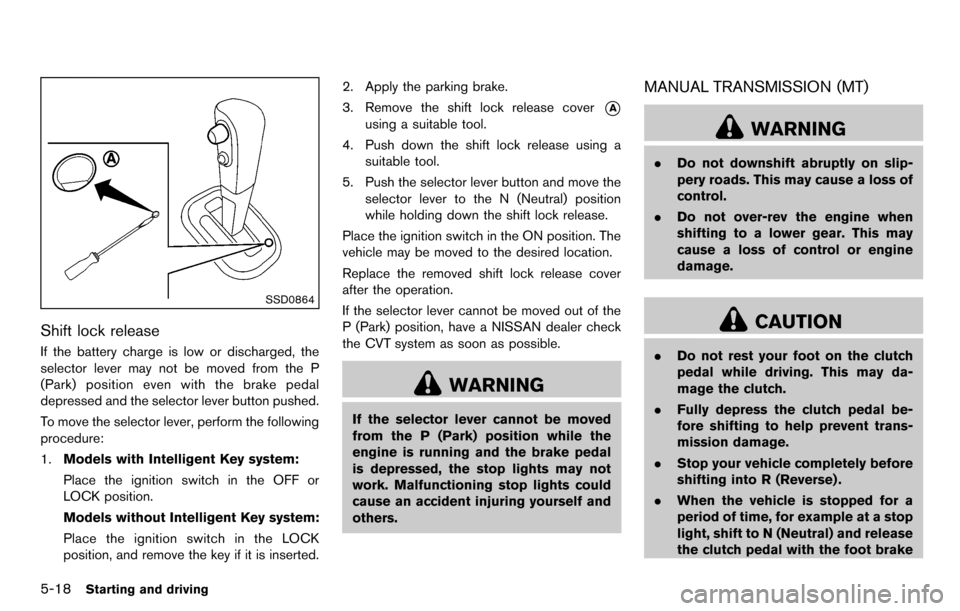
position, and remove the key if it is inserted. 2. Apply the parking brake.
3. Remove the shift lock release cover
*A
using a suitable tool.
4. Push down the shift lock release using a suitable tool.
5. Push the selector lever button and move the selector lever to the N (Neutral) position
while holding down the shift lock release.
Place the ignition switch in the ON position. The
vehicle may be moved to the desired location.
Replace the removed shift lock release cover
after the operation.
If the selector lever cannot be moved out of the
P (Park) position, have a NISSAN dealer check
the CVT system as soon as possible.
WARNING
If the selector lever cannot be moved
from the P (Park) position while the
engine is running and the brake pedal
is depressed, the stop lights may not
work. Malfunctioning stop lights could
cause an accident injuring yourself and
others.
MANUAL TRANSMISSION (MT)
WARNING
. Do not downshift abruptly on slip-
pery roads. This may cause a loss of
control.
. Do not over-rev the engine when
shifting to a lower gear. This may
cause a loss of control or engine
damage.
CAUTION
.Do not rest your foot on the clutch
pedal while driving. This may da-
mage the clutch.
. Fully depress the clutch pedal be-
fore shifting to help prevent trans-
mission damage.
. Stop your vehicle completely before
shifting into R (Reverse) .
. When the vehicle is stopped for a
period of time, for example at a stop
light, shift to N (Neutral) and release
the clutch pedal with the foot brake
Page 225 of 331
SPA2110
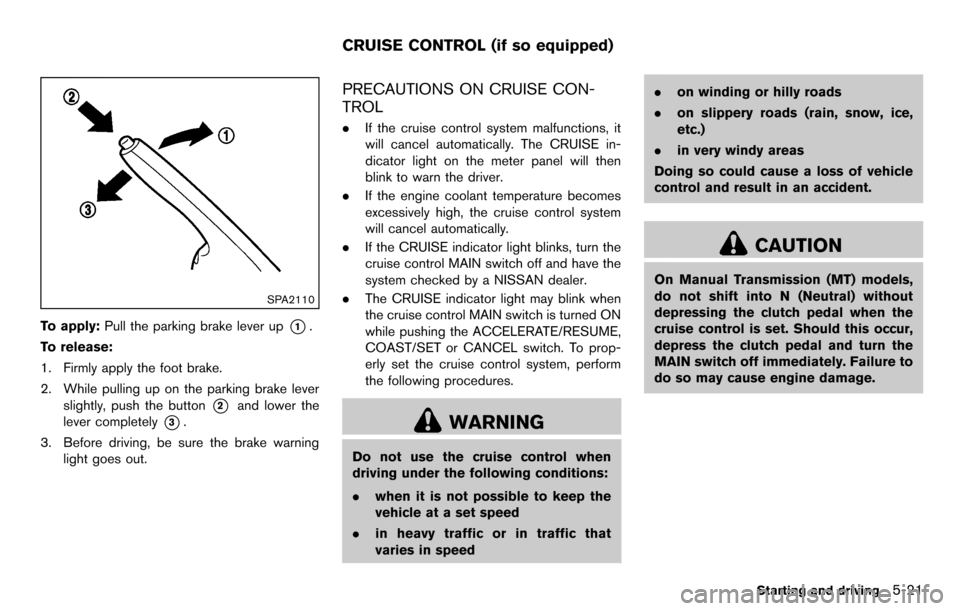
To apply:Pull the parking brake lever up*1.
To release:
1. Firmly apply the foot brake.
2. While pulling up on the parking brake lever slightly, push the button
*2and lower the
lever completely
*3.
3. Before driving, be sure the brake warning light goes out.
PRECAUTIONS ON CRUISE CON-
TROL
.If the cruise control system malfunctions, it
will cancel automatically. The CRUISE in-
dicator light on the meter panel will then
blink to warn the driver.
. If the engine coolant temperature becomes
excessively high, the cruise control system
will cancel automatically.
. If the CRUISE indicator light blinks, turn the
cruise control MAIN switch off and have the
system checked by a NISSAN dealer.
. The CRUISE indicator light may blink when
the cruise control MAIN switch is turned ON
while pushing the ACCELERATE/RESUME,
COAST/SET or CANCEL switch. To prop-
erly set the cruise control system, perform
the following procedures.
WARNING
Do not use the cruise control when
driving under the following conditions:
.when it is not possible to keep the
vehicle at a set speed
. in heavy traffic or in traffic that
varies in speed .
on winding or hilly roads
. on slippery roads (rain, snow, ice,
etc.)
. in very windy areas
Doing so could cause a loss of vehicle
control and result in an accident.
CAUTION
On Manual Transmission (MT) models,
do not shift into N (Neutral) without
depressing the clutch pedal when the
cruise control is set. Should this occur,
depress the clutch pedal and turn the
MAIN switch off immediately. Failure to
do so may cause engine damage.
Starting and driving5-21
CRUISE CONTROL (if so equipped)
Page 226 of 331
5-22Starting and driving
SSD0861
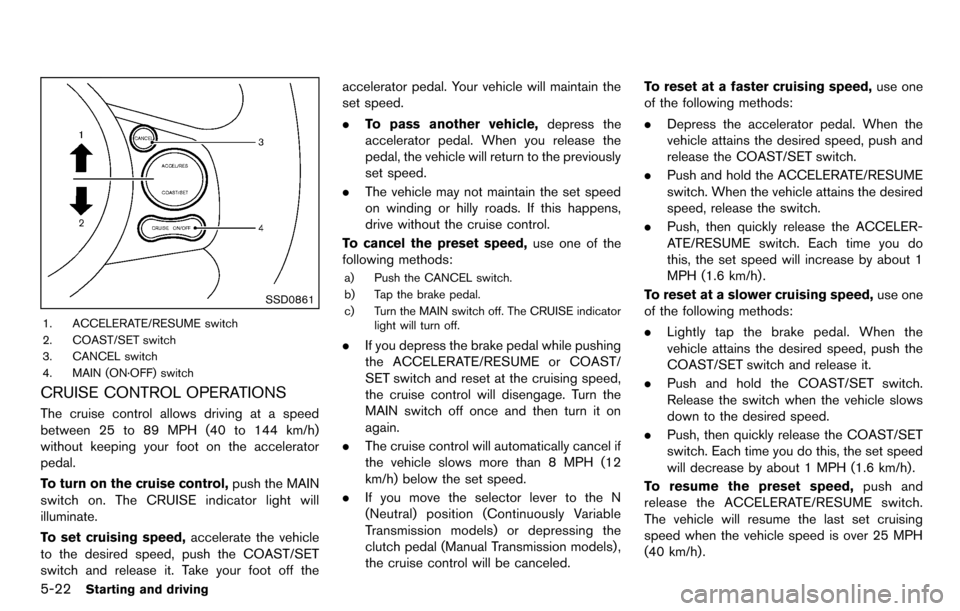
1. ACCELERATE/RESUME switch
2. COAST/SET switch
3. CANCEL switch
4. MAIN (ON·OFF) switch
CRUISE CONTROL OPERATIONS
The cruise control allows driving at a speed
between 25 to 89 MPH (40 to 144 km/h)
without keeping your foot on the accelerator
pedal.
To turn on the cruise control,push the MAIN
switch on. The CRUISE indicator light will
illuminate.
To set cruising speed, accelerate the vehicle
to the desired speed, push the COAST/SET
switch and release it. Take your foot off the accelerator pedal. Your vehicle will maintain the
set speed.
.
To pass another vehicle, depress the
accelerator pedal. When you release the
pedal, the vehicle will return to the previously
set speed.
. The vehicle may not maintain the set speed
on winding or hilly roads. If this happens,
drive without the cruise control.
To cancel the preset speed, use one of the
following methods:
a) Push the CANCEL switch.
b) Tap the brake pedal.
c) Turn the MAIN switch off. The CRUISE indicator light will turn off.
.If you depress the brake pedal while pushing
the ACCELERATE/RESUME or COAST/
SET switch and reset at the cruising speed,
the cruise control will disengage. Turn the
MAIN switch off once and then turn it on
again.
. The cruise control will automatically cancel if
the vehicle slows more than 8 MPH (12
km/h) below the set speed.
. If you move the selector lever to the N
(Neutral) position (Continuously Variable
Transmission models) or depressing the
clutch pedal (Manual Transmission models) ,
the cruise control will be canceled. To reset at a faster cruising speed,
use one
of the following methods:
. Depress the accelerator pedal. When the
vehicle attains the desired speed, push and
release the COAST/SET switch.
. Push and hold the ACCELERATE/RESUME
switch. When the vehicle attains the desired
speed, release the switch.
. Push, then quickly release the ACCELER-
ATE/RESUME switch. Each time you do
this, the set speed will increase by about 1
MPH (1.6 km/h) .
To reset at a slower cruising speed, use one
of the following methods:
. Lightly tap the brake pedal. When the
vehicle attains the desired speed, push the
COAST/SET switch and release it.
. Push and hold the COAST/SET switch.
Release the switch when the vehicle slows
down to the desired speed.
. Push, then quickly release the COAST/SET
switch. Each time you do this, the set speed
will decrease by about 1 MPH (1.6 km/h).
To resume the preset speed, push and
release the ACCELERATE/RESUME switch.
The vehicle will resume the last set cruising
speed when the vehicle speed is over 25 MPH
(40 km/h).
Page 228 of 331
5-24Starting and driving
SSD0488
WARNING
.Do not stop or park the vehicle over
flammable materials such as dry
grass, waste paper or rags. They
may ignite and cause a fire.
. Never leave the engine running
while the vehicle is unattended.
. Do not leave children unattended
inside the vehicle. They could un-
knowingly activate switches or con-
trols. Unattended children could
become involved in serious acci- dents.
. Safe parking procedures require
that both the parking brake be
applied and the transmission placed
into P (Park) for Continuously Vari-
able Transmission (CVT) model or in
an appropriate gear for Manual
Transmission (MT) model. Failure
to do so could cause the vehicle to
move unexpectedly or roll away and
result in an accident.
. Make sure the continuously variable
transmission selector lever has
been pushed as far forward as it can go and cannot be moved with-
out depressing the foot brake pedal.
1. Firmly apply the parking brake.
2. Continuously Variable Transmission
(CVT) models:
Move the selector lever to the P (Park)
position.
Manual Transmission (MT) models:
Move the shift lever to the R (Reverse) gear.
When parking on an uphill grade, place the
shift lever in the 1st gear.
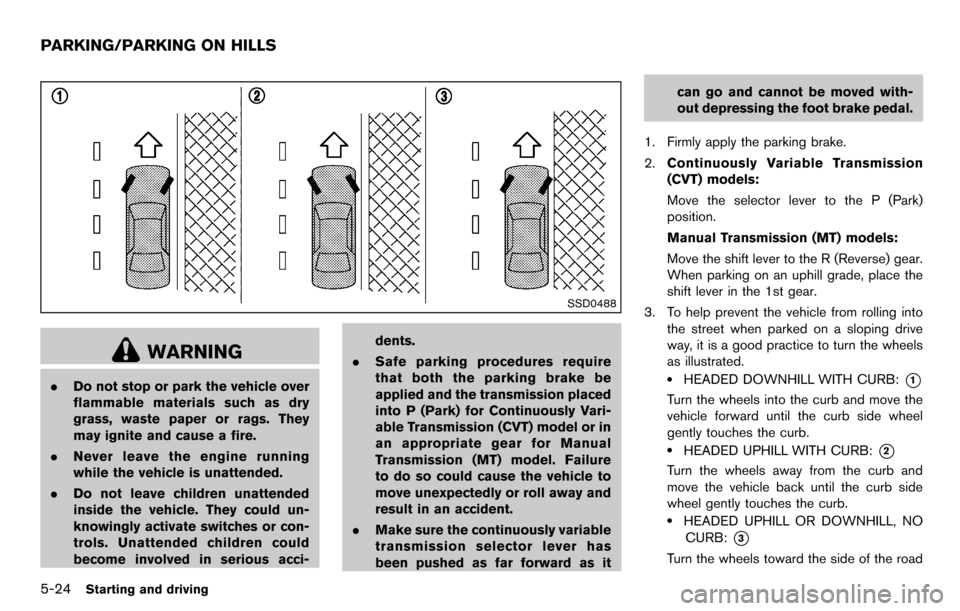
3. To help prevent the vehicle from rolling into the street when parked on a sloping drive
way, it is a good practice to turn the wheels
as illustrated..HEADED DOWNHILL WITH CURB:*1
Turn the wheels into the curb and move the
vehicle forward until the curb side wheel
gently touches the curb.
.HEADED UPHILL WITH CURB:*2
Turn the wheels away from the curb and
move the vehicle back until the curb side
wheel gently touches the curb.
.HEADED UPHILL OR DOWNHILL, NOCURB:
*3
Turn the wheels toward the side of the road
PARKING/PARKING ON HILLS
Page 239 of 331
the tire pressure sensors.
CHANGING A FLAT TIRE
If you have a flat tire, follow the instructions
below.
Stopping the vehicle
1. Safely move the vehicle off the road andaway from traffic.
2. Turn on the hazard warning flashers.
3. Park on a level surface and apply the parking brake.
4. Continuously Variable Transmission
(CVT) models:
Move the selector lever to the P (Park)
position.
Manual Transmission (MT) models:
Move the shift lever to the R (Reverse)
position.
5. Turn off the engine.
6. Raise the hood to warn other traffic, and to signal professional road assistance person-
nel that you need assistance.
7. Have all passengers get out of the vehicle and stand in a safe place, away from traffic
and clear of the vehicle.
WARNING
.Make sure the parking brake is
securely applied and the Manual
Transmission is shifted into R (Re-
verse) , or the Continuously Variable
Transmission into P (Park) .
. Never change tires when the vehicle
is on a slope, ice or slippery areas.
This is hazardous.
. Never change tires if oncoming
traffic is close to your vehicle. Wait
for professional road assistance.
MCE0001A
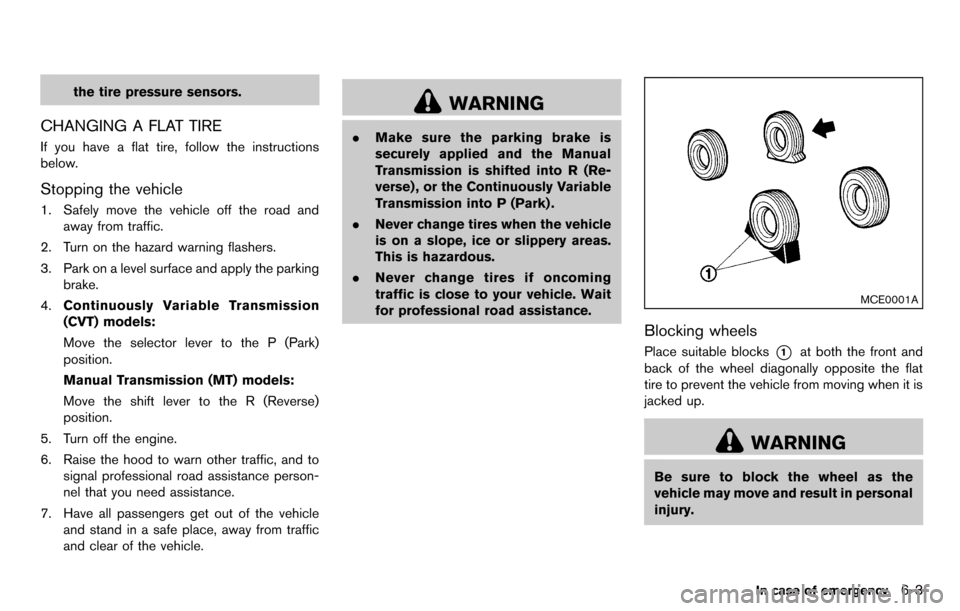
Blocking wheels
Place suitable blocks*1at both the front and
back of the wheel diagonally opposite the flat
tire to prevent the vehicle from moving when it is
jacked up.
WARNING
Be sure to block the wheel as the
vehicle may move and result in personal
injury.
In case of emergency6-3
Page 246 of 331
6-10In case of emergency
SCE0862
WARNING
Always follow the instructions below.
Failure to do so could result in damage
to the charging system and cause
personal injury.
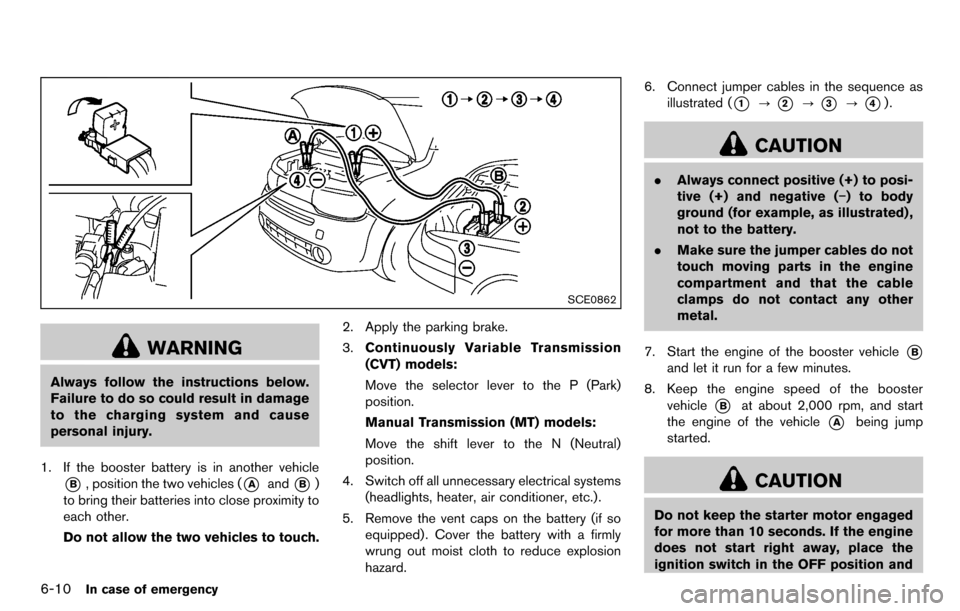
1. If the booster battery is in another vehicle
*B, position the two vehicles (*Aand*B)
to bring their batteries into close proximity to
each other.
Do not allow the two vehicles to touch. 2. Apply the parking brake.
3.
Continuously Variable Transmission
(CVT) models:
Move the selector lever to the P (Park)
position.
Manual Transmission (MT) models:
Move the shift lever to the N (Neutral)
position.
4. Switch off all unnecessary electrical systems (headlights, heater, air conditioner, etc.).
5. Remove the vent caps on the battery (if so equipped) . Cover the battery with a firmly
wrung out moist cloth to reduce explosion
hazard. 6. Connect jumper cables in the sequence as
illustrated (
*1?*2?*3?*4).
CAUTION
.Always connect positive (+) to posi-
tive (+) and negative (−) to body
ground (for example, as illustrated) ,
not to the battery.
. Make sure the jumper cables do not
touch moving parts in the engine
compartment and that the cable
clamps do not contact any other
metal.
7. Start the engine of the booster vehicle
*B
and let it run for a few minutes.
8. Keep the engine speed of the booster vehicle
*Bat about 2,000 rpm, and start
the engine of the vehicle
*Abeing jump
started.
CAUTION
Do not keep the starter motor engaged
for more than 10 seconds. If the engine
does not start right away, place the
ignition switch in the OFF position and