2012 NISSAN CUBE transmission
[x] Cancel search: transmissionPage 81 of 331
OUTSIDE AIR TEMPERATURE (if so
equipped)
The outside air temperature is displayed in8For
8C.
When the outside air temperature becomes
378F(3 8C) or lower, the outside air temperature
display blinks to give a warning. The display will
stop blinking after 1 minute or when the outside
air temperature becomes 398F(4 8C) or above.
The display may differ from the actual outside
temperature displayed on various signs or bill-
boards.
CONTINUOUSLY VARIABLE TRANS-
MISSION (CVT) POSITION INDICATOR
(if so equipped)
The Continuously Variable Transmission (CVT)
position indicator indicates the selector lever
position when the ignition switch is in the ON
position.
SIC4126
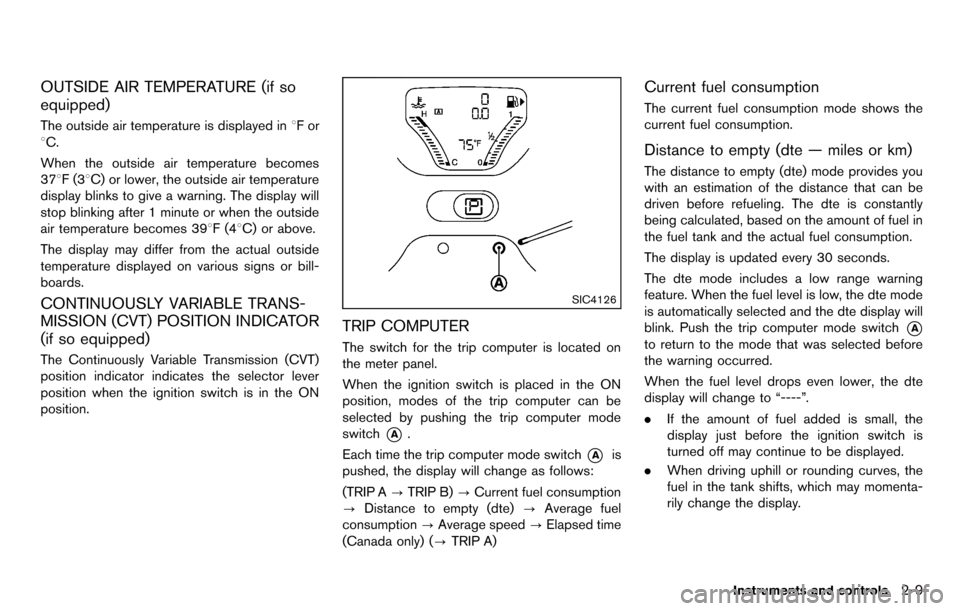
TRIP COMPUTER
The switch for the trip computer is located on
the meter panel.
When the ignition switch is placed in the ON
position, modes of the trip computer can be
selected by pushing the trip computer mode
switch
*A.
Each time the trip computer mode switch
*Ais
pushed, the display will change as follows:
(TRIP A ?TRIP B) ?Current fuel consumption
? Distance to empty (dte) ?Average fuel
consumption ?Average speed ?Elapsed time
(Canada only) (? TRIP A)
Current fuel consumption
The current fuel consumption mode shows the
current fuel consumption.
Distance to empty (dte — miles or km)
The distance to empty (dte) mode provides you
with an estimation of the distance that can be
driven before refueling. The dte is constantly
being calculated, based on the amount of fuel in
the fuel tank and the actual fuel consumption.
The display is updated every 30 seconds.
The dte mode includes a low range warning
feature. When the fuel level is low, the dte mode
is automatically selected and the dte display will
blink. Push the trip computer mode switch
*A
to return to the mode that was selected before
the warning occurred.
When the fuel level drops even lower, the dte
display will change to “----”.
.If the amount of fuel added is small, the
display just before the ignition switch is
turned off may continue to be displayed.
. When driving uphill or rounding curves, the
fuel in the tank shifts, which may momenta-
rily change the display.
Instruments and controls2-9
Page 89 of 331
High beam indicator light
This light illuminates when the headlight high
beam is on and goes out when the low beam is
selected.
Malfunction Indicator Light (MIL)
If the malfunction indicator light illuminates
steady or blinks while the engine is running, it
may indicate a potential emission control and/or
Continuously Variable Transmission (CVT) mal-
function.
The malfunction indicator light may also illumi-
nate steady if the fuel-filler cap is loose or
missing, or if the vehicle runs out of fuel. Check
to make sure the fuel-filler cap is installed and
closed tightly, and that the vehicle has at least 3
US gallons (11.4 liters) of fuel in the fuel tank.
After a few driving trips, the
light should
turn off if no other potential emission control
system malfunction exists.
If this indicator light remains on for 20 seconds
and then blinks for 10 seconds when the engine
is not running, it indicates that the vehicle is not
ready for an emission control system inspection/
maintenance test. (See “Readiness for Inspec-
tion/Maintenance (I/M) test” (P.9-19) .)
Operation:
The malfunction indicator light will illuminate in
one of two ways: .
Malfunction indicator light illuminated steady
— An emission control system and/or CVT
malfunction has been detected. Check the
fuel-filler cap if the LOOSE FUEL CAP
warning message is displayed on the twin
trip odometer. If the fuel-filler cap is loose or
missing, tighten or install the cap and
continue to drive the vehicle. The
light
should turn off after a few driving trips. If the
light does not turn off after a few driving
trips, have the vehicle inspected by a
NISSAN dealer. You do not need to have
your vehicle towed to the dealer.
. Malfunction indicator light blinking — An
engine misfire has been detected which may
damage the emission control system.
To reduce or avoid emission control system
damage:
1) Do not drive at speeds above 45 MPH
(72 km/h).
2) Avoid hard acceleration or deceleration.
3) Avoid steep uphill grades.
4) If possible, reduce the amount of cargo being hauled or towed.
The malfunction indicator light may stop
blinking and remain illuminated.
Have the vehicle inspected by a NISSAN
dealer. You do not need to have your vehicle
towed to the dealer.
CAUTION
Continued vehicle operation without
having the emission control system
and/or CVT system checked and re-
paired as necessary could lead to poor
driveability, reduced fuel economy, and
possible damage to the emission con-
trol system.
Overdrive off indicator light (if so
equipped)
The overdrive off indicator light illuminates when
the overdrive off mode is selected.
For additional information, see “Continuously
Variable Transmission (CVT)” (P.5-14) of this
manual.
Security indicator light
The light blinks when the ignition switch is in the
ACC, OFF or LOCK position. This function
indicates the security system equipped on the
vehicle is operational.
If the security system is malfunctioning, this light
will remain on while the ignition switch is in the
ON position. For additional information, see
“Security systems” (P.2-19) .
Instruments and controls2-17
Page 202 of 331
4-62Center display, heater, air conditioner, audio and phone systems
Training procedure
1. Position the vehicle in a reasonably quietoutdoor location.
2. Sit in the driver’s seat with the engine running, the parking brake on, and the
transmission in Park.
3. Press and hold the
button for more than
5 seconds.
4. The system announces: “Press the PHONE SEND (
) button for the hands-free
phone system to enter the speaker adapta-
tion mode or press the PHONE END (
)
button to select a different language.”
5. Press the
button.
For information on selecting a different
language, see “Choosing a language” (P.4-
56).
6. If the connected phone is already in use, the system will prompt you to overwrite. Follow
the instructions provided by the system.
7. When preparation is complete and you are ready to begin, press the
button.
8. The SA mode will be explained. Follow the instructions provided by the system.
9. When training is finished, the system will tell you an adequate number of phrases have
been recorded. 10. The system will announce that speaker
adaptation has been completed and the
system is ready.
The SA mode will stop if:
. The
button is pressed for more than 5
seconds in SA mode.
. The vehicle is driven during SA mode.
. The ignition switch is turned to the OFF or
LOCK position.
Training phrases
During the SA mode, the system instructs you to
say the following phrases.
(The system will prompt you for each phrase.)
.phonebook transfer entry
. dial 30429
. delete call back number
. incoming
. transfer entry
. 8 pause 9 3 2 pause 7
. delete all entries
. call 7 2409
. phonebook delete entry
. next entry
. dial star 2170
. yes .
no
. select
. missed
. dial 85692
. Bluetooth on
. Outgoing
. call 3 1902
. 9 7 pause pause 3 0 8
. cancel
. call back number
. call star 2095
. delete phone
. dial 83051
. Record name
. 4 3 pause 2 9 pause 0
. delete redial number
. phonebook list names
. call 8 0541
. correction
. setup main menu
. dial 74018
. memo pad delete
. delete
. dial 97266
. call 7 6301
Page 205 of 331
5 Starting and driving
Precautions when starting and driving ................................ 5-2Exhaust gas (carbon monoxide) ...................................... 5-2
Three-way catalyst .............................................................. 5-3
Tire Pressure Monitoring System (TPMS) .................... 5-3
Avoiding collision and rollover ......................................... 5-6
Off-road recovery ................................................................ 5-6
Rapid air pressure loss ...................................................... 5-6
Drinking alcohol/drugs and driving ................................. 5-7
Ignition switch (models without Intelligent
Key system) ........................................................................\
........ 5-8
Continuously Variable Transmission (CVT) ................... 5-8
Manual Transmission (MT) ................................................ 5-9
Key positions ........................................................................\
5-9
Push-button ignition switch (models with Intelligent
Key system) ........................................................................\
........ 5-9 Operating range for engine start function ................. 5-10
Push-button ignition switch operation ........................ 5-10
Push-button ignition switch positions ......................... 5-11
Emergency engine shut off ............................................ 5-11
Intelligent Key battery discharge .................................. 5-12
Before starting the engine ................................................... 5-12
Starting the engine ................................................................ 5-13 Models without Intelligent Key system ....................... 5-13
Models with Intelligent Key system ............................. 5-13 Driving the vehicle ................................................................. 5-14
Continuously Variable Transmission (CVT) ............. 5-14
Manual Transmission (MT) ........................................... 5-18
Parking brake ........................................................................\
.. 5-20
Cruise control (if so equipped) ......................................... 5-21 Precautions on cruise control ..................................... 5-21
Cruise control operations ............................................ 5-22
Break-in schedule ................................................................. 5-23
Increasing fuel economy ...................................................... 5-23
Parking/parking on hills ........................................................ 5-24
Electric power steering system ......................................... 5-25
Brake system ........................................................................\
.. 5-26 Braking precautions ...................................................... 5-26
Anti-lock Braking System (ABS) ............................... 5-26
Vehicle Dynamic Control (VDC) system ......................... 5-28
Cold weather driving ............................................................ 5-29
Freeing a frozen door lock ........................................... 5-29
Anti-freeze ........................................................................\
5-29
Battery ........................................................................\
....... 5-29
Draining of coolant water ............................................. 5-29
Tire equipment ................................................................ 5-30
Special winter equipment ............................................ 5-30
Driving on snow or ice ................................................. 5-30
Engine block heater (if so equipped) ....................... 5-30
Page 213 of 331
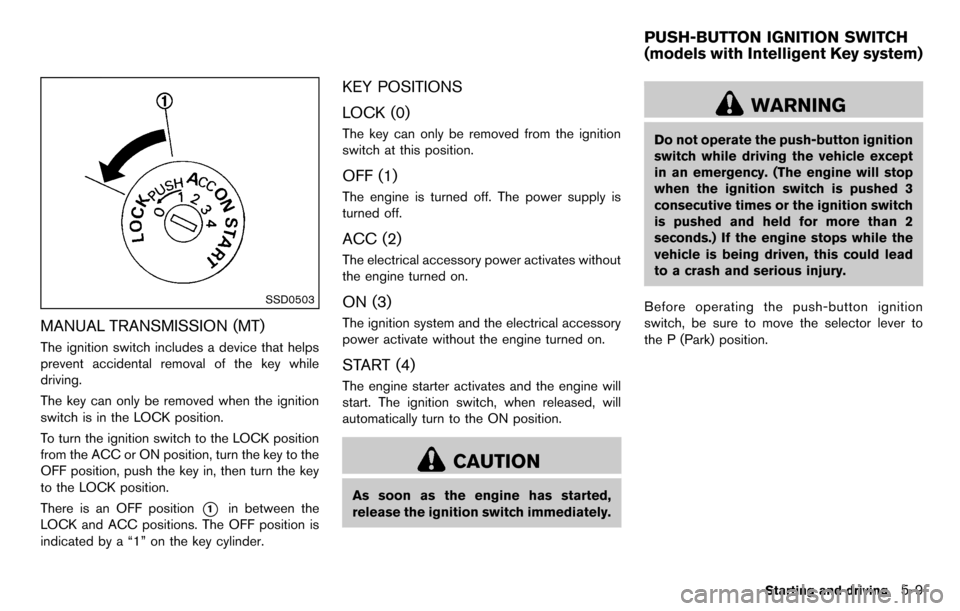
SSD0503
MANUAL TRANSMISSION (MT)
The ignition switch includes a device that helps
prevent accidental removal of the key while
driving.
The key can only be removed when the ignition
switch is in the LOCK position.
To turn the ignition switch to the LOCK position
from the ACC or ON position, turn the key to the
OFF position, push the key in, then turn the key
to the LOCK position.
There is an OFF position
*1in between the
LOCK and ACC positions. The OFF position is
indicated by a “1” on the key cylinder.
KEY POSITIONS
LOCK (0)
The key can only be removed from the ignition
switch at this position.
OFF (1)
The engine is turned off. The power supply is
turned off.
ACC (2)
The electrical accessory power activates without
the engine turned on.
ON (3)
The ignition system and the electrical accessory
power activate without the engine turned on.
START (4)
The engine starter activates and the engine will
start. The ignition switch, when released, will
automatically turn to the ON position.
CAUTION
As soon as the engine has started,
release the ignition switch immediately.
WARNING
Do not operate the push-button ignition
switch while driving the vehicle except
in an emergency. (The engine will stop
when the ignition switch is pushed 3
consecutive times or the ignition switch
is pushed and held for more than 2
seconds.) If the engine stops while the
vehicle is being driven, this could lead
to a crash and serious injury.
Before operating the push-button ignition
switch, be sure to move the selector lever to
the P (Park) position.
Starting and driving5-9
PUSH-BUTTON IGNITION SWITCH
(models with Intelligent Key system)
Page 217 of 331
MODELS WITHOUT INTELLIGENT KEY
SYSTEM
1. Apply the parking brake.
2.Continuously Variable Transmission
(CVT) models:
Move the selector lever to the P (Park) or N
(Neutral) position. (P is recommended.)
The starter is designed so that it does not
operate unless the selector lever is in either
of the above positions.
Manual Transmission (MT) models:
Move the shift lever to the N (Neutral)
position. Depress the clutch pedal fully to
the floor.
The starter is designed not to operate unless
the clutch pedal is fully depressed.
3. Crank the engine with your foot off the
accelerator pedal by turning the ignition
switch to START. Release the switch when
the engine starts. If the engine starts, but
fails to run, repeat the above procedure.
.If the engine is very hard to start in
extremely cold weather or when restart-
ing, depress the accelerator pedal a little
(approximately 1/3 to the floor) and hold
it and then crank the engine. Release the
accelerator pedal when the engine starts.
.If the engine is very hard to start becauseit is flooded, depress the accelerator
pedal all the way to the floor and hold it.
Crank the engine for 5 - 6 seconds. After
cranking the engine, release the accel-
erator pedal. Crank the engine with your
foot off the accelerator pedal by
turning the ignition switch to START.
Release the ignition switch when the
engine starts. If the engine starts, but fails
to run, repeat the above procedure.
CAUTION
Do not operate the starter for more
than 15 seconds at a time. If the engine
does not start, turn the ignition switch
off and wait 10 seconds before cranking
again, otherwise the starter could be
damaged.
4. Warm-up
Allow the engine to idle for at least 30
seconds after starting. Do not race the
engine while warming it up. Drive at
moderate speed for a short distance first,
especially in cold weather. In cold weather,
keep the engine running for a minimum of 2 -
3 minutes before shutting it off. Starting and stopping the engine over a short period of
time may make the vehicle more difficult to
start.
5. To stop the engine, move the selector lever to the P (Park) position (CVT model) or move
the shift lever to the N (Neutral) position (MT
model) , and turn the ignition switch to the
OFF position.
MODELS WITH INTELLIGENT KEY
SYSTEM
1. Apply the parking brake.
2. Move the selector lever to the P (Park) or N(Neutral) position. (P is recommended.)
The starter is designed not to operate unless
the selector lever is in either of the above
positions.
The Intelligent Key must be carried
when operating the ignition switch.
3. Push the ignition switch to the ON position. Depress the brake pedal and push the
ignition switch to start the engine.
To start the engine immediately, push and
release the ignition switch while depressing
the brake pedal with the ignition switch in
any position.
.If the engine is very hard to start inextremely cold weather or when restart-
ing, depress the accelerator pedal a little
Starting and driving5-13
STARTING THE ENGINE
Page 218 of 331
5-14Starting and driving
(approximately 1/3 to the floor) and while
holding, crank the engine. Release the
accelerator pedal when the engine starts.
.If the engine is very hard to start becauseit is flooded, depress the accelerator
pedal all the way to the floor and hold it.
Push the ignition switch to the ON
position to start cranking the engine.
After 5 or 6 seconds, stop cranking by
pushing the ignition switch to OFF. After
cranking the engine, release the accel-
erator pedal. Crank the engine with your
foot off the accelerator pedal by
depressing the brake pedal and pushing
the push-button ignition switch to start
the engine. If the engine starts, but fails
to run, repeat the above procedure.
CAUTION
Do not operate the starter for more
than 15 seconds at a time. If the engine
does not start, push the ignition switch
to OFF and wait 10 seconds before
cranking again, otherwise the starter
could be damaged.
4. Warm-up
Allow the engine to idle for at least 30 seconds after starting. Do not race the
engine while warming it up. Drive at
moderate speed for a short distance first,
especially in cold weather. In cold weather,
keep the engine running for a minimum of 2 -
3 minutes before shutting it off. Starting and
stopping the engine over a short period of
time may make the vehicle more difficult to
start.
When racing the engine up to 4,000 rpm or
more under no load condition, the engine
will enter the fuel cut mode.
5. To stop the engine, move the selector lever to the P (Park) position, and push the
ignition switch to the OFF position.
CONTINUOUSLY VARIABLE TRANS-
MISSION (CVT)
The Continuously Variable Transmission (CVT)
in your vehicle is electronically controlled to
produce maximum power and smooth operation.
The recommended operating procedures for this
transmission are shown on the following pages.
Follow these procedures for maximum vehicle
performance and driving enjoyment.
Engine power may be automatically re-
duced to protect the CVT if the engine
speed increases quickly when driving on
slippery roads or while being tested on
some dynamometers.
Starting the vehicle
1. After starting the engine, fully depress the
foot brake pedal before moving the selector
lever out of the P (Park) position.
This CVT is designed so that the foot
brake pedal must be depressed before
shifting from P (Park) to any driving
position while the ignition switch is in
the ON position.
The selector lever cannot be moved out
of the P (Park) position and into any of
the other positions if the ignition
switch is placed in the LOCK, OFF or
ACC position or if the key is removed.
DRIVING THE VEHICLE
Page 219 of 331
2. Keep the foot brake pedal depressed, pushthe selector lever button and move the
selector lever to a driving position.
3. Release the parking brake and foot brake pedal, and then gradually start the vehicle in
motion.
WARNING
.Do not depress the accelerator
pedal while shifting from P (Park)
or N (Neutral) to R (Reverse) , D
(Drive) or L (Low) . Always depress
the brake pedal until shifting is
completed. Failure to do so could
cause you to lose control and have
an accident.
. Cold engine idle speed is high, so
use caution when shifting into a
forward or reverse gear before the
engine has warmed up.
. Never shift to P (Park) or R (Re-
verse) while vehicle is moving. Fail-
ure to do so could cause you to lose
control and have an accident.
CAUTION
.Except in an emergency, do not shift
to the N (Neutral) position while
driving. Doing so can cause a loss
of engine braking which may result
in a collision, serious personal in-
jury or death. In addition, coasting
with the transmission in the N
(Neutral) position may cause ser-
ious damage to the transmission.
. When stopping the vehicle on an
uphill grade, do not hold the vehicle
by depressing the accelerator pedal.
The foot brake should be used for
this purpose.
. Do not downshift abruptly on slip-
pery roads. This may cause a loss of
control.
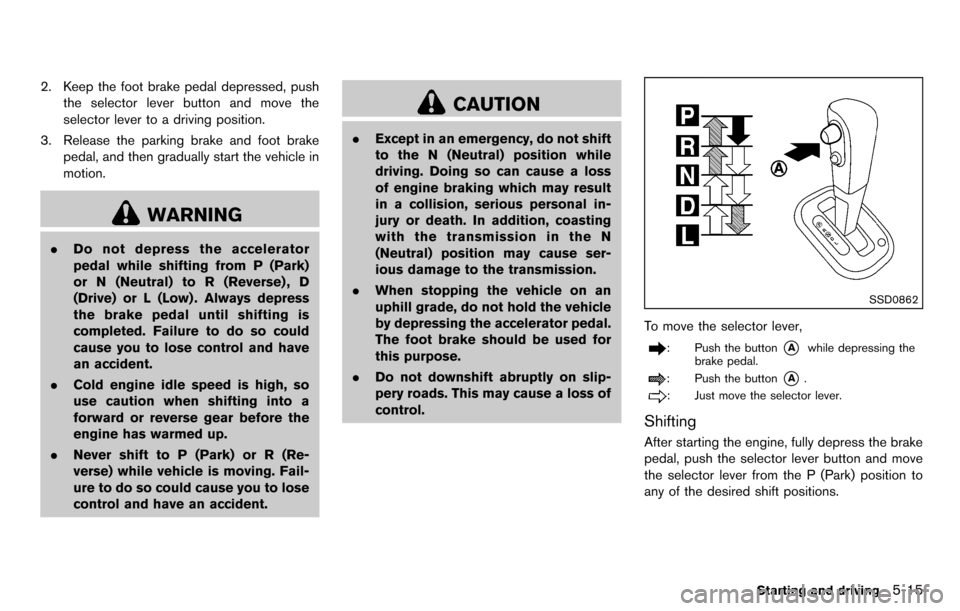
SSD0862
To move the selector lever,
: Push the button*Awhile depressing the
brake pedal.
: Push the button*A.
: Just move the selector lever.
Shifting
After starting the engine, fully depress the brake
pedal, push the selector lever button and move
the selector lever from the P (Park) position to
any of the desired shift positions.
Starting and driving5-15