Page 131 of 427
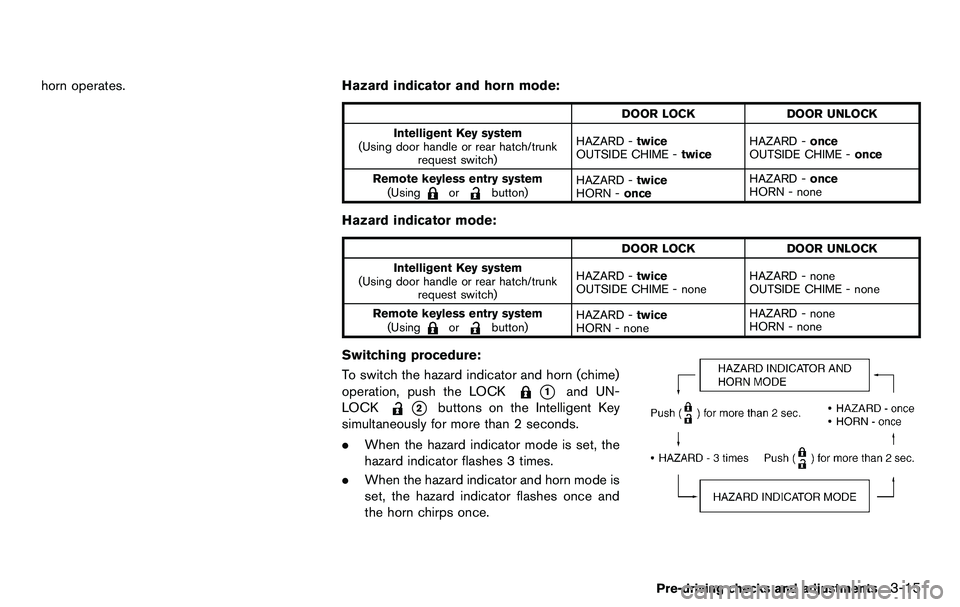
horn operates.Hazard indicator and horn mode:
DOOR LOCKDOOR UNLOCK
Intelligent Key system
(Using door handle or rear hatch/trunk request switch) HAZARD -
twice
OUTSIDE CHIME - twiceHAZARD -
once
OUTSIDE CHIME - once
Remote keyless entry system (Using
orbutton) HAZARD -
twice
HORN - once HAZARD -
once
HORN - none
Hazard indicator mode:
DOOR LOCK DOOR UNLOCK
Intelligent Key system
(Using door handle or rear hatch/trunk request switch) HAZARD -
twice
OUTSIDE CHIME - none HAZARD - none
OUTSIDE CHIME - none
Remote keyless entry system (Using
orbutton) HAZARD -
twice
HORN - none HAZARD - none
HORN - none
Switching procedure:
To switch the hazard indicator and horn (chime)
operation, push the LOCK
*1and UN-
LOCK
*2buttons on the Intelligent Key
simultaneously for more than 2 seconds.
. When the hazard indicator mode is set, the
hazard indicator flashes 3 times.
. When the hazard indicator and horn mode is
set, the hazard indicator flashes once and
the horn chirps once.
Pre-driving checks and adjustments3-15
Page 133 of 427
SPA2573
REAR HATCH OPENER SWITCH
The rear hatch can be opened by pushing the
rear hatch opener switch when the Intelligent
Key is within the operating range of the rear
hatch lock/unlock function regardless of the
inside lock knob position. (See “Intelligent Key
system” (P.3-6) .)
To close the rear hatch, push it down securely.
SPA2646
NISMO models
CAUTION
Do not use the rear spoiler*Ato open
or close the rear hatch. Doing so may damage the rear spoiler.
Always hold area
*Bto open or close the rear
hatch.
Pre-driving checks and adjustments3-17
Page 134 of 427
3-18Pre-driving checks and adjustments
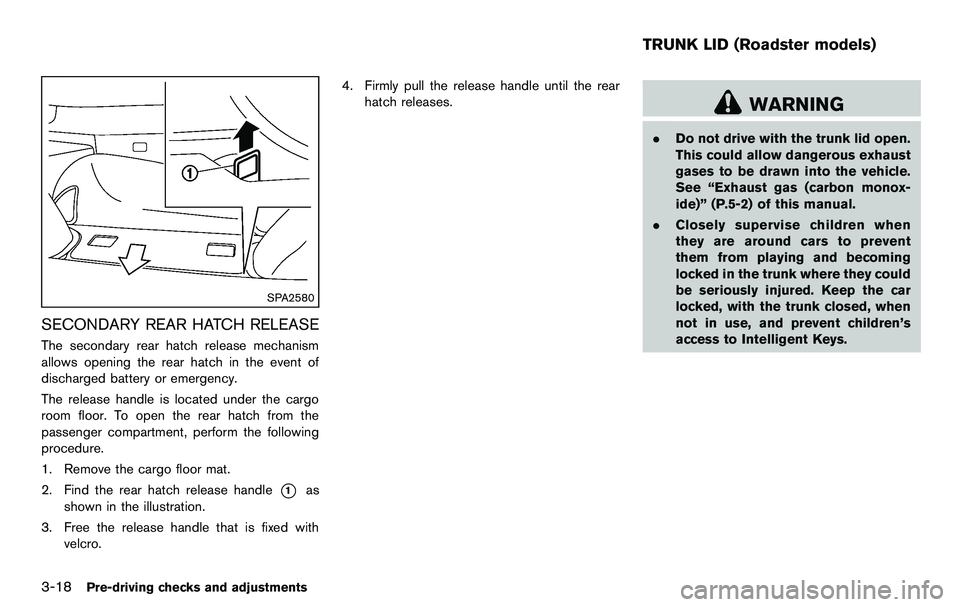
SPA2580
SECONDARY REAR HATCH RELEASE
The secondary rear hatch release mechanism
allows opening the rear hatch in the event of
discharged battery or emergency.
The release handle is located under the cargo
room floor. To open the rear hatch from the
passenger compartment, perform the following
procedure.
1. Remove the cargo floor mat.
2. Find the rear hatch release handle
*1as
shown in the illustration.
3. Free the release handle that is fixed with velcro. 4. Firmly pull the release handle until the rear
hatch releases.
WARNING
.Do not drive with the trunk lid open.
This could allow dangerous exhaust
gases to be drawn into the vehicle.
See “Exhaust gas (carbon monox-
ide)” (P.5-2) of this manual.
. Closely supervise children when
they are around cars to prevent
them from playing and becoming
locked in the trunk where they could
be seriously injured. Keep the car
locked, with the trunk closed, when
not in use, and prevent children’s
access to Intelligent Keys.
TRUNK LID (Roadster models)
Page 135 of 427
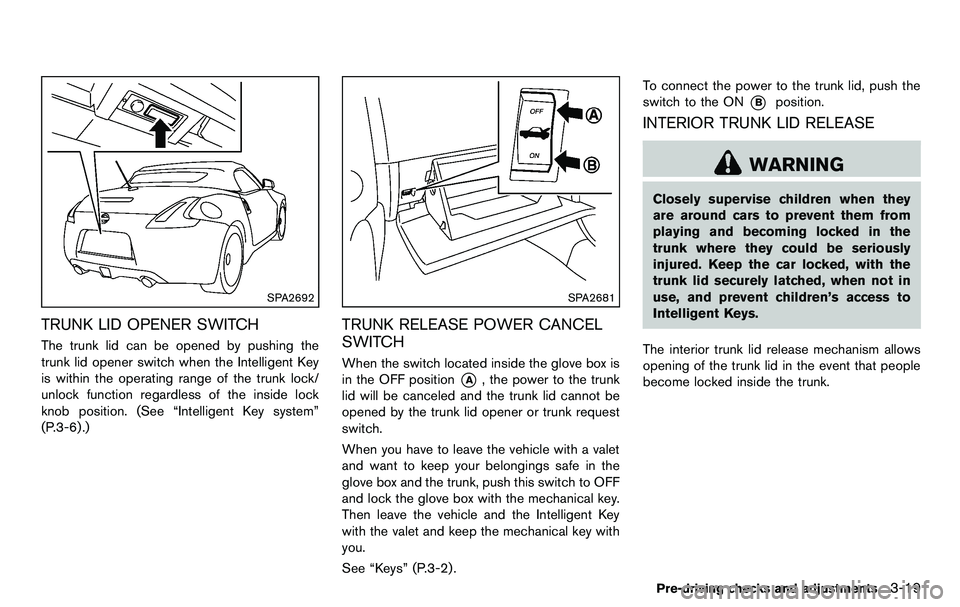
SPA2692
TRUNK LID OPENER SWITCH
The trunk lid can be opened by pushing the
trunk lid opener switch when the Intelligent Key
is within the operating range of the trunk lock/
unlock function regardless of the inside lock
knob position. (See “Intelligent Key system”
(P.3-6) .)
SPA2681
TRUNK RELEASE POWER CANCEL
SWITCH
When the switch located inside the glove box is
in the OFF position
*A, the power to the trunk
lid will be canceled and the trunk lid cannot be
opened by the trunk lid opener or trunk request
switch.
When you have to leave the vehicle with a valet
and want to keep your belongings safe in the
glove box and the trunk, push this switch to OFF
and lock the glove box with the mechanical key.
Then leave the vehicle and the Intelligent Key
with the valet and keep the mechanical key with
you.
See “Keys” (P.3-2) . To connect the power to the trunk lid, push the
switch to the ON
*Bposition.
INTERIOR TRUNK LID RELEASE
WARNING
Closely supervise children when they
are around cars to prevent them from
playing and becoming locked in the
trunk where they could be seriously
injured. Keep the car locked, with the
trunk lid securely latched, when not in
use, and prevent children’s access to
Intelligent Keys.
The interior trunk lid release mechanism allows
opening of the trunk lid in the event that people
become locked inside the trunk.
Pre-driving checks and adjustments3-19
Page 136 of 427
3-20Pre-driving checks and adjustments
SPA2682
Releasing inside the trunk
To open the trunk lid from the inside, pull the
release handle
*Auntil the lock releases and
push up on the trunk lid. The release lever is
made of a material that glows in the dark after a
brief exposure to ambient light.
The handle
*Ais located inside the trunk
compartment as illustrated.
SPA2683
SECONDARY TRUNK LID RELEASE
The secondary trunk lid release mechanism
allows opening the trunk lid in the event of
discharged battery or emergency.
1. Open the rear parcel box.
2. Remove the cap
*1with a suitable tool*2.
3. Insert the key into the key cylinder and turn it counterclockwise. The trunk lid will open.
Page 142 of 427
3-26Pre-driving checks and adjustments
OPENING THE TOP USING THE IN-
TELLIGENT KEY
The soft top can be opened using the request
switch.
SPA2570
Opening the soft top
Push the ignition switch to the OFF position and
make sure to carry the Intelligent Key with you.
Push the door handle request switch (driver’s or
passenger’s)
*Aand hold it until the soft top is
fully open.
Page 150 of 427
3-34Pre-driving checks and adjustments
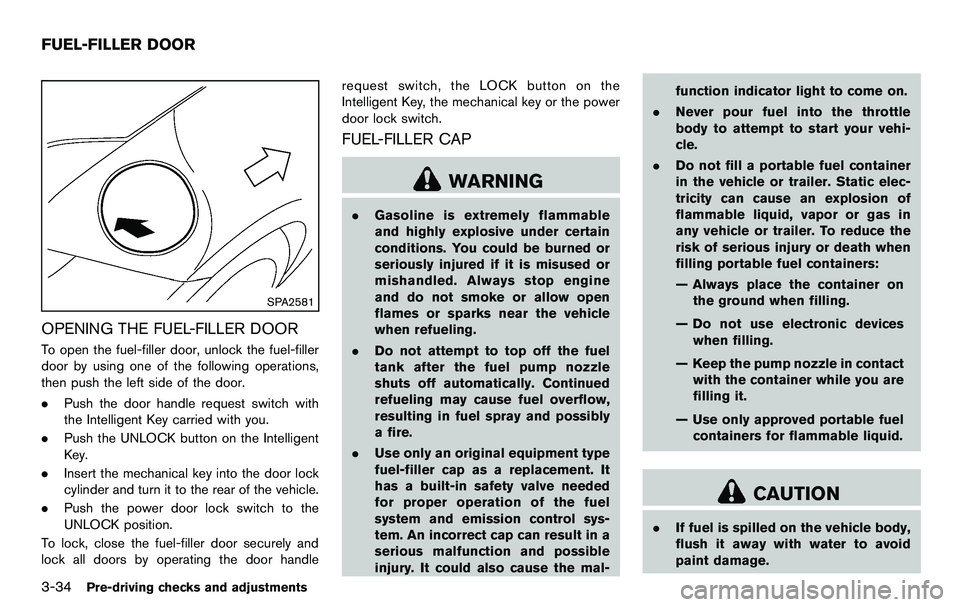
SPA2581
OPENING THE FUEL-FILLER DOOR
To open the fuel-filler door, unlock the fuel-filler
door by using one of the following operations,
then push the left side of the door.
.Push the door handle request switch with
the Intelligent Key carried with you.
. Push the UNLOCK button on the Intelligent
Key.
. Insert the mechanical key into the door lock
cylinder and turn it to the rear of the vehicle.
. Push the power door lock switch to the
UNLOCK position.
To lock, close the fuel-filler door securely and
lock all doors by operating the door handle request switch, the LOCK button on the
Intelligent Key, the mechanical key or the power
door lock switch.
FUEL-FILLER CAP
WARNING
.
Gasoline is extremely flammable
and highly explosive under certain
conditions. You could be burned or
seriously injured if it is misused or
mishandled. Always stop engine
and do not smoke or allow open
flames or sparks near the vehicle
when refueling.
. Do not attempt to top off the fuel
tank after the fuel pump nozzle
shuts off automatically. Continued
refueling may cause fuel overflow,
resulting in fuel spray and possibly
a fire.
. Use only an original equipment type
fuel-filler cap as a replacement. It
has a built-in safety valve needed
for proper operation of the fuel
system and emission control sys-
tem. An incorrect cap can result in a
serious malfunction and possible
injury. It could also cause the mal- function indicator light to come on.
. Never pour fuel into the throttle
body to attempt to start your vehi-
cle.
. Do not fill a portable fuel container
in the vehicle or trailer. Static elec-
tricity can cause an explosion of
flammable liquid, vapor or gas in
any vehicle or trailer. To reduce the
risk of serious injury or death when
filling portable fuel containers:
— Always place the container on
the ground when filling.
— Do not use electronic devices when filling.
— Keep the pump nozzle in contact with the container while you are
filling it.
— Use only approved portable fuel containers for flammable liquid.
CAUTION
. If fuel is spilled on the vehicle body,
flush it away with water to avoid
paint damage.
FUEL-FILLER DOOR
Page 163 of 427
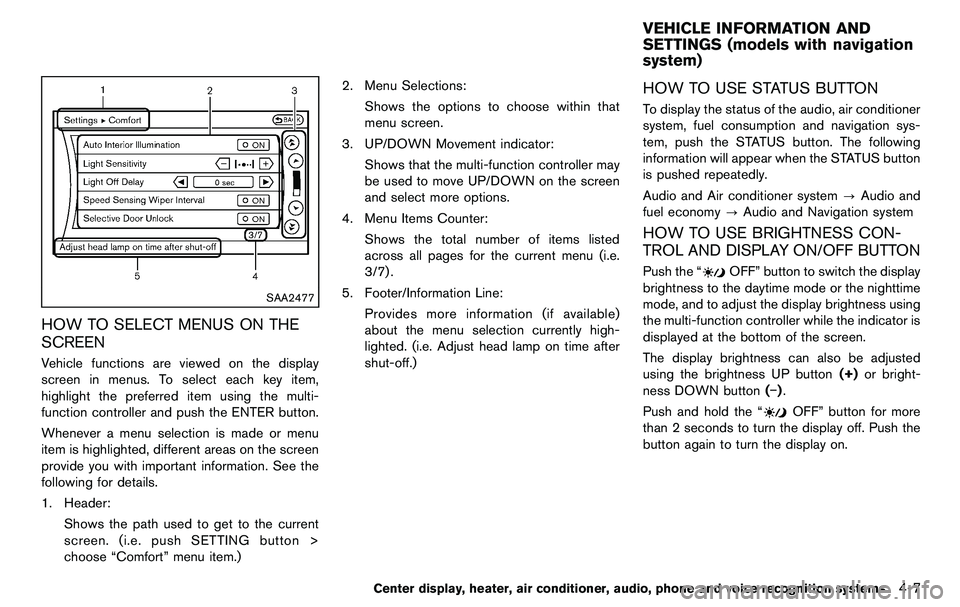
SAA2477
HOW TO SELECT MENUS ON THE
SCREEN
Vehicle functions are viewed on the display
screen in menus. To select each key item,
highlight the preferred item using the multi-
function controller and push the ENTER button.
Whenever a menu selection is made or menu
item is highlighted, different areas on the screen
provide you with important information. See the
following for details.
1. Header:Shows the path used to get to the current
screen. (i.e. push SETTING button >
choose “Comfort” menu item.) 2. Menu Selections:
Shows the options to choose within that
menu screen.
3. UP/DOWN Movement indicator: Shows that the multi-function controller may
be used to move UP/DOWN on the screen
and select more options.
4. Menu Items Counter: Shows the total number of items listed
across all pages for the current menu (i.e.
3/7) .
5. Footer/Information Line: Provides more information (if available)
about the menu selection currently high-
lighted. (i.e. Adjust head lamp on time after
shut-off.)
HOW TO USE STATUS BUTTON
To display the status of the audio, air conditioner
system, fuel consumption and navigation sys-
tem, push the STATUS button. The following
information will appear when the STATUS button
is pushed repeatedly.
Audio and Air conditioner system ?Audio and
fuel economy ?Audio and Navigation system
HOW TO USE BRIGHTNESS CON-
TROL AND DISPLAY ON/OFF BUTTON
Push the “OFF” button to switch the display
brightness to the daytime mode or the nighttime
mode, and to adjust the display brightness using
the multi-function controller while the indicator is
displayed at the bottom of the screen.
The display brightness can also be adjusted
using the brightness UP button (+)or bright-
ness DOWN button (−).
Push and hold the “
OFF” button for more
than 2 seconds to turn the display off. Push the
button again to turn the display on.
Center display, heater, air conditioner, audio, phone and voice recognition systems4-7
VEHICLE INFORMATION AND
SETTINGS (models with navigation
system)