2012 NISSAN 370Z COUPE ECU
[x] Cancel search: ECUPage 128 of 427
3-12Pre-driving checks and adjustments
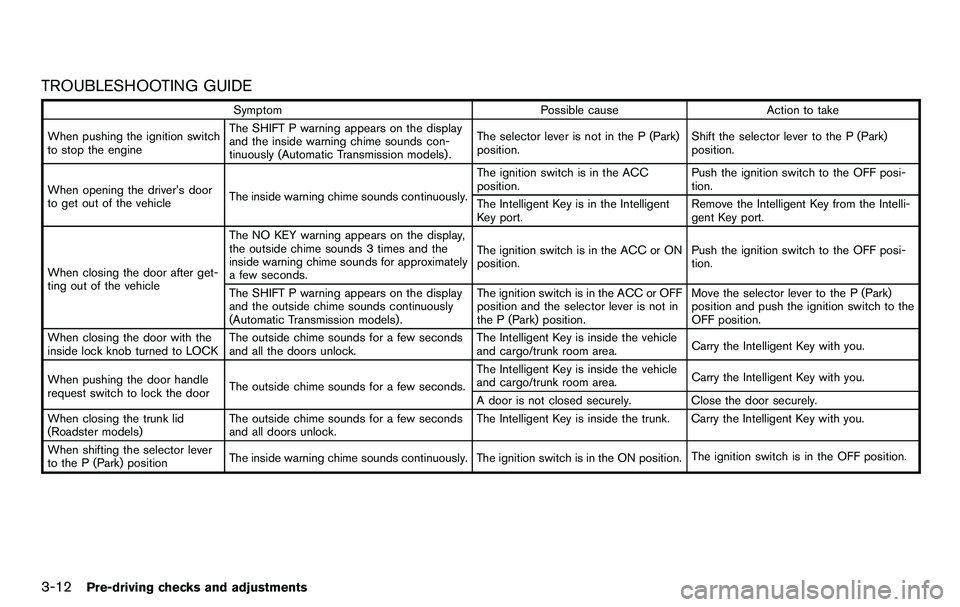
TROUBLESHOOTING GUIDE
SymptomPossible causeAction to take
When pushing the ignition switch
to stop the engine The SHIFT P warning appears on the display
and the inside warning chime sounds con-
tinuously (Automatic Transmission models) .
The selector lever is not in the P (Park)
position.
Shift the selector lever to the P (Park)
position.
When opening the driver’s door
to get out of the vehicle The inside warning chime sounds continuously. The ignition switch is in the ACC
position.
Push the ignition switch to the OFF posi-
tion.
The Intelligent Key is in the Intelligent
Key port. Remove the Intelligent Key from the Intelli-
gent Key port.
When closing the door after get-
ting out of the vehicle The NO KEY warning appears on the display,
the outside chime sounds 3 times and the
inside warning chime sounds for approximately
a few seconds.
The ignition switch is in the ACC or ON
position.
Push the ignition switch to the OFF posi-
tion.
The SHIFT P warning appears on the display
and the outside chime sounds continuously
(Automatic Transmission models) . The ignition switch is in the ACC or OFF
position and the selector lever is not in
the P (Park) position.Move the selector lever to the P (Park)
position and push the ignition switch to the
OFF position.
When closing the door with the
inside lock knob turned to LOCK The outside chime sounds for a few seconds
and all the doors unlock. The Intelligent Key is inside the vehicle
and cargo/trunk room area.
Carry the Intelligent Key with you.
When pushing the door handle
request switch to lock the door The outside chime sounds for a few seconds. The Intelligent Key is inside the vehicle
and cargo/trunk room area.
Carry the Intelligent Key with you.
A door is not closed securely. Close the door securely.
When closing the trunk lid
(Roadster models) The outside chime sounds for a few seconds
and all doors unlock. The Intelligent Key is inside the trunk. Carry the Intelligent Key with you.
When shifting the selector lever
to the P (Park) position The inside warning chime sounds continuously. The ignition switch is in the ON position.
The ignition switch is in the OFF position.
Page 129 of 427
WARNING
The Intelligent Key transmits radio
waves when the buttons are pushed.
The FAA advises that the radio waves
may affect aircraft navigation and com-
munication systems. Do not operate the
Intelligent Key while on an airplane.
Make sure the buttons are not operated
unintentionally when the unit is stored
during a flight.
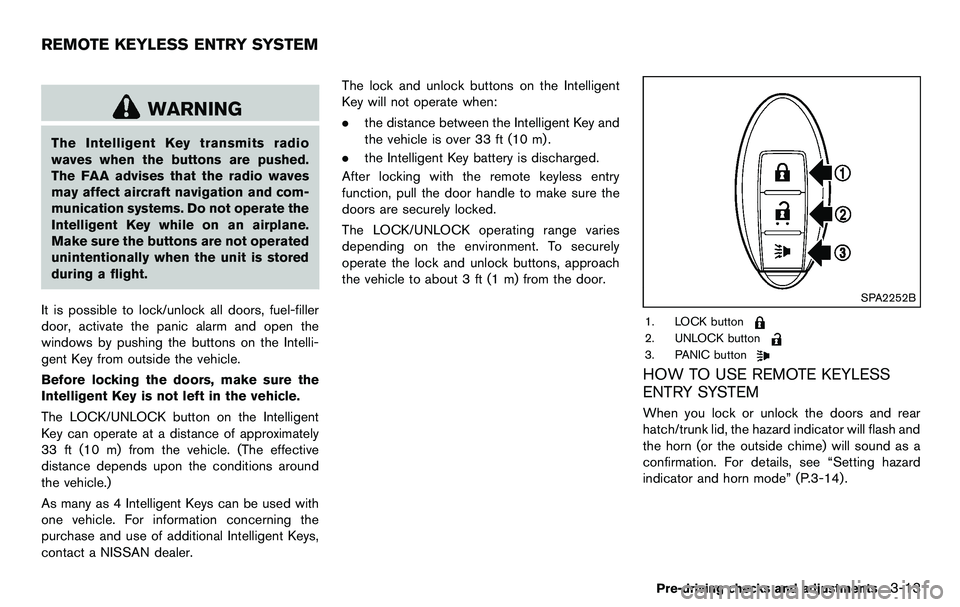
It is possible to lock/unlock all doors, fuel-filler
door, activate the panic alarm and open the
windows by pushing the buttons on the Intelli-
gent Key from outside the vehicle.
Before locking the doors, make sure the
Intelligent Key is not left in the vehicle.
The LOCK/UNLOCK button on the Intelligent
Key can operate at a distance of approximately
33 ft (10 m) from the vehicle. (The effective
distance depends upon the conditions around
the vehicle.)
As many as 4 Intelligent Keys can be used with
one vehicle. For information concerning the
purchase and use of additional Intelligent Keys,
contact a NISSAN dealer. The lock and unlock buttons on the Intelligent
Key will not operate when:
.
the distance between the Intelligent Key and
the vehicle is over 33 ft (10 m) .
. the Intelligent Key battery is discharged.
After locking with the remote keyless entry
function, pull the door handle to make sure the
doors are securely locked.
The LOCK/UNLOCK operating range varies
depending on the environment. To securely
operate the lock and unlock buttons, approach
the vehicle to about 3 ft (1 m) from the door.
SPA2252B
1. LOCK button
2. UNLOCK button
3. PANIC button
HOW TO USE REMOTE KEYLESS
ENTRY SYSTEM
When you lock or unlock the doors and rear
hatch/trunk lid, the hazard indicator will flash and
the horn (or the outside chime) will sound as a
confirmation. For details, see “Setting hazard
indicator and horn mode” (P.3-14) .
Pre-driving checks and adjustments3-13
REMOTE KEYLESS ENTRY SYSTEM
Page 133 of 427
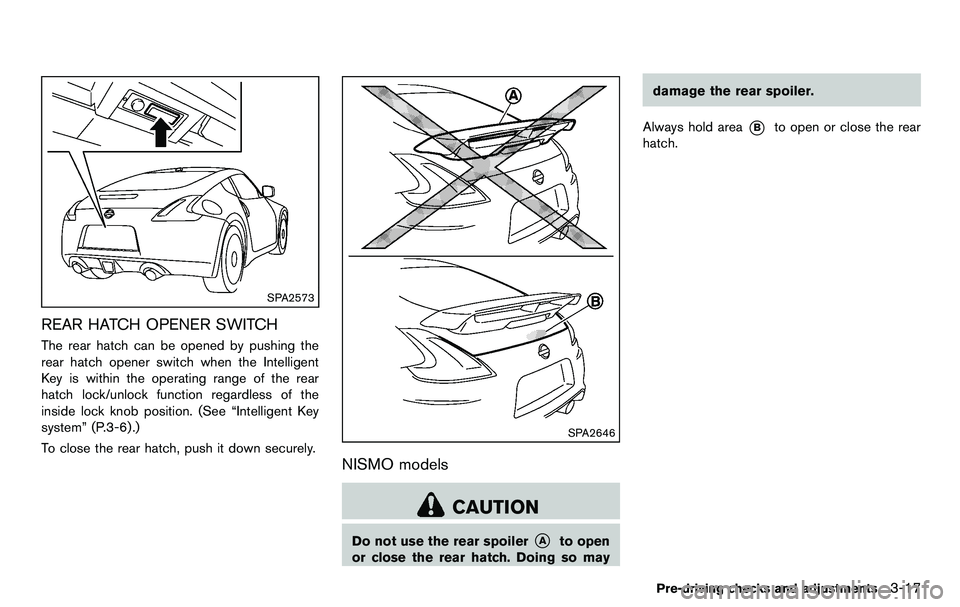
SPA2573
REAR HATCH OPENER SWITCH
The rear hatch can be opened by pushing the
rear hatch opener switch when the Intelligent
Key is within the operating range of the rear
hatch lock/unlock function regardless of the
inside lock knob position. (See “Intelligent Key
system” (P.3-6) .)
To close the rear hatch, push it down securely.
SPA2646
NISMO models
CAUTION
Do not use the rear spoiler*Ato open
or close the rear hatch. Doing so may damage the rear spoiler.
Always hold area
*Bto open or close the rear
hatch.
Pre-driving checks and adjustments3-17
Page 135 of 427
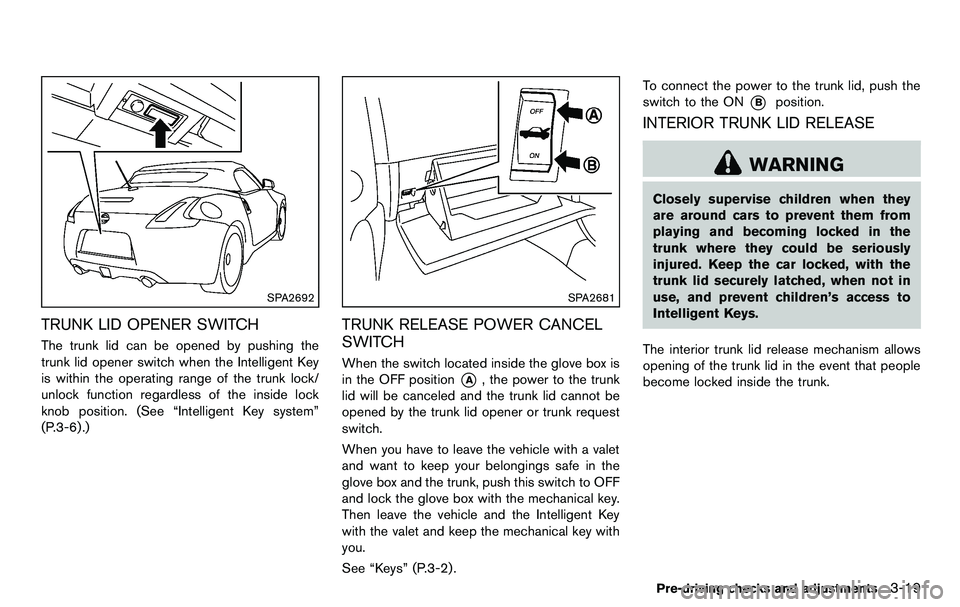
SPA2692
TRUNK LID OPENER SWITCH
The trunk lid can be opened by pushing the
trunk lid opener switch when the Intelligent Key
is within the operating range of the trunk lock/
unlock function regardless of the inside lock
knob position. (See “Intelligent Key system”
(P.3-6) .)
SPA2681
TRUNK RELEASE POWER CANCEL
SWITCH
When the switch located inside the glove box is
in the OFF position
*A, the power to the trunk
lid will be canceled and the trunk lid cannot be
opened by the trunk lid opener or trunk request
switch.
When you have to leave the vehicle with a valet
and want to keep your belongings safe in the
glove box and the trunk, push this switch to OFF
and lock the glove box with the mechanical key.
Then leave the vehicle and the Intelligent Key
with the valet and keep the mechanical key with
you.
See “Keys” (P.3-2) . To connect the power to the trunk lid, push the
switch to the ON
*Bposition.
INTERIOR TRUNK LID RELEASE
WARNING
Closely supervise children when they
are around cars to prevent them from
playing and becoming locked in the
trunk where they could be seriously
injured. Keep the car locked, with the
trunk lid securely latched, when not in
use, and prevent children’s access to
Intelligent Keys.
The interior trunk lid release mechanism allows
opening of the trunk lid in the event that people
become locked inside the trunk.
Pre-driving checks and adjustments3-19
Page 139 of 427

.Do not place anything in the top
storage area. The top will not fit
there properly, and this could da-
mage the top and/or the vehicle
body.
. Do not sit or place excessive weight
on the top and the storage lid,
especially when the top is being
operated. The top may be damaged.
. Do not drive the vehicle with the top
partially opened. Always make sure
the top is either fully opened or
closed before driving.
. Secure items so that they cannot be
blown from the vehicle while driving
with the top open.
. Do not operate the top manually
except for emergency cases. Manual
operation may damage the top.
. Be sure to fully open or fully close
the top. Do not release the switch
half way through the roof opening
or closing process. If the top is only
partially opened, significant da-
mage to the top could occur.
Make sure the trunk lid is securely closed before
operating the top.
SPA2706
WHEN OPERATING THE TOP
WARNING
Keep hands and other parts of the body
away from moving parts such as the
top, storage lid, side flap
*Aand power
windows.
CAUTION
Keep all parts of the top linkage clear of
obstructions, or the top latch may not be securely locked.
NOTE:
. In case of low battery or low tempera-
ture, the top may temporarily stop
moving during the operation. This func-
tions to protect the top control me-
chanism, and it is not a malfunction.
. If the top is opened and closed repeat-
edly in a short period of time or the top
operation is stopped while opening or
closing, the top operation may be
automatically stopped to protect the
system. Wait for approximately 5 min-
utes before operating the top again.
Pre-driving checks and adjustments3-23
Page 150 of 427
3-34Pre-driving checks and adjustments
SPA2581
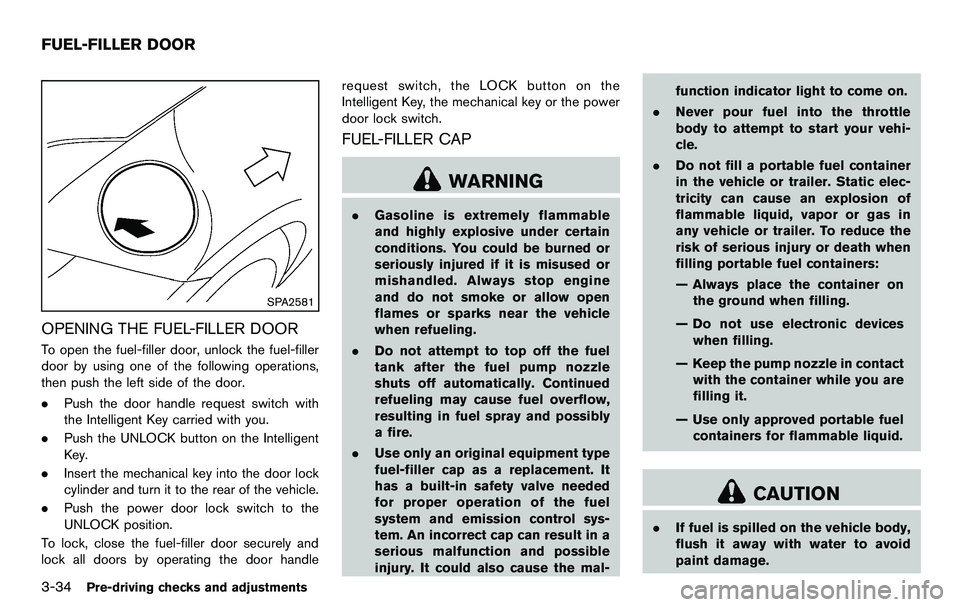
OPENING THE FUEL-FILLER DOOR
To open the fuel-filler door, unlock the fuel-filler
door by using one of the following operations,
then push the left side of the door.
.Push the door handle request switch with
the Intelligent Key carried with you.
. Push the UNLOCK button on the Intelligent
Key.
. Insert the mechanical key into the door lock
cylinder and turn it to the rear of the vehicle.
. Push the power door lock switch to the
UNLOCK position.
To lock, close the fuel-filler door securely and
lock all doors by operating the door handle request switch, the LOCK button on the
Intelligent Key, the mechanical key or the power
door lock switch.
FUEL-FILLER CAP
WARNING
.
Gasoline is extremely flammable
and highly explosive under certain
conditions. You could be burned or
seriously injured if it is misused or
mishandled. Always stop engine
and do not smoke or allow open
flames or sparks near the vehicle
when refueling.
. Do not attempt to top off the fuel
tank after the fuel pump nozzle
shuts off automatically. Continued
refueling may cause fuel overflow,
resulting in fuel spray and possibly
a fire.
. Use only an original equipment type
fuel-filler cap as a replacement. It
has a built-in safety valve needed
for proper operation of the fuel
system and emission control sys-
tem. An incorrect cap can result in a
serious malfunction and possible
injury. It could also cause the mal- function indicator light to come on.
. Never pour fuel into the throttle
body to attempt to start your vehi-
cle.
. Do not fill a portable fuel container
in the vehicle or trailer. Static elec-
tricity can cause an explosion of
flammable liquid, vapor or gas in
any vehicle or trailer. To reduce the
risk of serious injury or death when
filling portable fuel containers:
— Always place the container on
the ground when filling.
— Do not use electronic devices when filling.
— Keep the pump nozzle in contact with the container while you are
filling it.
— Use only approved portable fuel containers for flammable liquid.
CAUTION
. If fuel is spilled on the vehicle body,
flush it away with water to avoid
paint damage.
FUEL-FILLER DOOR
Page 152 of 427
3-36Pre-driving checks and adjustments
WARNING
.Do not adjust the steering wheel
while driving. You could lose control
of your vehicle and cause an acci-
dent.
. Do not adjust the steering wheel
any closer to you than is necessary
for proper steering operation and
comfort. The driver’s air bag inflates
with great force. If you are unrest-
rained, leaning forward, sitting side-
ways or out of position in any way,
you are at greater risk of injury or
death in a crash. You may also
receive serious or fatal injuries from
the air bag if you are up against it
when it inflates. Always sit back
against the seatback and as far
away as practical from the steering
wheel. Always use the seat belts.
SPA2583
MANUAL OPERATION
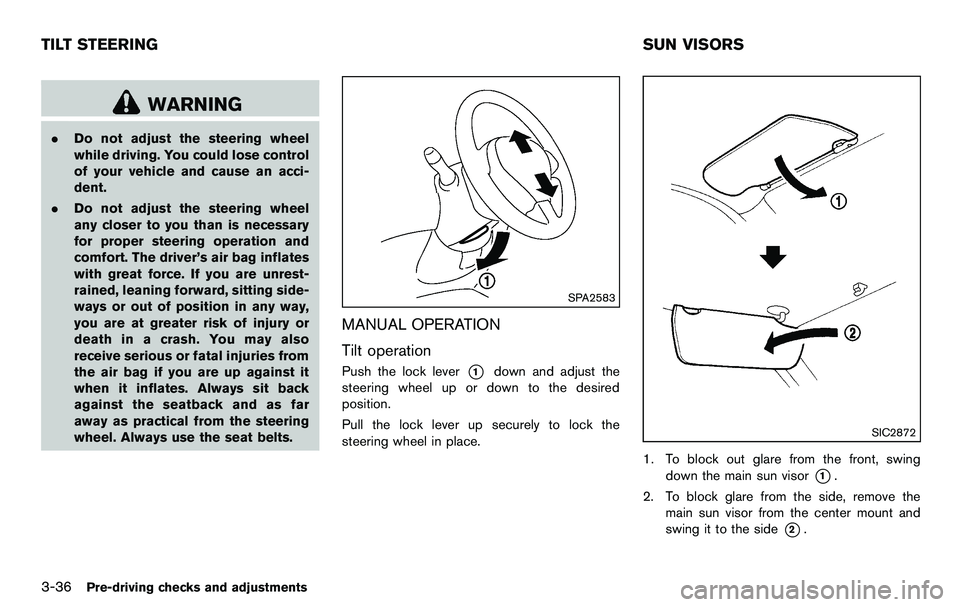
Tilt operation
Push the lock lever*1down and adjust the
steering wheel up or down to the desired
position.
Pull the lock lever up securely to lock the
steering wheel in place.
SIC2872
1. To block out glare from the front, swing down the main sun visor
*1.
2. To block glare from the side, remove the main sun visor from the center mount and
swing it to the side
*2.
TILT STEERING SUN VISORS
Page 174 of 427

4-18Center display, heater, air conditioner, audio, phone and voice recognition systems
When the selector/shift lever is shifted into the R
(Reverse) position, the monitor display shows
view to the rear of the vehicle.
The system is designed as an aid to the driver in
detecting large stationary objects to help avoid
damaging the vehicle. The system will not detect
small objects below the bumper and may not
detect objects close to the bumper or on the
ground.
WARNING
.The rearview camera is a conveni-
ence but it is not a substitute for
proper backing up. Always turn and
check that it is safe to do so before
backing up. Always back up slowly.
. Objects viewed in the RearView
Monitor differ from actual distance
because a wide-angle lens is used.
Objects in the RearView Monitor
will appear visually opposite like
ones viewed in the inside and out-
side mirrors.
. Make sure that the trunk is securely
closed when backing up.
. Underneath the bumper and the
corner areas of the bumper cannot
be viewed on the RearView monitor because of its monitoring range
limitation.
. Do not put anything on the rearview
camera. The rearview camera is
installed above the license plate.
. When washing the vehicle with
high-pressure water, be sure not to
spray it around the camera. Other-
wise, water may enter the camera
unit causing water condensation on
the lens, a malfunction, fire or an
electric shock.
. Do not strike the camera. It is a
precision instrument. Otherwise, it
may malfunction or cause damage
resulting in a fire or an electric
shock.
CAUTION
There is a plastic cover over the camera.
Do not scratch the cover when cleaning
dirt or snow from the cover.
SAA1896
HOW TO READ DISPLAYED LINES
Guiding lines which indicate the vehicle width
and distances to objects with reference to the
bumper line
*Aare displayed on the monitor.
Distance guide lines:
Indicate distances from the bumper.
. Red line
*1: approx. 1.5 ft (0.5 m)
. Yellow line
*2: approx. 3 ft (1 m)
. Green line
*3: approx. 7 ft (2 m)
. Green line
*4: approx. 10 ft (3 m)
Vehicle width guide lines
*5:
Indicate the vehicle width when backing up.
REARVIEW MONITOR (models with
navigation system)