2012 NISSAN 370Z COUPE sat nav
[x] Cancel search: sat navPage 157 of 427
4 Center display, heater, air conditioner, audio,phone and voice recognition systems
Safety note ........................................................................\
.......... 4-3
Center multi-function control panel (models with
navigation system) .................................................................... 4-3
How to use multi-function controller .............................. 4-4
How to use touch screen ................................................. 4-4
Menu options ........................................................................\
4-6
How to select menus on the screen .............................. 4-7
Vehicle information and settings (models with
navigation system) .................................................................... 4-7 How to use STATUS button ............................................. 4-7
How to use brightness control and display
ON/OFF button ................................................................... 4-7
How to use INFO button .................................................. 4-8
How to use SETTING button ....................................... 4-11
RearView monitor (models with navigation system) ..... 4-18 How to read displayed lines .......................................... 4-18
How to park with predicted course lines ................... 4-19
Difference between predicted and
actual distances ................................................................ 4-20
How to adjust screen ...................................................... 4-23
Operating tips ................................................................... 4-23
Ventilators ........................................................................\
......... 4-24 Center ventilators ............................................................. 4-24
Side ventilators ................................................................. 4-24 Heater and air conditioner .................................................. 4-24
Automatic air conditioner (Type A) ............................ 4-25
Automatic air conditioner (Type B) ........................... 4-28
Operating tips ................................................................. 4-30
In-cabin microfilter ......................................................... 4-30
Servicing air conditioner .............................................. 4-30
Audio system ........................................................................\
.. 4-31 Audio operation precautions ....................................... 4-31
FM-AM radio with Compact Disc (CD) player ....... 4-43
FM-AM-SAT radio with Compact Disc (CD)
changer (models without navigation system) ......... 4-47
FM-AM-SAT radio with Compact Disc (CD) player
(models with navigation system) ................................ 4-52
DVD (Digital Versatile Disc) player operation
(models with navigation system) ................................ 4-56
USB memory operation (models with
navigation system) ......................................................... 4-59
Bluetooth
®streaming audio (models with
navigation system) ......................................................... 4-63
iPod
®player operation (models with
navigation system) ......................................................... 4-68
Music Box
®(if so equipped) ...................................... 4-69
Auxiliary input jacks (models with
navigation system) ......................................................... 4-75
CD/DVD/USB memory care and cleaning .............. 4-76
Page 174 of 427

4-18Center display, heater, air conditioner, audio, phone and voice recognition systems
When the selector/shift lever is shifted into the R
(Reverse) position, the monitor display shows
view to the rear of the vehicle.
The system is designed as an aid to the driver in
detecting large stationary objects to help avoid
damaging the vehicle. The system will not detect
small objects below the bumper and may not
detect objects close to the bumper or on the
ground.
WARNING
.The rearview camera is a conveni-
ence but it is not a substitute for
proper backing up. Always turn and
check that it is safe to do so before
backing up. Always back up slowly.
. Objects viewed in the RearView
Monitor differ from actual distance
because a wide-angle lens is used.
Objects in the RearView Monitor
will appear visually opposite like
ones viewed in the inside and out-
side mirrors.
. Make sure that the trunk is securely
closed when backing up.
. Underneath the bumper and the
corner areas of the bumper cannot
be viewed on the RearView monitor because of its monitoring range
limitation.
. Do not put anything on the rearview
camera. The rearview camera is
installed above the license plate.
. When washing the vehicle with
high-pressure water, be sure not to
spray it around the camera. Other-
wise, water may enter the camera
unit causing water condensation on
the lens, a malfunction, fire or an
electric shock.
. Do not strike the camera. It is a
precision instrument. Otherwise, it
may malfunction or cause damage
resulting in a fire or an electric
shock.
CAUTION
There is a plastic cover over the camera.
Do not scratch the cover when cleaning
dirt or snow from the cover.
SAA1896
HOW TO READ DISPLAYED LINES
Guiding lines which indicate the vehicle width
and distances to objects with reference to the
bumper line
*Aare displayed on the monitor.
Distance guide lines:
Indicate distances from the bumper.
. Red line
*1: approx. 1.5 ft (0.5 m)
. Yellow line
*2: approx. 3 ft (1 m)
. Green line
*3: approx. 7 ft (2 m)
. Green line
*4: approx. 10 ft (3 m)
Vehicle width guide lines
*5:
Indicate the vehicle width when backing up.
REARVIEW MONITOR (models with
navigation system)
Page 189 of 427
.During cold weather or rainy days, the player
may malfunction due to the humidity. If this
occurs, remove the CD and dehumidify or
ventilate the player completely.
. The player may skip while driving on rough
roads.
. The CD player sometimes cannot function
when the passenger compartment tempera-
ture is extremely high. Decrease the tem-
perature before use.
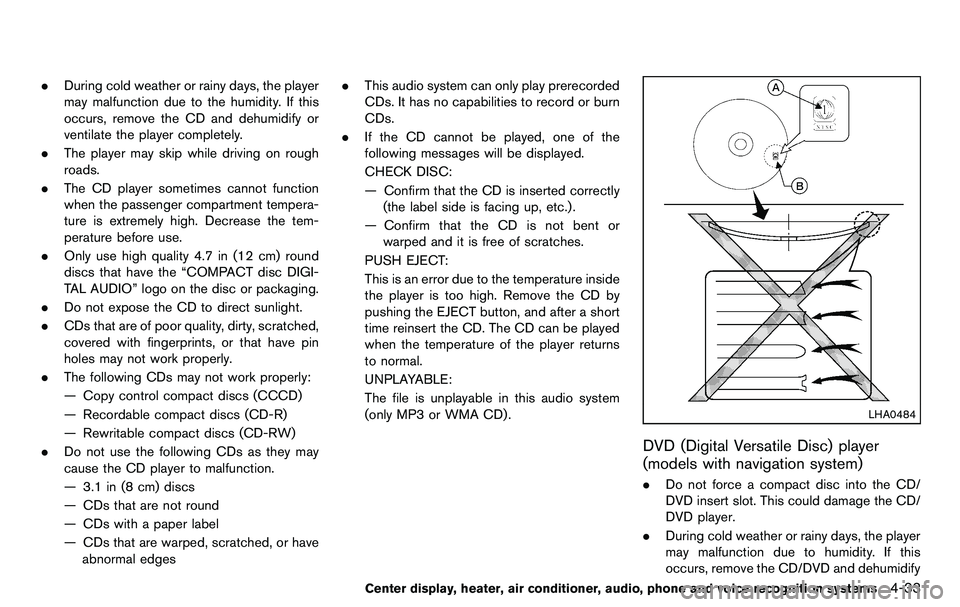
. Only use high quality 4.7 in (12 cm) round
discs that have the “COMPACT disc DIGI-
TAL AUDIO” logo on the disc or packaging.
. Do not expose the CD to direct sunlight.
. CDs that are of poor quality, dirty, scratched,
covered with fingerprints, or that have pin
holes may not work properly.
. The following CDs may not work properly:
— Copy control compact discs (CCCD)
— Recordable compact discs (CD-R)
— Rewritable compact discs (CD-RW)
. Do not use the following CDs as they may
cause the CD player to malfunction.
— 3.1 in (8 cm) discs
— CDs that are not round
— CDs with a paper label
— CDs that are warped, scratched, or have
abnormal edges .
This audio system can only play prerecorded
CDs. It has no capabilities to record or burn
CDs.
. If the CD cannot be played, one of the
following messages will be displayed.
CHECK DISC:
— Confirm that the CD is inserted correctly
(the label side is facing up, etc.).
— Confirm that the CD is not bent or warped and it is free of scratches.
PUSH EJECT:
This is an error due to the temperature inside
the player is too high. Remove the CD by
pushing the EJECT button, and after a short
time reinsert the CD. The CD can be played
when the temperature of the player returns
to normal.
UNPLAYABLE:
The file is unplayable in this audio system
(only MP3 or WMA CD) .
LHA0484
DVD (Digital Versatile Disc) player
(models with navigation system)
. Do not force a compact disc into the CD/
DVD insert slot. This could damage the CD/
DVD player.
. During cold weather or rainy days, the player
may malfunction due to humidity. If this
occurs, remove the CD/DVD and dehumidify
Center display, heater, air conditioner, audio, phone and voice recognition systems4-33
Page 203 of 427
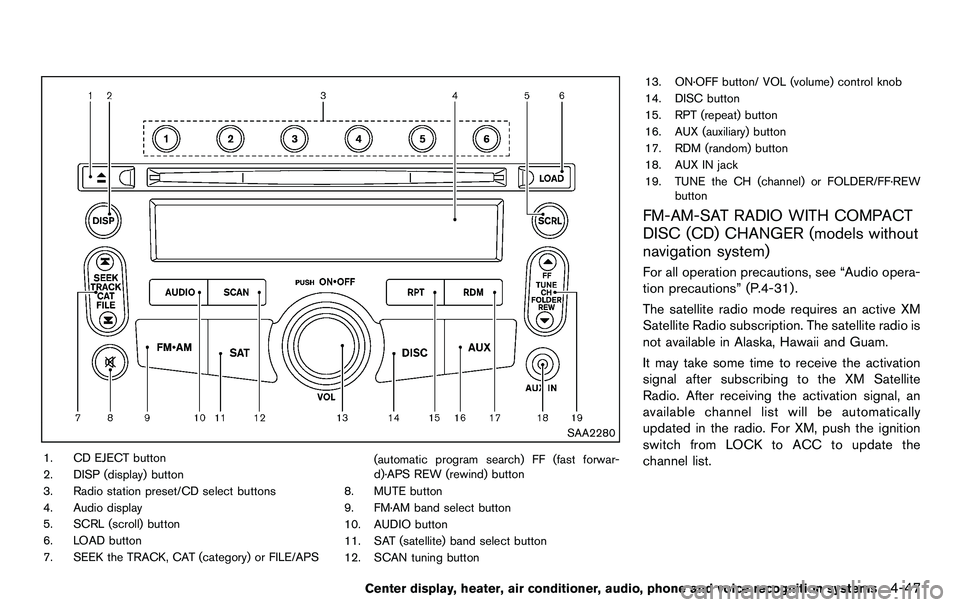
SAA2280
1. CD EJECT button
2. DISP (display) button
3. Radio station preset/CD select buttons
4. Audio display
5. SCRL (scroll) button
6. LOAD button
7. SEEK the TRACK, CAT (category) or FILE/APS(automatic program search) FF (fast forwar-
d)·APS REW (rewind) button
8. MUTE button
9. FM·AM band select button
10. AUDIO button
11. SAT (satellite) band select button
12. SCAN tuning button 13. ON·OFF button/ VOL (volume) control knob
14. DISC button
15. RPT (repeat) button
16. AUX (auxiliary) button
17. RDM (random) button
18. AUX IN jack
19. TUNE the CH (channel) or FOLDER/FF·REW
button
FM-AM-SAT RADIO WITH COMPACT
DISC (CD) CHANGER (models without
navigation system)
For all operation precautions, see “Audio opera-
tion precautions” (P.4-31) .
The satellite radio mode requires an active XM
Satellite Radio subscription. The satellite radio is
not available in Alaska, Hawaii and Guam.
It may take some time to receive the activation
signal after subscribing to the XM Satellite
Radio. After receiving the activation signal, an
available channel list will be automatically
updated in the radio. For XM, push the ignition
switch from LOCK to ACC to update the
channel list.
Center display, heater, air conditioner, audio, phone and voice recognition systems4-47
Page 208 of 427
4-52Center display, heater, air conditioner, audio, phone and voice recognition systems
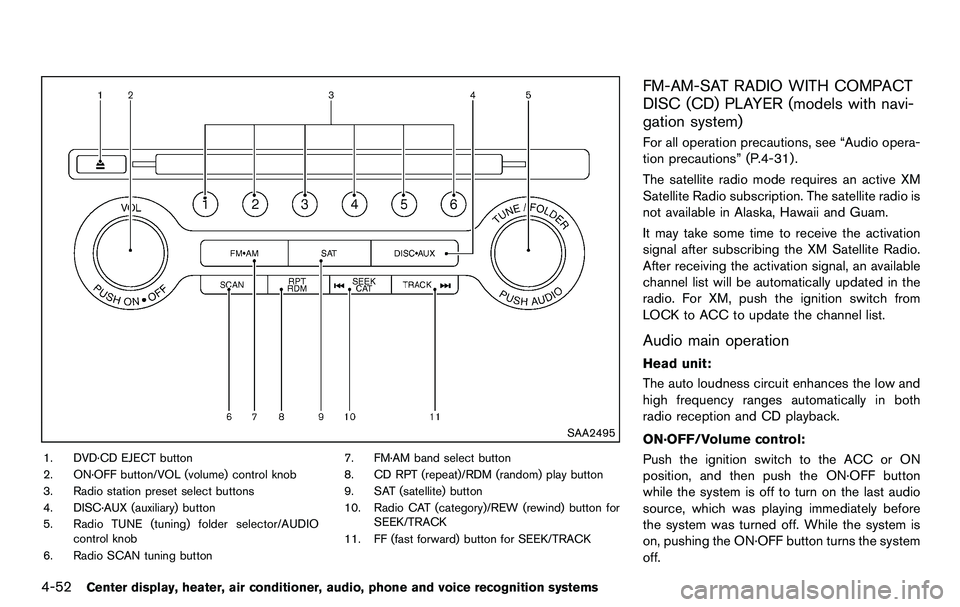
SAA2495
1. DVD·CD EJECT button
2. ON·OFF button/VOL (volume) control knob
3. Radio station preset select buttons
4. DISC·AUX (auxiliary) button
5. Radio TUNE (tuning) folder selector/AUDIOcontrol knob
6. Radio SCAN tuning button 7. FM·AM band select button
8. CD RPT (repeat)/RDM (random) play button
9. SAT (satellite) button
10. Radio CAT (category)/REW (rewind) button for
SEEK/TRACK
11. FF (fast forward) button for SEEK/TRACK
FM-AM-SAT RADIO WITH COMPACT
DISC (CD) PLAYER (models with navi-
gation system)
For all operation precautions, see “Audio opera-
tion precautions” (P.4-31) .
The satellite radio mode requires an active XM
Satellite Radio subscription. The satellite radio is
not available in Alaska, Hawaii and Guam.
It may take some time to receive the activation
signal after subscribing the XM Satellite Radio.
After receiving the activation signal, an available
channel list will be automatically updated in the
radio. For XM, push the ignition switch from
LOCK to ACC to update the channel list.
Audio main operation
Head unit:
The auto loudness circuit enhances the low and
high frequency ranges automatically in both
radio reception and CD playback.
ON·OFF/Volume control:
Push the ignition switch to the ACC or ON
position, and then push the ON·OFF button
while the system is off to turn on the last audio
source, which was playing immediately before
the system was turned off. While the system is
on, pushing the ON·OFF button turns the system
off.
Page 212 of 427

4-56Center display, heater, air conditioner, audio, phone and voice recognition systems
When this button is pushed while the CD is
being played, the CD will be ejected.
If the CD comes out and is not removed, it
will be pulled back into the slot to protect
it.
DVD (Digital Versatile Disc) PLAYER
OPERATION (models with navigation
system)
Precautions
Start the engine when using the DVD entertain-
ment system.
Movies will not be shown on the front display
while the vehicle is in any drive position to
reduce driver distraction. Audio is available
when a movie is played. To view movies in the
front display, stop the vehicle in a safe location,
move the selector lever to the P (Park) position
and apply the parking brake.
WARNING
.The driver must not attempt to
operate the DVD system or wear
the headphones while the vehicle is
in motion so that full attention may
be given to vehicle operation. .
Do not attempt to modify the system
to display a movie on the front
screen while the vehicle is being
driven. Doing so may distract the
driver and may cause a collision and
serious personal injury or death.
CAUTION
.Only operate the DVD while the
vehicle engine is running. Operating
the DVD for extended periods of
time with the engine OFF can dis-
charge the vehicle battery.
. Do not allow the system to get wet.
Excessive moisture such as spilled
liquids may cause the system to
malfunction.
. While playing VIDEO-CD media, this
DVD player does not guarantee
complete functionality of all VI-
DEO-CD formats.
Display settings
To adjust the front display mode, push the
SETTING button while the DVD is being played,
select the “Others” key and then select the
“Display” key.
To adjust the display ON/OFF, brightness, tint,
color and contrast, select the “Display Adjust-
ment” key and then select each key.
Then you can adjust each item using the multi-
function controller. After changes have been
made push the BACK button to save the setting.
Page 234 of 427
4-78Center display, heater, air conditioner, audio, phone and voice recognition systems
XM Satellite Radio (if so equipped):
.Tilting up/down for less than 1.5 seconds
will scroll up or down through the preset
channel.
. Tilting up/down for more than 1.5 seconds
will go to the next or previous category.
. Pushing the menu control switch will show
the XM Menu.
iPod
®(models with navigation system):
. Tilting up/down for less than 1.5 seconds
will scroll up or down through the track
number.
. Pushing the menu control switch will show
the iPod Menu.
CD:
. Tilting up/down for less than 1.5 seconds
will scroll up or down through the track
number.
. Tilting up/down for more than 1.5 seconds
will scroll up or down through the folder
number (if playing compressed audio files) .
. Pushing the menu control switch will show
the CD Menu.
DVD (models with navigation system):
. Tilting up/down for less than 1.5 seconds
will scroll up or down through the track
number. .
Tilting up/down for more than 1.5 seconds
will scroll up or down through the title
number.
. Pushing the menu control switch will select
an item from the DVD display.
. When the transparent operation menu ap-
pears, the switch will control the menu.
USB (models with navigation system):
. Tilting up/down for less than 1.5 seconds
will scroll up or down through the track
number.
. Tilting up/down for more than 1.5 seconds
will scroll up or down through the folder
number
. Pushing the menu control switch will show
the USB Menu.
Music Box
®(if so equipped):
. Tilting up/down for less than 1.5 seconds
will scroll up or down through the track
number.
. Tilting up/down for more than 1.5 seconds
will scroll up or down through the album
(folder) number (if playing compressed
audio files) .
. Pushing the menu control switch will show
the Music Box
®Menu. Bluetooth
®Audio (models with navigation
system):
. Tilting up/down for less than 1.5 seconds
will scroll up or down through the track
number.
AUX:
. Pushing the menu control switch will show
the AUX Menu.
BACK switch (models with navi-
gation system)
Push this switch to go back to the previous
screen or cancel the selection if it is not
completed.
Volume control switches
Push the upper (+) or lower (−) side switch to
increase or decrease the volume.
Audio source switch
Push the audio source switch to change the
mode as follows.
. Models with navigation system
AM ?FM ?SAT ?CD/DVD ?Music
Box
®? USB/iPod®?Bluetooth®Audio ?
AUX
. Models without navigation system
AM ?FM ?CD ?AUX ?SAT*
*: if so equipped
Page 262 of 427
4-106Center display, heater, air conditioner, audio, phone and voice recognition systems
USING THE SYSTEM
Initialization
When the ignition switch is pushed to the ON
position, NISSAN Voice Recognition is initia-
lized, which may take up to one minute. When
completed, the system is ready to accept voice
commands. If the TALK
switch is pushed
before the initialization completes, the display
will show the message: “System not ready.” or a
beep sounds.
Before starting
To get the best recognition performance from
NISSAN Voice Recognition, observe the follow-
ing:
. The interior of the vehicle should be as quiet
as possible. Close the windows to eliminate
the surrounding noises (traffic noise and
vibration sounds, etc.), which may prevent
the system from correctly recognizing the
voice commands.
. Wait until the tone sounds before speaking a
command.
. Speak in a natural conversational voice
without pausing between words.
. If the air conditioner is set to “Auto”, the fan
speed is automatically lowered so that your
commands can be recognized more easily.SAA2167
Giving voice commands
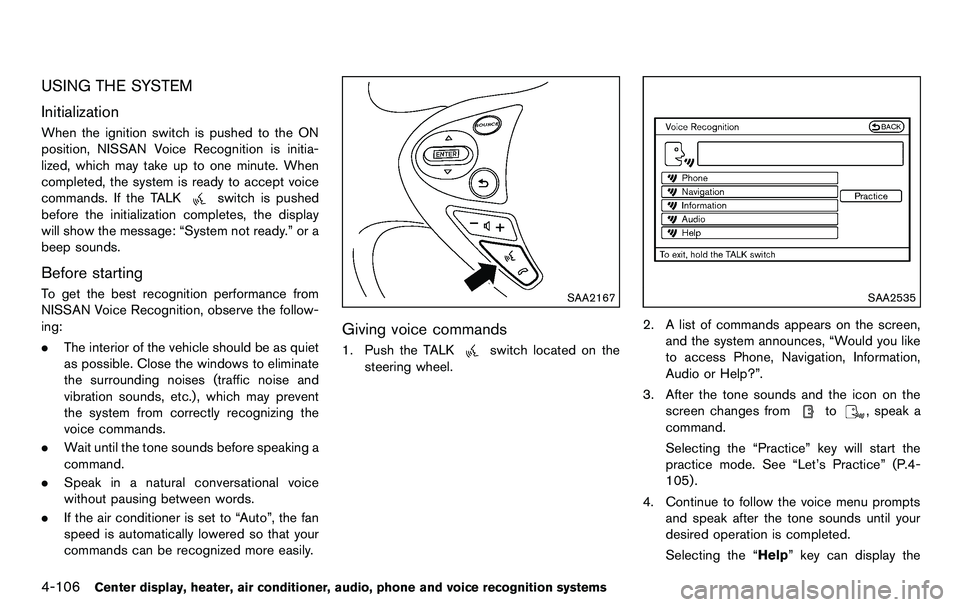
1. Push the TALKswitch located on the
steering wheel.
SAA2535
2. A list of commands appears on the screen,
and the system announces, “Would you like
to access Phone, Navigation, Information,
Audio or Help?”.
3. After the tone sounds and the icon on the screen changes from
to, speak a
command.
Selecting the “Practice” key will start the
practice mode. See “Let’s Practice” (P.4-
105).
4. Continue to follow the voice menu prompts and speak after the tone sounds until your
desired operation is completed.
Selecting the “Help” key can display the