2012 NISSAN 370Z COUPE reset
[x] Cancel search: resetPage 233 of 427
.A new disc may be rough on the inner and
outer edges. Remove the rough edges by
rubbing the inner and outer edges with the
side of a pen or pencil as illustrated.
USB memory
.Never touch the terminal portion of the USB
memory.
. Do not place heavy objects on the USB
memory.
. Do not store the USB memory in highly
humid locations.
. Do not expose the USB memory to direct
sunlight.
. Do not spill any liquids on the USB memory.
Refer to the USB memory Owner’s Manual for
the details.
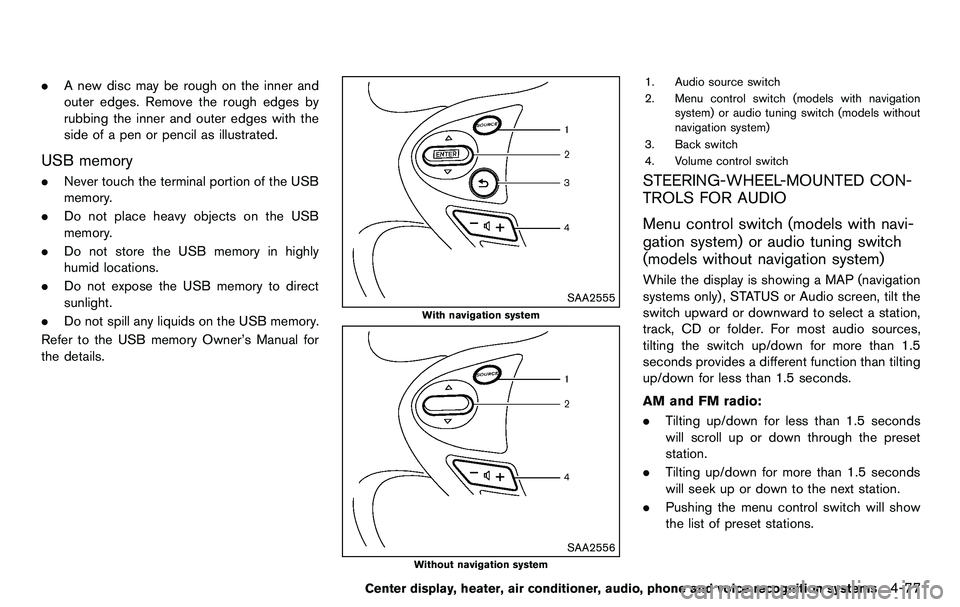
SAA2555
With navigation system
SAA2556
Without navigation system
1. Audio source switch
2. Menu control switch (models with navigation system) or audio tuning switch (models without
navigation system)
3. Back switch
4. Volume control switch
STEERING-WHEEL-MOUNTED CON-
TROLS FOR AUDIO
Menu control switch (models with navi-
gation system) or audio tuning switch
(models without navigation system)
While the display is showing a MAP (navigation
systems only), STATUS or Audio screen, tilt the
switch upward or downward to select a station,
track, CD or folder. For most audio sources,
tilting the switch up/down for more than 1.5
seconds provides a different function than tilting
up/down for less than 1.5 seconds.
AM and FM radio:
. Tilting up/down for less than 1.5 seconds
will scroll up or down through the preset
station.
. Tilting up/down for more than 1.5 seconds
will seek up or down to the next station.
. Pushing the menu control switch will show
the list of preset stations.
Center display, heater, air conditioner, audio, phone and voice recognition systems4-77
Page 234 of 427
4-78Center display, heater, air conditioner, audio, phone and voice recognition systems
XM Satellite Radio (if so equipped):
.Tilting up/down for less than 1.5 seconds
will scroll up or down through the preset
channel.
. Tilting up/down for more than 1.5 seconds
will go to the next or previous category.
. Pushing the menu control switch will show
the XM Menu.
iPod
®(models with navigation system):
. Tilting up/down for less than 1.5 seconds
will scroll up or down through the track
number.
. Pushing the menu control switch will show
the iPod Menu.
CD:
. Tilting up/down for less than 1.5 seconds
will scroll up or down through the track
number.
. Tilting up/down for more than 1.5 seconds
will scroll up or down through the folder
number (if playing compressed audio files) .
. Pushing the menu control switch will show
the CD Menu.
DVD (models with navigation system):
. Tilting up/down for less than 1.5 seconds
will scroll up or down through the track
number. .
Tilting up/down for more than 1.5 seconds
will scroll up or down through the title
number.
. Pushing the menu control switch will select
an item from the DVD display.
. When the transparent operation menu ap-
pears, the switch will control the menu.
USB (models with navigation system):
. Tilting up/down for less than 1.5 seconds
will scroll up or down through the track
number.
. Tilting up/down for more than 1.5 seconds
will scroll up or down through the folder
number
. Pushing the menu control switch will show
the USB Menu.
Music Box
®(if so equipped):
. Tilting up/down for less than 1.5 seconds
will scroll up or down through the track
number.
. Tilting up/down for more than 1.5 seconds
will scroll up or down through the album
(folder) number (if playing compressed
audio files) .
. Pushing the menu control switch will show
the Music Box
®Menu. Bluetooth
®Audio (models with navigation
system):
. Tilting up/down for less than 1.5 seconds
will scroll up or down through the track
number.
AUX:
. Pushing the menu control switch will show
the AUX Menu.
BACK switch (models with navi-
gation system)
Push this switch to go back to the previous
screen or cancel the selection if it is not
completed.
Volume control switches
Push the upper (+) or lower (−) side switch to
increase or decrease the volume.
Audio source switch
Push the audio source switch to change the
mode as follows.
. Models with navigation system
AM ?FM ?SAT ?CD/DVD ?Music
Box
®? USB/iPod®?Bluetooth®Audio ?
AUX
. Models without navigation system
AM ?FM ?CD ?AUX ?SAT*
*: if so equipped
Page 254 of 427
4-98Center display, heater, air conditioner, audio, phone and voice recognition systems
commands.
.“Help” — The system announces the avail-
able commands.
. “Go back/Correction” — The system an-
nounces “Go back,” ends the VR session
and returns to the call.
. “Cancel/Quit” — The system announces
“Cancel,” ends the VR session and returns
to the call.
. “Send/Enter/Call/Dial” — Use the Send
command to enter numbers, “*” or “#”
during a call. For example, if you were
directed to dial an extension by an auto-
mated system:
Say: “Send one two three four.”
The system acknowledges the command
and sends the tones associated with the
numbers. The system then ends the VR
session and returns to the call. Say “star” for
“*”, say “pound” for “#”.
. “Transfer call” — Use the Transfer Call
command to transfer the call from the
Bluetooth
®Hands-Free Phone System to
the cellular phone when privacy is desired.
The system announces, “Transfer call. Call
transferred to privacy mode.” The system
then ends the VR session.
To reconnect a call from the cellular phone
to the Bluetooth
®Hands-Free Phone sys- tem, push the
button.
. “Mute” — Use the Mute command to mute
your voice so the other party cannot hear it.
Use the mute command again to unmute
your voice.
NOTE:
If a call is ended or the cellular phone
network connection is lost while the Mute
feature is on, the Mute feature will be reset
to “off” for the next call so the other party
can hear your voice.
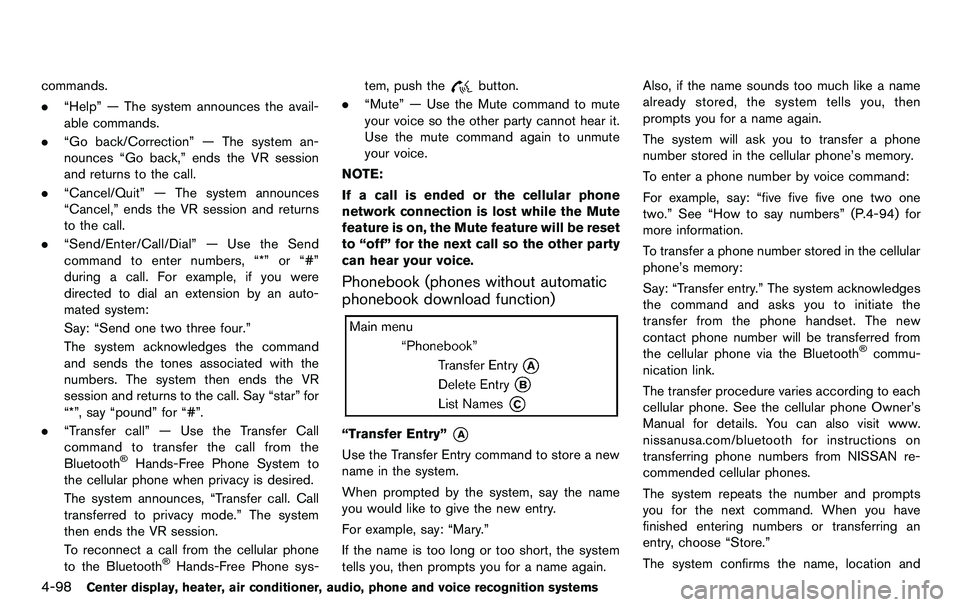
Phonebook (phones without automatic
phonebook download function)
“Transfer Entry”*A
Use the Transfer Entry command to store a new
name in the system.
When prompted by the system, say the name
you would like to give the new entry.
For example, say: “Mary.”
If the name is too long or too short, the system
tells you, then prompts you for a name again. Also, if the name sounds too much like a name
already stored, the system tells you, then
prompts you for a name again.
The system will ask you to transfer a phone
number stored in the cellular phone’s memory.
To enter a phone number by voice command:
For example, say: “five five five one two one
two.” See “How to say numbers” (P.4-94) for
more information.
To transfer a phone number stored in the cellular
phone’s memory:
Say: “Transfer entry.” The system acknowledges
the command and asks you to initiate the
transfer from the phone handset. The new
contact phone number will be transferred from
the cellular phone via the Bluetooth
®commu-
nication link.
The transfer procedure varies according to each
cellular phone. See the cellular phone Owner’s
Manual for details. You can also visit www.
nissanusa.com/bluetooth for instructions on
transferring phone numbers from NISSAN re-
commended cellular phones.
The system repeats the number and prompts
you for the next command. When you have
finished entering numbers or transferring an
entry, choose “Store.”
The system confirms the name, location and
Page 283 of 427
SAA2553
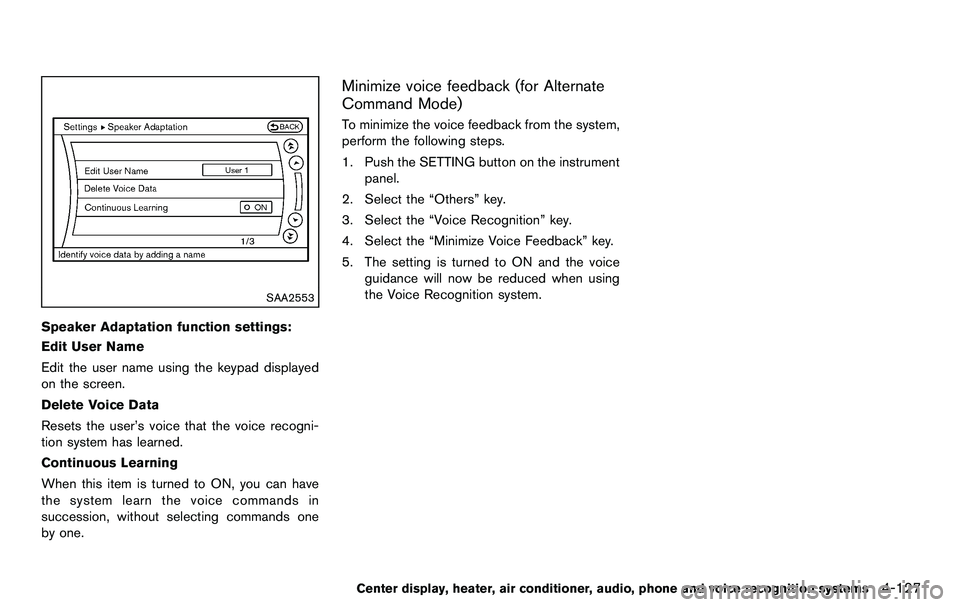
Speaker Adaptation function settings:
Edit User Name
Edit the user name using the keypad displayed
on the screen.
Delete Voice Data
Resets the user’s voice that the voice recogni-
tion system has learned.
Continuous Learning
When this item is turned to ON, you can have
the system learn the voice commands in
succession, without selecting commands one
by one.
Minimize voice feedback (for Alternate
Command Mode)
To minimize the voice feedback from the system,
perform the following steps.
1. Push the SETTING button on the instrumentpanel.
2. Select the “Others” key.
3. Select the “Voice Recognition” key.
4. Select the “Minimize Voice Feedback” key.
5. The setting is turned to ON and the voice guidance will now be reduced when using
the Voice Recognition system.
Center display, heater, air conditioner, audio, phone and voice recognition systems4-127
Page 288 of 427
5-4Starting and driving
pressure telltale.
Your vehicle has also been equipped with a
TPMS malfunction indicator to indicate when the
system is not operating properly. The TPMS
malfunction indicator is combined with the low
tire pressure telltale. When the system detects a
malfunction, the telltale will flash for approxi-
mately one minute and then remain continuously
illuminated. This sequence will continue upon
subsequent vehicle start-ups as long as the
malfunction exists. When the malfunction indi-
cator is illuminated, the system may not be able
to detect or signal low tire pressure as intended.
TPMS malfunctions may occur for a variety of
reasons, including the installation of replace-
ment or alternate tires or wheels on the vehicle
that prevent the TPMS from functioning properly.
Always check the TPMS malfunction telltale
after replacing one or more tires or wheels on
your vehicle to ensure that the replacement or
alternate tires and wheels allow the TPMS to
continue to function properly.
Additional information
.The TPMS does not monitor the tire
pressure of the spare tire.
. The TPMS will activate only when the
vehicle is driven at speeds above 16 MPH
(25 km/h) . Also, this system may not detect
a sudden drop in tire pressure (for example a flat tire while driving) .
. The low tire pressure warning light does not
automatically turn off when the tire pressure
is adjusted. After the tire is inflated to the
recommended pressure, the vehicle must be
driven at speeds above 16 MPH (25 km/h)
to activate the TPMS and turn off the low tire
pressure warning light. Use a tire pressure
gauge to check the tire pressure.
. Tire pressure rises and falls depending on
the heat caused by the vehicle’s operation
and the outside temperature. Low outside
temperature can lower the temperature of
the air inside the tire which can cause a
lower tire inflation pressure. This may cause
the low tire pressure warning light to
illuminate. If the warning light illuminates in
low ambient temperature, check the tire
pressure for all four tires.
For additional information, see “Low tire pres-
sure warning light” (P.2-12) and “Tire Pressure
Monitoring System (TPMS)” (P.6-2) .WARNING
. If the low tire pressure warning light
illuminates while driving, avoid sud-
den steering maneuvers or abrupt
braking, reduce vehicle speed, pull off the road to a safe location and
stop the vehicle as soon as possi-
ble. Driving with under-inflated tires
may permanently damage the tires
and increase the likelihood of tire
failure. Serious vehicle damage
could occur and may lead to an
accident and could result in serious
personal injury. Check the tire pres-
sure for all four tires. Adjust the tire
pressure to the recommended COLD
tire pressure shown on the Tire and
Loading Information label to turn
the low tire pressure warning light
OFF. If the light still illuminates
while driving after adjusting the tire
pressure, a tire may be flat. If you
have a flat tire, replace it with a
spare tire as soon as possible. (See
“Flat tire” (P.6-2) for changing a flat
tire.)
. When a spare tire is mounted or a
wheel is replaced, the TPMS will not
function and the low tire pressure
warning light will flash for approxi-
mately 1 minute. The light will
remain on after 1 minute. Contact
your NISSAN dealer as soon as
possible for tire replacement and/
or system resetting.
Page 306 of 427
5-22Starting and driving
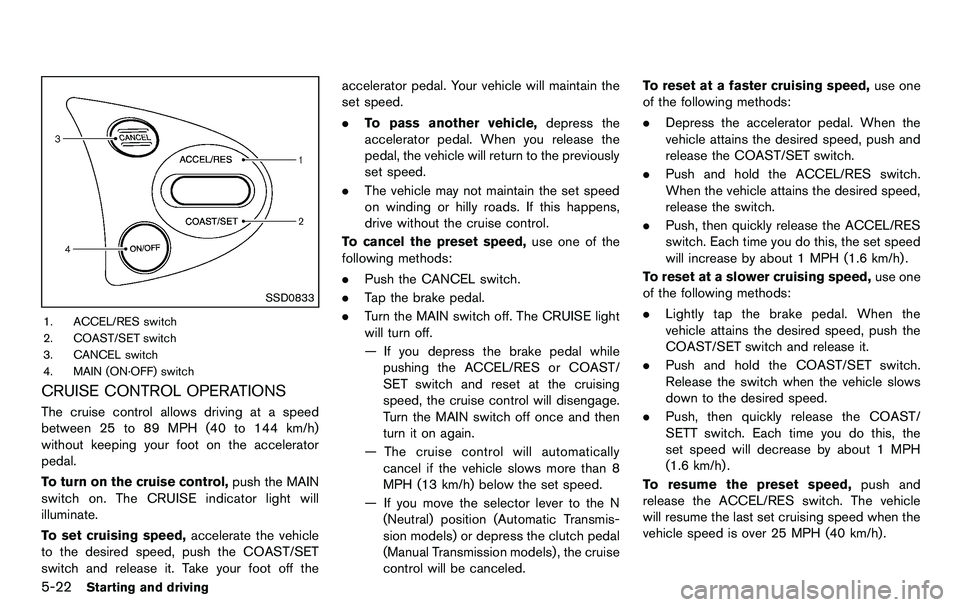
SSD0833
1. ACCEL/RES switch
2. COAST/SET switch
3. CANCEL switch
4. MAIN (ON·OFF) switch
CRUISE CONTROL OPERATIONS
The cruise control allows driving at a speed
between 25 to 89 MPH (40 to 144 km/h)
without keeping your foot on the accelerator
pedal.
To turn on the cruise control,push the MAIN
switch on. The CRUISE indicator light will
illuminate.
To set cruising speed, accelerate the vehicle
to the desired speed, push the COAST/SET
switch and release it. Take your foot off the accelerator pedal. Your vehicle will maintain the
set speed.
.
To pass another vehicle, depress the
accelerator pedal. When you release the
pedal, the vehicle will return to the previously
set speed.
. The vehicle may not maintain the set speed
on winding or hilly roads. If this happens,
drive without the cruise control.
To cancel the preset speed, use one of the
following methods:
. Push the CANCEL switch.
. Tap the brake pedal.
. Turn the MAIN switch off. The CRUISE light
will turn off.
— If you depress the brake pedal while
pushing the ACCEL/RES or COAST/
SET switch and reset at the cruising
speed, the cruise control will disengage.
Turn the MAIN switch off once and then
turn it on again.
— The cruise control will automatically cancel if the vehicle slows more than 8
MPH (13 km/h) below the set speed.
— If you move the selector lever to the N (Neutral) position (Automatic Transmis-
sion models) or depress the clutch pedal
(Manual Transmission models) , the cruise
control will be canceled. To reset at a faster cruising speed,
use one
of the following methods:
. Depress the accelerator pedal. When the
vehicle attains the desired speed, push and
release the COAST/SET switch.
. Push and hold the ACCEL/RES switch.
When the vehicle attains the desired speed,
release the switch.
. Push, then quickly release the ACCEL/RES
switch. Each time you do this, the set speed
will increase by about 1 MPH (1.6 km/h).
To reset at a slower cruising speed, use one
of the following methods:
. Lightly tap the brake pedal. When the
vehicle attains the desired speed, push the
COAST/SET switch and release it.
. Push and hold the COAST/SET switch.
Release the switch when the vehicle slows
down to the desired speed.
. Push, then quickly release the COAST/
SETT switch. Each time you do this, the
set speed will decrease by about 1 MPH
(1.6 km/h).
To resume the preset speed, push and
release the ACCEL/RES switch. The vehicle
will resume the last set cruising speed when the
vehicle speed is over 25 MPH (40 km/h).
Page 312 of 427
5-28Starting and driving
The Vehicle Dynamic Control (VDC) system
uses various sensors to monitor driver inputs
and vehicle motion. Under certain driving con-
ditions, the VDC system helps to perform the
following functions.
.Controls brake pressure to reduce wheel
slip on one slipping drive wheel so power is
transferred to a non slipping drive wheel on
the same axle.
. Controls brake pressure and engine output
to reduce drive wheel slip based on vehicle
speed (traction control function) .
. Controls brake pressure at individual wheels
and engine output to help the driver maintain
control of the vehicle in the following
conditions:
— understeer (vehicle tends to not follow
the steered path despite increased
steering input)
— oversteer (vehicle tends to spin due to certain road or driving conditions) .
The VDC system can help the driver to maintain
control of the vehicle, but it cannot prevent loss
of vehicle control in all driving situations.
When the VDC system operates, the VDC
warning light
in the instrument panel flashes
so note the following:
. The road may be slippery or the system may
determine some action is required to help keep the vehicle on the steered path.
. You may feel a pulsation in the brake pedal
and hear a noise or vibration from under the
hood. This is normal and indicates that the
VDC system is working properly.
. Adjust your speed and driving to the road
conditions.
See “Vehicle Dynamic Control (VDC) warning
light” (P.2-14).
If a malfunction occurs in the system, the VDC
warning light
illuminates in the instrument
panel. The VDC system automatically turns off.
The VDC OFF switch is used to turn off the VDC
system. The VDC off indicator
illuminates to
indicate the VDC system is off. When the VDC
switch is used to turn off the system, the VDC
system still operates to prevent one drive wheel
from slipping by transferring power to a non
slipping drive wheel. The VDC warning light
flashes if this occurs. All other VDC functions
are off, and the VDC warning light
will not
flash. The VDC system is automatically reset to
on when the ignition switch is placed in the off
position then back to the on position.
See “Vehicle Dynamic Control (VDC) warning
light” (P.2-14) and “Vehicle Dynamic Control
(VDC) off indicator light” (P.2-16).
The computer has a built-in diagnostic feature
that tests the system each time you start the engine and move the vehicle forward or in
reverse at a slow speed. When the self-test
occurs, you may hear a “clunk” noise and/or feel
a pulsation in the brake pedal. This is normal and
is not an indication of a malfunction.
WARNING
.
The VDC system is designed to help
the driver maintain stability but
does not prevent accidents due to
abrupt steering operation at high
speeds or by careless or dangerous
driving techniques. Reduce vehicle
speed and be especially careful
when driving and cornering on slip-
pery surfaces and always drive care-
fully.
. Do not modify the vehicle’s suspen-
sion. If suspension parts such as
shock absorbers, struts, springs,
stabilizer bars, bushings and
wheels are not NISSAN recom-
mended for your vehicle or are
extremely deteriorated, the VDC
system may not operate properly.
This could adversely affect vehicle
handling performance, and the VDC
warning light
may illuminate.
VEHICLE DYNAMIC CONTROL (VDC)
SYSTEM
Page 320 of 427

6-2In case of emergency
To shut off the engine in an emergency situation
while driving, perform the following procedure:
.Rapidly push the push-button ignition switch
3 consecutive times, or
. Push and hold the push-button ignition
switch for more than 2 seconds.TIRE PRESSURE MONITORING SYS-
TEM (TPMS)
This vehicle is equipped with the Tire Pressure
Monitoring System (TPMS) . It monitors tire
pressure of all tires except the spare. When
the low tire pressure warning light is lit, one or
more of your tires is significantly under-inflated.
If the vehicle is being driven with low tire
pressure, the TPMS will activate and warn you
of it by the low tire pressure warning light. This
system will activate only when the vehicle is
driven at speeds above 16 MPH (25 km/h). For
more details, see “Warning/indicator lights and
audible reminders” (P.2-9) and “Tire Pressure
Monitoring System (TPMS)” (P.5-3) .
WARNING
.If the low tire pressure warning light
illuminates while driving, avoid sud-
den steering maneuvers or abrupt
braking, reduce vehicle speed, pull
off the road to a safe location and
stop the vehicle as soon as possi-
ble. Driving with under-inflated tires
may permanently damage the tires
and increase the likelihood of tire
failure. Serious vehicle damage
could occur and may lead to an accident and could result in serious
personal injury. Check the tire pres-
sure for all four tires. Adjust the tire
pressure to the recommended COLD
tire pressure shown on the Tire and
Loading Information label to turn
the low tire pressure warning light
OFF. If the light still illuminates
while driving after adjusting the tire
pressure, a tire may be flat. If you
have a flat tire, replace it with a
spare tire as soon as possible.
. When a spare tire is mounted or a
wheel is replaced, the TPMS will not
function and the low tire pressure
warning light will flash for approxi-
mately 1 minute. The light will
remain on after 1 minute. Contact
your NISSAN dealer as soon as
possible for tire replacement and/
or system resetting.
. Replacing tires with those not ori-
ginally specified by NISSAN could
affect the proper operation of the
TPMS.
. Do not inject any tire liquid or
aerosol tire sealant into the tires,
as this may cause a malfunction of
the tire pressure sensors (for mod-
EMERGENCY ENGINE SHUT OFF FLAT TIRE