2012 NISSAN 370Z COUPE clutch
[x] Cancel search: clutchPage 303 of 427
the engine speed lowers to the target
engine speed.
Rapid clutch engagement before the engine
speed lowers to the target engine speed
may cause shift shock.
. When depressing the clutch pedal with
the gear engaged:
The engine speed is automatically kept at
the proper engine speed for the engaged
gear.
This function will not operate when low (1st)
gear is selected.
There is a delay between the clutch pedal
operation and the S-MODE operation. Make
sure the engine speed is adjusted before
engaging the clutch again.
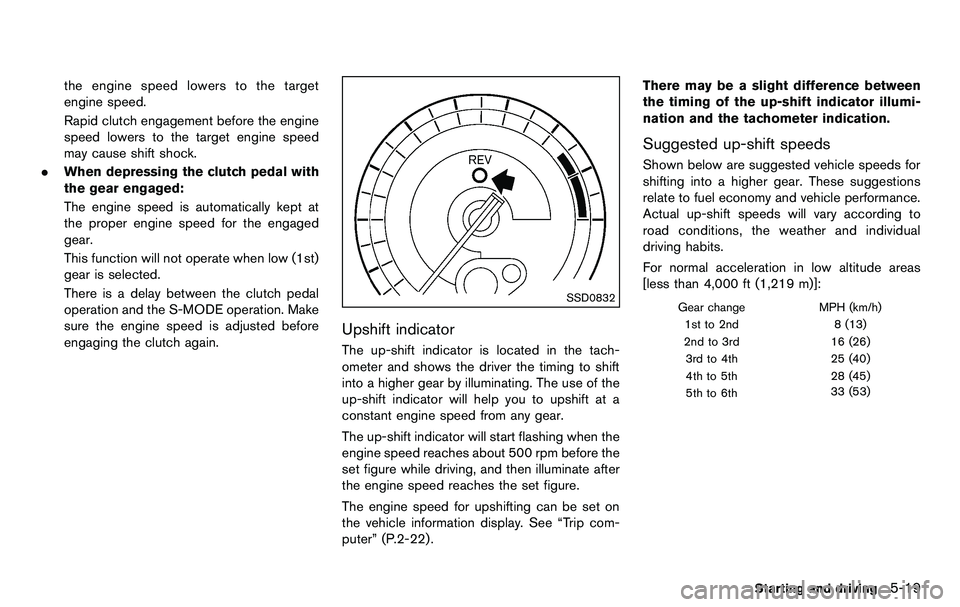
SSD0832
Upshift indicator
The up-shift indicator is located in the tach-
ometer and shows the driver the timing to shift
into a higher gear by illuminating. The use of the
up-shift indicator will help you to upshift at a
constant engine speed from any gear.
The up-shift indicator will start flashing when the
engine speed reaches about 500 rpm before the
set figure while driving, and then illuminate after
the engine speed reaches the set figure.
The engine speed for upshifting can be set on
the vehicle information display. See “Trip com-
puter” (P.2-22) . There may be a slight difference between
the timing of the up-shift indicator illumi-
nation and the tachometer indication.
Suggested up-shift speeds
Shown below are suggested vehicle speeds for
shifting into a higher gear. These suggestions
relate to fuel economy and vehicle performance.
Actual up-shift speeds will vary according to
road conditions, the weather and individual
driving habits.
For normal acceleration in low altitude areas
[less than 4,000 ft (1,219 m)]:
Gear change
MPH (km/h)
1st to 2nd 8 (13)
2nd to 3rd 16 (26)
3rd to 4th 25 (40)
4th to 5th 28 (45)
5th to 6th 33 (53)
Starting and driving5-19
Page 305 of 427
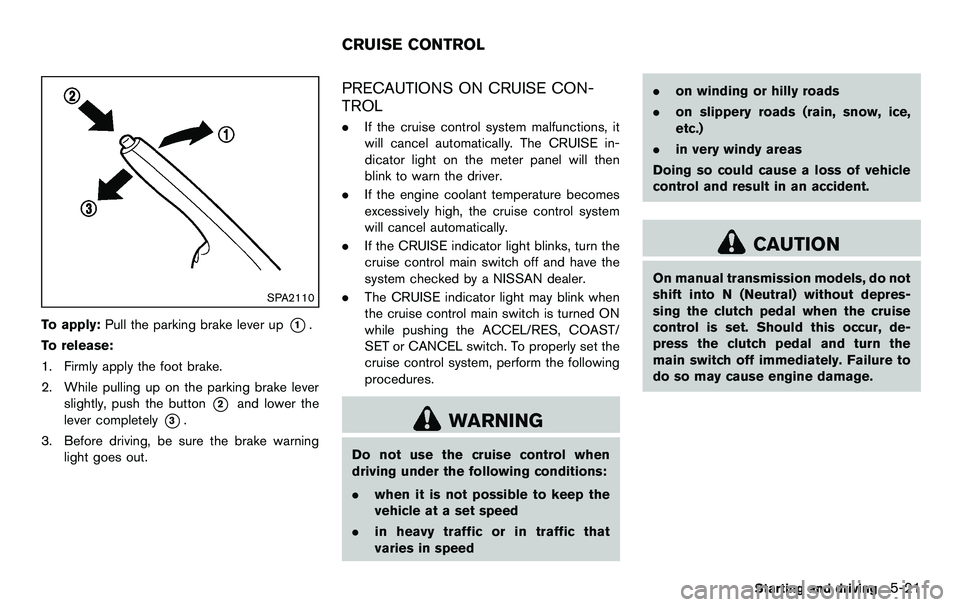
SPA2110
To apply:Pull the parking brake lever up*1.
To release:
1. Firmly apply the foot brake.
2. While pulling up on the parking brake lever slightly, push the button
*2and lower the
lever completely
*3.
3. Before driving, be sure the brake warning light goes out.
PRECAUTIONS ON CRUISE CON-
TROL
.If the cruise control system malfunctions, it
will cancel automatically. The CRUISE in-
dicator light on the meter panel will then
blink to warn the driver.
. If the engine coolant temperature becomes
excessively high, the cruise control system
will cancel automatically.
. If the CRUISE indicator light blinks, turn the
cruise control main switch off and have the
system checked by a NISSAN dealer.
. The CRUISE indicator light may blink when
the cruise control main switch is turned ON
while pushing the ACCEL/RES, COAST/
SET or CANCEL switch. To properly set the
cruise control system, perform the following
procedures.
WARNING
Do not use the cruise control when
driving under the following conditions:
.when it is not possible to keep the
vehicle at a set speed
. in heavy traffic or in traffic that
varies in speed .
on winding or hilly roads
. on slippery roads (rain, snow, ice,
etc.)
. in very windy areas
Doing so could cause a loss of vehicle
control and result in an accident.
CAUTION
On manual transmission models, do not
shift into N (Neutral) without depres-
sing the clutch pedal when the cruise
control is set. Should this occur, de-
press the clutch pedal and turn the
main switch off immediately. Failure to
do so may cause engine damage.
Starting and driving5-21
CRUISE CONTROL
Page 306 of 427
5-22Starting and driving
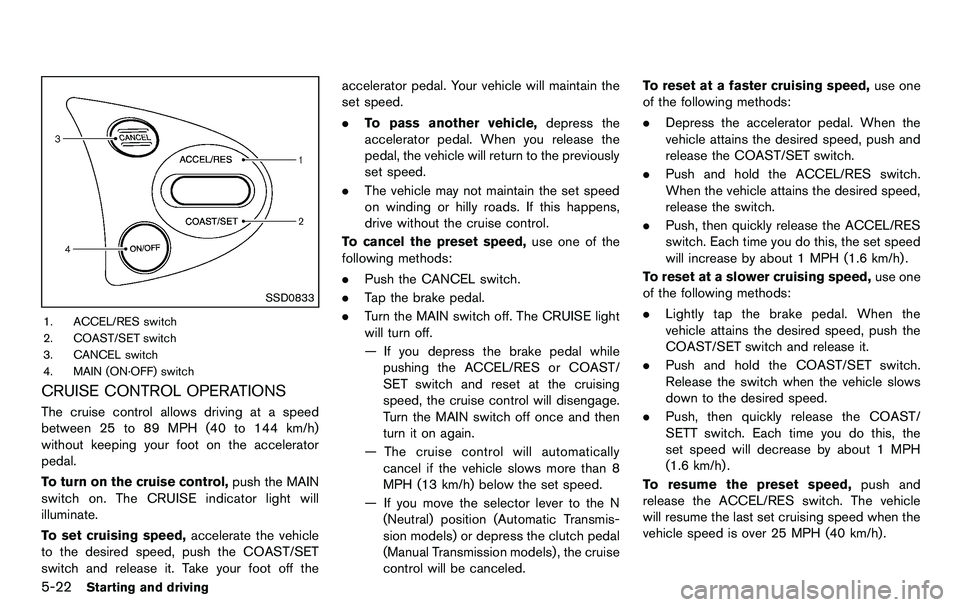
SSD0833
1. ACCEL/RES switch
2. COAST/SET switch
3. CANCEL switch
4. MAIN (ON·OFF) switch
CRUISE CONTROL OPERATIONS
The cruise control allows driving at a speed
between 25 to 89 MPH (40 to 144 km/h)
without keeping your foot on the accelerator
pedal.
To turn on the cruise control,push the MAIN
switch on. The CRUISE indicator light will
illuminate.
To set cruising speed, accelerate the vehicle
to the desired speed, push the COAST/SET
switch and release it. Take your foot off the accelerator pedal. Your vehicle will maintain the
set speed.
.
To pass another vehicle, depress the
accelerator pedal. When you release the
pedal, the vehicle will return to the previously
set speed.
. The vehicle may not maintain the set speed
on winding or hilly roads. If this happens,
drive without the cruise control.
To cancel the preset speed, use one of the
following methods:
. Push the CANCEL switch.
. Tap the brake pedal.
. Turn the MAIN switch off. The CRUISE light
will turn off.
— If you depress the brake pedal while
pushing the ACCEL/RES or COAST/
SET switch and reset at the cruising
speed, the cruise control will disengage.
Turn the MAIN switch off once and then
turn it on again.
— The cruise control will automatically cancel if the vehicle slows more than 8
MPH (13 km/h) below the set speed.
— If you move the selector lever to the N (Neutral) position (Automatic Transmis-
sion models) or depress the clutch pedal
(Manual Transmission models) , the cruise
control will be canceled. To reset at a faster cruising speed,
use one
of the following methods:
. Depress the accelerator pedal. When the
vehicle attains the desired speed, push and
release the COAST/SET switch.
. Push and hold the ACCEL/RES switch.
When the vehicle attains the desired speed,
release the switch.
. Push, then quickly release the ACCEL/RES
switch. Each time you do this, the set speed
will increase by about 1 MPH (1.6 km/h).
To reset at a slower cruising speed, use one
of the following methods:
. Lightly tap the brake pedal. When the
vehicle attains the desired speed, push the
COAST/SET switch and release it.
. Push and hold the COAST/SET switch.
Release the switch when the vehicle slows
down to the desired speed.
. Push, then quickly release the COAST/
SETT switch. Each time you do this, the
set speed will decrease by about 1 MPH
(1.6 km/h).
To resume the preset speed, push and
release the ACCEL/RES switch. The vehicle
will resume the last set cruising speed when the
vehicle speed is over 25 MPH (40 km/h).
Page 353 of 427
8 Maintenance and do-it-yourself
Maintenance requirement ........................................................ 8-3Scheduled maintenance .................................................... 8-3
General maintenance ......................................................... 8-3
Where to go for service .................................................... 8-3
General maintenance ............................................................... 8-3 Explanation of maintenance items ................................... 8-3
Maintenance precautions ........................................................ 8-6
Engine compartment check locations .................................. 8-8 VQ37VHR engine model .................................................. 8-8
Engine cooling system ............................................................. 8-9
Checking engine coolant level ...................................... 8-10
Changing engine coolant ............................................... 8-10
Engine oil ........................................................................\
......... 8-11
Checking engine oil level ............................................... 8-11
Changing engine oil and filter ....................................... 8-11
Automatic transmission fluid ............................................... 8-13
Power steering fluid ............................................................... 8-13
Brake and clutch fluid ........................................................... 8-14 Brake fluid ........................................................................\
.. 8-14
Clutch fluid (Manual transmission models) ............... 8-15
Window washer fluid ............................................................ 8-15
Battery ........................................................................\
............... 8-16 Jump starting ..................................................................... 8-17 Variable voltage control system ......................................... 8-18
Drive belts ........................................................................\
....... 8-18
Spark plugs ........................................................................\
..... 8-19
Replacing spark plugs .................................................. 8-19
Air cleaner ........................................................................\
....... 8-19
Windshield wiper blades ..................................................... 8-20
Cleaning ........................................................................\
... 8-20
Replacing ........................................................................\
. 8-21
Brakes ........................................................................\
.............. 8-22 Self-adjusting brakes .................................................... 8-22
Brake pad wear warning .............................................. 8-22
Fuses ........................................................................\
................ 8-22 Engine compartment ..................................................... 8-22
Passenger compartment .............................................. 8-24
Intelligent Key battery replacement ................................... 8-25
Lights ........................................................................\
................ 8-27
Coupe ........................................................................\
....... 8-27
Roadster ........................................................................\
... 8-28
Headlights ........................................................................\
8-29
Exterior and interior lights ............................................ 8-29
Wheels and tires ................................................................... 8-31 Tire pressure ................................................................... 8-31
Tire labeling ..................................................................... 8-34
Page 357 of 427
Windshield defroster:Check that the air
comes out of the defroster outlets properly and
in sufficient quantity when operating the heater
or air conditioner.
Windshield wiper and washer*: Check that
the wipers and washer operate properly and that
the wipers do not streak.
Under the hood and vehicle
The maintenance items listed here should be
checked periodically (for example, each time you
check the engine oil or refuel) .
Battery*: Check the fluid level in each cell. It
should be between the MAX and MIN lines.
Vehicles operated in high temperatures or under
severe condition require frequent checks of the
battery fluid level.
Brake and clutch fluid levels*: Make sure
that the brake and clutch fluid levels are
between the MAX and MIN lines on the
reservoirs.
Engine coolant level*: Check the coolant level
when the engine is cold.
Engine drive belts*: Make sure that no belt is
frayed, worn, cracked or oily.
Engine oil level*: Check the level after parking
the vehicle on a level spot and turning off the
engine. Wait more than 15 minutes for the oil to
drain back into the oil pan. Exhaust system:
Make sure there are no loose
supports, cracks or holes. If the sound of the
exhaust seems unusual or there is a smell of
exhaust fumes, immediately have the exhaust
system inspected by a NISSAN dealer. (See
“Precautions when starting and driving” (P.5-2)
for exhaust gas (carbon monoxide) .)
Fluid leaks: Check under the vehicle for fuel,
oil, water or other fluid leaks after the vehicle has
been parked for a while. Water dripping from the
air conditioner after use is normal. If you should
notice any leaks or if gasoline fumes are evident,
check for the cause and have it corrected
immediately.
Power steering fluid level* and lines: Check
the level with the engine off. Check the lines for
proper attachment, leaks, cracks, etc.
Radiator and hoses: Check the front of the
radiator and clean off any dirt, insects, leaves,
etc., that may have accumulated. Make sure the
hoses have no cracks, deformation, rot or loose
connections.
Underbody: The underbody is frequently ex-
posed to corrosive substances such as those
used on icy roads or to control dust. It is very
important to remove these substances, other-
wise rust will form on the floor pan, frame, fuel
lines and around the exhaust system. At the end
of winter, the underbody should be thoroughly flushed with plain water, being careful to clean
those areas where mud and dirt may accumu-
late. For additional information, see “Cleaning
exterior” (P.7-2).
Windshield washer fluid*:
Check that there is
adequate fluid in the reservoir.
Maintenance and do-it-yourself8-5
Page 360 of 427
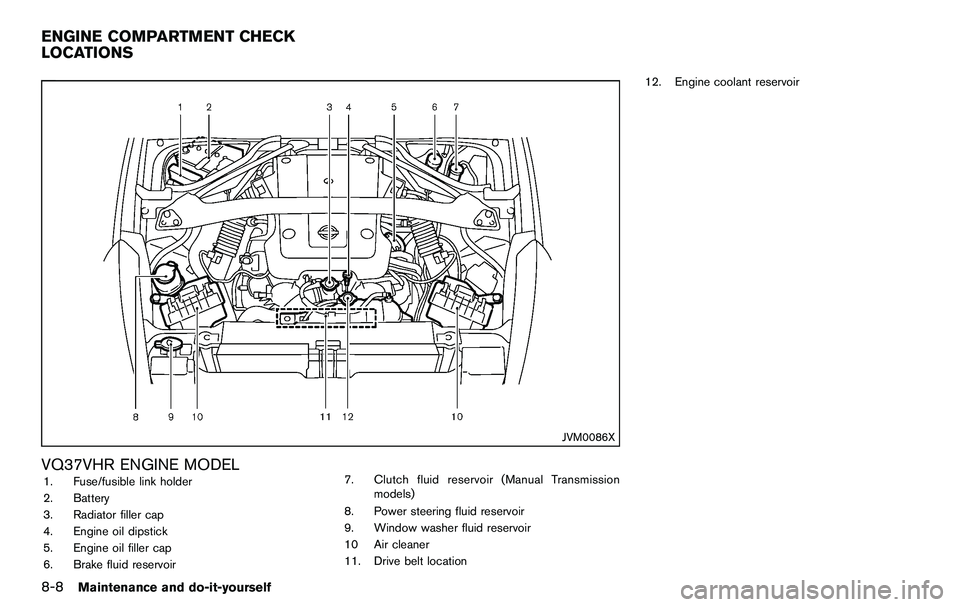
8-8Maintenance and do-it-yourself
JVM0086X
VQ37VHR ENGINE MODEL1. Fuse/fusible link holder
2. Battery
3. Radiator filler cap
4. Engine oil dipstick
5. Engine oil filler cap
6. Brake fluid reservoir7. Clutch fluid reservoir (Manual Transmission
models)
8. Power steering fluid reservoir
9. Window washer fluid reservoir
10 Air cleaner
11. Drive belt location 12. Engine coolant reservoir
ENGINE COMPARTMENT CHECK
LOCATIONS
Page 366 of 427
8-14Maintenance and do-it-yourself
CAUTION
.Do not overfill.
. Use Genuine NISSAN PSF or
equivalent. For further brake and clutch fluid information,
see “Capacities and recommended fuel/lubri-
cants” (P.9-2) of this manual.
WARNING
.
Use only new fluid from a sealed
container. Old, inferior or contami-
nated fluid may damage the brake
and clutch system.
. Be sure to clean the filler cap before
removing.
CAUTION
Do not spill the fluid on painted sur-
faces. This will damage the paint. If
fluid is spilled, wash the surface with
water.
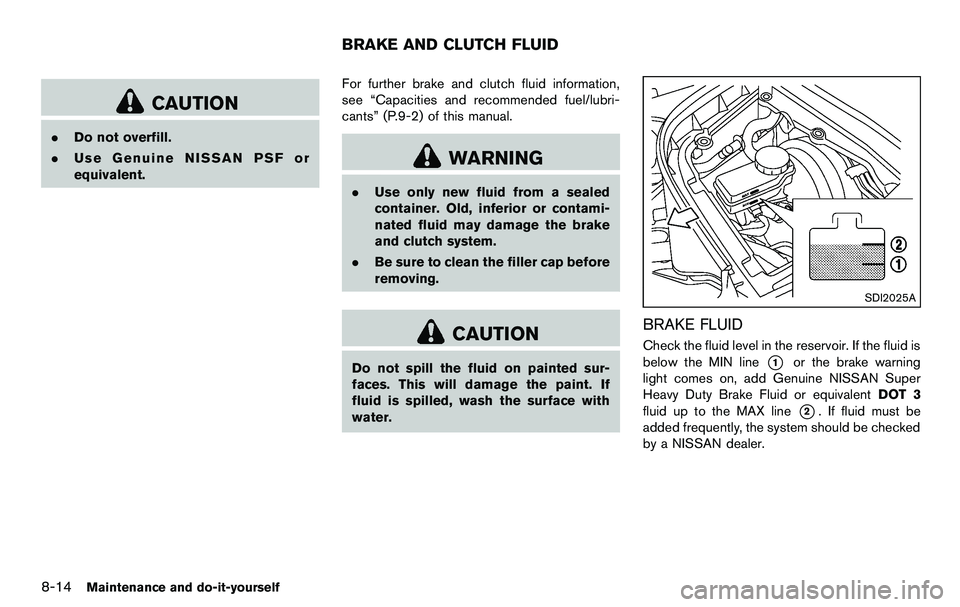
SDI2025A
BRAKE FLUID
Check the fluid level in the reservoir. If the fluid is
below the MIN line
*1or the brake warning
light comes on, add Genuine NISSAN Super
Heavy Duty Brake Fluid or equivalent DOT 3
fluid up to the MAX line
*2. If fluid must be
added frequently, the system should be checked
by a NISSAN dealer.
BRAKE AND CLUTCH FLUID
Page 367 of 427
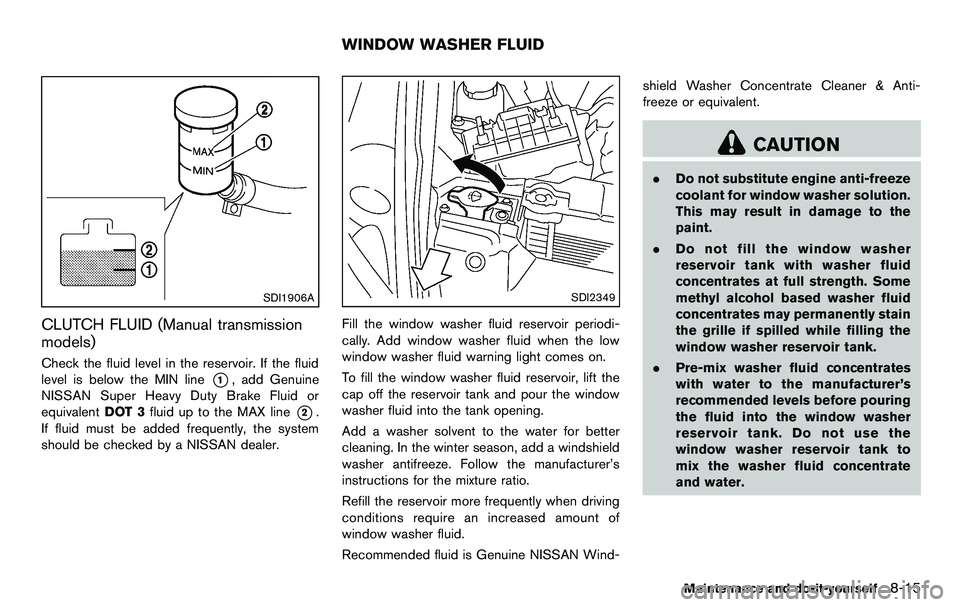
SDI1906A
CLUTCH FLUID (Manual transmission
models)
Check the fluid level in the reservoir. If the fluid
level is below the MIN line
*1, add Genuine
NISSAN Super Heavy Duty Brake Fluid or
equivalent DOT 3fluid up to the MAX line
*2.
If fluid must be added frequently, the system
should be checked by a NISSAN dealer.
SDI2349
Fill the window washer fluid reservoir periodi-
cally. Add window washer fluid when the low
window washer fluid warning light comes on.
To fill the window washer fluid reservoir, lift the
cap off the reservoir tank and pour the window
washer fluid into the tank opening.
Add a washer solvent to the water for better
cleaning. In the winter season, add a windshield
washer antifreeze. Follow the manufacturer’s
instructions for the mixture ratio.
Refill the reservoir more frequently when driving
conditions require an increased amount of
window washer fluid.
Recommended fluid is Genuine NISSAN Wind- shield Washer Concentrate Cleaner & Anti-
freeze or equivalent.
CAUTION
.
Do not substitute engine anti-freeze
coolant for window washer solution.
This may result in damage to the
paint.
. Do not fill the window washer
reservoir tank with washer fluid
concentrates at full strength. Some
methyl alcohol based washer fluid
concentrates may permanently stain
the grille if spilled while filling the
window washer reservoir tank.
. Pre-mix washer fluid concentrates
with water to the manufacturer’s
recommended levels before pouring
the fluid into the window washer
reservoir tank. Do not use the
window washer reservoir tank to
mix the washer fluid concentrate
and water.
Maintenance and do-it-yourself8-15
WINDOW WASHER FLUID