2012 NISSAN 370Z COUPE light
[x] Cancel search: lightPage 271 of 427
SAA2529
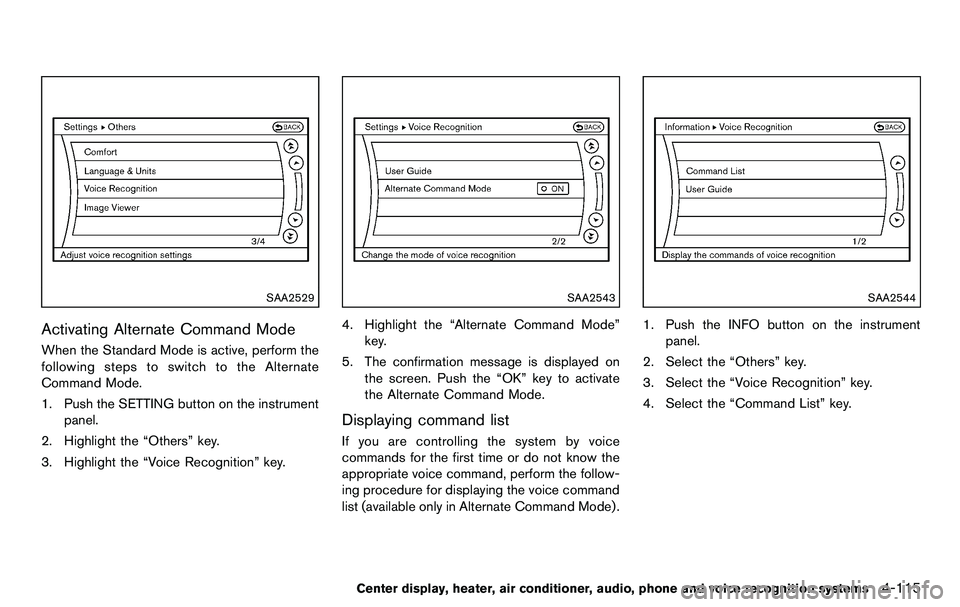
Activating Alternate Command Mode
When the Standard Mode is active, perform the
following steps to switch to the Alternate
Command Mode.
1. Push the SETTING button on the instrumentpanel.
2. Highlight the “Others” key.
3. Highlight the “Voice Recognition” key.
SAA2543
4. Highlight the “Alternate Command Mode” key.
5. The confirmation message is displayed on the screen. Push the “OK” key to activate
the Alternate Command Mode.
Displaying command list
If you are controlling the system by voice
commands for the first time or do not know the
appropriate voice command, perform the follow-
ing procedure for displaying the voice command
list (available only in Alternate Command Mode) .
SAA2544
1. Push the INFO button on the instrument
panel.
2. Select the “Others” key.
3. Select the “Voice Recognition” key.
4. Select the “Command List” key.
Center display, heater, air conditioner, audio, phone and voice recognition systems4-115
Page 279 of 427
SAA2547
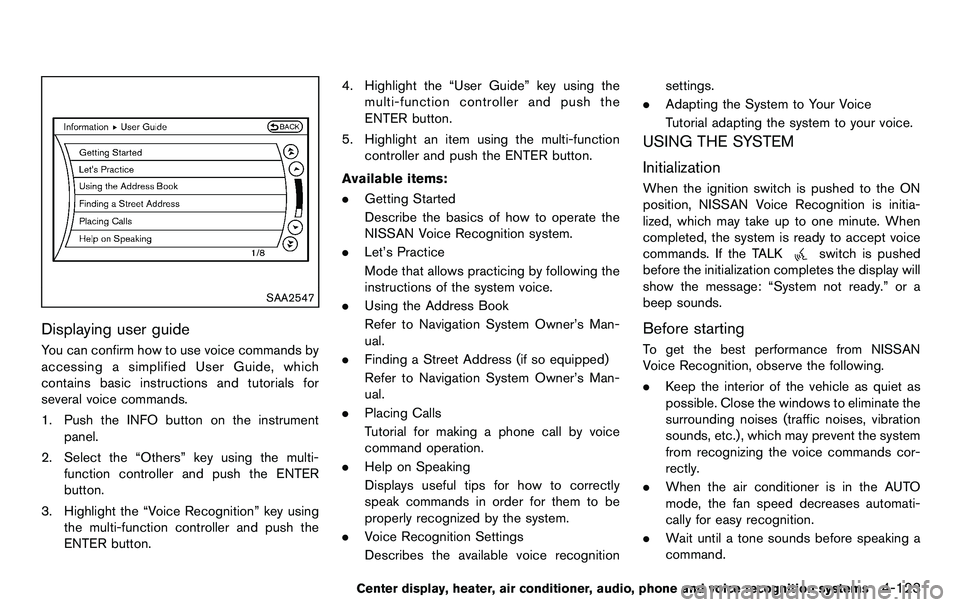
Displaying user guide
You can confirm how to use voice commands by
accessing a simplified User Guide, which
contains basic instructions and tutorials for
several voice commands.
1. Push the INFO button on the instrumentpanel.
2. Select the “Others” key using the multi- function controller and push the ENTER
button.
3. Highlight the “Voice Recognition” key using the multi-function controller and push the
ENTER button. 4. Highlight the “User Guide” key using the
multi-function controller and push the
ENTER button.
5. Highlight an item using the multi-function controller and push the ENTER button.
Available items:
. Getting Started
Describe the basics of how to operate the
NISSAN Voice Recognition system.
. Let’s Practice
Mode that allows practicing by following the
instructions of the system voice.
. Using the Address Book
Refer to Navigation System Owner’s Man-
ual.
. Finding a Street Address (if so equipped)
Refer to Navigation System Owner’s Man-
ual.
. Placing Calls
Tutorial for making a phone call by voice
command operation.
. Help on Speaking
Displays useful tips for how to correctly
speak commands in order for them to be
properly recognized by the system.
. Voice Recognition Settings
Describes the available voice recognition settings.
. Adapting the System to Your Voice
Tutorial adapting the system to your voice.
USING THE SYSTEM
Initialization
When the ignition switch is pushed to the ON
position, NISSAN Voice Recognition is initia-
lized, which may take up to one minute. When
completed, the system is ready to accept voice
commands. If the TALK
switch is pushed
before the initialization completes the display will
show the message: “System not ready.” or a
beep sounds.
Before starting
To get the best performance from NISSAN
Voice Recognition, observe the following.
. Keep the interior of the vehicle as quiet as
possible. Close the windows to eliminate the
surrounding noises (traffic noises, vibration
sounds, etc.), which may prevent the system
from recognizing the voice commands cor-
rectly.
. When the air conditioner is in the AUTO
mode, the fan speed decreases automati-
cally for easy recognition.
. Wait until a tone sounds before speaking a
command.
Center display, heater, air conditioner, audio, phone and voice recognition systems4-123
Page 288 of 427
5-4Starting and driving
pressure telltale.
Your vehicle has also been equipped with a
TPMS malfunction indicator to indicate when the
system is not operating properly. The TPMS
malfunction indicator is combined with the low
tire pressure telltale. When the system detects a
malfunction, the telltale will flash for approxi-
mately one minute and then remain continuously
illuminated. This sequence will continue upon
subsequent vehicle start-ups as long as the
malfunction exists. When the malfunction indi-
cator is illuminated, the system may not be able
to detect or signal low tire pressure as intended.
TPMS malfunctions may occur for a variety of
reasons, including the installation of replace-
ment or alternate tires or wheels on the vehicle
that prevent the TPMS from functioning properly.
Always check the TPMS malfunction telltale
after replacing one or more tires or wheels on
your vehicle to ensure that the replacement or
alternate tires and wheels allow the TPMS to
continue to function properly.
Additional information
.The TPMS does not monitor the tire
pressure of the spare tire.
. The TPMS will activate only when the
vehicle is driven at speeds above 16 MPH
(25 km/h) . Also, this system may not detect
a sudden drop in tire pressure (for example a flat tire while driving) .
. The low tire pressure warning light does not
automatically turn off when the tire pressure
is adjusted. After the tire is inflated to the
recommended pressure, the vehicle must be
driven at speeds above 16 MPH (25 km/h)
to activate the TPMS and turn off the low tire
pressure warning light. Use a tire pressure
gauge to check the tire pressure.
. Tire pressure rises and falls depending on
the heat caused by the vehicle’s operation
and the outside temperature. Low outside
temperature can lower the temperature of
the air inside the tire which can cause a
lower tire inflation pressure. This may cause
the low tire pressure warning light to
illuminate. If the warning light illuminates in
low ambient temperature, check the tire
pressure for all four tires.
For additional information, see “Low tire pres-
sure warning light” (P.2-12) and “Tire Pressure
Monitoring System (TPMS)” (P.6-2) .WARNING
. If the low tire pressure warning light
illuminates while driving, avoid sud-
den steering maneuvers or abrupt
braking, reduce vehicle speed, pull off the road to a safe location and
stop the vehicle as soon as possi-
ble. Driving with under-inflated tires
may permanently damage the tires
and increase the likelihood of tire
failure. Serious vehicle damage
could occur and may lead to an
accident and could result in serious
personal injury. Check the tire pres-
sure for all four tires. Adjust the tire
pressure to the recommended COLD
tire pressure shown on the Tire and
Loading Information label to turn
the low tire pressure warning light
OFF. If the light still illuminates
while driving after adjusting the tire
pressure, a tire may be flat. If you
have a flat tire, replace it with a
spare tire as soon as possible. (See
“Flat tire” (P.6-2) for changing a flat
tire.)
. When a spare tire is mounted or a
wheel is replaced, the TPMS will not
function and the low tire pressure
warning light will flash for approxi-
mately 1 minute. The light will
remain on after 1 minute. Contact
your NISSAN dealer as soon as
possible for tire replacement and/
or system resetting.
Page 289 of 427
.Replacing tires with those not ori-
ginally specified by NISSAN could
affect the proper operation of the
TPMS.
. Do not inject any tire liquid or
aerosol tire sealant into the tires,
as this may cause a malfunction of
the tire pressure sensors (for mod-
els not equipped with the emer-
gency tire puncture repair kit) .
. If you used the Emergency Tire
Sealant to repair a minor tire punc-
ture, your NISSAN dealer will also
need to replace the TPMS sensor in
addition to repairing or replacing
the tire (for models equipped with
the emergency tire puncture repair
kit) .
. NISSAN recommends using only
NISSAN Genuine Emergency Tire
Sealant provided with your vehicle.
Other tire sealants may damage the
valve stem seal which can cause the
tire to lose air pressure (for models
equipped with the emergency tire
puncture repair kit) .CAUTION
.The TPMS may not function properly
when the wheels are equipped with
tire chains or the wheels are buried
in snow.
. Do not place metalized film or any
metal parts (antenna, etc.) on the
windows. This may cause poor re-
ception of the signals from the tire
pressure sensors, and the TPMS will
not function properly.
Some devices and transmitters may temporarily
interfere with the operation of the TPMS and
cause the low tire pressure warning light to
illuminate. Some examples are:
. Facilities or electric devices using similar
radio frequencies are near the vehicle.
. If a transmitter set to similar frequencies is
being used in or near the vehicle.
. If a computer (or similar equipment) or a DC/
AC converter is being used in or near the
vehicle. FCC Notice:
For USA:
This device complies with Part 15 of the
FCC Rules. Operation is subject to the
following two conditions:
(1) This device may not cause harmful
interference, and (2) this device must
accept any interference received, including
interference that may cause undesired
operation.
Note: Changes or modifications not ex-
pressly approved by the party responsible
for compliance could void the user’s
authority to operate the equipment.
For Canada:
This device complies with RSS-210 of
Industry Canada. Operation is subject to
the following two conditions:
(1) this device may not cause interference,
and (2) this device must accept any inter-
ference, including interference that may
cause undesired operation of the device.
Starting and driving5-5
Page 291 of 427
WARNING
The following actions can increase the
chance of losing control of the vehicle if
there is a sudden loss of tire air
pressure. Losing control of the vehicle
may cause a collision and result in
personal injury.
.The vehicle generally moves or pulls
in the direction of the flat tire.
. Do not rapidly apply the brakes.
. Do not rapidly release the accelera-
tor pedal.
. Do not rapidly turn the steering
wheel.
1. Remain calm and do not overreact.
2. Maintain a firm grip on the steering wheel with both hands and try to hold a straight
course.
3. When appropriate, slowly release the accel- erator pedal to gradually slow the vehicle.
4. Gradually steer the vehicle to a safe location off the road and away from traffic if possible.
5. Lightly apply the brake pedal to gradually stop the vehicle. 6. Turn on the hazard warning flashers and
either contact a roadside emergency service
to change the tire or see “Changing a flat
tire (for models with spare tire)” (P.6-3) of
this Owner’s Manual.
DRINKING ALCOHOL/DRUGS AND
DRIVING
WARNING
Never drive under the influence of
alcohol or drugs. Alcohol in the blood-
stream reduces coordination, delays
reaction time and impairs judgement.
Driving after drinking alcohol increases
the likelihood of being involved in an
accident injuring yourself and others.
Additionally, if you are injured in an
accident, alcohol can increase the se-
verity of the injury.
NISSAN is committed to safe driving. However,
you must choose not to drive under the influence
of alcohol. Every year thousands of people are
injured or killed in alcohol-related accidents.
Although the local laws vary on what is
considered to be legally intoxicated, the fact is
that alcohol affects all people differently and
most people underestimate the effects of alcohol.
Remember, drinking and driving don’t mix! And
that is true for drugs, too (over-the-counter,
prescription, and illegal drugs) . Don’t drive if
your ability to operate your vehicle is impaired by
alcohol, drugs, or some other physical condition.
Starting and driving5-7
Page 294 of 427

5-10Starting and driving
EMERGENCY ENGINE SHUT OFF
To shut off the engine in an emergency situation
while driving perform the following procedure:
.Rapidly push the push-button ignition switch
3 consecutive times, or
. Push and hold the push-button ignition
switch for more than 2 seconds.
CAUTION
Do not leave the vehicle with the push-
button ignition switch in ACC or ON
positions when the engine is not run-
ning for an extended period. This can
discharge the battery.
SSD0826
INTELLIGENT KEY BATTERY DIS-
CHARGE
If the battery of the Intelligent Key is almost
discharged, the guide light
*Bof the Intelligent
Key port
*Ablinks and the indicator appears on
the vehicle information display. (See “Vehicle
information display” (P.2-17) .)
In this case, inserting the Intelligent Key into the
port
*1allows you to start the engine. Make
sure that the key ring side faces backward as
illustrated. Insert the Intelligent Key in the port
until it is latched and secured.
To remove the Intelligent Key from the port, push
the ignition switch to the OFF position and pull
the Intelligent Key out of the port. NOTE:
The Intelligent Key port does not charge
the Intelligent Key battery. If you see the
low battery indicator in the vehicle infor-
mation display, replace the battery as soon
as possible. (See “Intelligent Key battery
replacement” (P.8-25) .)
CAUTION
.
Never place anything except the
Intelligent Key in the Intelligent
Key port. Doing so may cause da-
mage to the equipment.
. Make sure the Intelligent Key is in
the correct direction when inserting
it to the Intelligent Key port. The
engine may not start if it is in the
incorrect direction.
. Remove the Intelligent Key from the
Intelligent Key port after the ignition
switch is pushed to the OFF posi-
tion.
Page 295 of 427
.Make sure the area around the vehicle is
clear.
. Check fluid levels such as engine oil, cool-
ant, brake fluid and window washer fluid as
frequently as possible, or at least whenever
you refuel.
. Check that all windows and lights are clean.
. Visually inspect tires for their appearance
and condition. Also check tires for proper
inflation.
. Lock all doors.
. Position seat and adjust head restraints.
. Adjust inside and outside mirrors.
. Fasten seat belts and ask all passengers to
do likewise.
. Check the operation of warning lights when
the ignition switch is pushed to the ON
position. (See “Warning/indicator lights and
audible reminders” (P.2-9) .) 1. Apply the parking brake.
2.
Automatic Transmission (AT) model:
Move the selector lever to the P (Park) or N
(Neutral) position. (P is recommended.)
The starter is designed not to operate unless
the selector lever is in either of the above
positions.
Manual Transmission (MT) model:
Move the shift lever to the N (Neutral)
position. Depress the clutch pedal fully to
the floor.
The starter is designed not to operate unless
the clutch pedal is fully depressed.
The Intelligent Key must be carried
when operating the ignition switch.
3. Push the ignition switch to the ON position. Depress the brake pedal (AT model) or the
clutch pedal (MT model) and push the
ignition switch to start the engine.
To start the engine immediately, push and
release the ignition switch while depressing
the brake pedal with the ignition switch in
any position.
.If the engine is very hard to start inextremely cold weather or when restart-
ing, depress the accelerator pedal a little
(approximately 1/3 to the floor) and while
holding, crank the engine. Release the accelerator pedal when the engine starts.
.If the engine is very hard to start because
it is flooded, depress the accelerator
pedal all the way to the floor and hold it.
Push the ignition switch to the ON
position to start cranking the engine.
After 5 or 6 seconds, stop cranking by
pushing the ignition switch to OFF. After
cranking the engine, release the accel-
erator pedal. Crank the engine with your
foot off the accelerator pedal by
depressing the brake pedal and pushing
the push-button ignition switch to start
the engine. If the engine starts, but fails
to run, repeat the above procedure.
CAUTION
Do not operate the starter for more
than 15 seconds at a time. If the engine
does not start, push the ignition switch
to OFF and wait 10 seconds before
cranking again, otherwise the starter
could be damaged.
4. Warm-up
Allow the engine to idle for at least 30
seconds after starting. Do not race the
engine while warming it up. Drive at
Starting and driving5-11
BEFORE STARTING THE ENGINE STARTING THE ENGINE
Page 299 of 427
4M(4th) , 3M(3rd) and 2M(2nd):
Use these positions for hill climbing or engine
braking on downhill grades.
1
M(1st):
Use this position when climbing steep hills
slowly or driving slowly through deep snow, or
for maximum engine braking on steep downhill
grades.
. Remember not to drive at high speeds for
extended periods of time in lower than 7th
gear. This reduces fuel economy.
. Moving the selector lever rapidly to the same
side twice will shift the ranges in succes-
sion.
. In the manual shift mode, the transmis-
sion may not shift to the selected gear.
This helps maintain driving perfor-
mance and reduces the chance of
vehicle damage or loss of control.
When this situation occurs, the Automatic
Transmission (AT) position indicator light (on
the vehicle information display) will blink and
the buzzer will sound.
. In the manual shift mode, the transmis-
sion automatically shifts down to 1st
gear before the vehicle comes to a
stop. When accelerating again, it is
necessary to shift up to the desired
range.
SSD0832
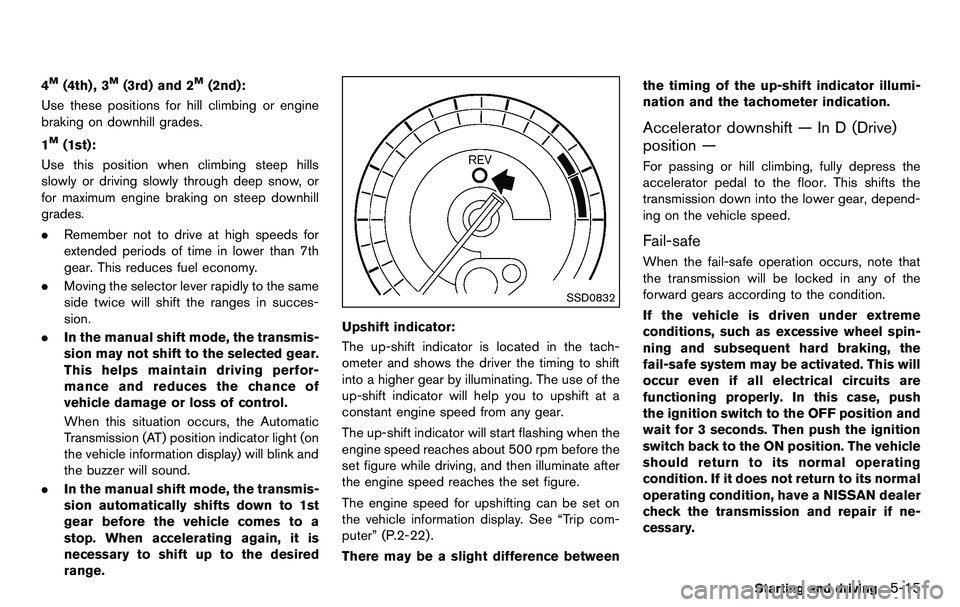
Upshift indicator:
The up-shift indicator is located in the tach-
ometer and shows the driver the timing to shift
into a higher gear by illuminating. The use of the
up-shift indicator will help you to upshift at a
constant engine speed from any gear.
The up-shift indicator will start flashing when the
engine speed reaches about 500 rpm before the
set figure while driving, and then illuminate after
the engine speed reaches the set figure.
The engine speed for upshifting can be set on
the vehicle information display. See “Trip com-
puter” (P.2-22) .
There may be a slight difference between the timing of the up-shift indicator illumi-
nation and the tachometer indication.
Accelerator downshift — In D (Drive)
position —
For passing or hill climbing, fully depress the
accelerator pedal to the floor. This shifts the
transmission down into the lower gear, depend-
ing on the vehicle speed.
Fail-safe
When the fail-safe operation occurs, note that
the transmission will be locked in any of the
forward gears according to the condition.
If the vehicle is driven under extreme
conditions, such as excessive wheel spin-
ning and subsequent hard braking, the
fail-safe system may be activated. This will
occur even if all electrical circuits are
functioning properly. In this case, push
the ignition switch to the OFF position and
wait for 3 seconds. Then push the ignition
switch back to the ON position. The vehicle
should return to its normal operating
condition. If it does not return to its normal
operating condition, have a NISSAN dealer
check the transmission and repair if ne-
cessary.
Starting and driving5-15