2012 NISSAN 370Z COUPE ignition
[x] Cancel search: ignitionPage 296 of 427
5-12Starting and driving
moderate speed for a short distance first,
especially in cold weather. In cold weather,
keep the engine running for a minimum of 2 -
3 minutes before shutting it off. Starting and
stopping the engine over a short period of
time may make the vehicle more difficult to
start.
When racing the engine up to 4,500 rpm or
more under no load condition, the engine
will enter the fuel cut mode.
5. To stop the engine, shift the selector lever to the P (Park) position (AT model) or move the
shift lever to the N (Neutral) position (MT
model) , and push the ignition switch to the
OFF position.AUTOMATIC TRANSMISSION
7 speed automatic transmission
The automatic transmission in your vehicle is
electronically controlled by a transmission con-
trol module to produce maximum efficiency and
smooth operation.
Shown on the following pages are the recom-
mended operating procedures for this transmis-
sion. Follow these procedures for maximum
vehicle performance and driving enjoyment.
Starting the vehicle
After starting the engine, fully depress the foot
brake pedal and push the selector lever button
before shifting the selector lever to the R
(Reverse), N (Neutral) , D (Drive) or Manual shift
mode position. Be sure the vehicle is fully
stopped before attempting to shift the selector
lever.
This automatic transmission model is de-
signed so that the foot brake pedal must
be depressed before shifting from P (Park)
to any drive position while the ignition
switch position is ON.
The selector lever cannot be moved out of
the P (Park) position and into any of the
other gear positions if the ignition switch
is pushed to the LOCK, OFF or ACC position.
1. Keep the foot brake pedal depressed and
push the selector lever button to shift into a
driving gear.
2. Release the parking brake and foot brake, then gradually start the vehicle in motion.
WARNING
.Do not depress the accelerator
pedal while shifting from P (Park)
or N (Neutral) to R (Reverse) D
(Drive) , or manual shift mode. Al-
ways depress the brake pedal until
shifting is completed. Failure to do
so could cause you to lose control
and have an accident.
. Cold engine idle speed is high, so
use caution when shifting into a
forward or reverse gear before the
engine has warmed up.
. Never shift to P (Park) or R (Re-
verse) while vehicle is moving for-
ward. Never shift to P (Park) or D
(Drive) while vehicle is moving rear-
ward. Failure to do so could cause
you to lose control and have an
accident.
DRIVING THE VEHICLE
Page 299 of 427
4M(4th) , 3M(3rd) and 2M(2nd):
Use these positions for hill climbing or engine
braking on downhill grades.
1
M(1st):
Use this position when climbing steep hills
slowly or driving slowly through deep snow, or
for maximum engine braking on steep downhill
grades.
. Remember not to drive at high speeds for
extended periods of time in lower than 7th
gear. This reduces fuel economy.
. Moving the selector lever rapidly to the same
side twice will shift the ranges in succes-
sion.
. In the manual shift mode, the transmis-
sion may not shift to the selected gear.
This helps maintain driving perfor-
mance and reduces the chance of
vehicle damage or loss of control.
When this situation occurs, the Automatic
Transmission (AT) position indicator light (on
the vehicle information display) will blink and
the buzzer will sound.
. In the manual shift mode, the transmis-
sion automatically shifts down to 1st
gear before the vehicle comes to a
stop. When accelerating again, it is
necessary to shift up to the desired
range.
SSD0832
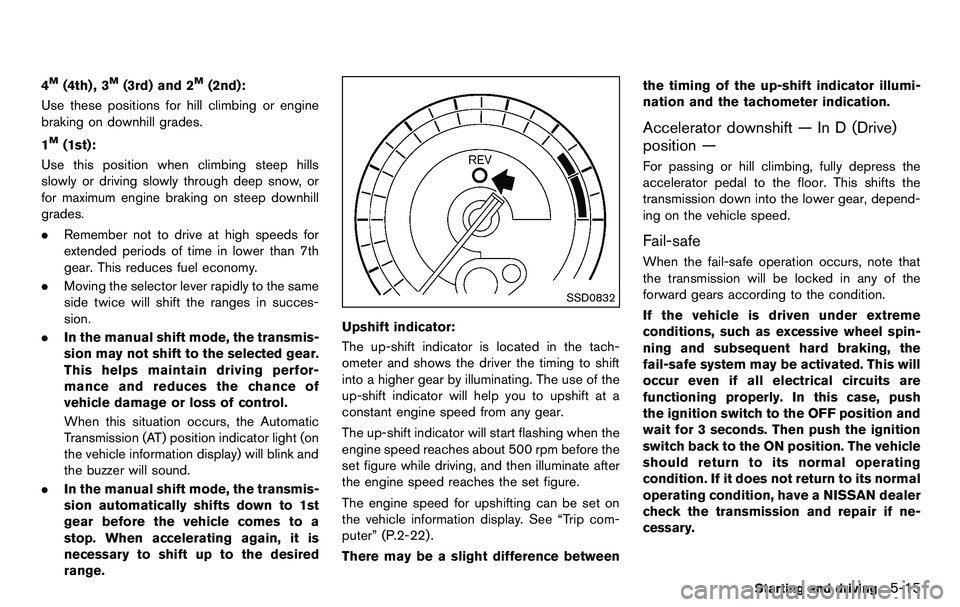
Upshift indicator:
The up-shift indicator is located in the tach-
ometer and shows the driver the timing to shift
into a higher gear by illuminating. The use of the
up-shift indicator will help you to upshift at a
constant engine speed from any gear.
The up-shift indicator will start flashing when the
engine speed reaches about 500 rpm before the
set figure while driving, and then illuminate after
the engine speed reaches the set figure.
The engine speed for upshifting can be set on
the vehicle information display. See “Trip com-
puter” (P.2-22) .
There may be a slight difference between the timing of the up-shift indicator illumi-
nation and the tachometer indication.
Accelerator downshift — In D (Drive)
position —
For passing or hill climbing, fully depress the
accelerator pedal to the floor. This shifts the
transmission down into the lower gear, depend-
ing on the vehicle speed.
Fail-safe
When the fail-safe operation occurs, note that
the transmission will be locked in any of the
forward gears according to the condition.
If the vehicle is driven under extreme
conditions, such as excessive wheel spin-
ning and subsequent hard braking, the
fail-safe system may be activated. This will
occur even if all electrical circuits are
functioning properly. In this case, push
the ignition switch to the OFF position and
wait for 3 seconds. Then push the ignition
switch back to the ON position. The vehicle
should return to its normal operating
condition. If it does not return to its normal
operating condition, have a NISSAN dealer
check the transmission and repair if ne-
cessary.
Starting and driving5-15
Page 300 of 427
5-16Starting and driving
SSD0829
Shift lock release
If the battery charge is low or discharged, the
selector lever may not be moved from the P
(Park) position even with the brake pedal
depressed and the selector lever button pushed.
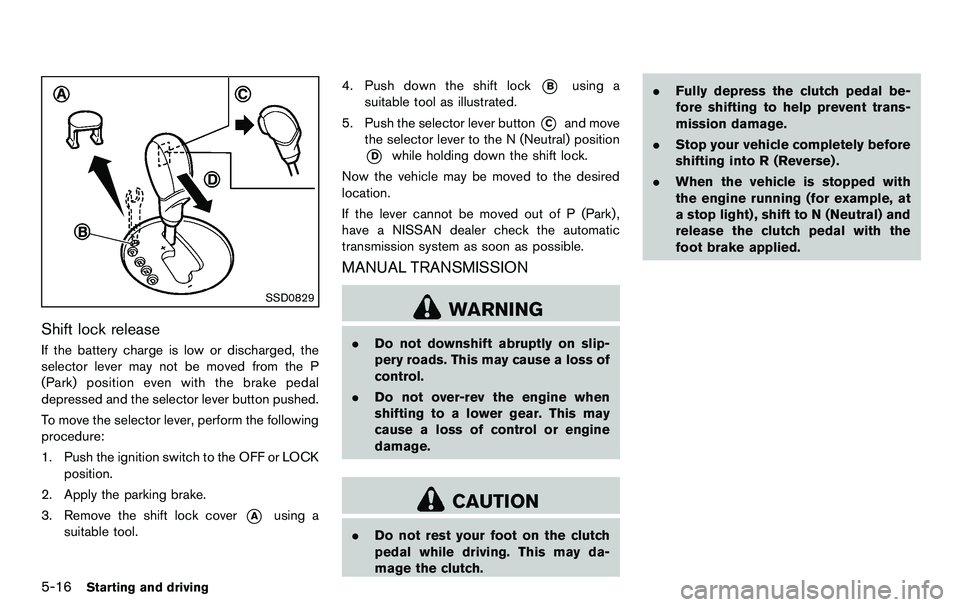
To move the selector lever, perform the following
procedure:
1. Push the ignition switch to the OFF or LOCKposition.
2. Apply the parking brake.
3. Remove the shift lock cover
*Ausing a
suitable tool. 4. Push down the shift lock
*Busing a
suitable tool as illustrated.
5. Push the selector lever button
*Cand move
the selector lever to the N (Neutral) position
*Dwhile holding down the shift lock.
Now the vehicle may be moved to the desired
location.
If the lever cannot be moved out of P (Park) ,
have a NISSAN dealer check the automatic
transmission system as soon as possible.
MANUAL TRANSMISSION
WARNING
. Do not downshift abruptly on slip-
pery roads. This may cause a loss of
control.
. Do not over-rev the engine when
shifting to a lower gear. This may
cause a loss of control or engine
damage.
CAUTION
.Do not rest your foot on the clutch
pedal while driving. This may da-
mage the clutch. .
Fully depress the clutch pedal be-
fore shifting to help prevent trans-
mission damage.
. Stop your vehicle completely before
shifting into R (Reverse) .
. When the vehicle is stopped with
the engine running (for example, at
a stop light) , shift to N (Neutral) and
release the clutch pedal with the
foot brake applied.
Page 302 of 427
5-18Starting and driving
SSD0830
SynchroRev Match mode (S-MODE) warn-
ing:
The SynchroRev Match mode (S-MODE) warn-
ing will appear on the vehicle information display
and the S-MODE indicator will turn off if a
system malfunction occurs.
If the warning appears, the S-MODE function
will not operate, but manual transmission will
operate normally and driving can be continued.
Have the system checked by a NISSAN dealer.
SSD0831
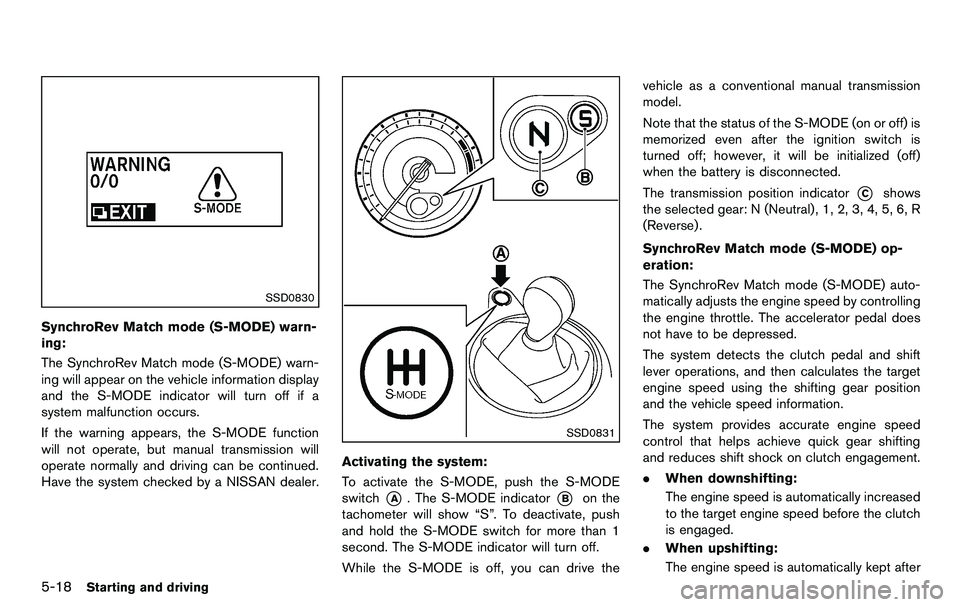
Activating the system:
To activate the S-MODE, push the S-MODE
switch
*A. The S-MODE indicator*Bon the
tachometer will show “S”. To deactivate, push
and hold the S-MODE switch for more than 1
second. The S-MODE indicator will turn off.
While the S-MODE is off, you can drive the vehicle as a conventional manual transmission
model.
Note that the status of the S-MODE (on or off) is
memorized even after the ignition switch is
turned off; however, it will be initialized (off)
when the battery is disconnected.
The transmission position indicator
*Cshows
the selected gear: N (Neutral) , 1, 2, 3, 4, 5, 6, R
(Reverse).
SynchroRev Match mode (S-MODE) op-
eration:
The SynchroRev Match mode (S-MODE) auto-
matically adjusts the engine speed by controlling
the engine throttle. The accelerator pedal does
not have to be depressed.
The system detects the clutch pedal and shift
lever operations, and then calculates the target
engine speed using the shifting gear position
and the vehicle speed information.
The system provides accurate engine speed
control that helps achieve quick gear shifting
and reduces shift shock on clutch engagement.
. When downshifting:
The engine speed is automatically increased
to the target engine speed before the clutch
is engaged.
. When upshifting:
The engine speed is automatically kept after
Page 309 of 427
4. Push the ignition switch to the OFF position.
WARNING
If the engine is not running or is turned
off while driving, the power assist for
the steering will not work. Steering will
be harder to operate.
The power assisted steering uses a hydraulic
pump, driven by the engine, to assist steering.
If the engine stops or the drive belt breaks, you
will still have control of the vehicle. However,
much greater steering effort is needed, espe-
cially in sharp turns and at low speeds.
BRAKING PRECAUTIONS
The brake system has two separate hydraulic
circuits. If one circuit malfunctions, you will still
have braking at two wheels.
Vacuum assisted brakes
The brake booster aids braking by using engine
vacuum. If the engine stops, you can stop the
vehicle by depressing the brake pedal. However,
greater foot pressure on the brake pedal will be
required to stop the vehicle and the stopping
distance will be longer.
When the brake pedal is depressed slowly and
firmly, you may hear a clicking noise and feel a
slight pulsation. This is normal and indicates that
the Brake Assist System is operating.
Wet brakes
When the vehicle is washed or driven through
water, the brakes may get wet. As a result, your
braking distance will be longer and the vehicle
may pull to one side during braking.
To dry brakes, drive the vehicle at a safe speed
while lightly tapping the brake pedal to heat-up
the brakes. Do this until the brakes return to
normal. Avoid driving the vehicle at high speeds
until the brakes function correctly.
Starting and driving5-25
POWER STEERING BRAKE SYSTEM
Page 312 of 427
5-28Starting and driving
The Vehicle Dynamic Control (VDC) system
uses various sensors to monitor driver inputs
and vehicle motion. Under certain driving con-
ditions, the VDC system helps to perform the
following functions.
.Controls brake pressure to reduce wheel
slip on one slipping drive wheel so power is
transferred to a non slipping drive wheel on
the same axle.
. Controls brake pressure and engine output
to reduce drive wheel slip based on vehicle
speed (traction control function) .
. Controls brake pressure at individual wheels
and engine output to help the driver maintain
control of the vehicle in the following
conditions:
— understeer (vehicle tends to not follow
the steered path despite increased
steering input)
— oversteer (vehicle tends to spin due to certain road or driving conditions) .
The VDC system can help the driver to maintain
control of the vehicle, but it cannot prevent loss
of vehicle control in all driving situations.
When the VDC system operates, the VDC
warning light
in the instrument panel flashes
so note the following:
. The road may be slippery or the system may
determine some action is required to help keep the vehicle on the steered path.
. You may feel a pulsation in the brake pedal
and hear a noise or vibration from under the
hood. This is normal and indicates that the
VDC system is working properly.
. Adjust your speed and driving to the road
conditions.
See “Vehicle Dynamic Control (VDC) warning
light” (P.2-14).
If a malfunction occurs in the system, the VDC
warning light
illuminates in the instrument
panel. The VDC system automatically turns off.
The VDC OFF switch is used to turn off the VDC
system. The VDC off indicator
illuminates to
indicate the VDC system is off. When the VDC
switch is used to turn off the system, the VDC
system still operates to prevent one drive wheel
from slipping by transferring power to a non
slipping drive wheel. The VDC warning light
flashes if this occurs. All other VDC functions
are off, and the VDC warning light
will not
flash. The VDC system is automatically reset to
on when the ignition switch is placed in the off
position then back to the on position.
See “Vehicle Dynamic Control (VDC) warning
light” (P.2-14) and “Vehicle Dynamic Control
(VDC) off indicator light” (P.2-16).
The computer has a built-in diagnostic feature
that tests the system each time you start the engine and move the vehicle forward or in
reverse at a slow speed. When the self-test
occurs, you may hear a “clunk” noise and/or feel
a pulsation in the brake pedal. This is normal and
is not an indication of a malfunction.
WARNING
.
The VDC system is designed to help
the driver maintain stability but
does not prevent accidents due to
abrupt steering operation at high
speeds or by careless or dangerous
driving techniques. Reduce vehicle
speed and be especially careful
when driving and cornering on slip-
pery surfaces and always drive care-
fully.
. Do not modify the vehicle’s suspen-
sion. If suspension parts such as
shock absorbers, struts, springs,
stabilizer bars, bushings and
wheels are not NISSAN recom-
mended for your vehicle or are
extremely deteriorated, the VDC
system may not operate properly.
This could adversely affect vehicle
handling performance, and the VDC
warning light
may illuminate.
VEHICLE DYNAMIC CONTROL (VDC)
SYSTEM
Page 320 of 427

6-2In case of emergency
To shut off the engine in an emergency situation
while driving, perform the following procedure:
.Rapidly push the push-button ignition switch
3 consecutive times, or
. Push and hold the push-button ignition
switch for more than 2 seconds.TIRE PRESSURE MONITORING SYS-
TEM (TPMS)
This vehicle is equipped with the Tire Pressure
Monitoring System (TPMS) . It monitors tire
pressure of all tires except the spare. When
the low tire pressure warning light is lit, one or
more of your tires is significantly under-inflated.
If the vehicle is being driven with low tire
pressure, the TPMS will activate and warn you
of it by the low tire pressure warning light. This
system will activate only when the vehicle is
driven at speeds above 16 MPH (25 km/h). For
more details, see “Warning/indicator lights and
audible reminders” (P.2-9) and “Tire Pressure
Monitoring System (TPMS)” (P.5-3) .
WARNING
.If the low tire pressure warning light
illuminates while driving, avoid sud-
den steering maneuvers or abrupt
braking, reduce vehicle speed, pull
off the road to a safe location and
stop the vehicle as soon as possi-
ble. Driving with under-inflated tires
may permanently damage the tires
and increase the likelihood of tire
failure. Serious vehicle damage
could occur and may lead to an accident and could result in serious
personal injury. Check the tire pres-
sure for all four tires. Adjust the tire
pressure to the recommended COLD
tire pressure shown on the Tire and
Loading Information label to turn
the low tire pressure warning light
OFF. If the light still illuminates
while driving after adjusting the tire
pressure, a tire may be flat. If you
have a flat tire, replace it with a
spare tire as soon as possible.
. When a spare tire is mounted or a
wheel is replaced, the TPMS will not
function and the low tire pressure
warning light will flash for approxi-
mately 1 minute. The light will
remain on after 1 minute. Contact
your NISSAN dealer as soon as
possible for tire replacement and/
or system resetting.
. Replacing tires with those not ori-
ginally specified by NISSAN could
affect the proper operation of the
TPMS.
. Do not inject any tire liquid or
aerosol tire sealant into the tires,
as this may cause a malfunction of
the tire pressure sensors (for mod-
EMERGENCY ENGINE SHUT OFF FLAT TIRE
Page 330 of 427
6-12In case of emergency
SCE0871
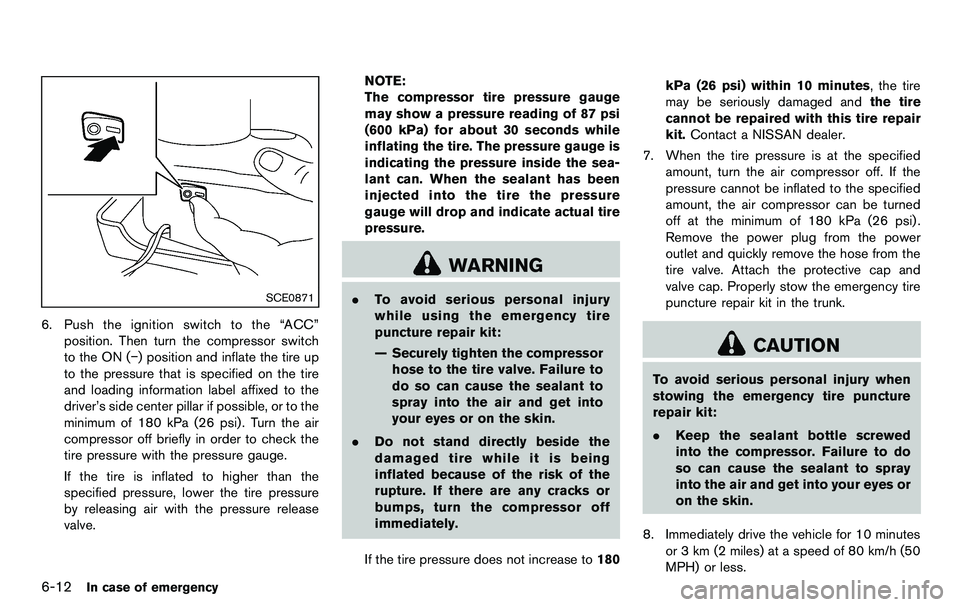
6. Push the ignition switch to the “ACC”position. Then turn the compressor switch
to the ON (−) position and inflate the tire up
to the pressure that is specified on the tire
and loading information label affixed to the
driver’s side center pillar if possible, or to the
minimum of 180 kPa (26 psi) . Turn the air
compressor off briefly in order to check the
tire pressure with the pressure gauge.
If the tire is inflated to higher than the
specified pressure, lower the tire pressure
by releasing air with the pressure release
valve. NOTE:
The compressor tire pressure gauge
may show a pressure reading of 87 psi
(600 kPa) for about 30 seconds while
inflating the tire. The pressure gauge is
indicating the pressure inside the sea-
lant can. When the sealant has been
injected into the tire the pressure
gauge will drop and indicate actual tire
pressure.
WARNING
.
To avoid serious personal injury
while using the emergency tire
puncture repair kit:
— Securely tighten the compressor
hose to the tire valve. Failure to
do so can cause the sealant to
spray into the air and get into
your eyes or on the skin.
. Do not stand directly beside the
damaged tire while it is being
inflated because of the risk of the
rupture. If there are any cracks or
bumps, turn the compressor off
immediately.
If the tire pressure does not increase to 180kPa (26 psi) within 10 minutes, the tire
may be seriously damaged and
the tire
cannot be repaired with this tire repair
kit. Contact a NISSAN dealer.
7. When the tire pressure is at the specified amount, turn the air compressor off. If the
pressure cannot be inflated to the specified
amount, the air compressor can be turned
off at the minimum of 180 kPa (26 psi) .
Remove the power plug from the power
outlet and quickly remove the hose from the
tire valve. Attach the protective cap and
valve cap. Properly stow the emergency tire
puncture repair kit in the trunk.
CAUTION
To avoid serious personal injury when
stowing the emergency tire puncture
repair kit:
.Keep the sealant bottle screwed
into the compressor. Failure to do
so can cause the sealant to spray
into the air and get into your eyes or
on the skin.
8. Immediately drive the vehicle for 10 minutes or 3 km (2 miles) at a speed of 80 km/h (50
MPH) or less.