2012 NISSAN 370Z COUPE ignition
[x] Cancel search: ignitionPage 153 of 427

SPA2447
INSIDE MIRROR
Adjust the height and the angle of the inside
mirror to the desired position.
SPA2143
Manual anti-glare type
The night position*1will reduce glare from the
headlights of vehicles behind you at night.
Use the day position
*2when driving in daylight
hours.
WARNING
Use the night position only when ne-
cessary, because it reduces rear view
clarity.
SPA2450
Automatic anti-glare type
The inside mirror is designed so that it
automatically changes reflection according to
the intensity of the headlights of the following
vehicle.
The anti-glare system will be automatically
turned on when the ignition switch is pushed
to the ON position.
When the anti-glare system is turned on, the
indicator light
*Awill illuminate and excessive
glare from the headlights of the vehicle behind
you will be reduced.
Push the “*” switch
*Cto make the inside
rearview mirror operate normally. The indicator
Pre-driving checks and adjustments3-37
MIRRORS
Page 154 of 427

3-38Pre-driving checks and adjustments
light will turn off. Push the “I” switch*Dto turn
the system on.
Do not allow any object to cover the
sensors
*Eor apply glass cleaner on
them. Doing so will reduce the sensitivity
of the sensor, resulting in improper opera-
tion.
For the HomeLink
®Universal Transceiver opera-
tion, see “HomeLink®Universal Transceiver”
(P.2-49) .
OUTSIDE MIRRORS
WARNING
Objects viewed in the outside mirror on
the passenger side are closer than they
appear. Be careful when moving to the
right. Using only this mirror could cause
an accident. Use the inside mirror or
glance over your shoulder to properly
judge distances to other objects.
SPA2319
Adjusting outside mirrors
The outside mirror control switch is located on
the armrest.
The outside mirror will operate only when the
ignition switch is in the ACC or ON position.
Turn the switch right or left to select the right or
left side mirror
*1, then adjust using the control
switch
*2.
Defrosting outside mirrors
The outside mirrors will be heated when the rear
window defroster switch is operated.
Page 164 of 427
4-8Center display, heater, air conditioner, audio, phone and voice recognition systems
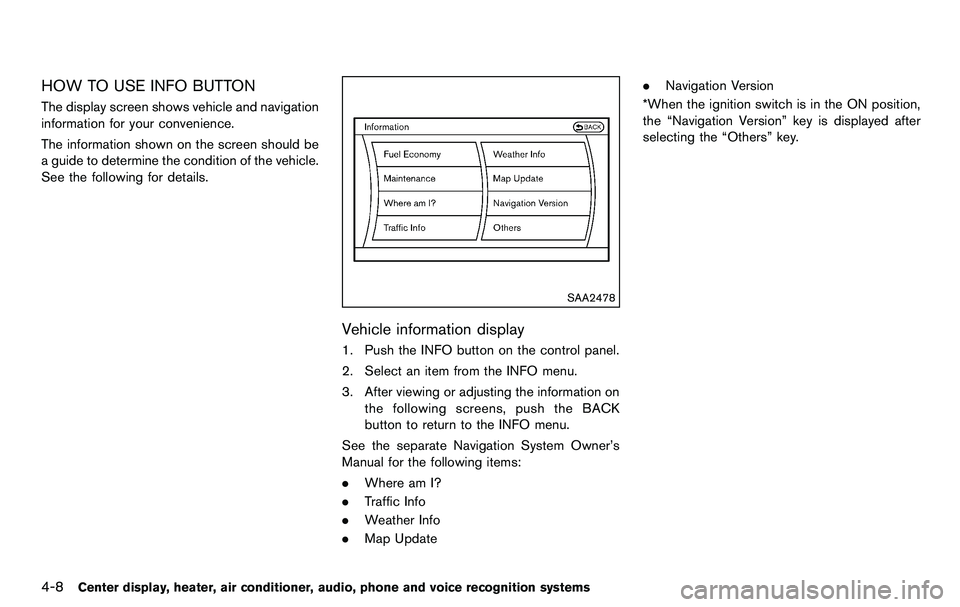
HOW TO USE INFO BUTTON
The display screen shows vehicle and navigation
information for your convenience.
The information shown on the screen should be
a guide to determine the condition of the vehicle.
See the following for details.
SAA2478
Vehicle information display
1. Push the INFO button on the control panel.
2. Select an item from the INFO menu.
3. After viewing or adjusting the information onthe following screens, push the BACK
button to return to the INFO menu.
See the separate Navigation System Owner’s
Manual for the following items:
. Where am I?
. Traffic Info
. Weather Info
. Map Update .
Navigation Version
*When the ignition switch is in the ON position,
the “Navigation Version” key is displayed after
selecting the “Others” key.
Page 166 of 427
4-10Center display, heater, air conditioner, audio, phone and voice recognition systems
SAA2482
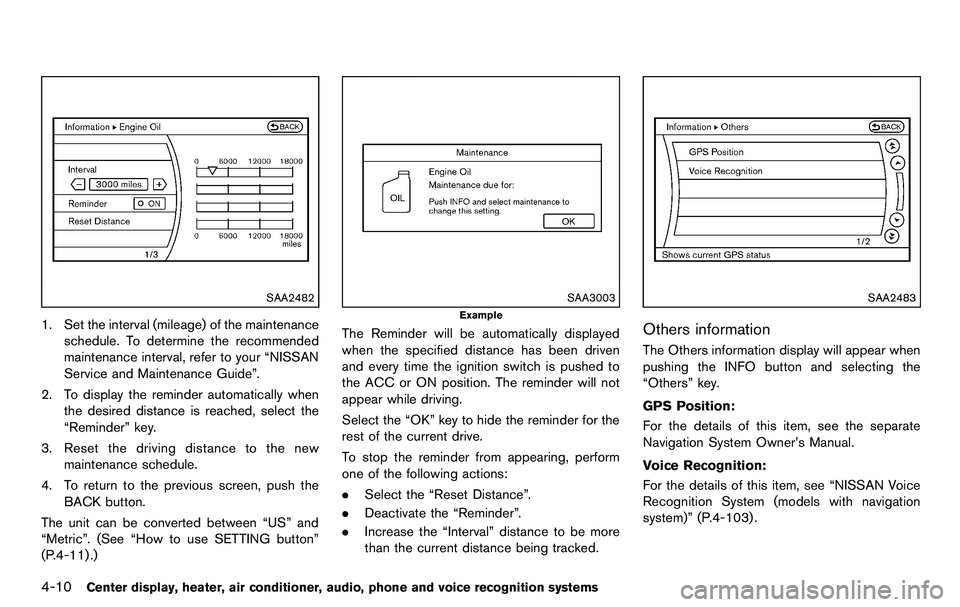
1. Set the interval (mileage) of the maintenanceschedule. To determine the recommended
maintenance interval, refer to your “NISSAN
Service and Maintenance Guide”.
2. To display the reminder automatically when the desired distance is reached, select the
“Reminder” key.
3. Reset the driving distance to the new maintenance schedule.
4. To return to the previous screen, push the BACK button.
The unit can be converted between “US” and
“Metric”. (See “How to use SETTING button”
(P.4-11) .)
SAA3003
Example
The Reminder will be automatically displayed
when the specified distance has been driven
and every time the ignition switch is pushed to
the ACC or ON position. The reminder will not
appear while driving.
Select the “OK” key to hide the reminder for the
rest of the current drive.
To stop the reminder from appearing, perform
one of the following actions:
. Select the “Reset Distance”.
. Deactivate the “Reminder”.
. Increase the “Interval” distance to be more
than the current distance being tracked.
SAA2483
Others information
The Others information display will appear when
pushing the INFO button and selecting the
“Others” key.
GPS Position:
For the details of this item, see the separate
Navigation System Owner’s Manual.
Voice Recognition:
For the details of this item, see “NISSAN Voice
Recognition System (models with navigation
system)” (P.4-103) .
Page 170 of 427
4-14Center display, heater, air conditioner, audio, phone and voice recognition systems
system.
Clock Format (24h):
When this item is turned to ON, the 24-hour
clock is displayed. When this item is not turned
to ON, the 12-hour clock is displayed.
Offset (hour)/(min):
Adjust the time by increasing or decreasing per
hour or per minute.
Daylight Saving Time:
Turn this item to ON for daylight saving time
application.
Time Zone:
Choose the time zone from the following
.Pacific
. Mountain
. Central
. Eastern
. Atlantic
. Newfoundland
. Hawaii
. Alaska
SAA2489
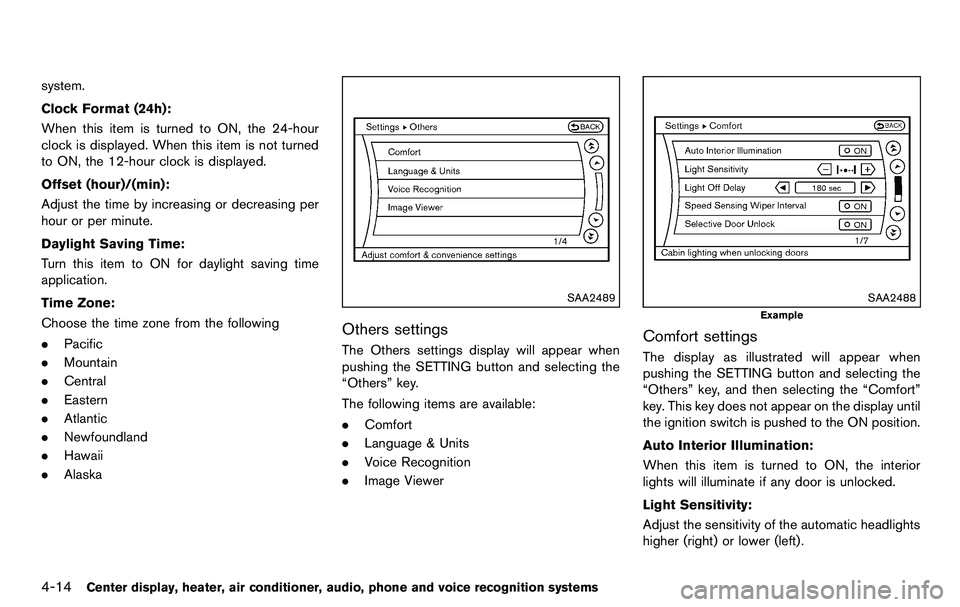
Others settings
The Others settings display will appear when
pushing the SETTING button and selecting the
“Others” key.
The following items are available:
.Comfort
. Language & Units
. Voice Recognition
. Image Viewer
SAA2488
Example
Comfort settings
The display as illustrated will appear when
pushing the SETTING button and selecting the
“Others” key, and then selecting the “Comfort”
key. This key does not appear on the display until
the ignition switch is pushed to the ON position.
Auto Interior Illumination:
When this item is turned to ON, the interior
lights will illuminate if any door is unlocked.
Light Sensitivity:
Adjust the sensitivity of the automatic headlights
higher (right) or lower (left).
Page 187 of 427
AUDIO OPERATION PRECAUTIONS
Radio
Push the ignition switch to the ACC or ON
position and push the radio band select button
to turn on the radio. If you listen to the radio with
the engine not running, the ignition switch
should be pushed to the ACC position.
Radio reception is affected by station signal
strength, distance from radio transmitter, build-
ings, bridges, mountains and other external
influences. Intermittent changes in reception
quality normally are caused by these external
influences.
Using a cellular phone in or near the
vehicle may influence radio reception
quality.
Radio reception:
Your NISSAN radio system is equipped with
state-of-the-art electronic circuits to enhance
radio reception. These circuits are designed to
extend reception range, and to enhance the
quality of that reception.
However there are some general characteristics
of both FM and AM radio signals that can affect
radio reception quality in a moving vehicle, even
when the finest equipment is used. These
characteristics are completely normal in a given
reception area, and do not indicate any mal-function in your NISSAN radio system.
Reception conditions will constantly change
because of vehicle movement. Buildings, terrain,
signal distance and interference from other
vehicles can work against ideal reception.
Described below are some of the factors that
can affect your radio reception.
Some cellular phones or other devices may
cause interference or a buzzing noise to come
from the audio system speakers. Storing the
device in a different location may reduce or
eliminate the noise.
SAA0306
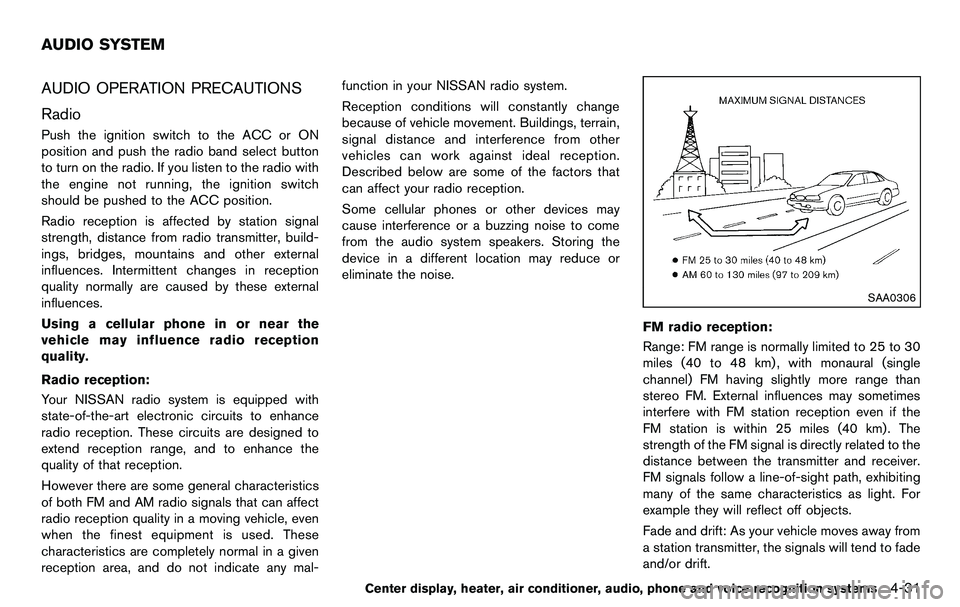
FM radio reception:
Range: FM range is normally limited to 25 to 30
miles (40 to 48 km) , with monaural (single
channel) FM having slightly more range than
stereo FM. External influences may sometimes
interfere with FM station reception even if the
FM station is within 25 miles (40 km). The
strength of the FM signal is directly related to the
distance between the transmitter and receiver.
FM signals follow a line-of-sight path, exhibiting
many of the same characteristics as light. For
example they will reflect off objects.
Fade and drift: As your vehicle moves away from
a station transmitter, the signals will tend to fade
and/or drift.
Center display, heater, air conditioner, audio, phone and voice recognition systems4-31
AUDIO SYSTEM
Page 199 of 427
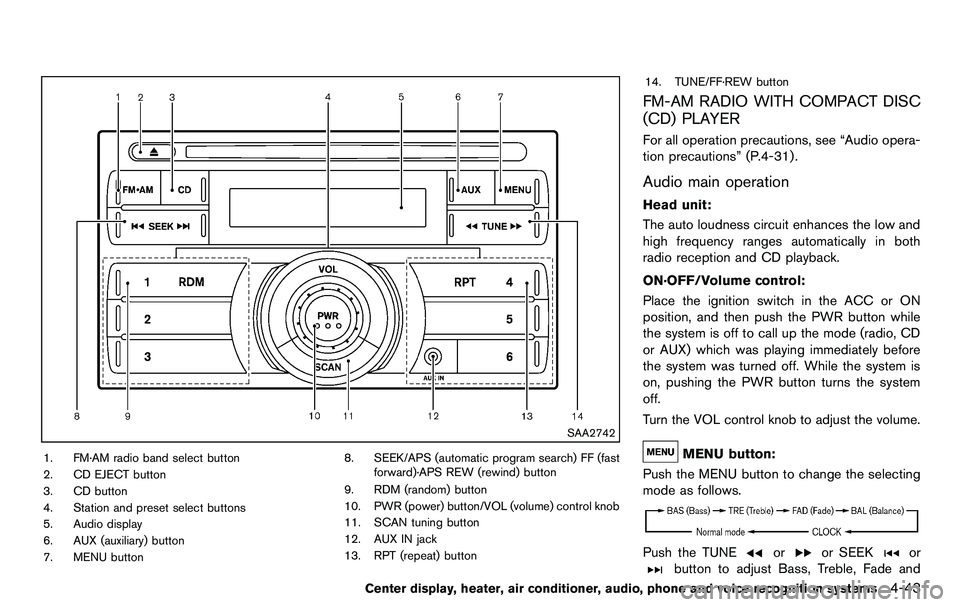
SAA2742
1. FM·AM radio band select button
2. CD EJECT button
3. CD button
4. Station and preset select buttons
5. Audio display
6. AUX (auxiliary) button
7. MENU button8. SEEK/APS (automatic program search) FF (fast
forward)·APS REW (rewind) button
9. RDM (random) button
10. PWR (power) button/VOL (volume) control knob
11. SCAN tuning button
12. AUX IN jack
13. RPT (repeat) button 14. TUNE/FF·REW button
FM-AM RADIO WITH COMPACT DISC
(CD) PLAYER
For all operation precautions, see “Audio opera-
tion precautions” (P.4-31) .
Audio main operation
Head unit:
The auto loudness circuit enhances the low and
high frequency ranges automatically in both
radio reception and CD playback.
ON·OFF/Volume control:
Place the ignition switch in the ACC or ON
position, and then push the PWR button while
the system is off to call up the mode (radio, CD
or AUX) which was playing immediately before
the system was turned off. While the system is
on, pushing the PWR button turns the system
off.
Turn the VOL control knob to adjust the volume.
MENU button:
Push the MENU button to change the selecting
mode as follows.
Push the TUNEoror SEEKor
button to adjust Bass, Treble, Fade and
Center display, heater, air conditioner, audio, phone and voice recognition systems4-43
Page 200 of 427
4-44Center display, heater, air conditioner, audio, phone and voice recognition systems
Balance to the desired level. Fade adjusts the
sound level between the front and rear speakers
and Balance adjusts the sound between the
right and left speakers.
Once you have adjusted the sound quality to the
desired level, push the MENU button repeatedly
until the radio or CD display reappears (normal
mode) . Otherwise, the radio or CD display will
automatically reappear after approximately 10
seconds.
Clock adjustment:
Push the MENU button until the CLOCK mode
appears. Then push the TUNE or SEEK button
to select “CLK-ON” or “CLK-OFF” to turn the
clock on or off.
“CLK-ON” needs to be selected before adjust-
ing the clock display.
1. Push the MENU button.
2. Push the MENU button again. The clockdisplay starts to flash.
3. Push the TUNE or SEEK button to adjust the hours.
4. Push the MENU button again. The display will switch to the minute adjustment mode.
5. Push the TUNE or SEEK button to adjust the minutes. 6. Push the MENU button again to exit the
clock mode.
The display will return to the regular clock
display after 5 seconds.
To reset the minute to zero, hold down the
MENU button and then push the TUNE or SEEK
button, the time will be reset as follows.
. In case the displayed minute is in the range
of 00 - 29, the hour will stay the same and
the minute will be reset to 00.
. In case the displayed minute is in the range
of 30 - 59, the hour will be advanced by one
hour and the minute will be reset to 00.
For example, if the MENU and TUNE buttons are
pushed while the time is between “8:00” and
“8:29”, the display will be reset to “8:00”. If
pushed while the time is between “8:30” and
“8:59”, the display will be reset to “9:00”. At the
same time the display will return to the previous
audio mode.FM-AM radio operation
Radio (FM/AM) band select:
Pushing the radio band select button will
change the band as follows:
AM ?FM1 ?FM2 ?AM
When the radio band select button is pushed
while the ignition switch is in the ACC or ON
position, the radio will come on at the station last
played.
The last station played will also come on when
the PWR button is pushed to ON.
If another audio source is playing when the radio
band select button is pushed, the audio source
will automatically be turned off and the last radio
station played will come on.
When the stereo broadcast signal is weak, the
radio will automatically change from stereo to
monaural reception.
TUNE (Tuning):
Push the TUNE button
orfor manual
tuning.
SEEK tuning:
Push the SEEK button
orto tune from
low to high or high to low frequencies and to
stop at the next broadcasting station.