2012 NISSAN 370Z COUPE weight
[x] Cancel search: weightPage 37 of 427
WARNING
Do not allow children to play with the
seat belts. Most seating positions are
equipped with Automatic Locking Re-
tractor (ALR) mode seat belts. If the
seat belt becomes wrapped around a
child’s neck with the ALR mode acti-
vated, the child can be seriously injured
or killed if the seat belt retracts and
becomes tight. This can occur even if
the vehicle is parked. Unbuckle the seat
belt to release the child. If the seat belt
can not be unbuckled or is already
unbuckled, release the child by cutting
the seat belt with a suitable tool (such
as a knife or scissors) to release the
seat belt.
Children need adults to help protect them.
They need to be properly restrained.
In addition to the general information in this
manual, child safety information is available from
many other sources, including doctors, teachers,
government traffic safety offices, and community
organizations. Every child is different, so be sure
to learn the best way to transport your child.
There are three basic types of child restraint systems:
.
Rear-facing child restraint
. Front-facing child restraint
. Booster seat
The proper restraint depends on the child’s size.
Generally, infants (up to about 1 year and less
than 20 lb (9 kg)) should be placed in rear-
facing child restraints. Front-facing child re-
straints are available for children who outgrow
rear-facing child restraints and are at least 1
year old. Booster seats are used to help position
a vehicle lap/shoulder belt on a child who can no
longer use a front-facing child restraint.
WARNING
Infants and children need special pro-
tection. The vehicle’s seat belts may not
fit them properly. The shoulder belt may
come too close to the face or neck. The
lap belt may not fit over their small hip
bones. In an accident, an improperly
fitting seat belt could cause serious or
fatal injury. Always use appropriate
child restraints.
All U.S. states and Canadian provinces or
territories require the use of approved child
restraints for infants and small children. (See “Child restraints” (P.1-18) .)
Also, there are other types of child restraints
available for larger children for additional pro-
tection.
INFANTS
Infants up to at least 1 year old should be placed
in a rear-facing child restraint. NISSAN recom-
mends that infants be placed in child restraints
that comply with Federal Motor Vehicle Safety
Standards or Canadian Motor Vehicle Safety
Standards. You should choose a child restraint
that fits your vehicle and always follow the
manufacturer’s instructions for installation and
use.
SMALL CHILDREN (for Coupe models)
Children that are over 1 year old and weigh at
least 20 lb (9 kg) should remain in a rear-facing
child restraint as long as possible up to the
height or weight limit of the child restraint.
Forward-facing child restraints are available for
children who outgrow rear-facing child restraints
and are at least 1 year old. Refer to the
manufacturer’s instructions for minimum and
maximum weight and height recommendations.
NISSAN recommends that small children be
placed in child restraints that comply with
Federal Motor Vehicle Safety Standards or
Canadian Motor Vehicle Safety Standards. You
should choose a child restraint that fits your
Safety — Seats, seat belts and supplemental restraint system1-15
CHILD SAFETY
Page 41 of 427
— Keep seatbacks as upright aspossible after fitting the child
restraint.
— Infants and children should al- ways be placed in an appropri-
ate child restraint while in the
vehicle.
CAUTION
A child restraint in a closed vehicle can
become very hot. Check the seating
surface and buckles before placing a
child in the child restraint.
In general, child restraints are designed to be
installed with the lap portion of a lap/shoulder
seat belt.
Several manufacturers offer child restraints for
children of various sizes. When selecting any
child restraint, keep the following points in mind:
. Choose only a restraint with a label certifying
that it complies with Federal Motor Vehicle
Safety Standard 213 or Canadian Motor
Vehicle Safety Standard 213.
. Check the child restraint in your vehicle to
be sure it is compatible with the vehicle’s seat and seat belt system.
. If the child restraint is compatible with your
vehicle, place your child in the child restraint
and check the various adjustments to be
sure the child restraint is compatible with
your child. Choose a child restraint that is
designed for your child’s height and weight.
Always follow all recommended procedures.
The passenger seat is not suitable for use with a
rear-facing child restraint for infants. Therefore,
infants should not be transported in this vehicle.
All U.S. states and Canadian provinces or
territories require that infants and small
children be restrained in an approved child
restraint at all times while the vehicle is
being operated. Canadian law requires the
top tether strap on front-facing child
restraints to be secured to the designated
anchor point on the vehicle.
TOP TETHER STRAP CHILD RE-
STRAINT (for Coupe models)
If the manufacturer of your child restraint
requires the use of a top tether strap, it must
be secured to an anchor point.
WARNING
. If the cargo cover (if so equipped)
contacts the top tether strap when it
is attached to the top tether anchor,
remove the cargo cover from the
vehicle or secure it on the cargo
floor below its attachment location.
If the cargo cover is not removed, it
may damage the top tether strap
during a collision. A child could be
seriously injured or killed in a colli-
sion if the child restraint top tether
strap is damaged.
. Do not allow cargo to contact the
top tether strap when it is attached
to the top tether anchor. Properly
secure the cargo so it does not
contact the top tether strap. Cargo
that is not properly secured or that
contacts the top tether strap may
damage the top tether strap during
a collision. Your child could be
Safety — Seats, seat belts and supplemental restraint system1-19
Page 139 of 427

.Do not place anything in the top
storage area. The top will not fit
there properly, and this could da-
mage the top and/or the vehicle
body.
. Do not sit or place excessive weight
on the top and the storage lid,
especially when the top is being
operated. The top may be damaged.
. Do not drive the vehicle with the top
partially opened. Always make sure
the top is either fully opened or
closed before driving.
. Secure items so that they cannot be
blown from the vehicle while driving
with the top open.
. Do not operate the top manually
except for emergency cases. Manual
operation may damage the top.
. Be sure to fully open or fully close
the top. Do not release the switch
half way through the roof opening
or closing process. If the top is only
partially opened, significant da-
mage to the top could occur.
Make sure the trunk lid is securely closed before
operating the top.
SPA2706
WHEN OPERATING THE TOP
WARNING
Keep hands and other parts of the body
away from moving parts such as the
top, storage lid, side flap
*Aand power
windows.
CAUTION
Keep all parts of the top linkage clear of
obstructions, or the top latch may not be securely locked.
NOTE:
. In case of low battery or low tempera-
ture, the top may temporarily stop
moving during the operation. This func-
tions to protect the top control me-
chanism, and it is not a malfunction.
. If the top is opened and closed repeat-
edly in a short period of time or the top
operation is stopped while opening or
closing, the top operation may be
automatically stopped to protect the
system. Wait for approximately 5 min-
utes before operating the top again.
Pre-driving checks and adjustments3-23
Page 383 of 427
If you have a flat tire, see “Flat tire” (P.6-2) .
TIRE PRESSURE
Tire Pressure Monitoring System (TPMS)
This vehicle is equipped with the Tire Pressure
Monitoring System (TPMS) . It monitors tire
pressure of all tires except the spare. When
the low tire pressure warning light is lit, one or
more of your tires is significantly under-inflated.
The TPMS will activate only when the vehicle is
driven at speeds above 16 MPH (25 km/h).
Also, this system may not detect a sudden drop
in tire pressure (for example a flat tire while
driving) .
For more details, see “Low tire pressure warning
light” (P.2-12) , “Tire Pressure Monitoring Sys-
tem (TPMS)” (P.5-3) and “Tire Pressure Mon-
itoring System (TPMS)” (P.6-2) .
Tire inflation pressure
Check the pressure of the tires (including
the spare) often and always prior to long
distance trips. The recommended tire
pressure specifications are shown on the
Tire and Loading Information label under
the “Cold Tire Pressure” heading. The Tire
and Loading Information label is affixed to
the driver side center pillar. Tire pressuresshould be checked regularly because:
.
Most tires naturally lose air over time.
. Tires can lose air suddenly when driven
over potholes or other objects or if the
vehicle strikes a curb while parking.
The tire pressures should be checked
when the tires are cold. The tires are
considered COLD after the vehicle has
been parked for 3 or more hours, or driven
less than 1 mile (1.6 km) at moderate
speeds.
Incorrect tire pressure, including un-
der inflation, may adversely affect tire
life and vehicle handling.
WARNING
. Improperly inflated tires can fail
suddenly and cause an accident.
. The Gross Vehicle Weight rating
(GVWR) is located on the F.M.V.
S.S./C.M.V.S.S. label. The vehi-
cle weight capacity is indicated
on the Tire and Loading Infor-
mation label. Do not load your
vehicle beyond this capacity. Overloading your vehicle may
result in reduced tire life, unsafe
operating conditions due to pre-
mature tire failure, or unfavor-
able handling characteristics
and could also lead to a serious
accident. Loading beyond the
specified capacity may also re-
sult in failure of other vehicle
components.
. Before taking a long trip, or
whenever you heavily load your
vehicle, use a tire pressure
gauge to ensure that the tire
pressures are at the specified
level.
. For additional information re-
garding tires, refer to “Important
Tire Safety Information” (US) or
“Tire Safety Information” (Cana-
da) in the Warranty Information
Booklet.
Maintenance and do-it-yourself8-31
WHEELS AND TIRES
Page 387 of 427

SDI1606
Example
*1Tire size (example: P215/60R16 94H)
1. P: The “P” indicates the tire is designedfor passenger vehicles. (Not all tires
have this information.)
2. Three-digit number (215): This number gives the width in millimeters of the tire
from sidewall edge to sidewall edge.
3. Two-digit number (60): This number, known as the aspect ratio, gives the
tire’s ratio of height to width.
4. R: The “R” stands for radial.
5. Two-digit number (16): This number is the wheel or rim diameter in inches. 6. Two- or three-digit number (94): This
number is the tire’s load index. It is a
measurement of how much weight each
tire can support. You may not find this
information on all tires because it is not
required by law.
7. H: Tire speed rating. You should not drive the vehicle faster than the tire
speed rating.
SDI1607
Example
*2TIN (Tire Identification Number) for a
new tire (example: DOT XX XX XXX
XXXX)
1. DOT: Abbreviation for the “Departmentof Transportation”. The symbol can be
placed above, below or to the left or
right of the Tire Identification Number.
2. Two-digit code: Manufacturer’s identifi- cation mark
3. Two-digit code: Tire size
4. Three-digit code: Tire type code (Op- tional)
Maintenance and do-it-yourself8-35
Page 395 of 427
9 Technical and consumer information
Capacities and recommended fuel/lubricants ................... 9-2Fuel recommendation ......................................................... 9-4
Engine oil and oil filter recommendation ....................... 9-6
Air conditioning system refrigerant and
lubricant recommendations ............................................... 9-7
Specifications ........................................................................\
..... 9-8
Engine ........................................................................\
............ 9-8
Wheels and tires ................................................................. 9-9
Dimensions ........................................................................\
9-10
When traveling or registering your vehicle in
another country ....................................................................... 9-11
Vehicle identification .............................................................. 9-11 Vehicle Identification Number (VIN) plate .................. 9-11
Vehicle identification number (chassis number) ....... 9-11
Engine serial number ....................................................... 9-12
F.M.V.S.S./C.M.V.S.S. certification label .................... 9-12
Emission control information label ............................... 9-12
Tire and Loading Information label .............................. 9-13
Air conditioner specification label ................................ 9-13
Installing front license plate ................................................. 9-14
Except for NISMO models ............................................. 9-14
For NISMO models .......................................................... 9-16 Removing air deflectors (except for
NISMO models) ..................................................................... 9-16
Vehicle loading information ................................................. 9-17
Terms ........................................................................\
......... 9-17
Vehicle load capacity .................................................... 9-18
Loading tips ..................................................................... 9-19
Measurement of weights .............................................. 9-19
Towing a trailer ....................................................................... 9-20
Flat towing ........................................................................\
....... 9-20 Automatic transmission ................................................ 9-20
Manual transmission ...................................................... 9-20
Uniform tire quality grading ................................................. 9-21 Treadwear ........................................................................\
9-21
Traction AA, A, B and C .............................................. 9-21
Temperature A, B and C .............................................. 9-21
Emission control system warranty ..................................... 9-22
Reporting safety defects ..................................................... 9-22
Readiness for Inspection/Maintenance (I/M) test ......... 9-23
Event Data Recorders (EDR) ............................................. 9-23
Owner’s Manual/Service Manual order information ..... 9-24
Page 406 of 427
9-12Technical and consumer information
STI0509
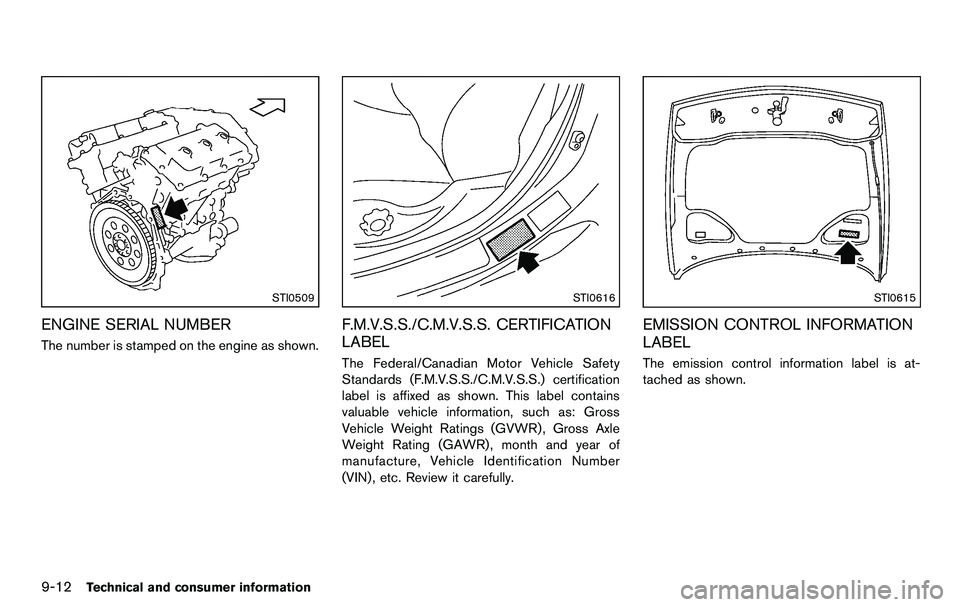
ENGINE SERIAL NUMBER
The number is stamped on the engine as shown.
STI0616
F.M.V.S.S./C.M.V.S.S. CERTIFICATION
LABEL
The Federal/Canadian Motor Vehicle Safety
Standards (F.M.V.S.S./C.M.V.S.S.) certification
label is affixed as shown. This label contains
valuable vehicle information, such as: Gross
Vehicle Weight Ratings (GVWR) , Gross Axle
Weight Rating (GAWR) , month and year of
manufacture, Vehicle Identification Number
(VIN) , etc. Review it carefully.
STI0615
EMISSION CONTROL INFORMATION
LABEL
The emission control information label is at-
tached as shown.
Page 411 of 427
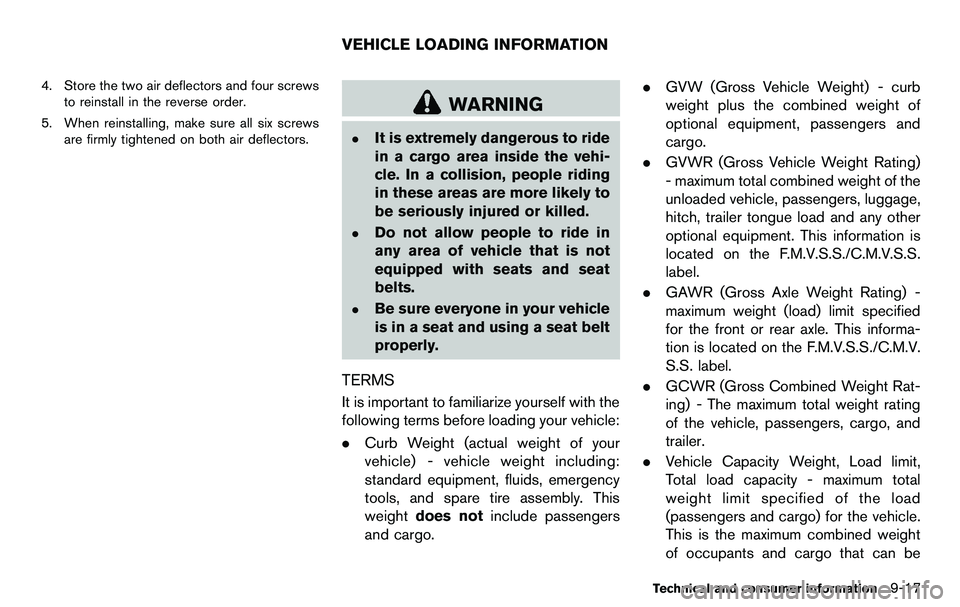
4. Store the two air deflectors and four screwsto reinstall in the reverse order.
5. When reinstalling, make sure all six screws are firmly tightened on both air deflectors.
WARNING
.It is extremely dangerous to ride
in a cargo area inside the vehi-
cle. In a collision, people riding
in these areas are more likely to
be seriously injured or killed.
.Do not allow people to ride in
any area of vehicle that is not
equipped with seats and seat
belts.
.Be sure everyone in your vehicle
is in a seat and using a seat belt
properly.
TERMS
It is important to familiarize yourself with the
following terms before loading your vehicle:
.Curb Weight (actual weight of your
vehicle) - vehicle weight including:
standard equipment, fluids, emergency
tools, and spare tire assembly. This
weight does not include passengers
and cargo. .
GVW (Gross Vehicle Weight) - curb
weight plus the combined weight of
optional equipment, passengers and
cargo.
. GVWR (Gross Vehicle Weight Rating)
- maximum total combined weight of the
unloaded vehicle, passengers, luggage,
hitch, trailer tongue load and any other
optional equipment. This information is
located on the F.M.V.S.S./C.M.V.S.S.
label.
. GAWR (Gross Axle Weight Rating) -
maximum weight (load) limit specified
for the front or rear axle. This informa-
tion is located on the F.M.V.S.S./C.M.V.
S.S. label.
. GCWR (Gross Combined Weight Rat-
ing) - The maximum total weight rating
of the vehicle, passengers, cargo, and
trailer.
. Vehicle Capacity Weight, Load limit,
Total load capacity - maximum total
weight limit specified of the load
(passengers and cargo) for the vehicle.
This is the maximum combined weight
of occupants and cargo that can be
Technical and consumer information9-17
VEHICLE LOADING INFORMATION