Page 9 of 20

7CHARGING YOUR MITSUBISHI i
Pacemaker and Defibrillator Warning
Before starting the charge operation or driving the vehicle, check with the electric medical device manufacturer concerning
the effects that charging may have on implantable devices if you use any medical electric devices, such as:
• An implantable cardiac pacemaker
• An implantable cardiovascular defibrillator
The Mitsubishi i is designed to comply with the ICNIRP International Guidelines however customer’s medical devices may not
comply.
Main Drive Battery vs. 12 Volt Battery
If the 12 Volt battery is discharged regardless of the remaining level of the main drive battery,
the vehicle cannot be driven.
The 12 Volt battery provides electricity to numerous devices in the car. Even if the remaining
electricity level of the main drive battery lowers, you can continue to use the lights and wipers.
To avoid the 12 Volt battery from dying please avoid using the headlights, radio, air
conditioning, etc. for a long period of time without the vehicle turned on and the READY light
lit.
– +
MAIN DRIVE
BATTERY
– +
12 VOLT
BATTERY
Main Drive Battery powers the Mitsubishi i, its heating as well as its air conditioning.
Major functions run by the 12 Volt battery include: start up of the power unit, headlights, power windows, wipers, cabin lights, audio, and seat heaters.
Power Down Warning Light
If this warning light illuminates, the power provided by the electric motor will be reduced, the vehicle will only
be able to move at low speeds, and the air conditioning unit shuts off. This warning light will illuminate;
• When the energy level in the main drive battery is near empty
• When temperature of the electric motor unit or the main drive battery is too high or too low
• When voltage of the main drive battery becomes low
Page 10 of 20

8
Charge Overview
CHARGING YOUR MITSUBISHI i
The Mitsubishi i can be charged anytime. However, repeatedly charging the vehicle’s battery
when it is almost full may decrease the battery’s overall lifespan.
There are three different levels of charging your Mitsubishi i.
Level 1 charging is based on using a standard rated A/C 120 Volt outlet.
1) Fully apply the parking brake and place the selector lever in the P - (Park) position.
2) Turn off the headlights and turn the key to the Lock position.
3) Pull the Level 1 / Level 2 charging opener located at the bottom left of the instrument
panel to open the regular charging lid at the rear passenger side of the vehicle.
4) Remove the key and lock the vehicle.
5) The Regular Charging Lid will be open. Press the tab to open the inner lid providing
access to the charge port.
6) Insert the charging cable plug into a standard 120 Volt outlet rated for 15 amps or more.
Warning - make sure the outlet is on a dedicated circuit which is not shared with any
other appliances. Also check the outlet to confirm there is no rust or corrosion.
Note: You cannot connect the charger cord into an extension cord. Please ensure you have a Garage Site Survey
completed before plugging in an EV into any outlet in your home or garage. Use a hook and a rope that can support
the weight of the EV charging cable, 8.8 lbs (4 kg) as shown in the figure to the right. Make sure that the rope has no
damage before use.
7) Open the cap on the regular charge connector and make sure there is no foreign matter such as dust or dirt on the end
of the connector.
8) Connect the regular charge connector to your Mitsubishi i until you hear a click. You will also hear a fan turn on briefly.
9) Make sure the charging indicator on the Mitsubishi i’s instrument cluster is illuminated.
10) Charging is complete when the charging indicator light turns off.
11) Remove the connector while pressing the button on the top of the connector.
12) Close the inner lid and the regular charging door.
13) Remove the charging cable plug from the outlet and store appropriately for future use.
Level 2
You can charge your vehicle through the regular charging port using 240 Volt Electric Vehicle Supply Equipment (EVSE) compatible
with the Mitsubishi i. For connecting/disconnecting the charging connector to or from the vehicle, follow steps 1-12 (omitting #6) as
outlined above. Also, please follow instructions provided with the 240 EVSE.
For further information, please refer to the General Information Section in your Owner’s Manual under Charging. Please pay particular
attention to instructions, warnings, and cautions in the Owner’s Manual.
CategorCategoryyCharCharge portge portCharCharge connectoge connectorrCharCharging Sourging SourceceCharCharging ging titime me with fully dis-with fully dis-charged battercharged batteryy
Level Level 11Regular Regular charcharging ging 11110-0-120120VV(Attached EV(Attached EVcharchargigingng cable) cable)
passenpassenger side ger side of vehiclof vehiclee11110-120-120V 0V hohousehusehololddoutlet (15 amp dedicatedoutlet (15 amp dedicatedcircuit required)circuit required)
About 22 hourAbout 22 hourss
LeLevevel l 22Regular Regular charcharging ging 22220-0-24240V0V(P(Pririmamaryry Home HomeEVSEVSE E Dock-Dock-AvAvailable separately)ailable separately)
passepassengnger sideer sideof of vevehiclehicleHome or public Home or public chcharargigingngdevdeviceice
AbAbouout 6 hourt 6 hourss
Quick charQuick chargigingng(c(chahargrging ing methmethododwith quick charger) with quick charger) (if so equipped(if so equipped))
drdriver iver siside de of of vehvehicleicle(if (if sosoequippedequipped))Public charPublic chargigingngststatationsionswhere availwhere availabablele
AbouAbout t 30 30 miminutesnutesfor 80 % charfor 80 % chargege
Page 11 of 20

Quick Charging is based on accessing a public charging station that is CHAdeMO certified. Note that in under 30 minutes of
charging you will reach a m")
9
Charge Overview
Quick Charge (if so equipped)
Quick Charging is based on accessing a public charging station that is CHAdeMO certified. Note that in under 30 minutes of
charging you will reach a maximum of 80% of a full charge as shown in your Energy Level Gauge.
1) Fully apply the parking brake and place the selector lever in the P - (Park) position.
2) Turn off the headlights and turn the key to the Lock position.
3) Pull the quick charging lid opener at the bottom left of the driver’s seat on the floor to open the quick charging lid at the
rear driver’s side of the vehicle.
4) Remove the key and lock the vehicle.
5) The fuel door will be open. Press the tab to open the inner lid providing access to the charge port.
6) Open the cap on the regular charge connector and make sure there is no foreign matter such as dust or dirt on the end of
the connector.
7) Connect the quick charge connector to your Mitsubishi i according to the manual of the quick charger you are using.
8) Make sure the charging indicator on the Mitsubishi i’s instrument cluster is illuminated.
9) In order to protect the life of the battery, charging is complete at 80% of a full charge.
10) Remove the connector according to the manual of the quick charger you are using.
11) Close the inner lid and the quick charging door.
12) Place the quick charger back on its unit.
CHARGING YOUR MITSUBISHI i
Access to Level 1/Level 2
Charging
Level 2 ChargingQuick Charging
Page 12 of 20
 FM (FM1/FM2) indicator
2) Radio (AM/FM selection) button
3) Memory (Memory selection) button
4) Power
5) Scan button
6) Seek (Up/Down) buttons
7) CD button
8) Clock button
9) Seek �")
10AUDIO SYSTEM
1) FM (FM1/FM2) indicator
2) Radio (AM/FM selection) button
3) Memory (Memory selection) button
4) Power
5) Scan button
6) Seek (Up/Down) buttons
7) CD button
8) Clock button
9) Seek ∧ button
10) Seek ∨ button
How to connect a USB memory device or an iPod®
The USB connector is used to play music or charge an audio device.
1) Park your vehicle in a safe place and turn the electric motor switch to the LOCK
position.
2) Open the USB terminal input cover (A) in the floor console.
3) Connect a commercially available USB connector cable to the USB memory device
or connect a genuine Apple Inc. Dock connector to your terminal and to your iPod®.
How to set the clock
1) Press and hold the clock button 8 and the clock display flashes.
2) Press the SEEK button 9 or 10 to adjust the “hours” digit. If you keep pressing the button, fast-forward begins.
3) When the “hours” digit is adjusted, press the clock button to flash the “minutes” digit. Press the SEEK button to adjust the
“minutes” digit. If you keep pressing the button, fast-forward begins.
4) When the time is set, press the clock button to stop the clock display from flashing.
4
1
6
8
29
10
7
53
Page 13 of 20

11
Making a call by using the telephone number:
1. Press A button and Say “Dial.”
2. The voice guide says “Number please.”
3. Say the telephone number “XXX•••••••.”
4. The voice guide says “Dialing .”
Making a call using a phonebook:
1. Press A button and Say “Call.”
2. After the voice guide says “Name please.”
Say the name you want to call “XXX•••••••.”
3. If there is only 1 match, the voice guide says “Calling ” and then the system will dial the telephone number.
Receiving calls:
1. If an incoming phone call is received while the ignition switch is in the “ACC” or “ON” position, with the audio system
OFF, the audio system automatically turns ON.
2. Press B button.
Hanging up a call:
1. Press C button.
To import a devices phonebook:
1. Press A button and Say “Phonebook.” Vehicle must be parked.
2. The voice guide will say “Select one of the following: new entry, edit number, edit name, list names, delete, erase all, or
import contact.” Say “Import contact.”
3. The voice guide will say “Would you like to import a single entry or all contact?” Say “All contacts.”
4. The voice guide will say “Importing the contact list from the mobile phonebook. This may take several minutes to
complete. Would you like to continue?” Answer “Yes.”
5. When the import is complete, the voice guide will say “Import complete.”
Bluetooth® Operation with FUSE Hands-free Link System™
(if so equipped)
If you are having difficulties operating your phone or connecting to the system, please call
Mitsubishi Handsfree at (888) 702-4100.
A
B
C
SPEECH button:Change to voice recognition
PICK-UP button:Answer an incoming call
HANG-UP buttonEnd a call or voice recognition
A
B
C
Page 14 of 20
 Pre-activate the climate control – you can use the controller to set the climate inside the vehicle while the vehicle is")
12MITSUBISHI MiEV REMOTE
Effectively using your Mitsubishi MiEV Remote
1) Pre-activate the climate control – you can use the controller to set the climate inside the vehicle while the vehicle is plugged in. The
vehicle cabin’s temperature will be comfortable while utilizing the power from the outlet rather than from the main drive battery.
2) Timed battery charging – you can set a timer to take advantage of lower energy rates by having your Mitsubishi i programmed to
charge during those off peak hours.
3) Battery level information – you can view your Mitsubishi i’s charge level on your MiEV Remote without being in your vehicle.
4) To maximize the range of the MiEV Remote, extend the antenna to its full height. When
unobstructed, the range is up to 300 feet.
Your Mitsubishi MiEV Remote includes the following functions:
1) Power/communication button – when briefly pushed, settings are communicated to the
Mitsubishi i. When pushed longer than a second, the controller is turned on or off.
2) Mode button – scrolls to Charging Time, AC, Heater, and Defroster by just pressing the mode
button
3) Manual charge button – turns charging on or off, bypassing preset timers.
4) Scrolling buttons – scrolls the display items.
5) Communication signal – blinks when communicating with the vehicle and when errors occur.
6) Charging indicator – lights up during charging and blinks if charging cable is not connected
during charging attempt.
7) ERROR indicator – blinks if there is an operation or communication error.
8) Battery indicator – shows remaining charge of main drive battery. Blinks if battery has less than
20% charge.
9) Timer indicator – shows whether the timer is on or off.
10) Program timing indicator – shows the amount of time left until timer charging is complete based on the program
time set.
11) Climate control settings – displays modes currently active.
6
1
8
2
11
3
5
7
9
10
4
Page 15 of 20
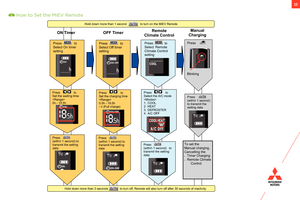
13
Press (within 1 second) totransmit the setting data
Press toSelect On timer setting
Press toSet the waiting time0h -19.5h
ON Timer
Press toSelect Off timer setting
OFF Timer
Press toSet the charging time0.5h -19.5h-h (Full charge)
Press(within 1 second) totransmit the setting data
Press toSelect RemoteClimate Controlsetting
Remote
Climate Control
Press toSelect the A/C mode1.COOL2.HEAT3.DEFROSTER4.A/C OFF
Press(within 1 second) totransmit the setting data
Press
Blinking
Manual
Charging
Press(within 1 second) to transmit the setting data
Hold down more than 1 second to turn on the MiEV Remote
Hold down more than 3 seconds to turn off, Remote will also turn off after 30 seconds of inactivity.
To set the Manual charging,Cancelling the�Timer Charging�Remote Climate Control
How to Set the MiEV Remote
Page 16 of 20
14NAVIGATION SYSTEM
1 Press the [MENU] key to display.
2 Touch [Point of Interest].
6Touch [All POIs]
3 Input the “State” and “City”
7 Input the POI name
4 Touch [All Categories]
8 Touch [Set]
5 Touch the category of the desired POI and category type to select.
Point of Interest (POI) Name
6
4
2
Way Points – Once you have set a destination, you can enter additional stops along the way called Way Points. For details on how to set Way Points refer to your Navigation Owner’s Manual.
Saving Addresses - To save an address, first enter the address into the system. Then touch [Address Book] and confirm location to be stored. Touch [Set to Address Book] to complete.


 totransmit the setting data
Press toSelect On timer setting
Press toSet the waiting time<Range>0h -19.5h
ON Timer
Press toSelect Off timer se")
![MITSUBISHI iMiEV 2012 1.G Owners Handbook 14NAVIGATION SYSTEM
1 Press the [MENU] key to display.
2 Touch [Point of Interest].
6Touch [All POIs]
3 Input the “State” and “City”
7 Input the POI name
4 Touch [All Categories]
8 Touch [Set]](/manual-img/19/7552/w960_7552-15.png "MITSUBISHI iMiEV 2012 1.G Owners Handbook 14NAVIGATION SYSTEM
1 Press the [MENU] key to display.
2 Touch [Point of Interest].
6Touch [All POIs]
3 Input the “State” and “City”
7 Input the POI name
4 Touch [All Categories]
8 Touch [Set]")