Page 1 of 20
Page 2 of 20
PLEASE PLACE COPIES OF THE FOLLOWING ITEMS IN THE \:POCKET BELOW:
\f. Pre\bDelivery Inspection F orm (Customer C opy)
2. T riple Diamond Delivery Checklist ( Customer Copy)
3. S alesperson or K ey Dealership C ontact’s Business Card
17
Q: What do I do if I get\u a �at tire?
A: The tire repair kit is stored under the rear seat cushion. To access the tire repair kit\f pull forward the seat stoppers under the r\.ear seat
cushion. \bift up the seat cushion and pull it forward. Next remove the wing nuts\f remove the cover and lift out the tire repair kit. Once
you have accessed the tire repair kit\f refer to the Mitsubishi i \.Owner’s Manual for instructions.
Warning – do not us\.e the tire sealant repair kit if any of these situations occur:
�
Page 3 of 20

1
Thank you for buying the 100% electric Mitsubishi i and doing your part to further
the electric vehicle movement in North America. There’s no doubt you’ve already
realized your positive environmental impact as well as the upcoming benefits to
your wallet by skipping those regular visits to the pump. In the pages ahead we’re
going to run through some of the unique Mitsubishi i technology and prepare you
for the road.
We’d also love to hear from you about your overall Mitsubishi experience. If you
haven’t already, please log on to www.MitsubishiSSIsurvey.com and tell us how
we did. This will help us make sure your next visit is that much better.
We hope you will visit the Mitsubishi Owner’s site where we store the latest
Mitsubishi news and special offers. Here you can also keep track of your Mitsubishi i’s
warranty and servicing needs, get Roadside Assistance Information and tap into
other owner-centric details. Just log on to www.Mitsubishicars.com/ownersonly.
Driver’s View......................Page 2
Driving Your Mitsubishi i..........................Page 3-6
Charging YourMitsubishi i..........................Page 7-9
Audio System....................Page 10
Bluetooth® Operation....Page 11
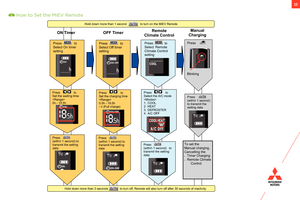
MiEV Remote ...................Page 13
Navigation System..........Page 14-15
You Might Be Thinking...............................Page 16-17
Table of Contents
You will find this Mitsubishi i symbol throughout your Owner’s Handbook. This
symbol indicates advanced technology only found in electric vehicles.
Not all features detailed in this book are available on all Mitsubishi i’s.
For additional information, refer to your Owner’s Manual.
Page 4 of 20
2
1
5
13
6
2
3
8
9
10
11
12
7
4
Driver’s View
1Energy level gauge
2Energy usage indicator
3Odo/Trip Meter
4Speedometer
5Reset/dash lights illumination/selector button
6Low energy warning indicator
7Ready indicator
812 volt starter battery charging system warning light
9Power down warning light
10Acoustic Vehicle Alerting System (AVAS indicator)
11Selector level position indicator
12TPMS (Tire Pressure Monitoring System)
13Vehicle Charging Light
Page 5 of 20

3DRIVING YOUR MITSUBISHI i
How To Start The Vehicle
Insert the key and press the brake pedal down.
Turn the key to the On position and make sure all warning lights are functioning properly.
Turn the key to the Start position for one or two seconds until you hear the startup bell and the READY indicator light comes on.
The indicator light tells you the car is ready to be driven.
While pressing the brake pedal, you
can select your drive mode.
D- use this position for normal
driving
Eco- use this position to limit
power consumption and
maximize driving range
B- use this position when
braking is required such as
on a steep downhill
Energy Use Indicator
As the needle moves to the right, the more
electrical power is consumed.
Charge Zone - when the needle is in this
area, more electric energy is charged back
to your battery
Eco Zone - when the needle is in this area,
you are maximizing your range
Power Zone - when the needle is in this area,
you are using more power while reducing
overall range
Combination MeterDrive Modes
How to Read the Energy Level Gauge
Similar to a traditional gas powered vehicle’s fuel gauge, the Energy Level
Gauge in your Mitsubishi i indicates the remaining power in the main drive
battery.
When the Energy Level Gauge shows two bars remaining, the warning
indicator (A) flashes telling you your remaining battery charge is low.
When the Energy Level Gauge shows one bar remaining, the warning indicator
(A) and the charging bars (B) flash alternately telling you your remaining
battery charge is low. Recharge the main drive battery as soon as possible.
The Power Down Warning (Turtle) Light (C) illuminates when there are no bars
remaining. Recharge the main battery as soon as possible.
A
B
C
Page 6 of 20
4
Driving Range
The distance you can drive varies considerably depending on a variety of factors:
DRIVING YOUR MITSUBISHI i
What is Regenerative Braking?
When you take your foot off the accelerator while
driving, motion energy is converted into electric
energy using the motor as a power generator. During
this conversion, braking force is generated and
converted electric energy is used to charge the main
drive battery.
To maximize regenerative braking set the drive mode
selector lever to:
B (Regenerative Brake Mode) - for downhill driving
and strong regenerative braking
Eco - for economical or gentle downhill driving using
moderate regenerative braking.
What is the sound I’m hearing while my
Mitsubishi i is moving at very slow speeds?
This is the Acoustic Vehicle Alerting System (AVAS)
which sounds an audible warning from 0 to 22 miles
per hour to alert pedestrians of the approaching
electric vehicle.
The Mitsubishi i has a tested EPA combined range of 62 miles.
Page 7 of 20

5
Using the accelerator - drive smoothly, accelerate gently and
read the road ahead. Your real-time energy consumption
is displayed at the power meter. Try to keep the red needle
within the green Eco zone. When your foot is off the
accelerator or you are braking (regenerating energy), the red
needle should be in the blue Charge zone.
Freeway driving - use Eco mode and try to maintain a
consistent speed. The faster you go, the greater the energy
consumption and less overall range.
Uphill driving – use D mode and try to carry as much speed
(momentum) from the flat section of the road up the hill as
possible to avoid having to accelerate in the middle of the hill.
While decelerating - try to take your foot off the accelerator
as early as possible. The moment you take your foot off the
pedal, the vehicle will start regenerating electricity which is
especially effective while driving downhill in B mode.
Extending Your Driving Range
Shift position
Selecting the most suitable shift position will help extend your driving range.
D- is the standard mode and provides full power access and normal regenerative braking
Eco- slightly reduces overall power thus conserving energy and slightly increasing regenerative braking
B- provides full power with the strongest calibration of regenerative braking
DRIVING YOUR MITSUBISHI i
Page 8 of 20

6
Extending Your Driving Range
Seat Heater Switch
What Happens in Extreme Heat and Cold Conditions:
Use of Climate Control - while the Mitsubishi i is plugged in to a level 1 or 2 charger, use your MiEV Remote to
pre-heat, pre-cool, or defrost the cabin as much as possible. This will draw power from the outlet rather than
pulling energy from the main Mitsubishi i battery.
Use the more energy efficient seat heater instead of the cabin heater to keep warm while driving.
The MAX switch is effective for adjusting the cabin temperature quickly, however, it pulls a lot of energy. Once
the temperature is set to your liking, it is better to turn off the MAX switch to reduce unnecessary energy
consumption.
Warning - the headlights and wipers are operated by the 12 Volt battery and do not have a significant impact
on driving range. Please keep these safety features on while operating the Mitsubishi i when necessary.
The heated seat can be operated when the vehicle starter is
in the ON position.
The indicator light (A) will illuminate while the heater is on.
When the vehicle is driven in a low or high ambient temperature, its heater or air-conditioning performance may be reduced. The
use of the heater or air-conditioner can reduce the vehicle’s driving distance. Please refer to the General Information in the Owner’s
Manual, regarding cautions and actions to deal with intense heat and cold.
DRIVING YOUR MITSUBISHI i
1- Heater on
2- Heater off


2. T riple Diamond Delivery Checklist ( Customer Copy)
3. S alesperson or K ey Dea")

