Page 225 of 494

3-130 Features and controls
3
NOTE�A light in the instrument panel flashes to show when the
front and rear turn signal lights are working properly.
If this light flashes faster than usual, check for a burned
out lamp bulb or malfunctioning connection.
If the panel light does not come on when the lever is
moved, check for a blown fuse or a burned out bulb in the
panel.
Have the vehicle inspected by an authorized Mitsubishi
Motors dealer or a repair facility of your choice.
Hazard warning flasher switch
N00522700246
If you press the flasher switch, the front and rear turn signals
will flash intermittently, and so will the hazard warning lights.
This is an emergency warning system and should not be used
when the vehicle is in motion, except for emergencies.
If you need to leave your vehicle, the flashers will keep work-
ing after the ignition key is removed. NOTE�If you keep the flashers on for several hours with the
engine turned off, the battery will run down.
BK0132701US.book 130 ページ 2010年12月6日 月曜日 午後2時3分
Page 343 of 494

5-54 Comfort controls
5
To unlock locked channels
N00761700054
You can unlock one or all locked channels. Unlocking one or
more channels requires entry of the code.NOTE�The code is set to “1111” at the factory.
�It is possible to change the code to any desired number
using “CODE EDIT”.
1. If you wish to unlock a single desired channel, select the
channel you wish to unlock. (If you wish to unlock all
locked channels, it doesn’t matter which channel you
select.)
2. Push the AUDIO switch (6) for at least about two seconds
to select the MENU mode. Then select the LOCK setting
mode.
3. In the LOCK setting mode, turn the AUDIO switch (6) to
select “UN LOCK” if you wish to unlock a single desired
channel or “UN LOCK AL” if you wish to unlock all
locked channels.
4. Push the AUDIO switch (6). The code entry window will
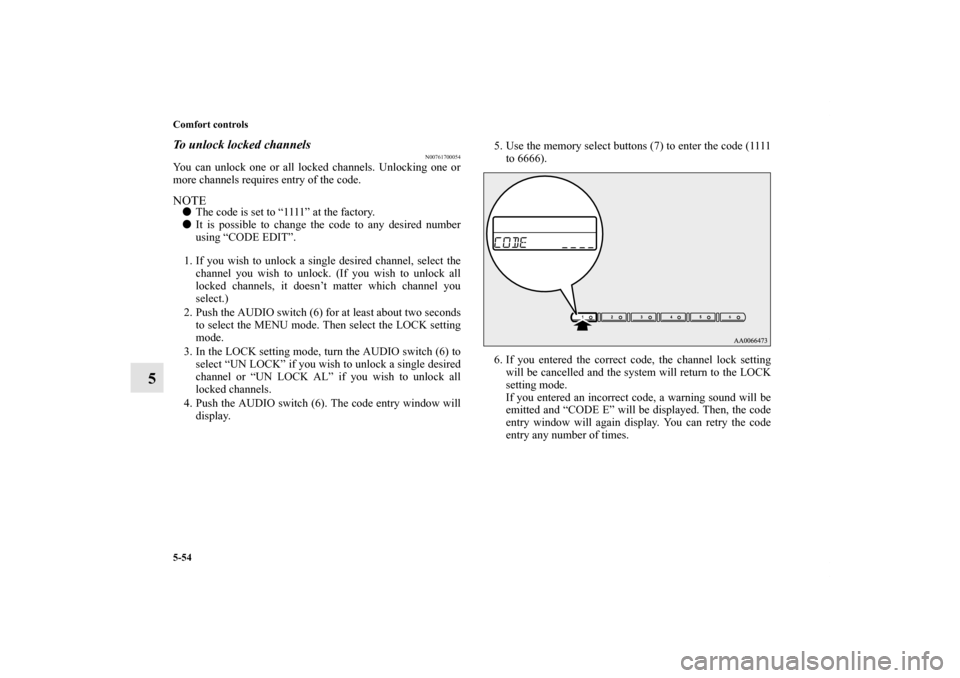
display.5. Use the memory select buttons (7) to enter the code (1111
to 6666).
6. If you entered the correct code, the channel lock setting
will be cancelled and the system will return to the LOCK
setting mode.
If you entered an incorrect code, a warning sound will be
emitted and “CODE E” will be displayed. Then, the code
entry window will again display. You can retry the code
entry any number of times.
BK0132701US.book 54 ページ 2010年12月6日 月曜日 午後2時3分
Page 344 of 494

Comfort controls
5-55
5
To change the lock cancellation code
N00761800055
It is possible to change the code for lock cancellation to any
desired number.
1. Push the AUDIO switch (6) for at least about 2 seconds to
select the MENU mode. Then select the LOCK setting
mode.
2. In the LOCK setting mode, turn the AUDIO switch (6) to
select “CODE EDIT”.
3. Push the AUDIO switch (6). The code entry window will
display.
4. Use the memory select buttons (7) to enter the current
code (the code prior to the change).
5. If you entered the correct code, the code entry window
will again be shown. Enter your desired code.
If you entered an incorrect code, a warning sound will be
emitted and “CODE E” will be displayed. Then, the code
entry window will again be shown. You can retry the code
entry any number of times.
6. After entering the new code, push the AUDIO switch (6).
The code entry window will again be shown for confirma-
tion. Enter the new code again, then push the AUDIO
switch (6).
7. The code will be changed, and the system will return to
the LOCK setting mode.NOTE�The code is stored in memory. If a battery cable is discon-
nected, such settings will be erased. (The code will return
to the “1111” that was set at the factory.)
To reset the lock cancellation code
N00761900030
In case you forget the code, it is possible to reset the code to the
“1111” that was set at the factory.
1. With the audio power OFF, push the PWR switch (1) and
AUDIO switch (6) simultaneously. The display will show
“CODE INITIAL”.
2. Push the AUDIO switch (6). The display will show
“YES”. If you wish to reset the code, push the AUDIO
switch (6) again. If you do not wish to reset the code, turn
the AUDIO switch (6) so the display shows “CANCEL”
and then push the AUDIO switch (6) again.
BK0132701US.book 55 ページ 2010年12月6日 月曜日 午後2時3分
Page 369 of 494

6-2 For emergencies
6If the vehicle breaks down
N00836300174
If your vehicle breaks down on the road, move to the shoulder
and turn on the hazard warning flashers. If there is no shoulder,
or the shoulder is not safe, drive in the right lane slowly, with
the hazard lights flashing, until you come to a safe stopping
place. Keep the flashers flashing. If the engine stops/fails If the engine stops, there will be no power assist to the steering
and brakes, making these difficult to use.
�The brake booster will not work, so the brakes will not
grip well. The brake pedal will be harder to press than
usual.
�Since there is no power steering assist, the steering wheel
will be hard to turn.When the engine fails at the intersection Get help from your passengers, bystanders, etc. to push the
vehicle and move it to a safe zone.
Jump-starting the engine
N00836400638
If the engine cannot be started because the battery is weak or
dead, you can start it with the battery from another vehicle
using jumper cables.
1. Take off any metal jewelry such as watch bands or brace-
lets that might make an accidental electrical contact.
2. Position the vehicles close enough together so that the
jumper cables can reach, but be sure the vehicles aren’t
touching each other.
WA R N I N G
!�When using jumper cables to start a vehicle, follow
the procedures and be very cautious.
CAUTION
!�Do not try to start your vehicle by pushing or tow-
ing. Vehicles with automatic transaxles cannot be
started this way. Pushing or towing a vehicle that
has a manual transaxle may overheat and damage
the catalytic converter. Also, there is more risk of an
accident when a vehicle is being pushed or towed.
CAUTION
!�Check the other vehicle. It must have a 12-volt bat-
tery. If the other system isn’t 12-volt, both systems
can be damaged.
BK0132701US.book 2 ページ 2010年12月6日 月曜日 午後2時3分
Page 372 of 494

For emergencies
6-5
6
8. After the engine is started, disconnect the cables in the
reverse order from the way you connected them.
As your vehicle has anti-lock brakesIf you drive your vehicle with a low battery charge, after the
engine has been started by using jumper cables, the engine may
misfire. This can cause the anti-lock braking system warning
light to blink on and off. This is only due to the low battery
voltage. It is not a problem with the brake system. If this hap-
pens, fully charge the battery and ensure the charging system is
operating properly.
WA R N I N G
!�Charging your battery while it is still in your vehicle
might cause the battery to catch fire and explode. If
you have to charge it while in the vehicle, disconnect
the negative terminal. �Keep sparks, cigarettes and flames away from the
battery because the battery may explode.�Keep your work area well vented when charging or
using the battery in an enclosed space. �Remove all the caps before charging the battery. �Electrolyte (battery acid) is corrosive diluted sul-
phuric acid. If electrolyte comes in contact with your
hands, eyes, clothes, or the painted surface of your
vehicle, thoroughly flush with water. If electrolyte
gets in your eyes, flush them immediately and thor-
oughly with water, and get prompt medical atten-
tion.�Always wear protective clothing and goggles when
working near the battery.�Keep the battery out of the reach of children.
BK0132701US.book 5 ページ 2010年12月6日 月曜日 午後2時3分
Page 376 of 494

For emergencies
6-9
6
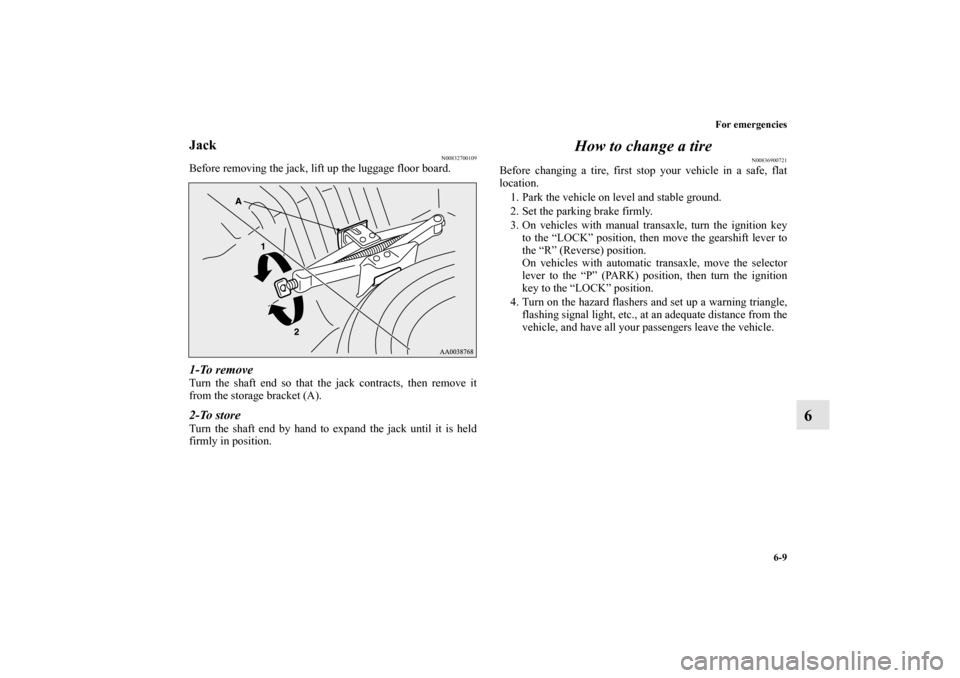
Jack
N00832700109
Before removing the jack, lift up the luggage floor board.1-To removeTurn the shaft end so that the jack contracts, then remove it
from the storage bracket (A).2-To storeTurn the shaft end by hand to expand the jack until it is held
firmly in position.
How to change a tire
N00836900721
Before changing a tire, first stop your vehicle in a safe, flat
location.
1. Park the vehicle on level and stable ground.
2. Set the parking brake firmly.
3. On vehicles with manual transaxle, turn the ignition key
to the “LOCK” position, then move the gearshift lever to
the “R” (Reverse) position.
On vehicles with automatic transaxle, move the selector
lever to the “P” (PARK) position, then turn the ignition
key to the “LOCK” position.
4. Turn on the hazard flashers and set up a warning triangle,
flashing signal light, etc., at an adequate distance from the
vehicle, and have all your passengers leave the vehicle.
BK0132701US.book 9 ページ 2010年12月6日 月曜日 午後2時3分
Page 406 of 494

Vehicle care and maintenance
7-15
7 Brake fluid/Clutch fluid
(if so equipped)
N00938700229
The brake fluid and the clutch fluid share the reservoir tank.To check the fluid levelThe fluid level must be between the “MAX” and “MIN” marks
on the reservoir.
The fluid level is monitored by a float. When the brake fluid
level falls below the “MIN” mark, the brake fluid warning
lamp lights up.
The fluid level falls slightly with wear of the brake pads, but
this does not indicate any abnormality.
The fluid in the master cylinder should be checked when doing
other work under the engine hood. The brake system should
also be checked for leaks at the same time.If the fluid level falls markedly in a short length of time, it indi-
cates leaks from the brake system.
If this occurs, have the vehicle checked by an authorized
Mitsubishi Motors dealer or a repair facility of your choice.
Fluid typeUse the brake fluid conforming to DOT 3 or DOT 4. The reser-
voir cap must be tightly sealed to keep dirt and water out.
CAUTION
!�Do not let any petroleum-based fluid touch, mix
with, or get into the brake fluid. This will damage
the seals.�Be careful when handling brake fluid. It can damage
painted surfaces.�Use only the listed brake fluid. Different brands of
brake fluid have different additives, and these can
cause a chemical reaction. Do not mix brands of
brake fluid.�Keep the reservoir tank cap closed to keep the brake
fluid from evaporating.
BK0132701US.book 15 ページ 2010年12月6日 月曜日 午後2時3分
Page 434 of 494

Vehicle care and maintenance
7-43
7
No.
Symbol
Electrical system
Capacity
1 Fuse (+B)
80 A*
1
2 Radiator fan motor30 A*
2,
50 A*3
3 Anti-lock braking system
60 A*
1
4 Ignition switch
40 A*1
5 Power window control
30 A*1
6 Front fog lights 15 A
7 Heated seat 20 A
8 Horn 15 A
9 Engine control 20 A
10 Air conditioning 10 A
11 Stop lights 7.5 A
12 Audio 30 A
13 Alternator 7.5 A
14 Hazard warning flasher 10 A
15 Automatic transaxle 20 A
16 Headlight high beam (right) 10 A
17 Headlight high beam (left) 10 A
18 Headlight low beam (right)10 A*4,
20 A*5
19 Headlight low beam (left)10 A*
4,
20 A*5
20 Position light (right) 7.5 A
21 Position light (left) 7.5 A
22 Dome light 10 A
23 Radio 15 A
24
Fuel pump 15 A
25 Windshield wiper 30 A
26 Electric convertible top
40 A*
1
*1:Fusible link
*2:Fusible link (2.4 liter models)
*3:Fusible link (3.8 liter models)
*4:Except for vehicles with high intensity discharge headlights
*5:Vehicles with high intensity discharge headlightsNo.
Symbol
Electrical system
Capacity
BK0132701US.book 43 ページ 2010年12月6日 月曜日 午後2時3分