2012 MINI COUPE ROADSTER CONVERTIBLE steering wheel
[x] Cancel search: steering wheelPage 187 of 283
COMMUNICATIONSMobile phone preparation Bluetooth
186
Rejecting a call
"Reject"
The caller is redirected to the mailbox if it has
been activated.
Ending a call
Press the button on the steering wheel
or
1. "Telephone"
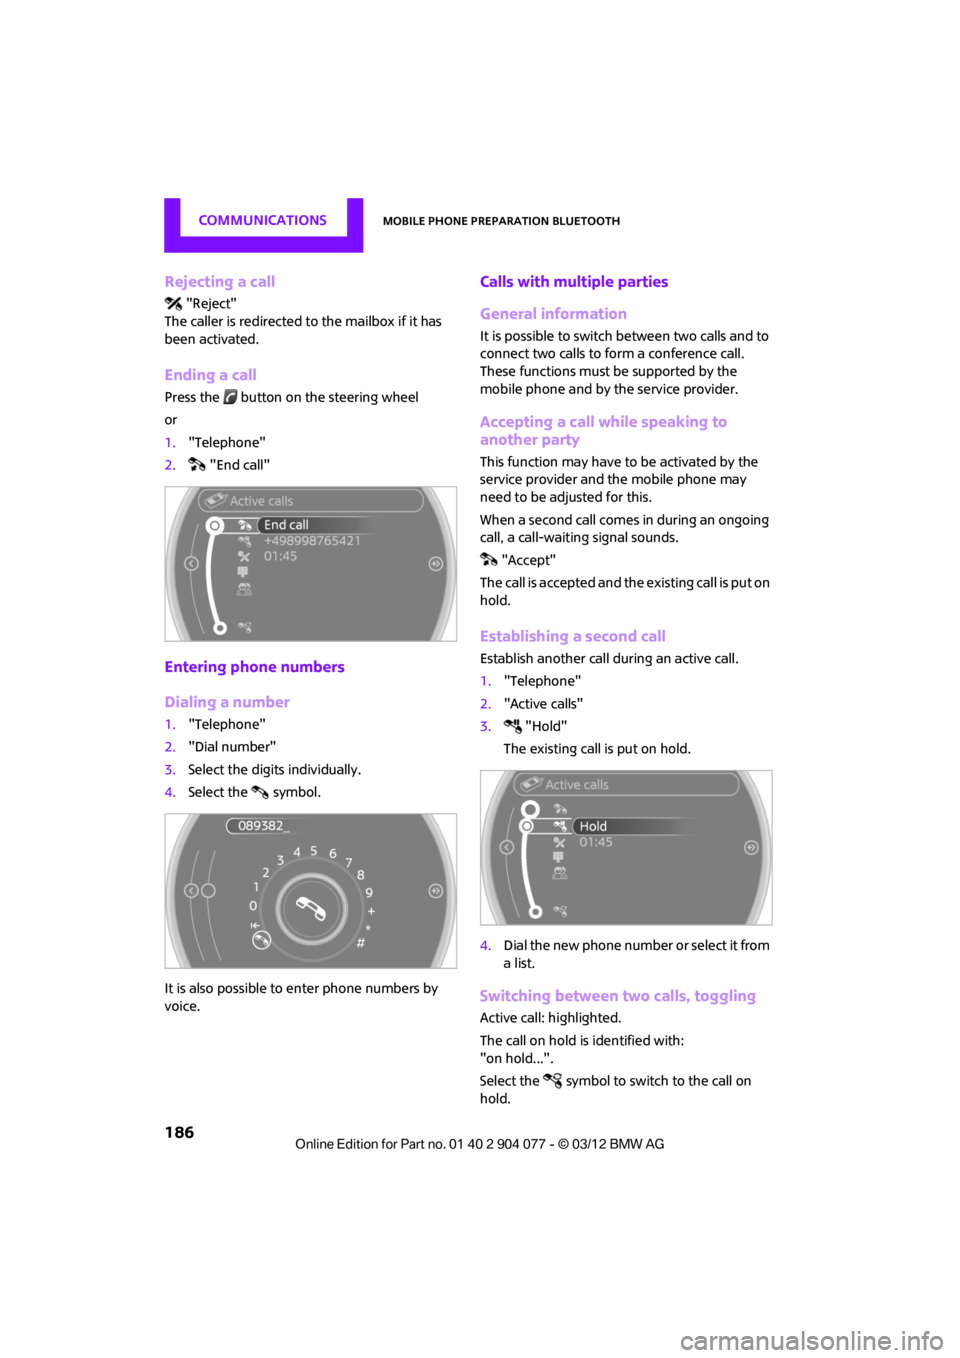
2. "End call"
Entering phone numbers
Dialing a number
1."Telephone"
2. "Dial number"
3. Select the digits individually.
4. Select the symbol.
It is also possible to enter phone numbers by
voice.
Calls with mult iple parties
General information
It is possible to switch between two calls and to
connect two calls to form a conference call.
These functions must be supported by the
mobile phone and by the service provider.
Accepting a call while speaking to
another party
This function may have to be activated by the
service provider and the mobile phone may
need to be adjusted for this.
When a second call comes in during an ongoing
call, a call-waiting signal sounds. "Accept"
The call is accepted and the existing call is put on
hold.
Establishing a second call
Establish another call during an active call.
1. "Telephone"
2. "Active calls"
3. "Hold"
The existing call is put on hold.
4. Dial the new phone number or select it from
a list.
Switching between two calls, toggling
Active call: highlighted.
The call on hold is identified with:
"on hold...".
Select the symbol to switch to the call on
hold.
00320051004F004C00510048000300280047004C0057004C005200510003
Page 190 of 283
Mobile phone preparation BluetoothCOMMUNICATIONS
189
Deleting a single entry or all entries
Deleting entries depends upon the mobile
phone.
1.Highlight the entry.
2. Open "Options".
3. "Delete entry" or "Delete list".
Saving an entry in the contacts
1.Highlight the entry.
2. Open "Options".
3. "Store as new contact" or "Add to existing
contact".
4. Select the type of number: "Home",
"Business", "Mobile" or "Other".
5. Complete the entries if necessary.
6. "Store contact" if necessary
Hands-free system
General information
Calls being conducted using the hands-free sys-
tem can be continued using the mobile phone
and vice versa.
From the mobile phone to the hands-
free system
Calls that have been initiated from outside the
Bluetooth range of the vehicle can be continued
using the hands-free system if the ignition is
switched on.
Depending on the mobile phone, the call is
automatically switched to hands-free mode.
If the switch does not occur automatically, then
follow the instructions that appear on the
display of the mobile phone, also refer to the
Owner's Manual for the mobile phone.
From hands-free system to mobile
phone
Calls being conducted using the hands-free
system can also be continued using the mobile
phone if so desired, depending on the mobile
phone. At this point, follow the
instructions that appear
on the display of the mobile phone, also refer to
the Owner's Manual for the mobile phone.
Operation by voice
Equipped with voice activation system: opera-
tion, refer to page 23. For the list with the short
commands, refer to page 260, does not apply
for this type of voice operation.
Equipped without voice activation system:
Depending upon the equipment, the mobile
phone can be voice-operated as described
below.
The concept
> The mobile phone can be operated without
removing your hand from the steering
wheel.
> In many cases, the entry process is
supported by means of announcements or
questions.
> {...} Verbal instructions to use with the voice
operation system.
> {{...}} Identifies the answers generated by
the voice operation system.
Voice commands
Activating voice activation system
1. Briefly press the button on the steering
wheel.
2. Say the command.
Finishing voice input
Press the button on the steering wheel
briefly
or
{Cancel }.
00320051004F004C00510048000300280047004C0057004C005200510003
Page 191 of 283
COMMUNICATIONSMobile phone preparation Bluetooth
190
Possible commands
Having possible commands read aloud
Press the button on the steering wheel.
Possible commands are read aloud.
Each digit can be spoken individually or com-
bined into a sequence to accelerate the entry
process.
Using alternative commands
There are often a number of commands to run a
function, e.g.:
Example: dialing phone numbers
1. Briefly press the button on the steering
wheel.
2. {Dial number}
3. The system replies: {{Please say the
number. }}
4. For example: {123 456 7890 }
5. The system replies: {{123 456 7890.
Continue? }}
6. {Dial }
System replies: {{Dialing number. }}
Calling
Dialing phone numbers
The connection to the desired subscriber is
established.
Correcting phone number
Digit sequences can be deleted after the system
has repeated the digits.
The command can be repeated as often as
necessary.
Deleting phone number
All digits entered up to this point are deleted.
Redialing
Voice phone book
Depending on how your vehicle is equipped, it
may be necessary to create your own voice
phone book.
The entries must be entered by voice and are
independent of the mobile phone's memory. Up
to 50 entries can be set up.
Storing the entry
Deleting the entry
Deleting all entries
Reading and selecting the entries
{Help }.
{ Dial name } or {Name }.
1. {Dial number}.
2. Say the phone number.
3. {Dial }.
{ Correct number }.
{Delete} .
{ Redial }.
1. {Save name }.
2. Say the name aloud. Do not exceed a
speaking duration of about 2 seconds.
3. Say the phone number after being
prompted to do so by the system.
4. {Save }.
1. {Delete name }.
2. Say the name when prompted.
3. Confirm prompt with {Yes }.
1. {Delete phonebook }.
The dialog for deleting phone book is
opened.
2. Confirm prompt with {Yes }.
3. Confirm repeated prompt with {Yes }.
1. {Read phonebook }.
The dialog for reading phone book is
opened.
2. {Dial number } when the desired entry is
read aloud.
00320051004F004C00510048000300280047004C0057004C005200510003
Page 203 of 283
COMMUNICATIONSMINI Connected
202
Connecting via the snap-in adapter
The mobile phone can also be connected using
the snap-in adapter, refer to page191.
Using MINI Connected
After successful connection of the mobile phone
to the vehicle and activation of MINI Connected,
the applications are di splayed on the Control
Display and can be operated using the MINI
joystick.
Volume adjustments can be made using the
buttons on the steering wheel, refer to page 10,
or using the volume control knob on the radio,
refer to page 147.
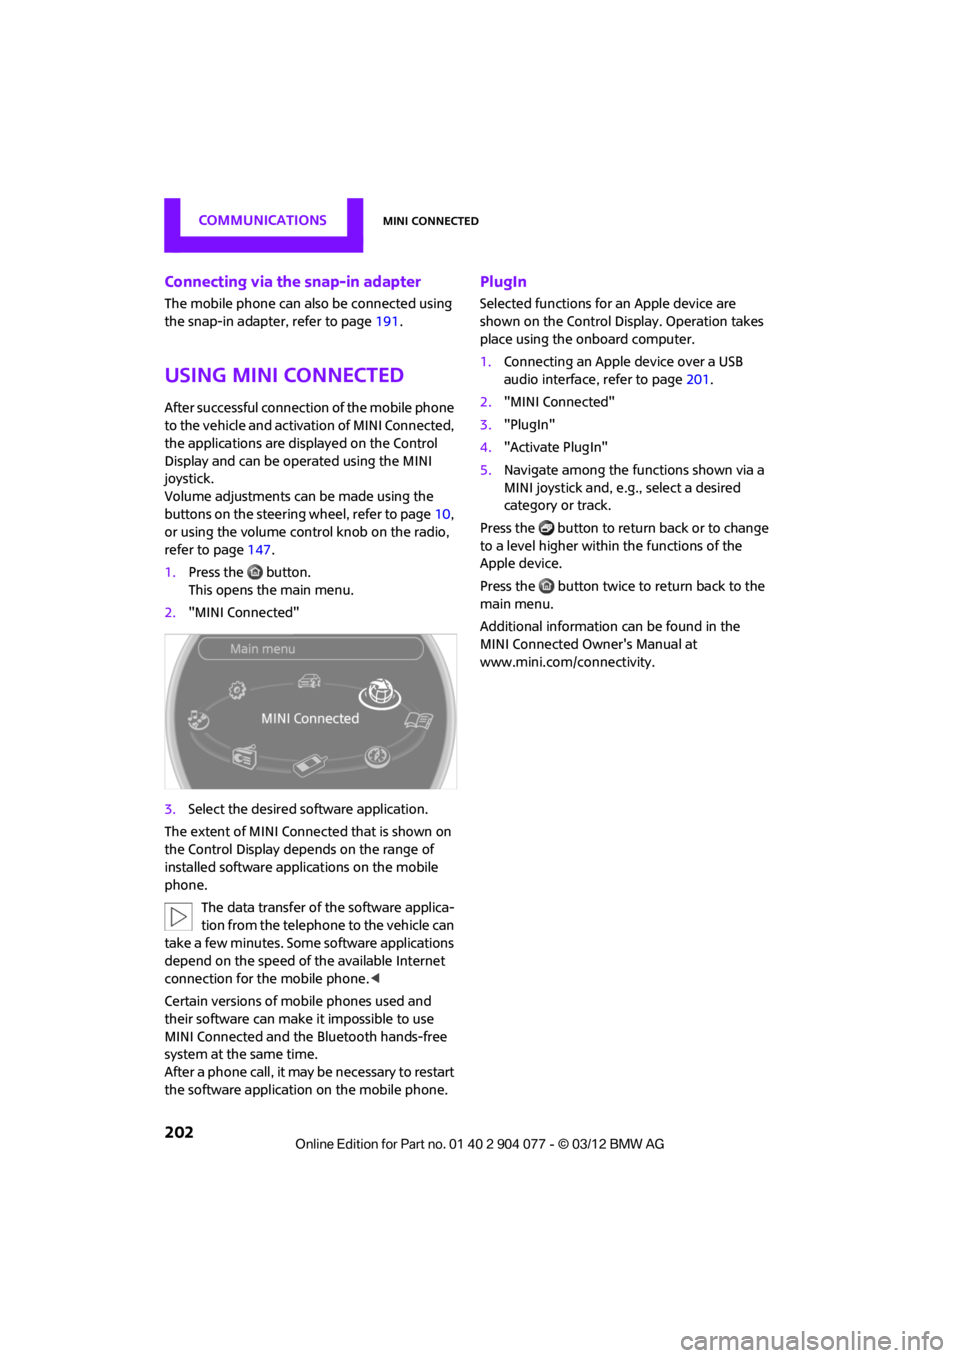
1. Press the button.
This opens the main menu.
2. "MINI Connected"
3. Select the desired so ftware application.
The extent of MINI Connected that is shown on
the Control Display depends on the range of
installed software applic ations on the mobile
phone.
The data transfer of the software applica-
tion from the telephone to the vehicle can
take a few minutes. Some software applications
depend on the speed of the available Internet
connection for the mobile phone. <
Certain versions of mobile phones used and
their software can make it impossible to use
MINI Connected and the Bluetooth hands-free
system at the same time.
After a phone call, it may be necessary to restart
the software application on the mobile phone.
PlugIn
Selected functions for an Apple device are
shown on the Control Display. Operation takes
place using the onboard computer.
1. Connecting an Apple device over a USB
audio interface, refer to page 201.
2. "MINI Connected"
3. "PlugIn"
4. "Activate PlugIn"
5. Navigate among the functions shown via a
MINI joystick and, e. g., select a desired
category or track.
Press the button to return back or to change
to a level higher within the functions of the
Apple device.
Press the button twice to return back to the
main menu.
Additional information can be found in the
MINI Connected Owner's Manual at
www.mini.com/c onnectivity.
00320051004F004C00510048000300280047004C0057004C005200510003
Page 238 of 283
Replacing componentsMOBILITY
237
Repairing a flat tire
Safety measures in the event of a
breakdown:
Park the vehicle as far as possible from moving
traffic and switch on the hazard warning
flashers.
Turn the steering wheel until the front wheels
are in the straight-ahead position and engage
the steering wheel lock. Engage the parking
brake and shift into 1st or reverse gear or place
the selector lever in position P.
All passengers should be outside the vehicle and
in a safe place, e.g. behind a guardrail.
Erect a warning triangle or warning flasher at the
appropriate distance if necessary. Comply with
all safety guidelines and regulations. <
In the event of a flat tire, different procedures
should be followed depending on the equip-
ment included in your vehicle:
> MINI Mobility Kit, refer to the following
section
> Run-flat tires, page 239
> Tire change with space-saver spare tire,
page 239
MINI Mobility Kit
Preparations
Use of the MINI Mobility Kit may be ineffective if
the tire puncture meas ures approx. 1/8 in/4 mm
or more. Contact the nearest MINI dealer if
the tire cannot be made drivable with the
Mobility Kit.
Do not remove foreign bodies which have
penetrated the tire if possible.
Follow the instructions on using the
Mobility Kit found on the compressor and
the sealant bottle. <
Remove the adhesive label for the speed limit
from the sealant bottle and affix it to the steer-
ing wheel.
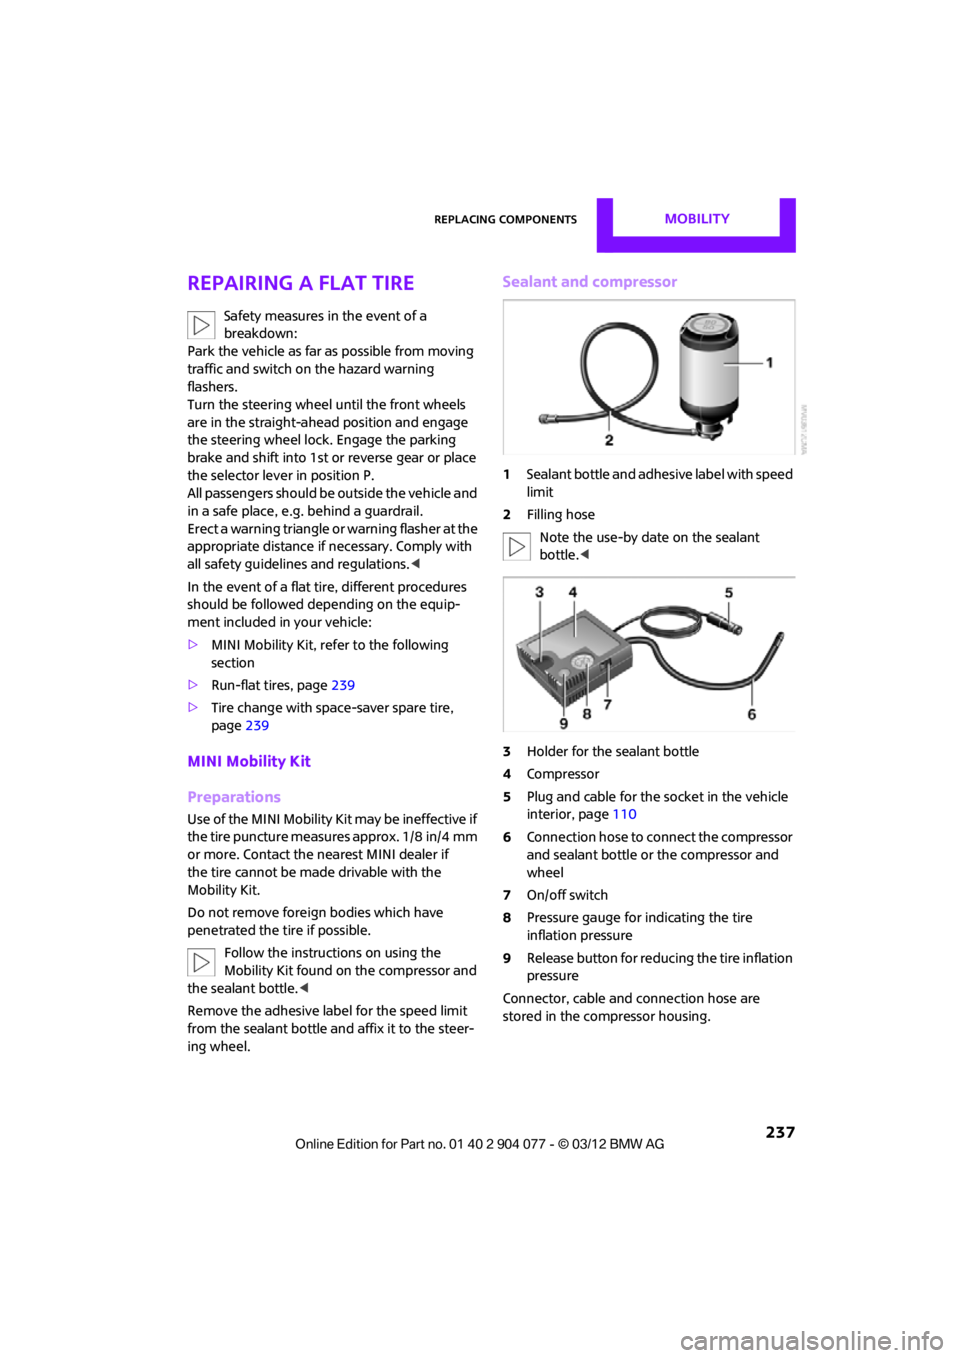
Sealant and compressor
1 Sealant bottle and adhesi ve label with speed
limit
2 Filling hose
Note the use-by date on the sealant
bottle. <
3 Holder for the sealant bottle
4 Compressor
5 Plug and cable for the socket in the vehicle
interior, page 110
6 Connection hose to connect the compressor
and sealant bottle or the compressor and
wheel
7 On/off switch
8 Pressure gauge for indicating the tire
inflation pressure
9 Release button for reduci ng the tire inflation
pressure
Connector, cable and connection hose are
stored in the compressor housing.
00320051004F004C00510048000300280047004C0057004C005200510003
Page 241 of 283
MOBILITYReplacing components
240
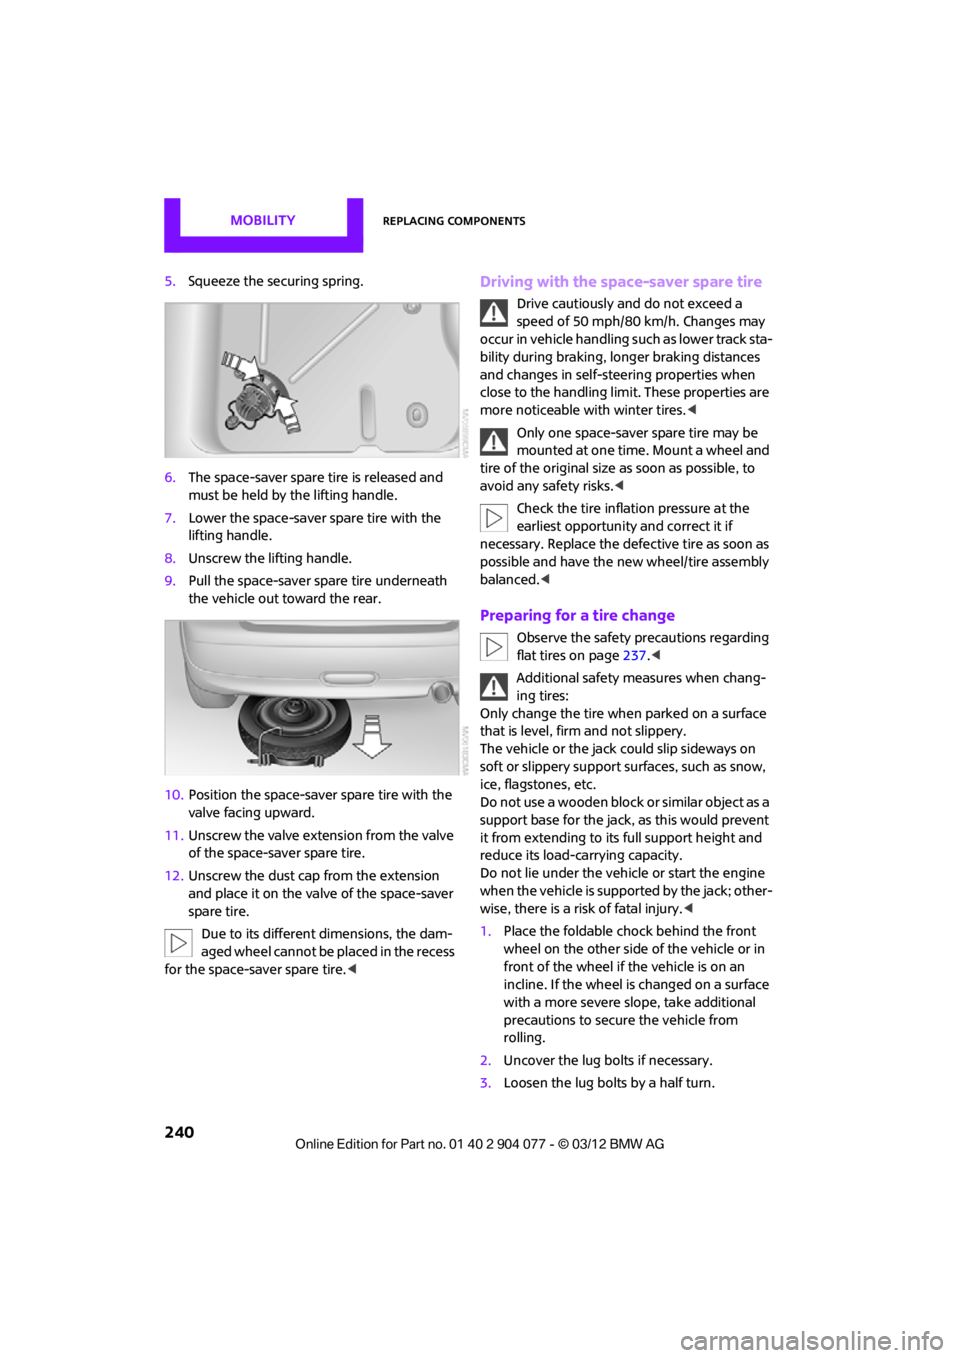
5.Squeeze the securing spring.
6. The space-saver spare tire is released and
must be held by the lifting handle.
7. Lower the space-saver spare tire with the
lifting handle.
8. Unscrew the lifting handle.
9. Pull the space-saver spare tire underneath
the vehicle out toward the rear.
10. Position the space-save r spare tire with the
valve facing upward.
11. Unscrew the valve extension from the valve
of the space-saver spare tire.
12. Unscrew the dust cap from the extension
and place it on the valve of the space-saver
spare tire.
Due to its different dimensions, the dam-
aged wheel cannot be placed in the recess
for the space-saver spare tire.
speed of 50 mph/80 km/h. Changes may
occur in vehicle handling such as lower track sta-
bility during braking, longer braking distances
and changes in self-steering properties when
close to the handling limit. These properties are
more noticeable with winter tires. <
Only one space-saver spare tire may be
mounted at one time. Mount a wheel and
tire of the original size as soon as possible, to
avoid any safety risks. <
Check the tire inflation pressure at the
earliest opportunity and correct it if
necessary. Replace the defe ctive tire as soon as
possible and have the ne w wheel/tire assembly
balanced. <
Preparing for a tire change
Observe the safety precautions regarding
flat tires on page 237.<
Additional safety measures when chang-
ing tires:
Only change the tire wh en parked on a surface
that is level, firm and not slippery.
The vehicle or the jack could slip sideways on
soft or slippery support surfaces, such as snow,
ice, flagstones, etc.
Do not use a wooden block or similar object as a
support base for the jack, as this would prevent
it from extending to its full support height and
reduce its load-carrying capacity.
Do not lie under the vehicle or start the engine
when the vehicle is supported by the jack; other-
wise, there is a risk of fatal injury. <
1. Place the foldable chock behind the front
wheel on the other side of the vehicle or in
front of the wheel if the vehicle is on an
incline. If the wheel is changed on a surface
with a more severe sl ope, take additional
precautions to secure the vehicle from
rolling.
2. Uncover the lug bolts if necessary.
3. Loosen the lug bolts by a half turn.
00320051004F004C00510048000300280047004C0057004C005200510003
Page 246 of 283
Giving and receiving assistanceMOBILITY
245
Using a tow fitting
The screw-in tow fitting must always be carried
in the car. It can be screwed in at the front or
rear of the MINI.
It is stored in the toolkit in the cargo area
underneath the cover on the right-hand side,
page231.
Use only the tow fitting provided with the
vehicle and screw it all the way in. Use the
tow fitting for towing on paved roads only. Avoid
lateral loading of the tow fitting, e.g. do not lift
the vehicle by the tow fitting. Otherwise, the tow
fitting and the vehicle could be damaged. <
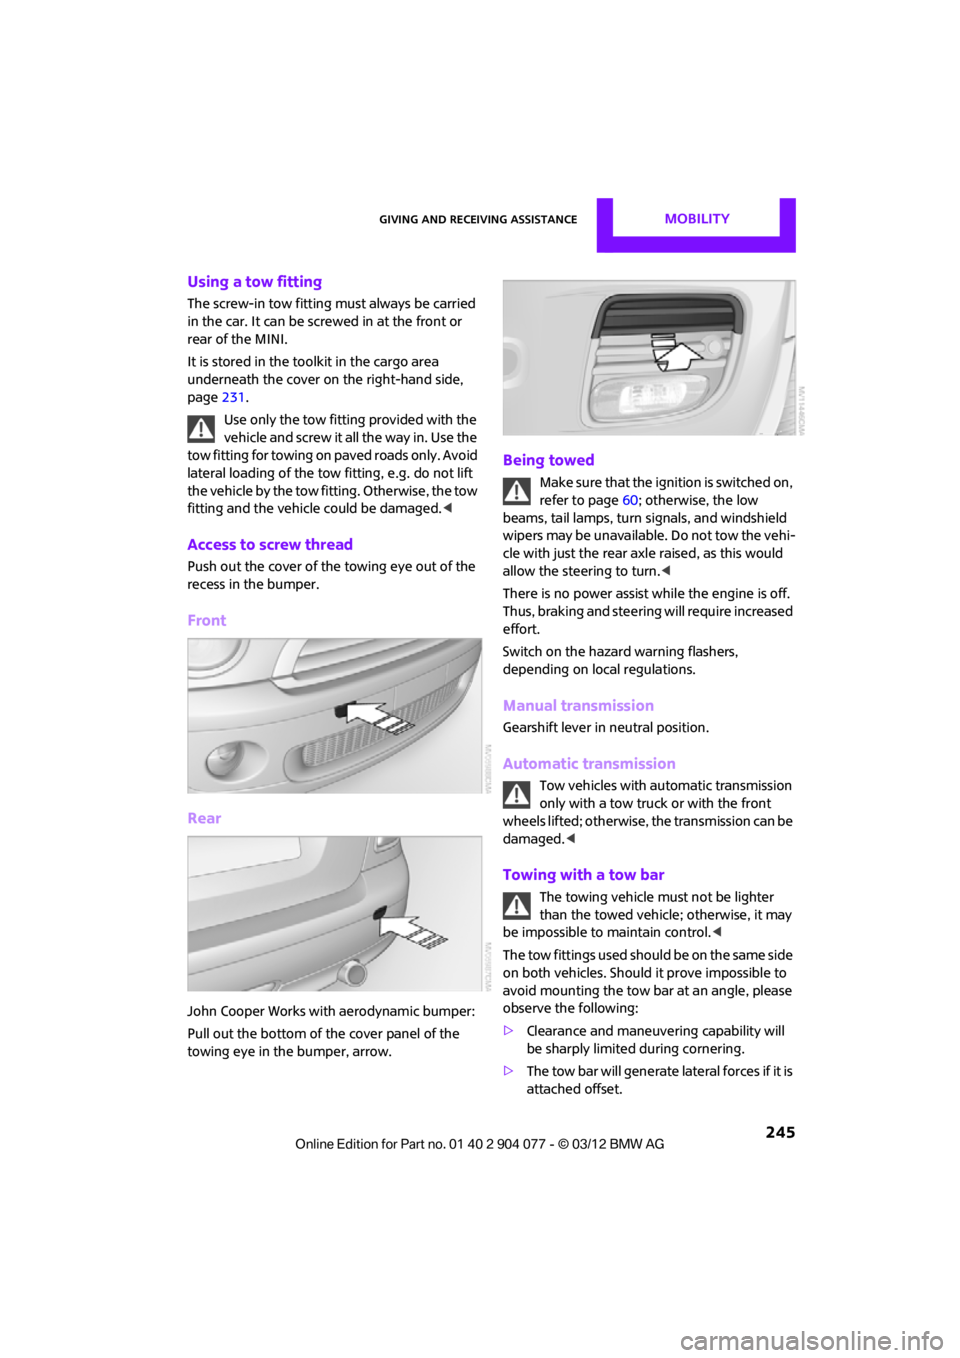
Access to screw thread
Push out the cover of the towing eye out of the
recess in the bumper.
Front
Rear
John Cooper Works with aerodynamic bumper:
Pull out the bottom of the cover panel of the
towing eye in the bumper, arrow.
Being towed
Make sure that the ignition is switched on,
refer to page60; otherwise, the low
beams, tail lamps, turn signals, and windshield
wipers may be unavailable. Do not tow the vehi-
cle with just the rear ax le raised, as this would
allow the steering to turn. <
There is no power assist while the engine is off.
Thus, braking and steering will require increased
effort.
Switch on the hazard warning flashers,
depending on local regulations.
Manual transmission
Gearshift lever in neutral position.
Automatic transmission
Tow vehicles with automatic transmission
only with a tow truck or with the front
wheels lifted; otherwise, the transmission can be
damaged. <
Towing with a tow bar
The towing vehicle must not be lighter
than the towed vehicle; otherwise, it may
be impossible to maintain control. <
The tow fittings used should be on the same side
on both vehicles. Should it prove impossible to
avoid mounting the tow bar at an angle, please
observe the following:
> Clearance and maneuvering capability will
be sharply limited during cornering.
> The tow bar will generate lateral forces if it is
attached offset.
00320051004F004C00510048000300280047004C0057004C005200510003
Page 270 of 283
Everything from A to ZREFERENCE
269
Average fuel consumption72
– setting the units 74
Average speed 72
Avoiding highways for
navigation 135
Axle loads, refer to Weights 257
B
Background ligh ting, refer to
Ambient lighting 100
Backrests, refer to Seats 51
Backup lamps
– replacing bulb 235
Band-aids, refer to First aid
pouch 243
Bar, refer to Tow-starting, towing away 245
Base plate for telephone or mobile phone
– refer to Snap-in adapter 191
Bass sounds, refer to Tone control 147
Battery 241
– disposal 38,242
– jump-starting 243
– temporary power failure 242
Battery renewal
– remote control 38
Being towed 245
Belts, refer to Safety belts 53
Belt tensioner, refer to Safety
belts 53
Beverage holders, refer to Cupholders 109
Black ice, refer to External temperature warning 71
Blower, refer to Air flow
rate 102,104
Bluetooth, activating/ deactivating 171,181 Bluetooth audio
163
– device pairing 163
– disconnecting an audio connection 165
– playback 164
– unpairing device 165
– what to do if... 166
Bottle holders, refer to Cupholders 109
Brake Assist 83
Brake fluid, refer to Service requirements 75
Brake lamps
– replacing bulbs 235
Brake pads, breaking in 114
Brake rotors 116
– brakes 114
– breaking in 114
Brakes
– ABS 83
– breaking in 114
– MINI Maintenance
System 225
– parking brake 62
– service requirements 75
Br akes,
refer to Braking
safely 115
Brake system 114
– breaking in 114
– disc brakes 116
– MINI Maintenance System 225
Breakdown service, refer to
Roadside Assistance 243
Breaking in the clutch 114
Break-in period 114
Bulb changing, refer to Lamps and bulbs 232
Button for starting the
engine 60
Buttons on the steering wheel 11
C
Calendar 197
– displaying appointment 197
– selecting calendar day 197
California Proposition 65 warning 5
Call
– accepting 173,185
– ending 174,186
– muting the microphone 187
Calling, refer to Phone numbers, dialing 174,186
Calling, refer to Telephone 108
Can holders, refer to Cupholders 109
Capacities 259
Car battery, refer to Vehicle battery 241
Car care 227
Care 227
– car-care products 227
– car washes 227
– CD/DVD drives 230
– high-pressure washers 228
– leather 230
– manual washing 228
– upholstery and fabrics 229
– windows 228
– wiper blades 228
Cargo, securing 119
Cargo area 116
– capacity 257
– Comfort Access 37
– lamp 99
– opening from outside 33
Cargo area lamp 99
Cargo area lid, refer to Tailgate 33
Cargo loading 118
– securing cargo 119
– stowing cargo 119
– vehicle 116
Car key, refer to Keys/remote controls 28
00320051004F004C00510048000300280047004C0057004C005200510003