2012 MINI COUPE ROADSTER CONVERTIBLE steering
[x] Cancel search: steeringPage 69 of 283

CONTROLSDriving
68
Cruise control
The concept
Cruise control is available at vehicle speeds of at
least approx. 20 mph or 30 km/h. The car then
stores and maintains the speed that you specify
using the button on the steering wheel.Do not use cruise control when driving at
constant speed is prevented by adverse
conditions, e.g. winding roads, dense traffic or
poor road conditions due to, e.g. snow, rain, ice
or loose surfaces. Otherwise, you could lose con-
trol of the vehicle and cause an accident as a
result. <
Activating
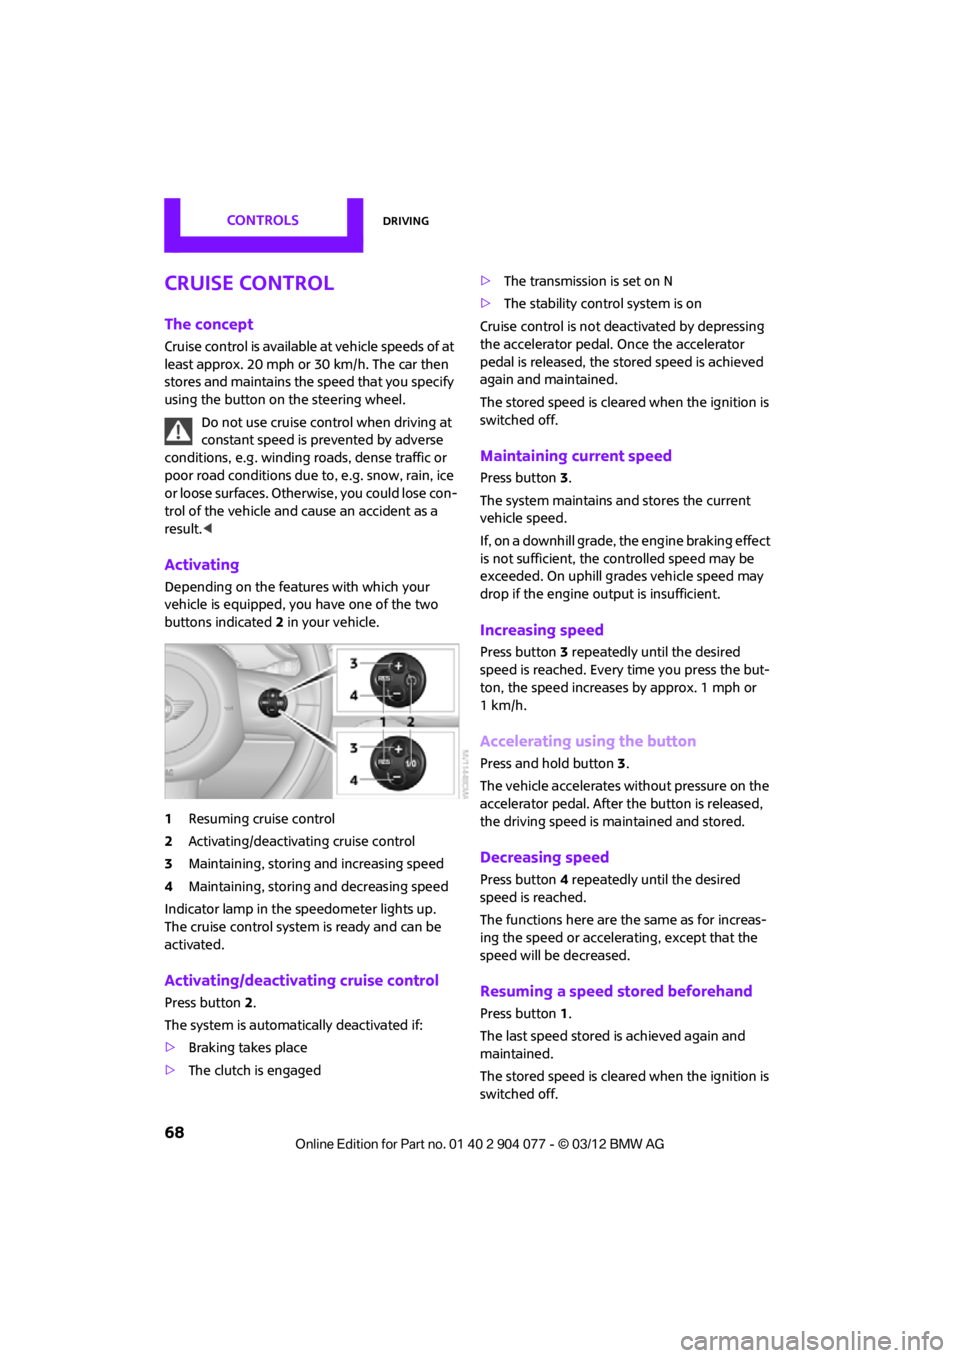
Depending on the features with which your
vehicle is equipped, you have one of the two
buttons indicated 2 in your vehicle.
1 Resuming cruise control
2 Activating/deactivating cruise control
3 Maintaining, storing and increasing speed
4 Maintaining, storing and decreasing speed
Indicator lamp in the speedometer lights up.
The cruise control system is ready and can be
activated.
Activating/deactivating cruise control
Press button 2.
The system is automati cally deactivated if:
> Braking takes place
> The clutch is engaged >
The transmission is set on N
> The stability control system is on
Cruise control is not deactivated by depressing
the accelerator pedal. Once the accelerator
pedal is released, the stored speed is achieved
again and maintained.
The stored speed is cleared when the ignition is
switched off.
Maintaining current speed
Press button 3.
The system maintains and stores the current
vehicle speed.
If, on a downhill grade, the engine braking effect
is not sufficient, the controlled speed may be
exceeded. On uphill grades vehicle speed may
drop if the engine output is insufficient.
Increasing speed
Press button 3 repeatedly until the desired
speed is reached. Every time you press the but-
ton, the speed increases by approx. 1 mph or
1km/h.
Accelerating using the button
Press and hold button 3.
The vehicle accelerates without pressure on the
accelerator pedal. After the button is released,
the driving speed is maintained and stored.
Decreasing speed
Press button 4 repeatedly until the desired
speed is reached.
The functions here are the same as for increas-
ing the speed or accelerating, except that the
speed will be decreased.
Resuming a speed stored beforehand
Press button 1.
The last speed stored is achieved again and
maintained.
The stored speed is cleared when the ignition is
switched off.
00320051004F004C00510048000300280047004C0057004C005200510003
Page 84 of 283

Technology for driving comfort and safetyCONTROLS
83
enter the sensors' blind spots before or after a
continuous audible signal is given. Higher, pro-
truding objects, such as wall ledges, may not be
detectable. Therefore, always drive cautiously;
otherwise, there is a risk of personal injury or
property damage. Loud sound sources outside
or inside the car can drown out the PDC signal. <
Driving stability control
systems
Your MINI has a number of systems that help to
maintain the vehicle's st ability even in adverse
driving conditions.
The laws of physics cannot be repealed,
even with driving stability control systems.
An appropriate driving style always remains the
responsibility of the driver. Therefore do not
reduce the additional safety margin by engaging
in hazardous driving thereby running the risk of
an accident. <
Antilock Brake System ABS
ABS prevents locking of the wheels during
braking. Safe steering response is maintained
even during full braking. Active safety is thus
increased.
Braking safely, refer to page 115.
ABS is operational every time you start the
engine.
Cornering Brake Control CBC
Driving stability and steering characteristics
are further enhanced while braking in turns or
during a lane change.
Electronic brake-forc e distribution EBV
The system controls the brake pressure in the
rear wheels to ensure stable braking behavior.
Brake Assist
Rapidly depressing the brake causes this system
to automatically develop maximum braking
force. Thus, the system helps keep braking
distance to a minimum. At the same time, all the
benefits provided by ABS are exploited.
Do not reduce the pressure on the brake for the
duration of the full braking application.
Dynamic Stability Control DSC
The concept
DSC prevents the driving wheels from losing
traction when you pull away from rest or
accelerate.
DSC also detects unstable driving conditions
such as when the vehicle' s rear end fishtails or
the vehicle is sliding on its front wheels. In these
cases, DSC helps the vehicle maintain a safe
course within physical limits by reducing engine
output and through br aking actions at the
individual wheels.
Every time that the engine is started, DSC is
ready to operate.
Deactivating DSC
Press the button until the DSC OFF indicator
lamp on the speedometer is on and DSC OFF is
displayed on the tachometer. DSC is deacti-
vated. Stabilizing and propulsion promoting
actions are no longer executed.
When driving with snow chains or to 'rock free'
in snow, it can be helpfu l to switch off DSC for a
brief period.
To increase vehicle stability, activate DSC again
as soon as possible.
00320051004F004C00510048000300280047004C0057004C005200510003
Page 86 of 283

Technology for driving comfort and safetyCONTROLS
85
Deactivating both DTC and DSC
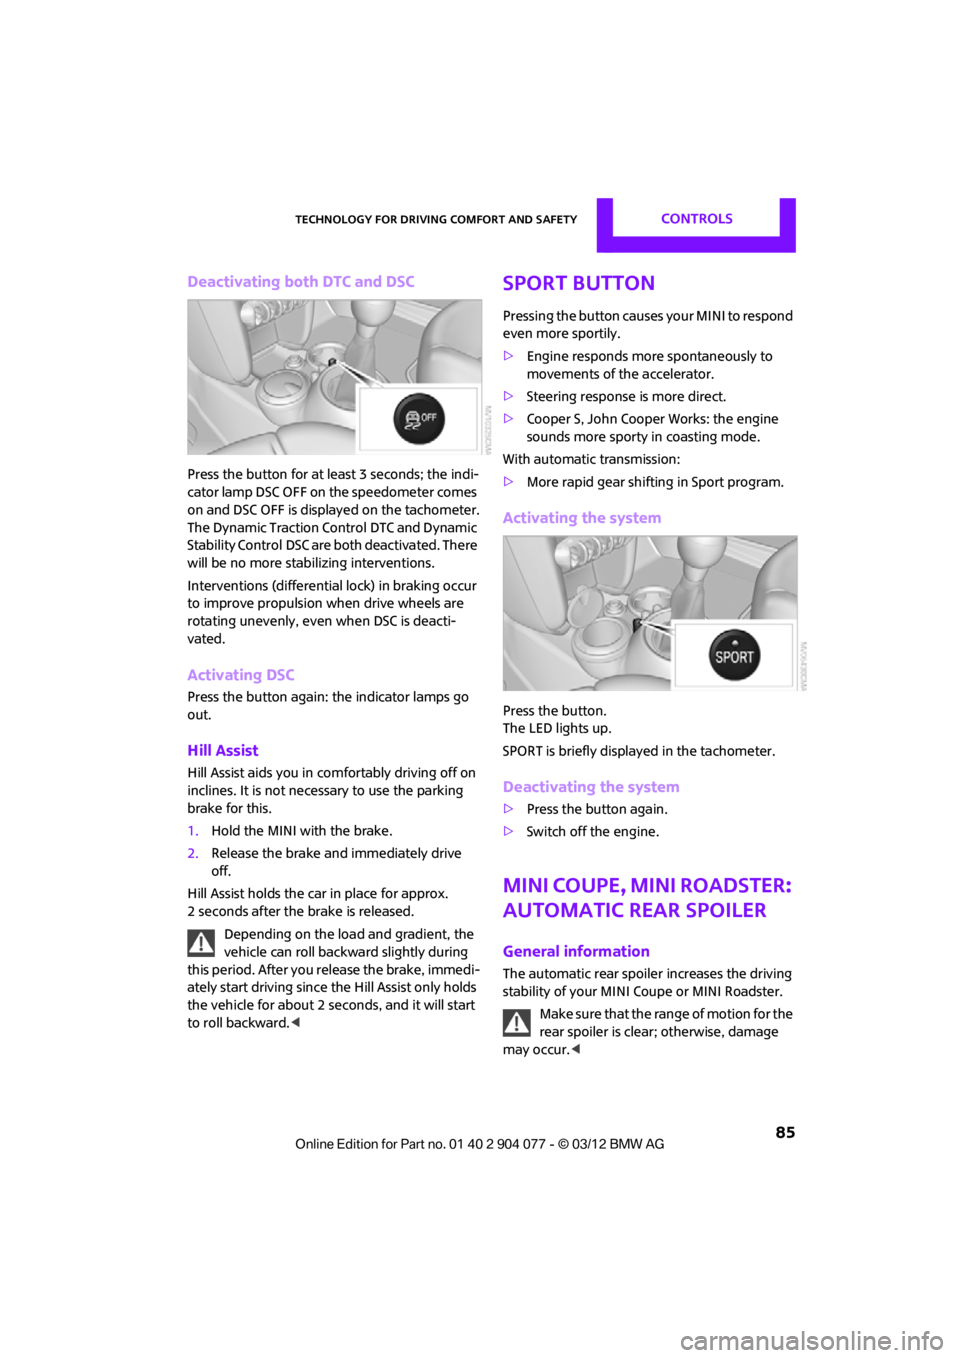
Press the button for at least 3 seconds; the indi-
cator lamp DSC OFF on the speedometer comes
on and DSC OFF is displayed on the tachometer.
The Dynamic Traction Control DTC and Dynamic
Stability Control DSC are both deactivated. There
will be no more stab ilizing interventions.
Interventions (differentia l lock) in braking occur
to improve propulsion when drive wheels are
rotating unevenly, even when DSC is deacti-
vated.
Activating DSC
Press the button again: the indicator lamps go
out.
Hill Assist
Hill Assist aids you in co mfortably driving off on
inclines. It is not necessary to use the parking
brake for this.
1. Hold the MINI with the brake.
2. Release the brake and immediately drive
off.
Hill Assist holds the car in place for approx.
2 seconds after the brake is released. Depending on the load and gradient, the
vehicle can roll backwa rd slightly during
this period. After you release the brake, immedi-
ately start driving since the Hill Assist only holds
the vehicle for about 2 seconds, and it will start
to roll backward. <
Sport button
Pressing the button causes your MINI to respond
even more sportily.
>Engine responds more spontaneously to
movements of the accelerator.
> Steering response is more direct.
> Cooper S, John Cooper Works: the engine
sounds more sporty in coasting mode.
With automatic transmission:
> More rapid gear shifting in Sport program.
Activating the system
Press the button.
The LED lights up.
SPORT is briefly displayed in the tachometer.
Deactivating the system
>Press the button again.
> Switch off the engine.
MINI Coupe, MINI Roadster:
Automatic rear spoiler
General information
The automatic rear spoile r increases the driving
stability of your MINI Coupe or MINI Roadster.
Make sure that the range of motion for the
rear spoiler is clear; otherwise, damage
may occur. <
00320051004F004C00510048000300280047004C0057004C005200510003
Page 89 of 283

CONTROLSTechnology for driving comfort and safety
88
The initialization is completed during driv-
ing, which can be interrupted at any time.
When driving resumes, the initialization is
continued automatically. <
Indication of a flat tire
The warning lamps come on in yellow
and red. A message appears on the
Control Display. An acoustic signal also
sounds. There is a flat tire or a major loss
in tire inflation pressure.
1. Reduce speed and stop the vehicle with
caution. Avoid sudden braking and steering
maneuvers.
2. Check whether the vehicle is equipped with
normal tires or with run-flat tires.
Run-flat tires, refer to page 218, are identi-
fied by a circular symbol containing the
letters RSC on the tire sidewall.
If the vehicle is not equipped with run-flat
tires, do not continue driving; continuing
to drive can result in serious accidents.<
When a flat tire is repo rted, the Dynamic Stability
Control DSC is activated.
Actions in the event of a flat tire
Normal tires
1. Identify the damaged tire.
To do so, check the infl ation pressure in all
four tires.
The inflation pressure display of the Mobility
Kit, page 237, can be used for this purpose.
If the inflation pressure in all four tires is cor-
rect, the Flat Tire Mo nitor might not have
been initialized. The system must then be
initialized.
If it is not possible to identify the damaged
tire, contact your MINI dealer.
2. Use the Mobility Kit to remedy the flat tire on
the damaged wheel, refer to page 237, or to
replace the damaged wheel, refer to
page 239.
Run-flat tires
You can continue driving with a damaged tire at
speeds up to 50 mph or 80 km/h.
Continued driving with a flat tire
When driving with a damaged tire:
1.Avoid sudden braking and steering
maneuvers.
2. Do not exceed a speed of 50 mph or
80 km/h.
3. At the next opportunity, check the air
pressure in all four tires.
If the inflation pressure in all four tires is cor-
rect, the Flat Tire Monitor might not have
been initialized. The system must then be
initialized.
Possible driving distance with complete loss of
tire inflation pressure:
The distance it is possible to drive with a flat tire
depends on the load and the stress on the vehi-
cle while driving.
With an average load, it may be possible to drive
for approx. 50 miles/80 km.
When driving with damaged tires, the handling
characteristics change, e. g. the vehicle will skid
sooner when braking, braking distances will be
longer, or self-steerin g response will change.
Adapt your driving style accordingly. Avoid turn-
ing abruptly and driving over obstacles such as
curbs, potholes, etc.
Since the possible driving distance depends to a
considerable degree on the strain exerted on
the vehicle while driving, it can be shorter or,
with a gentle driving styl e, can also be longer,
depending on the speed, road condition, exter-
nal temperature, vehicle load, etc.
Drive cautiously and do not exceed a
speed of 50 mph/80 km/h.
A loss of tire inflation pressure results in a
change in the handling characteristics, e.g.
reduced lane stability during braking, a longer
braking distance and altered self-steering
properties. <
00320051004F004C00510048000300280047004C0057004C005200510003
Page 91 of 283

CONTROLSTechnology for driving comfort and safety
90
Resetting the system
Reset the system again after each correction of
the tire inflation pressure and after every tire or
wheel change.
1. "Vehicle Info"
2. "Vehicle status"
3. "Reset"
4. Start the engine – do not drive away.
5. Select "Reset" to start the initialization.
6. Start to drive.
The tires are shown in gray and "Resetting
TPM..." is displayed.
After driving a few minutes, the set inflation
pressures in the tires are accepted as the target
values to be monitored. The resetting process is
completed automatically as you drive. The tires
are depicted in green on the Control Display and
"Status: TPM active" is displayed again.
The trip can be interrupted at any time. When
driving resumes, resett ing is continued auto-
matically.
If a flat tire is detected while the system is
resetting, all tires on the Control Display
are displayed in yellow. The message "Low tire!"
is displayed. <
Message for low tire inflation pressure
The warning lamps come on in yellow
and red. A message appears on the
onboard computer. An acoustic signal
also sounds. 1.
Reduce speed and stop the vehicle with
caution. Avoid sudden braking and steering
maneuvers.
2. Check whether the vehicle is equipped with
normal tires or with run-flat tires.
Run-flat tires, refer to page 218, are identi-
fied by a circular sy mbol containing the
letters RSC on the tire sidewall.
When a low inflation pressure is reported, the
Dynamic Stability Cont rol DSC is activated.
Actions in the event of a flat tire
Normal tires
1.Identify the damaged tire.
To do so, check the inflation pressure in all
four tires. The inflatio n pressure display of
the Mobility Kit, refer to page 237, can be
used for this.
If the inflation pressure is correct in all four
tires, then the Tire Pressure Monitor may not
have been reset. The system must then be
reset.
If it is not possible to identify the damaged
tire, contact your MINI dealer.
2. Use the Mobility Kit to remedy the flat tire on
the damaged wheel, refer to page 237, or to
replace the damaged wheel, refer to
page. 239.
The use of tire sealant, e.g. Mobility Kit, can
damage the TPM wheel electronics. In this
case, have the electronics checked and
replaced if necessary at your earliest
opportunity.
Run-flat tires
You can continue driving with a damaged tire at
speeds up to 50 mph/80 km/h.
If the vehicle is not equipped with run-flat
tires, do not continue driving; continuing
to drive can result in serious accidents.<
00320051004F004C00510048000300280047004C0057004C005200510003
Page 92 of 283

Technology for driving comfort and safetyCONTROLS
91
Continued driving with a flat tire
When driving with a damaged tire:
1.Avoid sudden braking and steering
maneuvers.
2. Do not exceed a speed of 50 mph/80 km/h.
3. At the next opportunity, check the air
pressure in all four tires.
If the inflation pressure is correct in all four
tires, then the Tire Pressure Monitor may not
have been reset. The system must then be
reset.
Possible driving distance with complete loss of
tire inflation pressure:
The distance it is possible to drive with a flat tire
depends on the load and the stress on the vehi-
cle while driving.
With an average load, it may be possible to drive
for approx. 50 miles/80 km.
When driving with damaged tires, the handling
characteristics change, e. g. the vehicle will skid
sooner when braking, braking distances will be
longer, or self-steering response will change.
Adapt your driving style accordingly. Avoid turn-
ing abruptly and driving over obstacles such as
curbs, potholes, etc.
Since the possible driving distance depends to a
considerable degree on the strain exerted on
the vehicle while driving, it can be shorter or,
with a gentle dr iving style, can also be longer,
depending on the speed, road condition, exter-
nal temperature, vehicle load, etc.
Drive cautiously and do not exceed a
speed of 50 mph/80 km/h.
A loss of tire inflation pr essure results in a change
in the handling characteristics, e.g. reduced lane
stability during braking, a longer braking dis-
tance and altered self-steering properties. <
Vibrations or loud noises while driving can
indicate complete failure of the tire.
Reduce your speed and bring the vehicle to a
stop; otherwise, pieces of tire may come off,
which could result in an accident. Do not con-
tinue driving and contact your MINI dealer. <
Malfunction
The small warning lamp flashes in yel-
low and then lights up continuously; the
larger warning lamp lights up in yellow.
On the onboard computer, the tires are
shown in gray and a message appears.
No punctures can be detected.
Display in the following situations:
> Wheel without TPM electronics is mounted:
If need be, have it checked by your MINI
dealer.
> Malfunction:
Have the system checked.
> TPM was unable to complete the resetting
procedure; reset the system again.
The small warning lamp flashes in yel-
low and then lights up continuously; the
larger warning lamp lights up in yellow.
On the onboard computer, the tires are
shown in gray and a message appears.
No punctures can be detected.
Display in the following situation:
> Malfunction because of other equipment or
devices, same radio frequency:
After leaving the inte rference area, the
system is again active automatically.
Message for unsuccessful system reset
Yellow warning lamp comes on. A
message appears on the onboard
computer.
The system has detected a wheel change, but
has not yet been reset. It is not possible to
provide a reliable warn ing about the current
inflation pressure.
Check the tire inflation pressure and reset the
system, page 90.
00320051004F004C00510048000300280047004C0057004C005200510003
Page 94 of 283

Technology for driving comfort and safetyCONTROLS
93
Airbags
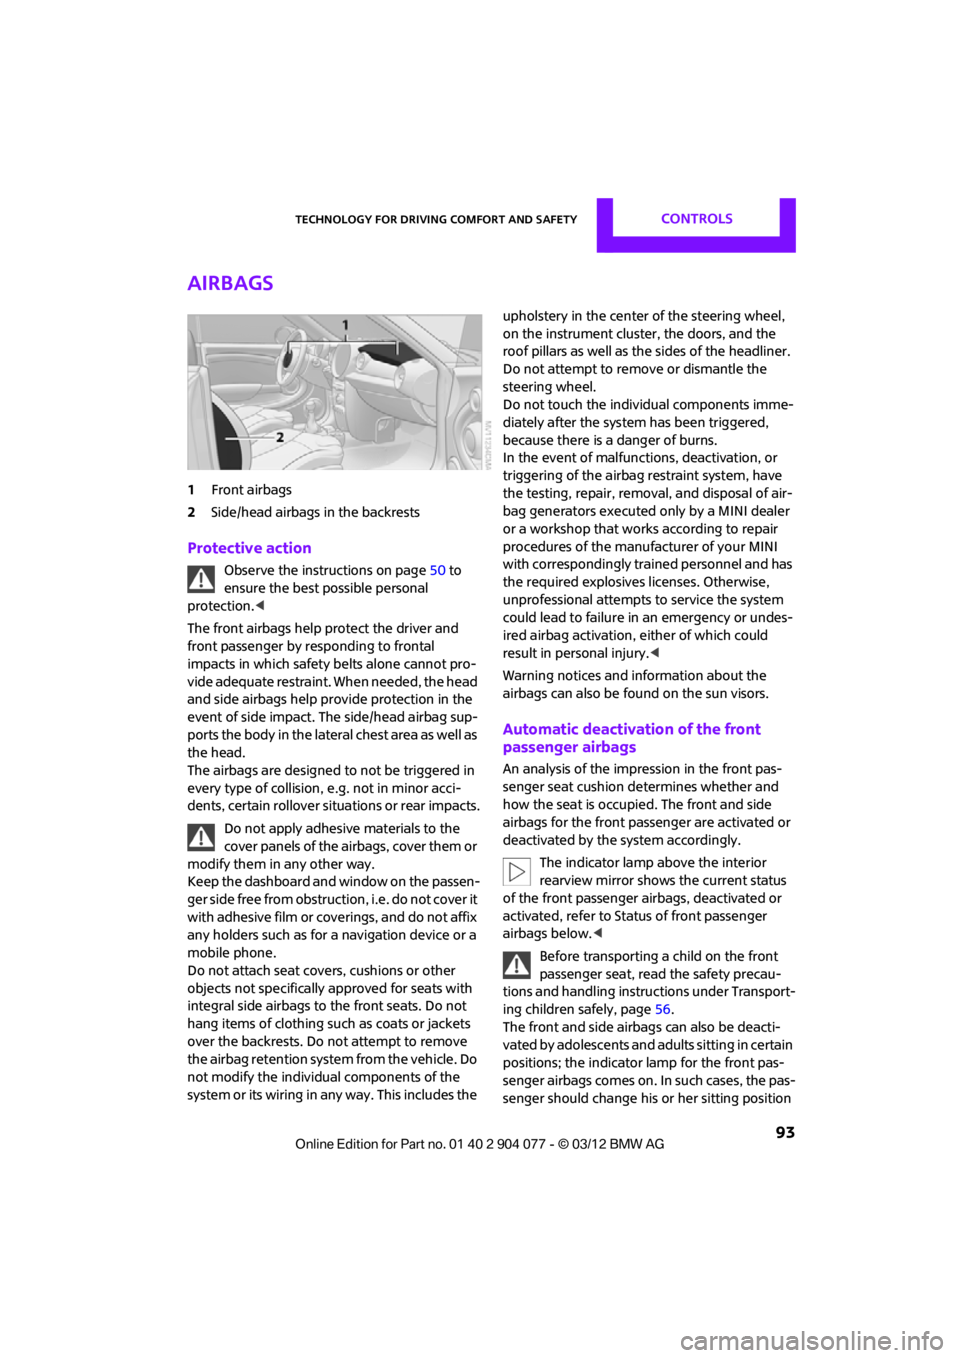
1Front airbags
2 Side/head airbags in the backrests
Protective action
Observe the instructions on page 50 to
ensure the best possible personal
protection.<
The front airbags help protect the driver and
front passenger by responding to frontal
impacts in which safety belts alone cannot pro-
vide adequate restraint. When needed, the head
and side airbags help provide protection in the
event of side impact. The side/head airbag sup-
ports the body in the lateral chest area as well as
the head.
The airbags are designed to not be triggered in
every type of collision, e.g. not in minor acci-
dents, certain rollover si tuations or rear impacts.
Do not apply adhesive materials to the
cover panels of the airbags, cover them or
modify them in any other way.
Keep the dashboard and window on the passen-
g e r s i d e f r e e f r o m o b s t r u c t i o n , i . e . d o n o t c o v e r i t
with adhesive film or coverings, and do not affix
any holders such as for a navigation device or a
mobile phone.
Do not attach seat covers, cushions or other
objects not specifically approved for seats with
integral side airbags to the front seats. Do not
hang items of clothing such as coats or jackets
over the backrests. Do not attempt to remove
the airbag retention system from the vehicle. Do
not modify the individual components of the
system or its wiring in any way. This includes the upholstery in the center of the steering wheel,
on the instrument cluster, the doors, and the
roof pillars as well as the sides of the headliner.
Do not attempt to remove or dismantle the
steering wheel.
Do not touch the individual components imme-
diately after the system has been triggered,
because there is a danger of burns.
In the event of malfuncti
ons, deactivation, or
triggering of the airbag restraint system, have
the testing, repair, remova l, and disposal of air-
bag generators executed only by a MINI dealer
or a workshop that work s according to repair
procedures of the manufacturer of your MINI
with correspondingly trained personnel and has
the required explosives licenses. Otherwise,
unprofessional attempts to service the system
could lead to failure in an emergency or undes-
ired airbag activation, either of which could
result in personal injury.<
Warning notices and in formation about the
airbags can also be found on the sun visors.
Automatic deactivation of the front
passenger airbags
An analysis of the impression in the front pas-
senger seat cushion determines whether and
how the seat is occupied. The front and side
airbags for the front passenger are activated or
deactivated by the system accordingly.
The indicator lamp above the interior
rearview mirror shows the current status
of the front passenger airbags, deactivated or
activated, refer to Status of front passenger
airbags below. <
Before transporting a child on the front
passenger seat, read the safety precau-
tions and handling instructions under Transport-
ing children safely, page 56.
The front and side airbag s can also be deacti-
vated by adolescents and adults sitting in certain
positions; the indicator lamp for the front pas-
senger airbags comes on. In such cases, the pas-
senger should change his or her sitting position
00320051004F004C00510048000300280047004C0057004C005200510003
Page 98 of 283

LampsCONTROLS
97
Welcome lamps
If you leave the light switch in the low beam or
automatic headlamp control position when you
switch off the ignition, the parking lamps and
interior lamps come on for a certain time as soon
as the vehicle is unlocked.
Pathway lighting
If you activate the headlamp flasher after
switching off the ignition with the lamps
switched off, the lo w beams come on and
remain on for a certain time.
The setting is stored for the remote control in
use, refer to Personal Profile, page 28.
Setting the duration or deactivating the
function
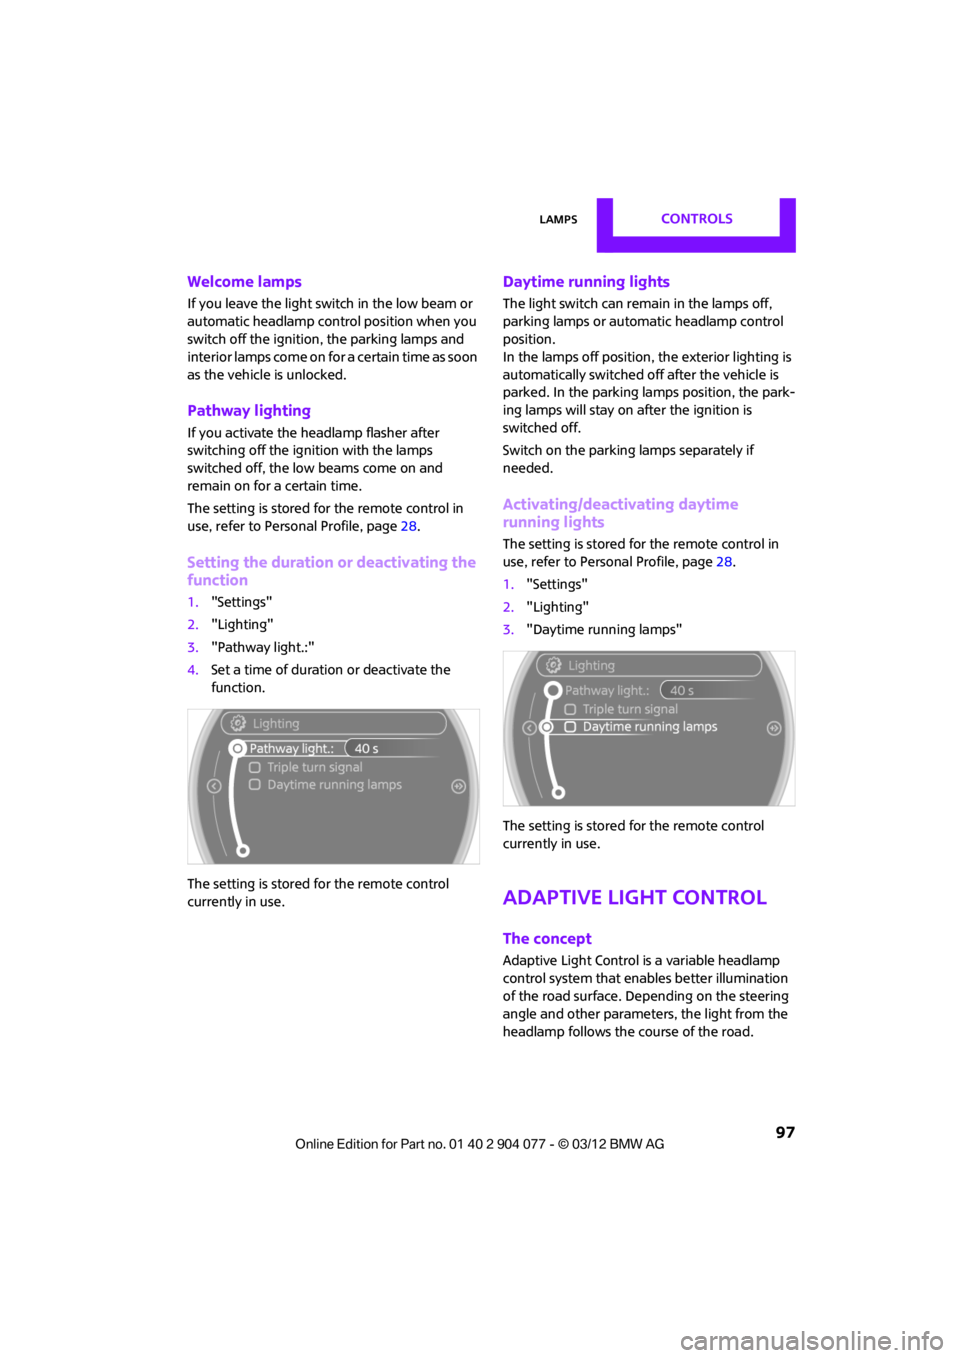
1. "Settings"
2. "Lighting"
3. "Pathway light.:"
4. Set a time of duration or deactivate the
function.
The setting is stored for the remote control
currently in use.
Daytime running lights
The light switch can remain in the lamps off,
parking lamps or automatic headlamp control
position.
In the lamps off position, the exterior lighting is
automatically switched of f after the vehicle is
parked. In the parking lamps position, the park-
ing lamps will stay on after the ignition is
switched off.
Switch on the parking lamps separately if
needed.
Activating/deactivating daytime
running lights
The setting is stored for the remote control in
use, refer to Personal Profile, page 28.
1. "Settings"
2. "Lighting"
3. "Daytime running lamps"
The setting is stored for the remote control
currently in use.
Adaptive Light Control
The concept
Adaptive Light Control is a variable headlamp
control system that enables better illumination
of the road surface. Depending on the steering
angle and other parameters, the light from the
headlamp follows the course of the road.
00320051004F004C00510048000300280047004C0057004C005200510003