2012 MINI COUPE ROADSTER CONVERTIBLE trip computer
[x] Cancel search: trip computerPage 12 of 283

CockpitAT A GLANCE
11
1Adjusting the exterior mirrors, folding them
in and out 54
3 MINI Roadster, MINI Convertible: Always
Open Timer 72
7 Ignition lock 60 8
Buttons on steering wheel,
Right side
Left side
9 Horn: the entire surface
10 Adjusting the steering wheel 55
11 Releasing the hood 222
2
Parking lamps 96
Low beams 96
Automatic headlamp control 96
Adaptive Light Control 97
Turn signals 65
High beams 98
Headlamp flasher 65
Roadside parking lamps 98
Computer 71
4 Tachometer 12
Instrument lighting 99
Resetting the trip odometer 71
5 Wiper system 66
6 Switching the ignition on/off and
starting/stopping the engine
60
Resuming cruise control68
Storing speed and accelerating or
decelerating
or Activating/deactivating cruise
control
68
Increasing or reducing volume
Telephone:
Press: accepting and ending a call,
starting dialing of selected phone
number and redialing if no phone
number is selected
Microphone on steering column
Activating/deactivating voice
activation system 23
Microphone on steering column
Changing the radio station
Selecting a music track
Scrolling through the redial list
00320051004F004C00510048000300280047004C0057004C005200510003
Page 13 of 283

AT A GLANCECockpit
12
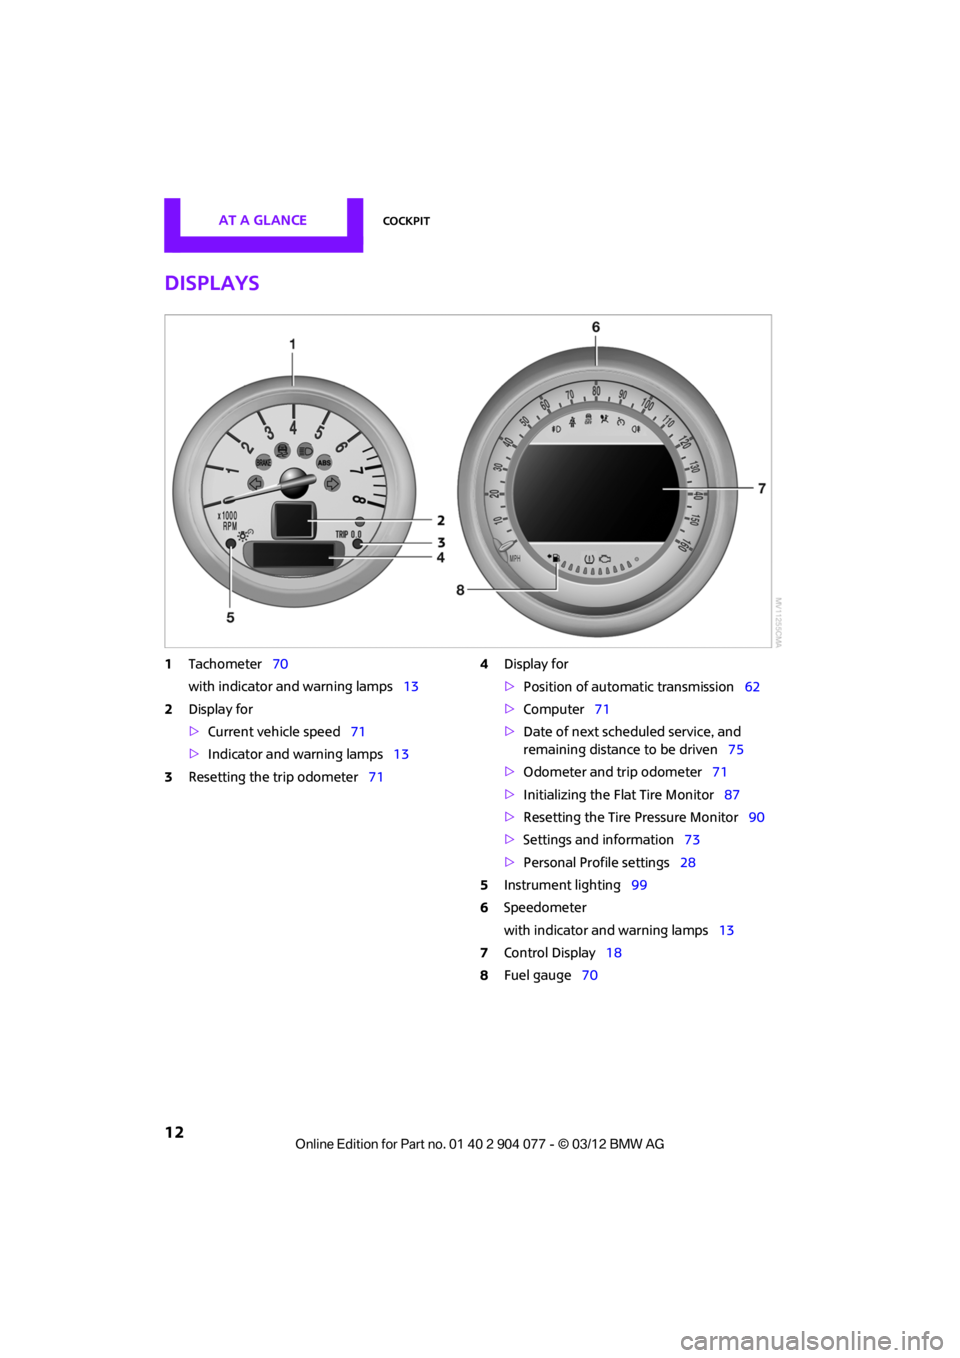
Displays
1Tachometer 70
with indicator and warning lamps 13
2 Display for
>Current vehicle speed 71
> Indicator and warning lamps 13
3 Resetting the trip odometer 714
Display for
>Position of automatic transmission 62
> Computer 71
> Date of next scheduled service, and
remaining distance to be driven 75
> Odometer and trip odometer 71
> Initializing the Flat Tire Monitor 87
> Resetting the Tire Pressure Monitor 90
> Settings and information 73
> Personal Prof ile settings28
5 Instrument lighting 99
6 Speedometer
with indicator and warning lamps 13
7 Control Display 18
8 Fuel gauge 70
00320051004F004C00510048000300280047004C0057004C005200510003
Page 30 of 283

Opening and closingCONTROLS
29
This means that your settings will be activated
for you, even if in the meantime your car was
used by someone else with another remote
control and the corresponding settings.
At most three remote co ntrols can be set for
three different people. A prerequisite is that
each person uses a separate remote control.
Personal Profile settings
For more information on specific settings, refer
to the specified pages.
> Response of the central locking system
when the car is being unlocked 30
> Automatic locking of the vehicle 33
> Triple turn signal activation 65
> Settings for the displays on the onboard
computer, in the speedometer and in the
tachometer:
>12 h/24 h mode of the clock 76
> Date format 77
> Brightness of the Control Display 80
> Language on the Control Display 80
> Units of measure for fuel consumption,
distance covered/re maining distances
and temperature 74
> Light settings:
>Pathway lighting 97
> Daytime running lights 97
> Automatic climate control: activating/
deactivating the AUTO program, setting the
temperature, air volume and air
distribution 103
> Entertainment:
>Tone control 147
> Adjusting vo lume levels 147
Central locking system
The concept
The central locking system is ready for operation
whenever the driver's door is closed.
The system simultaneously engages and
releases the locks on the following:
>Doors
> Tailgate
> Fuel filler flap
Operating from outside
>Via the remote control
> Using the door lock
> In cars with Comfor t Access, via the door
handles on the driver's and passenger's
sides
The anti-theft system is also operated at the
same time. It prevents the doors from being
unlocked using the lock buttons or door han-
dles. The remote control can also be used to
switch on/off the welcome lamps and interior
lamps. The alarm system is also activated or
deactivated, page 34.
Operating from inside
Button for central locking system, page 32.
In the event of a sufficiently severe accident,
the central locking system unlocks automati-
cally. In addition, the hazard warning flashers
and interior lamps come on.
Opening and closing:
from outside
Persons or animals in a parked vehicle
could lock the doors from the inside. Take
the key with you when you leave the vehicle
so that the vehicle can be opened from the
outside. <
00320051004F004C00510048000300280047004C0057004C005200510003
Page 72 of 283

Controls overviewCONTROLS
71
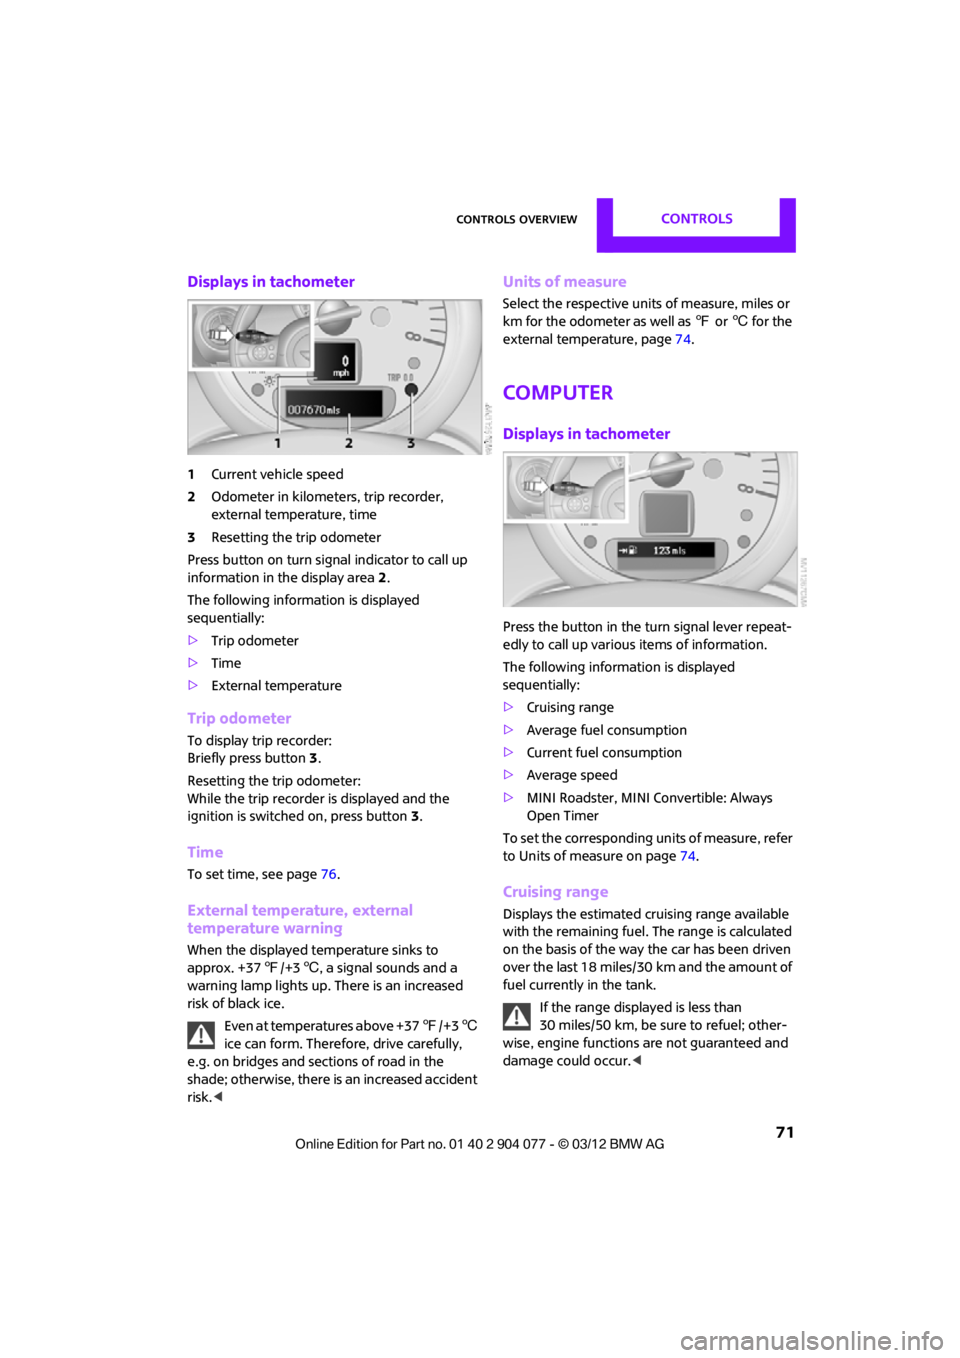
Displays in tachometer
1Current vehicle speed
2 Odometer in kilometers, trip recorder,
external temperature, time
3 Resetting the trip odometer
Press button on turn signal indicator to call up
information in the display area 2.
The following information is displayed
sequentially:
> Trip odometer
> Time
> External temperature
Trip odometer
To display trip recorder:
Briefly press button 3.
Resetting the trip odometer:
While the trip recorder is displayed and the
ignition is switched on, press button 3.
Time
To set time, see page 76.
External temperature, external
temperature warning
When the displayed temperature sinks to
approx. +37 7/+3 6, a signal sounds and a
warning lamp lights up. There is an increased
risk of black ice.
Even at temperatures above +37 7/+3 6
ice can form. Therefore, drive carefully,
e.g. on bridges and sections of road in the
shade; otherwise, there is an increased accident
risk. <
Units of measure
Select the respective units of measure, miles or
km for the odometer as well as 7 or 6 for the
external temperature, page 74.
Computer
Displays in tachometer
Press the button in the turn signal lever repeat-
edly to call up variou s items of information.
The following information is displayed
sequentially:
> Cruising range
> Average fuel consumption
> Current fuel consumption
> Average speed
> MINI Roadster, MINI Convertible: Always
Open Timer
To set the corresponding units of measure, refer
to Units of measure on page 74.
Cruising range
Displays the estimated cruising range available
with the remaining fuel. The range is calculated
on the basis of the way the car has been driven
over the last 18 miles/30 km and the amount of
fuel currently in the tank.
If the range displayed is less than
30 miles/50 km, be sure to refuel; other-
wise, engine functions are not guaranteed and
damage could occur.<
00320051004F004C00510048000300280047004C0057004C005200510003
Page 73 of 283

CONTROLSControls overview
72
Average fuel consumption
Calculated for the time the engine has been
running.
With the trip computer, page73, you can have
the average fuel consum ption for another trip
displayed.
To reset average fuel consumption: press the
button in the turn signal lever for approx.
2seconds.
Current fuel consumption
Displays the current fuel consumption to allow
you to see whether your current driving style is
conducive to fuel economy with minimum
exhaust emissions.
Average speed
Periods with the vehicle parked and the engine
switched off are not includ ed in the calculations
of average speed.
With the trip computer, page 73, you can have
the average speed for another trip displayed.
To reset average speed: press the button in the
turn signal lever for approx. 2 seconds.
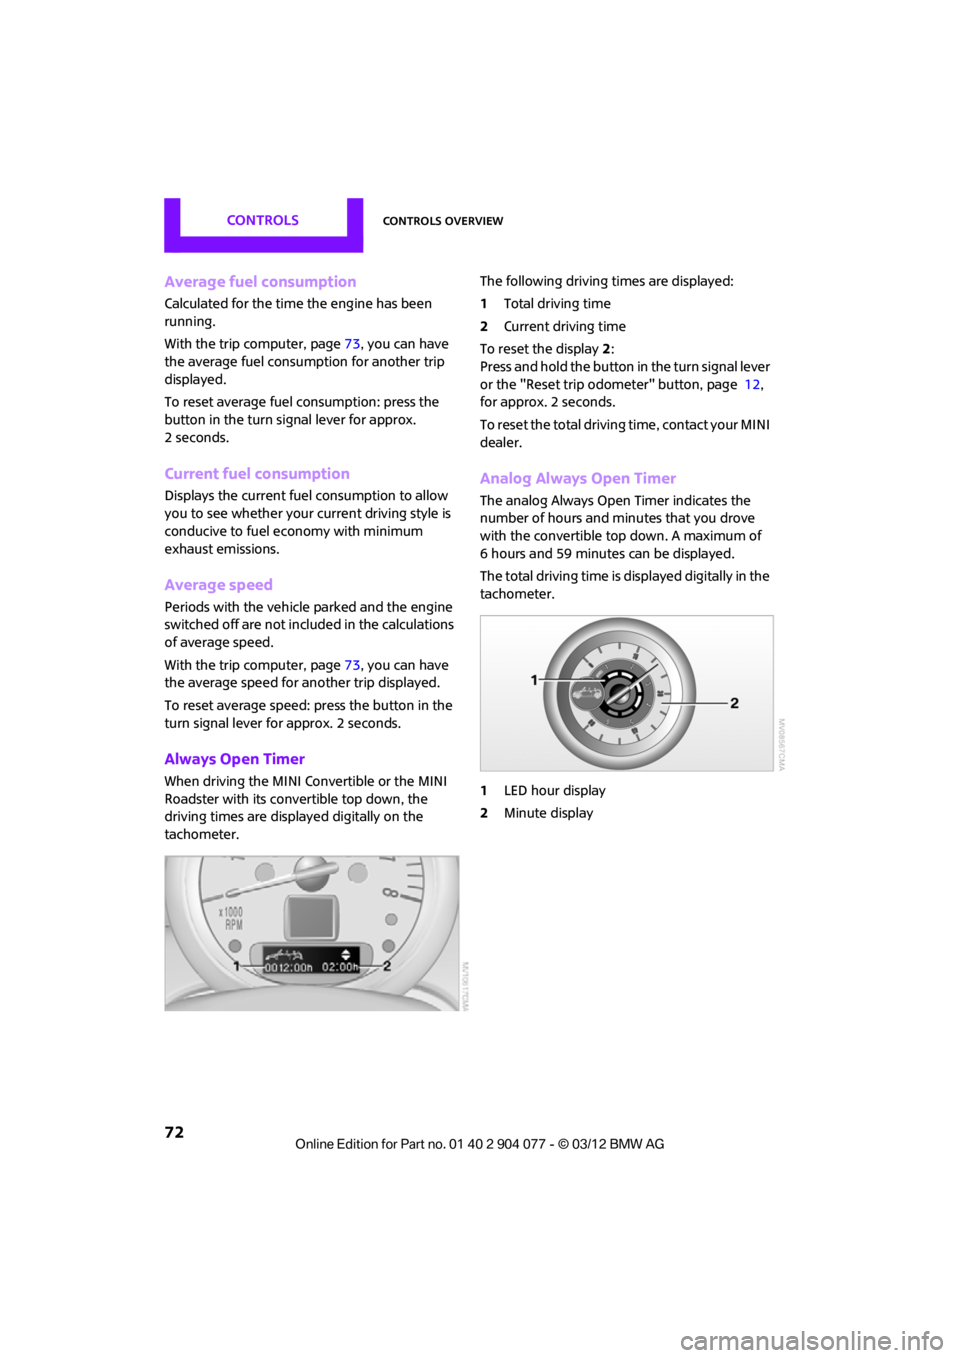
Always Open Timer
When driving the MINI Convertible or the MINI
Roadster with its convertible top down, the
driving times are displayed digitally on the
tachometer. The following driving times are displayed:
1
Total driving time
2 Current driving time
To reset the display 2:
Press and hold the button in the turn signal lever
or the "Reset trip odometer" button, page 12,
for approx. 2 seconds.
To reset the total driving time, contact your MINI
dealer.
Analog Always Open Timer
The analog Always Open Timer indicates the
number of hours and minutes that you drove
with the convertible top down. A maximum of
6 hours and 59 minutes can be displayed.
The total driving time is displayed digitally in the
tachometer.
1 LED hour display
2 Minute display
00320051004F004C00510048000300280047004C0057004C005200510003
Page 74 of 283

Controls overviewCONTROLS
73
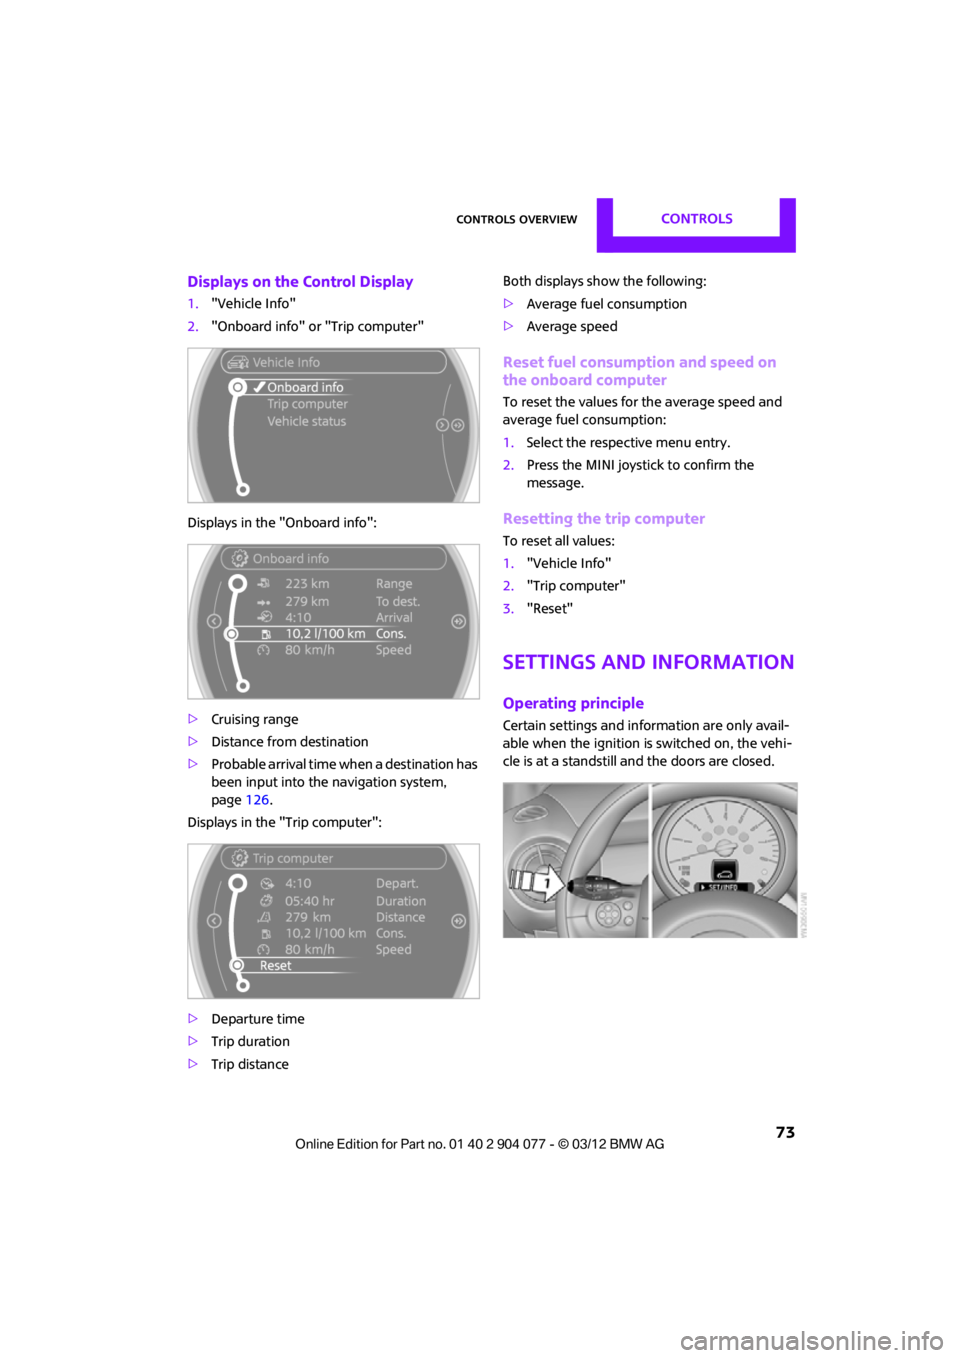
Displays on the Control Display
1."Vehicle Info"
2. "Onboard info" or "Trip computer"
Displays in the "Onboard info":
> Cruising range
> Distance from destination
> Probable arrival time when a destination has
been input into the navigation system,
page 126.
Displays in the "Trip computer":
> Departure time
> Trip duration
> Trip distance Both displays show the following:
>
Average fuel consumption
> Average speed
Reset fuel consumption and speed on
the onboard computer
To reset the values for the average speed and
average fuel consumption:
1.Select the respective menu entry.
2. Press the MINI joystick to confirm the
message.
Resetting the trip computer
To reset all values:
1."Vehicle Info"
2. "Trip computer"
3. "Reset"
Settings and information
Operating principle
Certain settings and information are only avail-
able when the ignition is switched on, the vehi-
cle is at a standstill and the doors are closed.
00320051004F004C00510048000300280047004C0057004C005200510003
Page 91 of 283

CONTROLSTechnology for driving comfort and safety
90
Resetting the system
Reset the system again after each correction of
the tire inflation pressure and after every tire or
wheel change.
1. "Vehicle Info"
2. "Vehicle status"
3. "Reset"
4. Start the engine – do not drive away.
5. Select "Reset" to start the initialization.
6. Start to drive.
The tires are shown in gray and "Resetting
TPM..." is displayed.
After driving a few minutes, the set inflation
pressures in the tires are accepted as the target
values to be monitored. The resetting process is
completed automatically as you drive. The tires
are depicted in green on the Control Display and
"Status: TPM active" is displayed again.
The trip can be interrupted at any time. When
driving resumes, resett ing is continued auto-
matically.
If a flat tire is detected while the system is
resetting, all tires on the Control Display
are displayed in yellow. The message "Low tire!"
is displayed. <
Message for low tire inflation pressure
The warning lamps come on in yellow
and red. A message appears on the
onboard computer. An acoustic signal
also sounds. 1.
Reduce speed and stop the vehicle with
caution. Avoid sudden braking and steering
maneuvers.
2. Check whether the vehicle is equipped with
normal tires or with run-flat tires.
Run-flat tires, refer to page 218, are identi-
fied by a circular sy mbol containing the
letters RSC on the tire sidewall.
When a low inflation pressure is reported, the
Dynamic Stability Cont rol DSC is activated.
Actions in the event of a flat tire
Normal tires
1.Identify the damaged tire.
To do so, check the inflation pressure in all
four tires. The inflatio n pressure display of
the Mobility Kit, refer to page 237, can be
used for this.
If the inflation pressure is correct in all four
tires, then the Tire Pressure Monitor may not
have been reset. The system must then be
reset.
If it is not possible to identify the damaged
tire, contact your MINI dealer.
2. Use the Mobility Kit to remedy the flat tire on
the damaged wheel, refer to page 237, or to
replace the damaged wheel, refer to
page. 239.
The use of tire sealant, e.g. Mobility Kit, can
damage the TPM wheel electronics. In this
case, have the electronics checked and
replaced if necessary at your earliest
opportunity.
Run-flat tires
You can continue driving with a damaged tire at
speeds up to 50 mph/80 km/h.
If the vehicle is not equipped with run-flat
tires, do not continue driving; continuing
to drive can result in serious accidents.<
00320051004F004C00510048000300280047004C0057004C005200510003
Page 125 of 283

NAVIGATIONNavigation system
124
Navigation system
Vehicle equipment
In this chapter, all production, country, and
optional equipment that is offered in the model
range is described. Equipment is also described
that is not available because of, for example,
selected options or coun try version. This also
applies to safety relate d functions and systems.
General information
The navigation system can determine the pre-
cise position of the vehicle, with the aid of satel-
lites and vehicle sensors, and can reliably guide
you to every entered destination.
Enter data only with the vehicle station-
ary, and always give priority to the appli-
cable traffic regulations in the event of any con-
tradiction between traffic and road conditions
and the instructions issu ed by the navigation
system. Failure to take to this precaution can
place you in violation of the law and put vehicle
occupants and other ro ad users in danger.<
Selecting navigation
1."Navigation"
During route guidance, an arrow view or a map
view is displayed on the onboard computer.
Navigation data
Information on navigation data
1. "Navigation"
2. Open "Options".
3. "Navigation system version"
Information about the data version is displayed.
Updating the navigation data
General information
Navigation data are stored in the vehicle and
can be updated.
You may obtain current navigation data and the
enabling code at your MINI dealer.
Updating the data can take several hours,
depending on the volume of data.
> Update data while driving to reduce the
drain on the battery.
> The update is resumed automatically when
a trip is continued after an interruption.
> Only the main functions of the navigation
system are available during updating.
> You can inquire as to the status of the
update.
> The data are stored in the vehicle.
> After the updating process is complete, the
system restarts.
> The medium with the na vigation data can be
removed after the update.
00320051004F004C00510048000300280047004C0057004C005200510003