Page 73 of 207

CONTROLSTechnology for driving comfort and safety
72
Airbags
The following airbags are located under the
marked covers:1
Front airbags
2 Side airbags in backrests
3 Head airbags at the front and rear
Protective action
Observe the instructions on page 35 to
ensure the best possible personal protec-
tion. <
The front airbags help protect the driver and
front passenger by re sponding to frontal
impacts in which safety belts alone cannot pro-
vide adequate restraint. When needed, the head
and side airbags help provide protection in the
event of side impact. The relevant side airbag
supports the side upper body area. The respec-
tive head airbag supports the head.
The airbags are designed to not be triggered in
every type of collision, e.g. not in minor acci-
dents, certain rollover situations or rear impacts.
Do not apply adhesive materials to the
cover panels of the airbags, cover them or
modify them in any other way.
Keep the dashboard and window on the passen-
g e r s i d e f r e e f r o m o b s t r u c t i o n , i . e . d o n o t c o v e r i t
with adhesive film or co verings, and do not affix
any holders such as for a navigation device or a
mobile phone.
Do not attach seat cove rs, cushions or other
objects not specifically approved for seats with
integral side airbags to the front seats. Do not
hang items of clothing su ch as coats or jackets
over the backrests. Do not attempt to remove
the airbag retention system from the vehicle. Do
not modify the individual components of the syste m o r its w iring in any way. Th is includ es the
upholstery in the center of the steering wheel,
on the instrument panel, the doors, and the roof
pillars as well as the sides of the headliner. Do
not attempt to remove or dismantle the steering
wheel.
Do not touch the individual components imme-
diately after the system has been triggered,
because there is a danger of burns.
In the event of malfunctions, deactivation, or
triggering of the airbag
restraint system, have
the testing, repair, remo val, and disposal of
airbag generators executed only by a MINI
dealer or a workshop th at works according to
repair procedures of the manufacturer of your
MINI with correspondingly trained personnel
and has the required explosives licenses. Other-
wise, unprofessional attempts to service the
system could lead to failure in an emergency or
undesired airbag activation, either of which
could result in personal injury. <
Warning notices and information about the
airbags can also be found on the sun visors.
Automatic deactivation of the front
passenger airbags
An analysis of the impression in the front pas-
senger seat cushion determines whether and
how the seat is occupied. The front and side
Online Edition for Part no. 01 40 2 914 744 - \251 07/12 BMW AG
Page 74 of 207

Technology for driving comfort and safetyCONTROLS
73
airbags for the front passenger are activated or
deactivated by the system accordingly.The indicator lamp above the interior rear-
view mirror shows th e current status of
the front passenger airbags, deactivated or acti-
vated, refer to Status of front passenger airbags
below. <
Before transporting a child on the front
passenger seat, read the safety precau-
tions and handling instructions under Transport-
ing children safely, page 41.
The front and side airbags can also be deacti-
vated by adolescents and adults sitting in certain
positions; the indicator lamp for the front pas-
senger airbags comes on. In such cases, the pas-
senger should change his or her sitting position
so that the front passenger airbags are activated
and the indicator lamp goes out. If the desired
airbag status cannot be achieved by changing
the sitting position, transport the relevant pas-
senger on a rear seat. Do not attach covers,
cushions, ball mats or other items to the front
passenger seat unless they are specifically rec-
ommended by the manufacturer of your MINI.
Do not place items under the seat which could
press against the seat fr om below. Otherwise,
a correct analysis of the seat cushion is not
ensured. <
Status of front passenger airbags
The indicator lamp for the front passenger air-
bags shows the functional status of the front
passenger's front and side airbags in accordance
with whether and how th e front passenger seat
is occupied. The indica tor lamp shows whether the front passenger airbags are activated or
deactivated.
>
The indicator lamp co mes on as intended
when a child in a specially designated child
restraint system is detected on the seat.
The front and side airbags for the front
passenger are not activated.
Most child seats are detected by the
system. This particularly applies to
child seats that were required by NHTSA at
the time of manufacture of the vehicle. After
installing a child seat, check that the indica-
tor lamp for the front passenger airbags
lights up. It indicates that the child seat has
been detected and that the front passenger
airbags are deactivated. <
> The indicator lamp does not come on as long
as a person of sufficient size and in a correct
sitting position is detected on the seat.
The front and side airbags for the front
passenger are activated.
> The indicator lamp does not come on if the
seat is empty.
The front and side airbags for the front
passenger are not activated.
Operational readiness of airbag system
As of radio readiness, page 44, the warning
lamp lights up briefly to indicate that the entire
airbag system and the belt tensioners are
operational.
Online Edition for Part no. 01 40 2 914 744 - \251 07/12 BMW AG
Page 75 of 207
CONTROLSTechnology for driving comfort and safety
74
Airbag system malfunction
>The warning lamp does not come on when
radio readiness is switched on.
> The warning lamp stays lit continuously.
In the event of a fault in the airbag system,
have it checked without delay; otherwise,
there is the risk that the system will not function
as intended even if a severe accident occurs. <
Online Edition for Part no. 01 40 2 914 744 - \251 07/12 BMW AG
Page 76 of 207

LampsCONTROLS
75
Lamps
Vehicle equipment
In this chapter, all production, country, and
optional equipment that is offered in the model
range is described. Equipment is also described
that is not available because of, for example,
selected options or count ry version. This also
applies to safety related functions and systems.
Parking lamps/low beams
0 Lamps off / daytime running lights
1 Parking lamps and daytime running lights
2 Low-beam headlamps and welcome lamps
3 Automatic headlamp control, daytime run-
ning lights, welcome lamps, and Adaptive
Light Control
When you open the driver's door with the
ignition switched off, the exterior lighting is
automatically switched off if the light switch is
in position 0, 2 or 3.
Switch on the parking lamps if necessary, switch
position 1.
Parking lamps
Turn the light switch to position 1.
The front, rear and side vehicle lighting is
switched on.
Activation of lights on one side of the vehicle for
parking, page 78. The parking lamps will discharge the
battery. Therefore, do not leave them on
for unduly long periods of time; otherwise, the
battery might not have enough power to start
the engine.<
Low beams
Turn the light switch to position 2.
The low beams come on when the ignition is on.
Automatic headlamp control
When the switch is in position 3, the low beams
are switched on and of f automatically depend-
ing on ambient light condit ions, e.g. in a tunnel,
in twilight, or if there is precipitation. Adaptive
Light Control is active.
The headlamps may also come on when the sun
is sitting low on a blue sky.
When driving into tunnels with bright overhead
lights, there may be a delay before the head-
lamps come on.
The low beams remain switched on indepen-
dent of the ambient lighting conditions when
you switch on the fog lamps.
If the daytime running lights are activated,
page 76, the low beams are al ways switched on
with the light switch in position 3 and the igni-
tion on. The exterior lamps are automatically
switched off after the vehicle is parked.
The automatic headlamp control cannot
serve as a substitute for your personal
judgment in determin ing when the lamps
should be switched on in response to ambient
lighting conditions. For example, the system
cannot detect fog or hazy weather. To avoid
safety risks, you should respond to these kinds
of low-visibility situations by switching the head-
lamps on manually. <
Online Edition for Part no. 01 40 2 914 744 - \251 07/12 BMW AG
Page 77 of 207

CONTROLSLamps
76
Welcome lamps
If you leave the light switch in the low beam or
automatic headlamp control position when you
switch off the ignition, the parking lamps and
interior lamps come on for a certain time as soon
as the vehicle is unlocked.
Pathway lighting
If you activate the headlamp flasher after
switching off the ignition with the lamps
switched off, the lo w beams come on and
remain on for a certain time.
The setting is stored for the remote control in
use, refer to Pers onal Profile, page 22.
Setting the duration or deactivating the
function
1.Switch on the ignition, refer to page 44.
2. Press the button in the turn signal indicator
as often as necessary until "SET/INFO" is
displayed.
3. Press and hold the button until the display
changes.
4. Press the button as often as necessary until
the symbol and "SET" are displayed. 5.
Press and hold the button until the display
changes.
6. Press the button repeat edly until the display
shows the illust rated symbol.
7. Press and hold the button until the display
changes.
8. Press the button to select:
>
The function is deactivated.
> …
Select the appropriate duration, e.g.
40 seconds.
9. Press the button for a longer period.
The setting is stored.
Daytime running lights
The light switch can remain in the lamps off,
parking lamps or automatic headlamp control
position.
In the lamps off position, the exterior lighting is
automatically switched off after the vehicle is
parked. In the parking lamps position, the
parking lamps will stay on after the ignition is
switched off.
Switch on the parking lamps separately if
needed.
Activating/deactivating daytime
running lights
The setting is stored for the remote control in
use, refer to Pers onal Profile, page 22.
Online Edition for Part no. 01 40 2 914 744 - \251 07/12 BMW AG
Page 78 of 207

LampsCONTROLS
77
1.Switch on the ignition, refer to page 44.
2. Press the button in the turn signal indicator
as often as necessary until "SET/INFO" is
displayed.
3. Press and hold the butt on until the display
changes.
4. Press the button as of ten as necessary until
the symbol and "SET" are displayed.
5. Press and hold the butt on until the display
changes.
6. Press the button repeatedly until the display
shows the illustra ted symbol, arrow.
7. Press and hold the butt on until the display
changes. 8.
Press the button to select:
>
Daytime running lights activated.
> Daytime running li ghts deactivated.
9. Press the button for a longer period.
The setting is stored.
Adaptive Light Control
The concept
Adaptive Light Control is a variable headlamp
control system that enables better illumination
of the road surface. Depending on the steering
angle and other parameters, the light from the
headlamp follows the course of the road.
Activating Adaptive Light Control
With the ignition switched on, turn the light
switch to position 3, refer to page 75.
Standstill function: to av oid blinding oncoming
traffic, the Adaptive Light Control does not pivot
toward the driver's side when the vehicle is at a
standstill.
In reverse, the Adaptive Light Control is not
activated.
Malfunction
A message is displayed.
The Adaptive Light Control is malfunctioning or
failed. Have the system checked as soon as
possible.
Online Edition for Part no. 01 40 2 914 744 - \251 07/12 BMW AG
Page 79 of 207

CONTROLSLamps
78
High beams/
roadside parking lamps
1Turn signals/roadside parking lamps
2 Switching on high beams
3 Switching off high beams/headlamp flasher
Roadside parking lamps, left or right
The vehicle can be illuminated on one side for
parking. Comply with local regulations when
doing so.
Switching on
After parking the vehicle, press the lever up or
down, arrow 1.
The roadside parking lamps drain the
battery. Therefore, do not leave them on
for unduly long periods of time; otherwise, the
battery might not have enough power to start
the engine. <
Switching off
Press the lever up or down to the pressure point.
Front fog lamps
1Front fog lamps
2 Rear fog lamp
Press the respective switch to turn the lamps on/
off.
Front fog lamps
The parking lamps or low beams must be
switched on for the fog lamps to operate. The
green indicator lamp lights up when the fog
lamps are switched on.
Depending on your vehicle's equipment, the fog
lamps are switched off when you activate the
headlamp flasher or switch on the high beams.
If the automatic headlamp control is acti-
vated, the low beams will come on auto-
matically when you switch on the fog lamps. <
Rear fog lamp
The low beams or parking lamps with fog lamps
must be switched on. The yellow indicator lamp
c o m e s o n w h e n t h e r e a r f o g l a m p i s s w i t c h e d o n .
Instrument lighting
You can adjust the brightness of the instrument
lighting only when the parking lamps or the low
beams are on.
The intensity of the brightness changes up to a
predetermined end point, and then decreases.
Online Edition for Part no. 01 40 2 914 744 - \251 07/12 BMW AG
Page 80 of 207

LampsCONTROLS
79
Adjusting brightness
>Briefly press button: brightness changes in
stages.
> Press and hold the button. Brightness
changes in a continuous manner.
Interior lamps
The interior lighting, the footwell lamps and the
luggage compartment lighting are automati-
cally controlled.
To reduce the drain on the battery, a short
while after the ignition is switched off,
refer to Start/Stop button on page 44, all lights in
the vehicle's passenger compartment are
switched off. <
Switching interior lamps on/off manually
To switch the interior lamps on/off.
Press the switch.
To switch off the interior lamps permanently,
press the switch for about 3 seconds.
Reading lamps
To switch the readin g lamps on and off.
In the front: press the switch.
In the rear: press the button.
Ambient lighting
The color and brightness of the ambient lighting
can be changed.
> Press the switch forward.
The color changes in stages.
> Press the switch toward the rear.
The brightness changes in stages.
Intermediate settings and colors are possible. For a continuous color change in the
ambient lighting, press and hold the
switch forward for lo nger than 10 seconds. <
Online Edition for Part no. 01 40 2 914 744 - \251 07/12 BMW AG
 1
1 2
2 3
3 4
4 5
5 6
6 7
7 8
8 9
9 10
10 11
11 12
12 13
13 14
14 15
15 16
16 17
17 18
18 19
19 20
20 21
21 22
22 23
23 24
24 25
25 26
26 27
27 28
28 29
29 30
30 31
31 32
32 33
33 34
34 35
35 36
36 37
37 38
38 39
39 40
40 41
41 42
42 43
43 44
44 45
45 46
46 47
47 48
48 49
49 50
50 51
51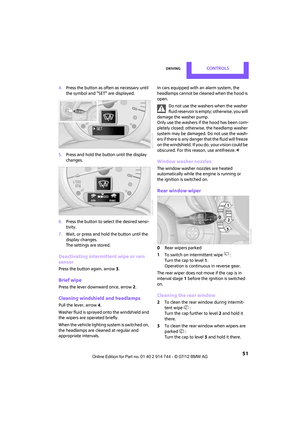 52
52 53
53 54
54 55
55 56
56 57
57 58
58 59
59 60
60 61
61 62
62 63
63 64
64 65
65 66
66 67
67 68
68 69
69 70
70 71
71 72
72 73
73 74
74 75
75 76
76 77
77 78
78 79
79 80
80 81
81 82
82 83
83 84
84 85
85 86
86 87
87 88
88 89
89 90
90 91
91 92
92 93
93 94
94 95
95 96
96 97
97 98
98 99
99 100
100 101
101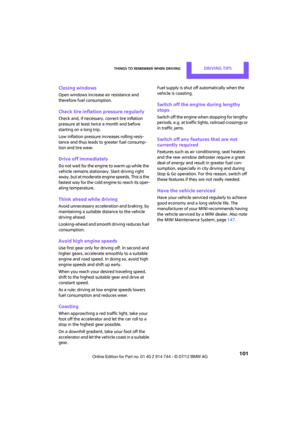 102
102 103
103 104
104 105
105 106
106 107
107 108
108 109
109 110
110 111
111 112
112 113
113 114
114 115
115 116
116 117
117 118
118 119
119 120
120 121
121 122
122 123
123 124
124 125
125 126
126 127
127 128
128 129
129 130
130 131
131 132
132 133
133 134
134 135
135 136
136 137
137 138
138 139
139 140
140 141
141 142
142 143
143 144
144 145
145 146
146 147
147 148
148 149
149 150
150 151
151 152
152 153
153 154
154 155
155 156
156 157
157 158
158 159
159 160
160 161
161 162
162 163
163 164
164 165
165 166
166 167
167 168
168 169
169 170
170 171
171 172
172 173
173 174
174 175
175 176
176 177
177 178
178 179
179 180
180 181
181 182
182 183
183 184
184 185
185 186
186 187
187 188
188 189
189 190
190 191
191 192
192 193
193 194
194 195
195 196
196 197
197 198
198 199
199 200
200 201
201 202
202 203
203 204
204 205
205 206
206