2012 MERCEDES-BENZ SLS AMG ROADSTER trunk
[x] Cancel search: trunkPage 133 of 288
Applying/releasing manually
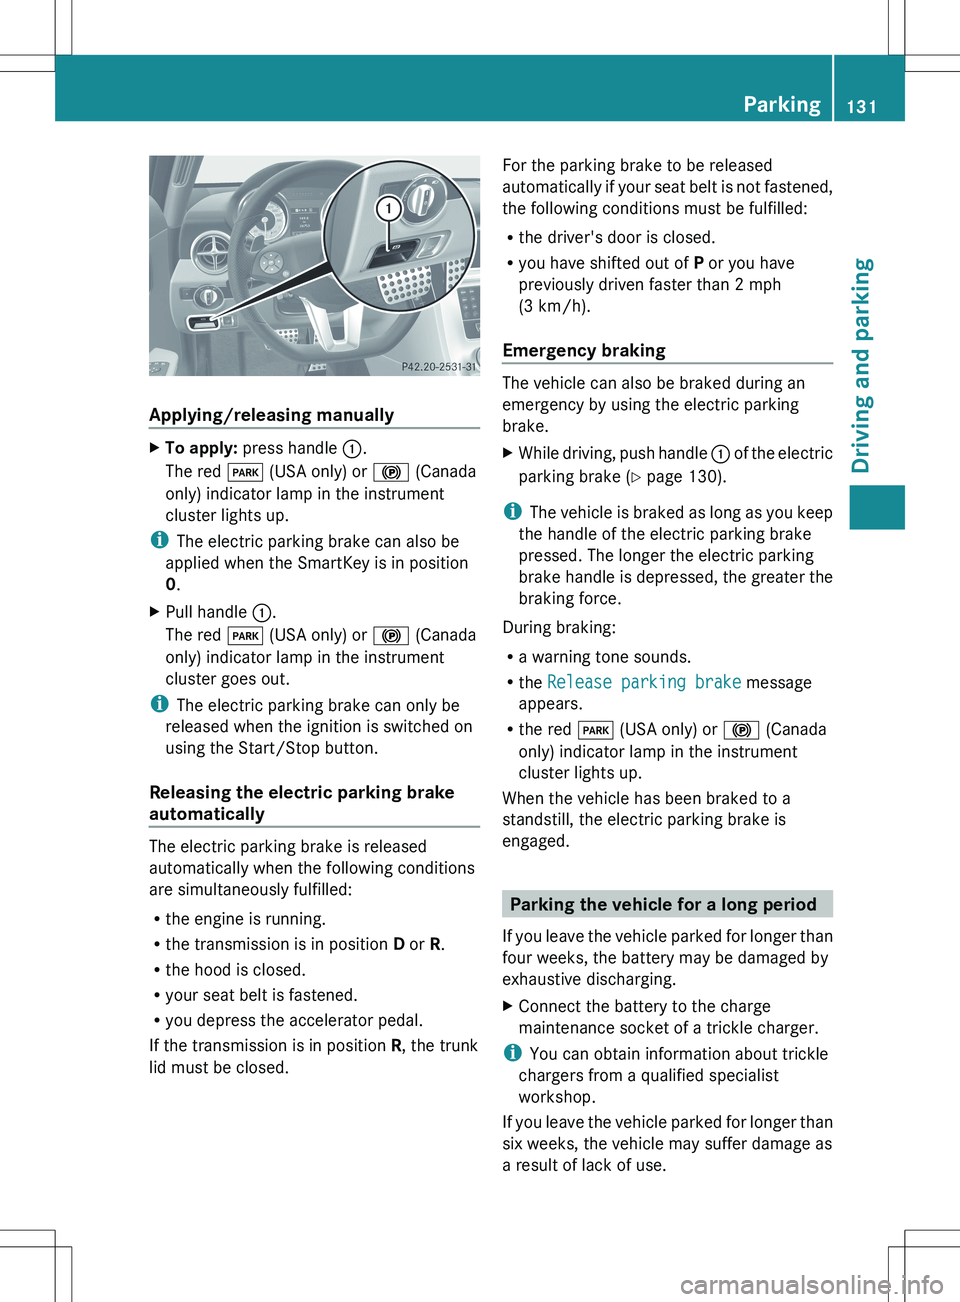
XTo apply: press handle :.
The red F (USA only) or ! (Canada
only) indicator lamp in the instrument
cluster lights up.
i The electric parking brake can also be
applied when the SmartKey is in position
0 .
XPull handle :.
The red F (USA only) or ! (Canada
only) indicator lamp in the instrument
cluster goes out.
i The electric parking brake can only be
released when the ignition is switched on
using the Start/Stop button.
Releasing the electric parking brake
automatically
The electric parking brake is released
automatically when the following conditions
are simultaneously fulfilled:
R the engine is running.
R the transmission is in position D or R.
R the hood is closed.
R your seat belt is fastened.
R you depress the accelerator pedal.
If the transmission is in position R, the trunk
lid must be closed.
For the parking brake to be released
automatically if your seat belt is not fastened,
the following conditions must be fulfilled:
R the driver's door is closed.
R you have shifted out of P or you have
previously driven faster than 2 mph
(3 km/h).
Emergency braking
The vehicle can also be braked during an
emergency by using the electric parking
brake.
XWhile driving, push handle : of the electric
parking brake ( Y page 130).
i
The vehicle is braked as long as you keep
the handle of the electric parking brake
pressed. The longer the electric parking
brake handle is depressed, the greater the
braking force.
During braking:
R a warning tone sounds.
R the Release parking brake message
appears.
R the red F (USA only) or ! (Canada
only) indicator lamp in the instrument
cluster lights up.
When the vehicle has been braked to a
standstill, the electric parking brake is
engaged.
Parking the vehicle for a long period
If you leave the vehicle parked for longer than
four weeks, the battery may be damaged by
exhaustive discharging.
XConnect the battery to the charge
maintenance socket of a trickle charger.
i You can obtain information about trickle
chargers from a qualified specialist
workshop.
If you leave the vehicle parked for longer than
six weeks, the vehicle may suffer damage as
a result of lack of use.
Parking131Driving and parkingZ
Page 185 of 288
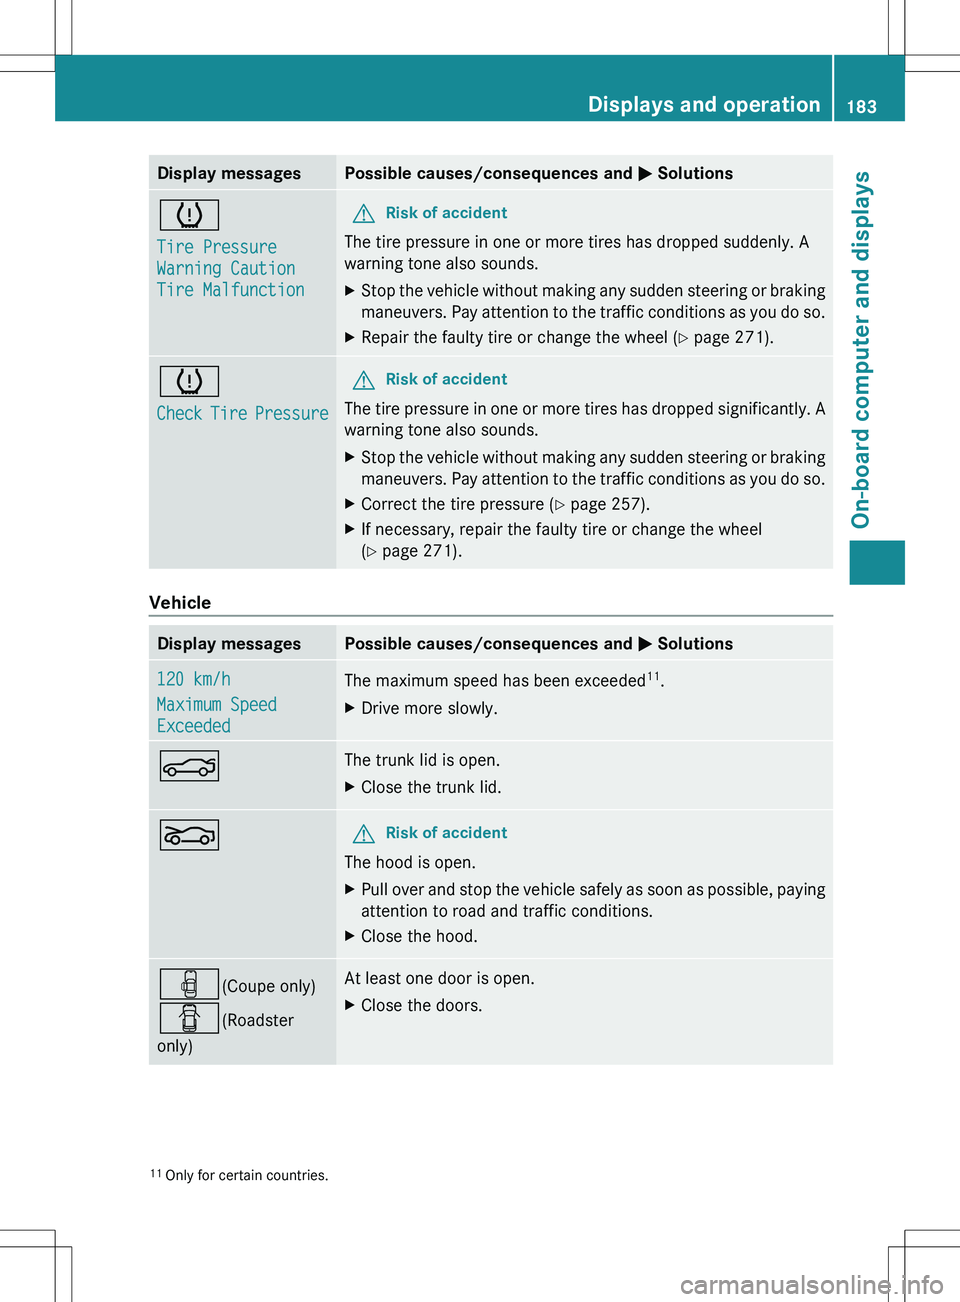
Display messagesPossible causes/consequences and M Solutionsh
Tire Pressure
Warning Caution
Tire MalfunctionGRisk of accident
The tire pressure in one or more tires has dropped suddenly. A
warning tone also sounds.
XStop the vehicle without making any sudden steering or braking
maneuvers. Pay attention to the traffic conditions as you do so.XRepair the faulty tire or change the wheel ( Y page 271).h
Check Tire PressureGRisk of accident
The tire pressure in one or more tires has dropped significantly. A
warning tone also sounds.
XStop the vehicle without making any sudden steering or braking
maneuvers. Pay attention to the traffic conditions as you do so.XCorrect the tire pressure ( Y page 257).XIf necessary, repair the faulty tire or change the wheel
( Y page 271).
Vehicle
Display messagesPossible causes/consequences and M Solutions120 km/h
Maximum Speed
ExceededThe maximum speed has been exceeded 11
.XDrive more slowly.NThe trunk lid is open.XClose the trunk lid.LGRisk of accident
The hood is open.
XPull over and stop the vehicle safely as soon as possible, paying
attention to road and traffic conditions.XClose the hood.´ (Coupe only)
C (Roadster
only)At least one door is open.XClose the doors.11 Only for certain countries.Displays and operation183On-board computer and displaysZ
Page 202 of 288
Useful information
i This Operator's Manual describes all
models and all standard and optional
equipment of your vehicle available at the
time of publication of the Operator's
Manual. Country-specific differences are
possible. Please note that your vehicle may
not be equipped with all features
described. This also applies to safety-
related systems and functions.
i Please read the information on qualified
specialist workshops ( Y page 21).
Stowage areas
Stowage space
Important safety notes
GWARNING
To help avoid personal injury during a collision
or sudden maneuver, exercise care when
storing objects in the vehicle. Put luggage or
cargo in the trunk if possible.
Keep compartment lids closed. This will help
to prevent stored objects from being thrown
about and injuring vehicle occupants during
R braking
R vehicle maneuvers
R an accident
Stowage compartments in the front
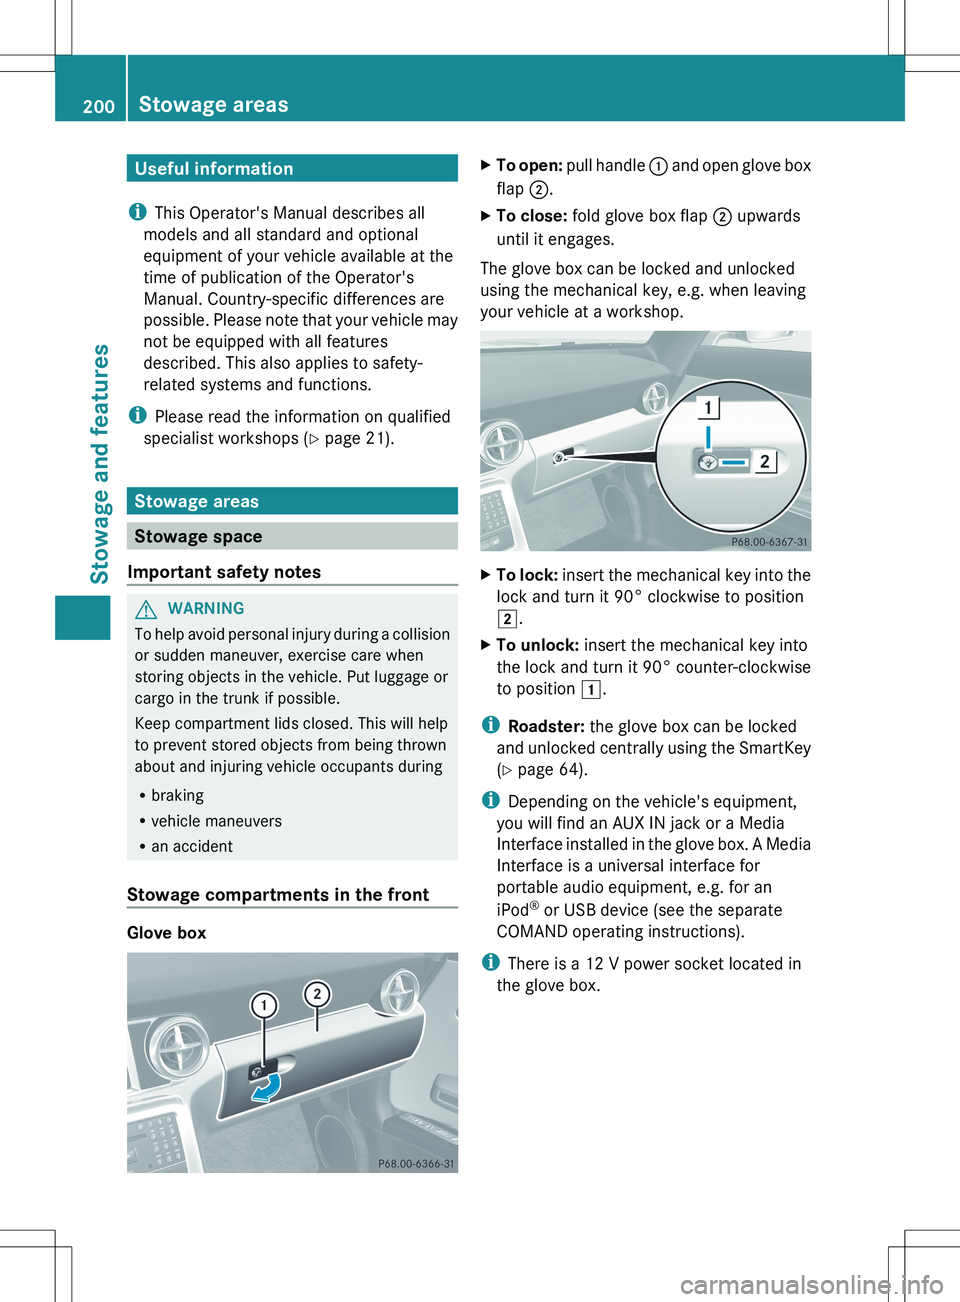
Glove box
XTo open: pull handle : and open glove box
flap ;.XTo close: fold glove box flap ; upwards
until it engages.
The glove box can be locked and unlocked
using the mechanical key, e.g. when leaving
your vehicle at a workshop.
XTo lock: insert the mechanical key into the
lock and turn it 90° clockwise to position
2 .XTo unlock: insert the mechanical key into
the lock and turn it 90° counter-clockwise
to position 1.
i
Roadster: the glove box can be locked
and unlocked centrally using the SmartKey
( Y page 64).
i Depending on the vehicle's equipment,
you will find an AUX IN jack or a Media
Interface installed in the glove box. A Media
Interface is a universal interface for
portable audio equipment, e.g. for an
iPod ®
or USB device (see the separate
COMAND operating instructions).
i There is a 12 V power socket located in
the glove box.
200Stowage areasStowage and features
Page 203 of 288
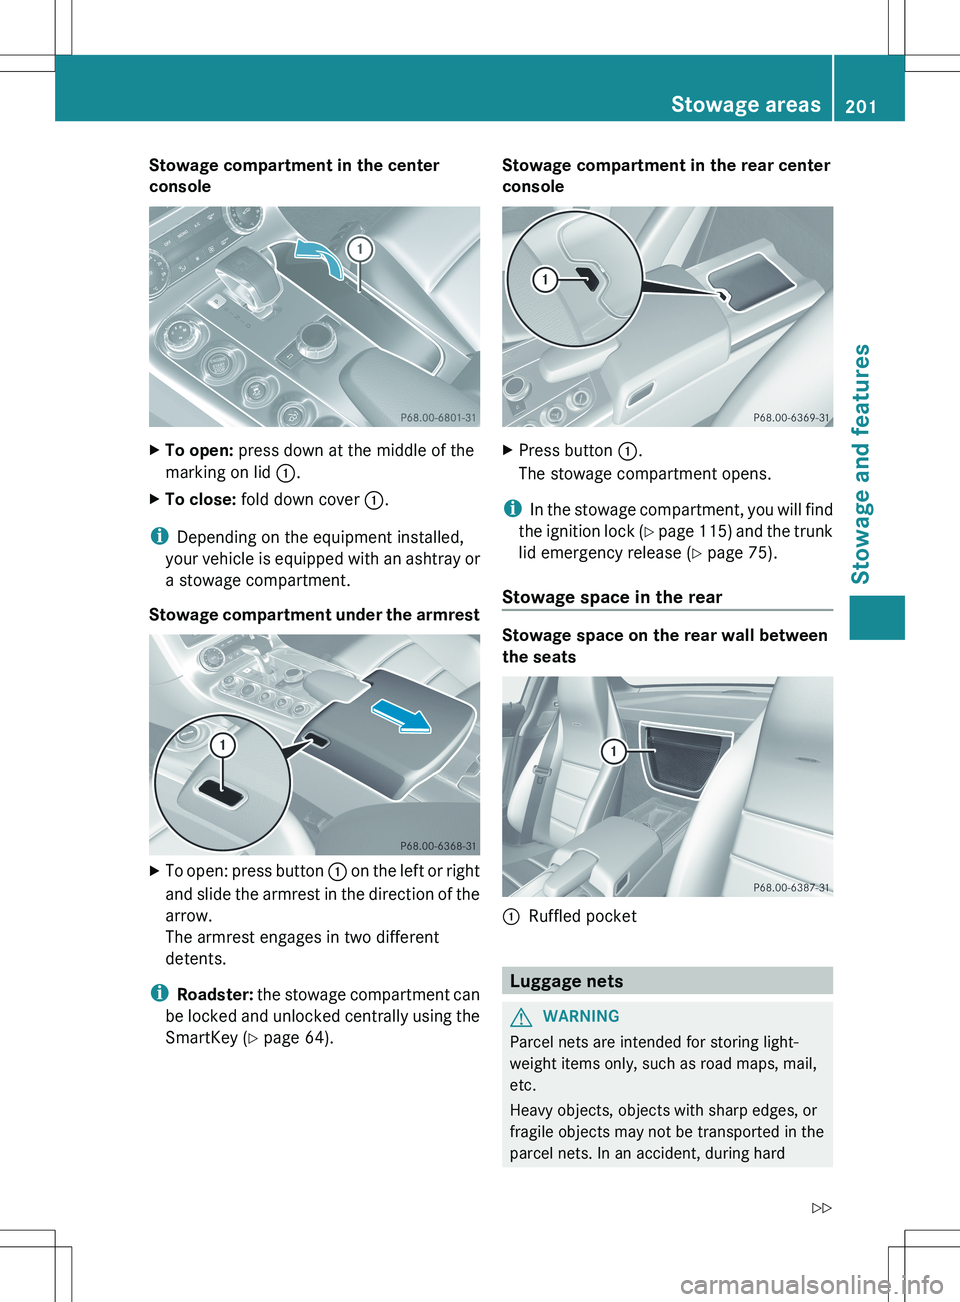
Stowage compartment in the center
consoleXTo open: press down at the middle of the
marking on lid :.XTo close: fold down cover :.
i
Depending on the equipment installed,
your vehicle is equipped with an ashtray or
a stowage compartment.
Stowage compartment under the armrest
XTo open: press button : on the left or right
and slide the armrest in the direction of the
arrow.
The armrest engages in two different
detents.
i Roadster: the stowage compartment can
be locked and unlocked centrally using the
SmartKey ( Y page 64).
Stowage compartment in the rear center
consoleXPress button :.
The stowage compartment opens.
i In the stowage compartment, you will find
the ignition lock (Y page 115) and the trunk
lid emergency release ( Y page 75).
Stowage space in the rear
Stowage space on the rear wall between
the seats
:Ruffled pocket
Luggage nets
GWARNING
Parcel nets are intended for storing light-
weight items only, such as road maps, mail,
etc.
Heavy objects, objects with sharp edges, or
fragile objects may not be transported in the
parcel nets. In an accident, during hard
Stowage areas201Stowage and featuresZ
Page 213 of 288
Extending and retracting the rear
spoiler manually
You can extend and retract the rear spoiler
manually for cleaning.
GWARNING
During manual retraction of the rear spoiler,
make sure that nobody becomes trapped. If
there is a danger of someone becoming
trapped, release the rear spoiler button to
pause retraction. The rear spoiler is then
extended again.
Never leave children unsupervised in the
vehicle. They could unintentionally retract the
extended rear spoiler. Someone could then
become trapped and seriously injured.
! Do not enter an automatic car wash with
the rear spoiler extended. Otherwise, the
rear spoiler may be damaged.
Only extend the rear spoiler in order to
clean it by hand. Retract it again when you
have finished cleaning it.
XClose the trunk lid.XSelect key position 2 with the Start/Stop
button.X To extend: press button :.
The rear spoiler is extended.
Button : flashes until the rear spoiler has
extended and then lights up in red.XTo retract: press and hold button : until
the rear spoiler is completely retracted.
Button : flashes until the rear spoiler has
retracted and then goes out.
Rear Spoiler retracts manually
appears in the display.
i If you release button : while retracting
the rear spoiler, it extends again
automatically.
Features211Stowage and featuresZ
Page 214 of 288
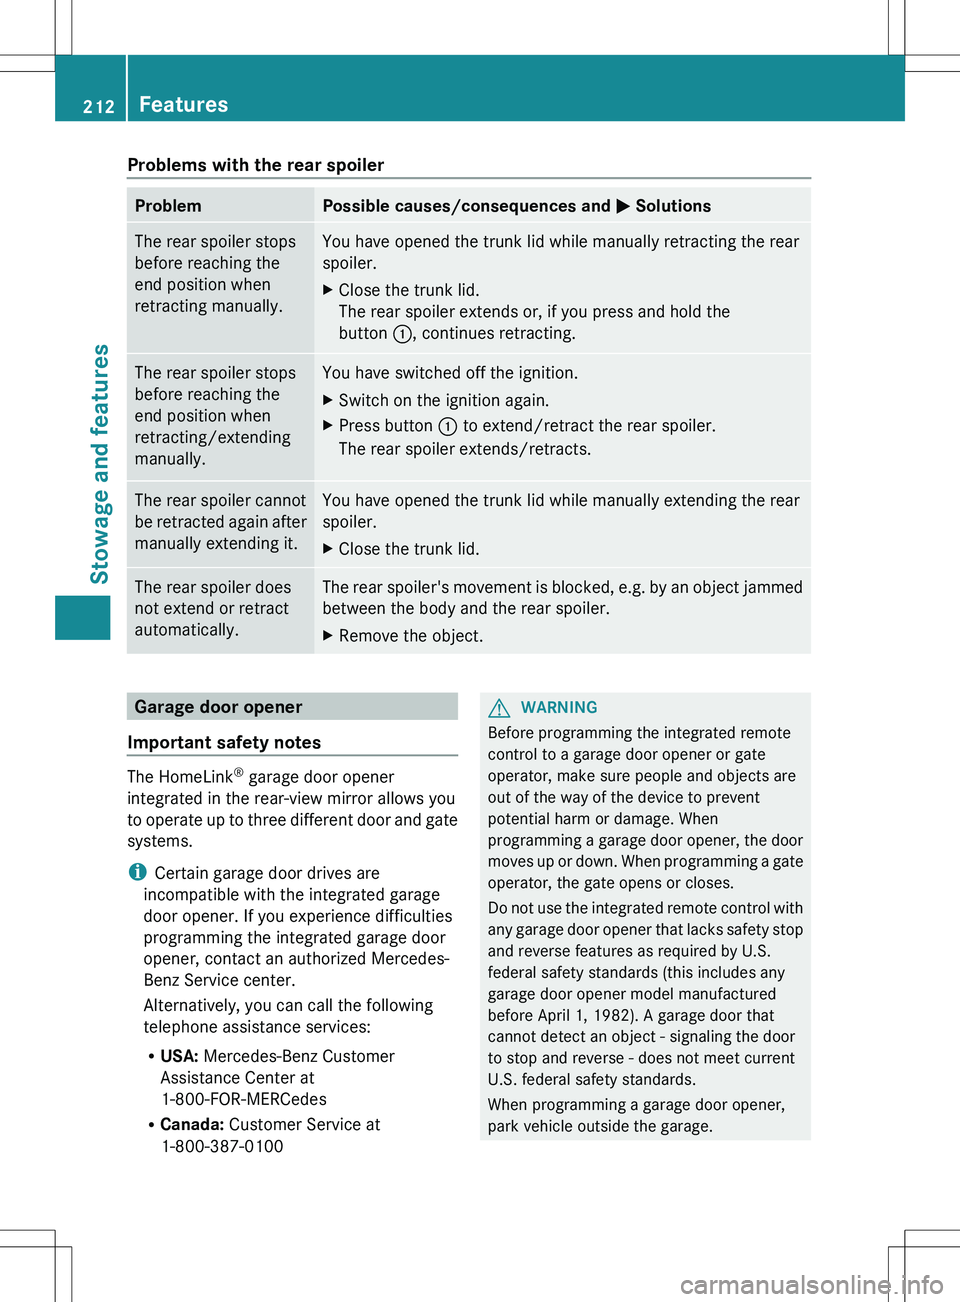
Problems with the rear spoilerProblemPossible causes/consequences and M SolutionsThe rear spoiler stops
before reaching the
end position when
retracting manually.You have opened the trunk lid while manually retracting the rear
spoiler.XClose the trunk lid.
The rear spoiler extends or, if you press and hold the
button :, continues retracting.The rear spoiler stops
before reaching the
end position when
retracting/extending
manually.You have switched off the ignition.XSwitch on the ignition again.XPress button : to extend/retract the rear spoiler.
The rear spoiler extends/retracts.The rear spoiler cannot
be retracted again after
manually extending it.You have opened the trunk lid while manually extending the rear
spoiler.XClose the trunk lid.The rear spoiler does
not extend or retract
automatically.The rear spoiler's movement is blocked, e.g. by an object jammed
between the body and the rear spoiler.XRemove the object.Garage door opener
Important safety notes
The HomeLink ®
garage door opener
integrated in the rear-view mirror allows you
to operate up to three different door and gate
systems.
i Certain garage door drives are
incompatible with the integrated garage
door opener. If you experience difficulties
programming the integrated garage door
opener, contact an authorized Mercedes-
Benz Service center.
Alternatively, you can call the following
telephone assistance services:
R USA: Mercedes-Benz Customer
Assistance Center at
1-800-FOR-MERCedes
R Canada: Customer Service at
1-800-387-0100
GWARNING
Before programming the integrated remote
control to a garage door opener or gate
operator, make sure people and objects are
out of the way of the device to prevent
potential harm or damage. When
programming a garage door opener, the door
moves up or down. When programming a gate
operator, the gate opens or closes.
Do not use the integrated remote control with
any garage door opener that lacks safety stop
and reverse features as required by U.S.
federal safety standards (this includes any
garage door opener model manufactured
before April 1, 1982). A garage door that
cannot detect an object - signaling the door
to stop and reverse - does not meet current
U.S. federal safety standards.
When programming a garage door opener,
park vehicle outside the garage.
212FeaturesStowage and features
Page 218 of 288
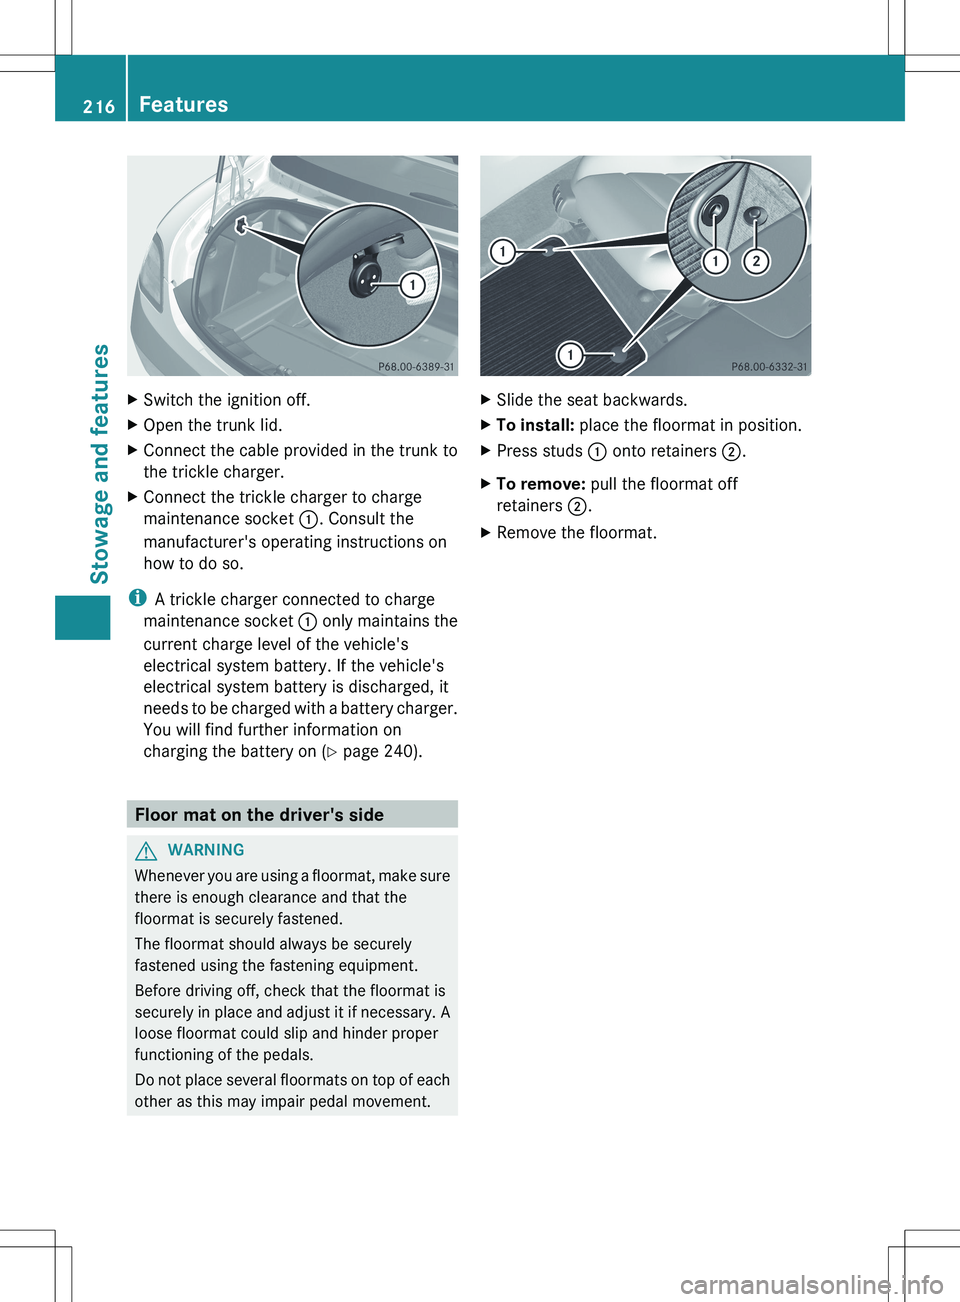
XSwitch the ignition off.XOpen the trunk lid.XConnect the cable provided in the trunk to
the trickle charger.XConnect the trickle charger to charge
maintenance socket :. Consult the
manufacturer's operating instructions on
how to do so.
i A trickle charger connected to charge
maintenance socket : only maintains the
current charge level of the vehicle's
electrical system battery. If the vehicle's
electrical system battery is discharged, it
needs to be charged with a battery charger.
You will find further information on
charging the battery on ( Y page 240).
Floor mat on the driver's side
GWARNING
Whenever you are using a floormat, make sure
there is enough clearance and that the
floormat is securely fastened.
The floormat should always be securely
fastened using the fastening equipment.
Before driving off, check that the floormat is
securely in place and adjust it if necessary. A
loose floormat could slip and hinder proper
functioning of the pedals.
Do not place several floormats on top of each
other as this may impair pedal movement.
XSlide the seat backwards.XTo install: place the floormat in position.XPress studs : onto retainers ;.XTo remove: pull the floormat off
retainers ;.XRemove the floormat.216FeaturesStowage and features
Page 234 of 288
Useful information
i This Operator's Manual describes all
models and all standard and optional
equipment of your vehicle available at the
time of publication of the Operator's
Manual. Country-specific differences are
possible. Please note that your vehicle may
not be equipped with all features
described. This also applies to safety-
related systems and functions.
i Please read the information on qualified
specialist workshops ( Y page 21).
Where will I find...?
First-aid kit
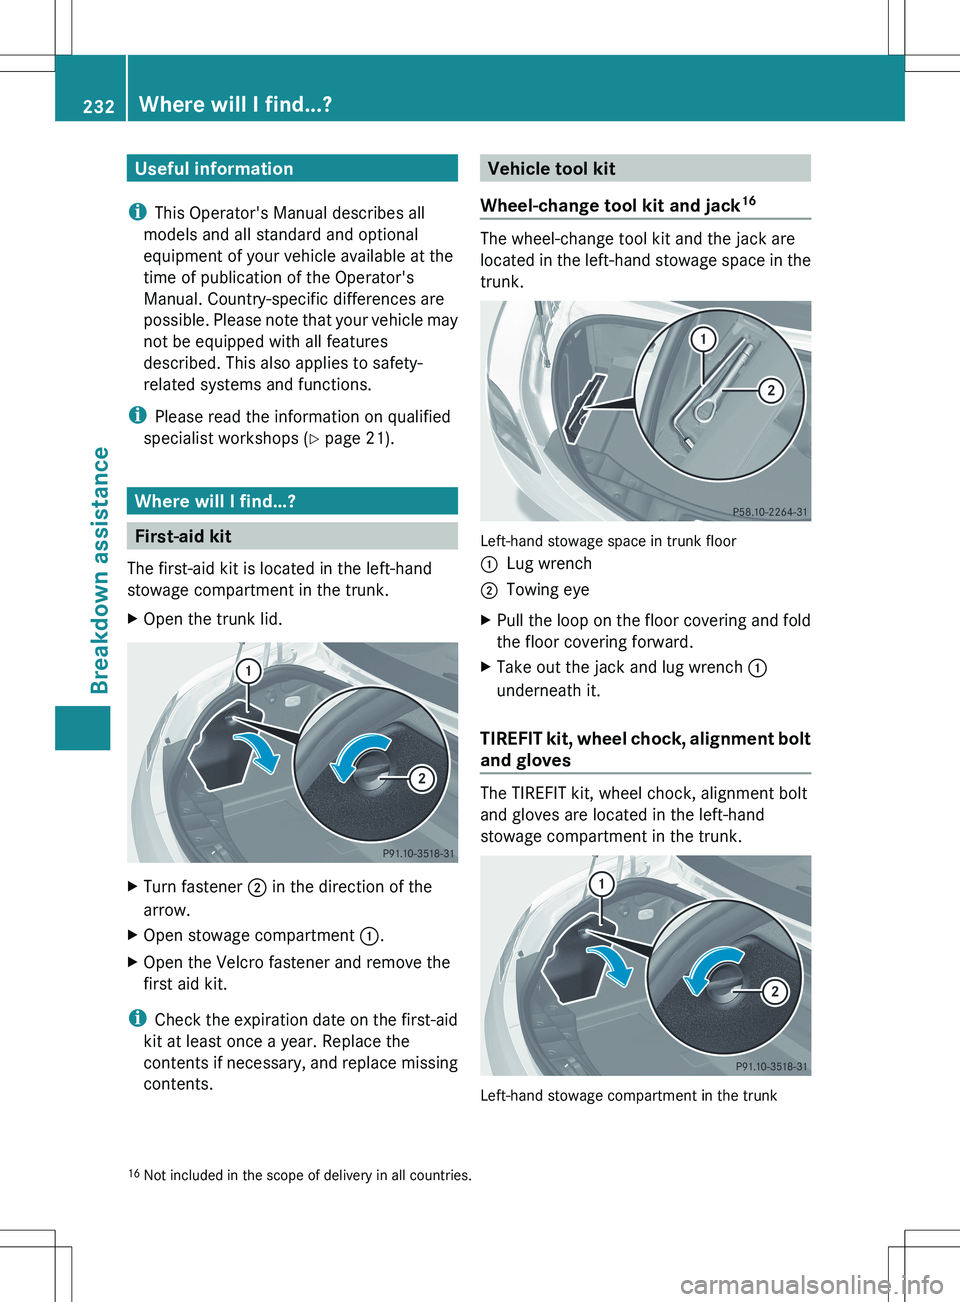
The first-aid kit is located in the left-hand
stowage compartment in the trunk.
XOpen the trunk lid.XTurn fastener ; in the direction of the
arrow.XOpen stowage compartment :.XOpen the Velcro fastener and remove the
first aid kit.
i Check the expiration date on the first-aid
kit at least once a year. Replace the
contents if necessary, and replace missing
contents.
Vehicle tool kit
Wheel-change tool kit and jack 16
The wheel-change tool kit and the jack are
located in the left-hand stowage space in the
trunk.
Left-hand stowage space in trunk floor
:Lug wrench;Towing eyeXPull the loop on the floor covering and fold
the floor covering forward.XTake out the jack and lug wrench :
underneath it.
TIREFIT kit, wheel chock, alignment bolt
and gloves
The TIREFIT kit, wheel chock, alignment bolt
and gloves are located in the left-hand
stowage compartment in the trunk.
Left-hand stowage compartment in the trunk
16 Not included in the scope of delivery in all countries.232Where will I find...?Breakdown assistance