2012 MERCEDES-BENZ SLK55AMG sensor
[x] Cancel search: sensorPage 224 of 334
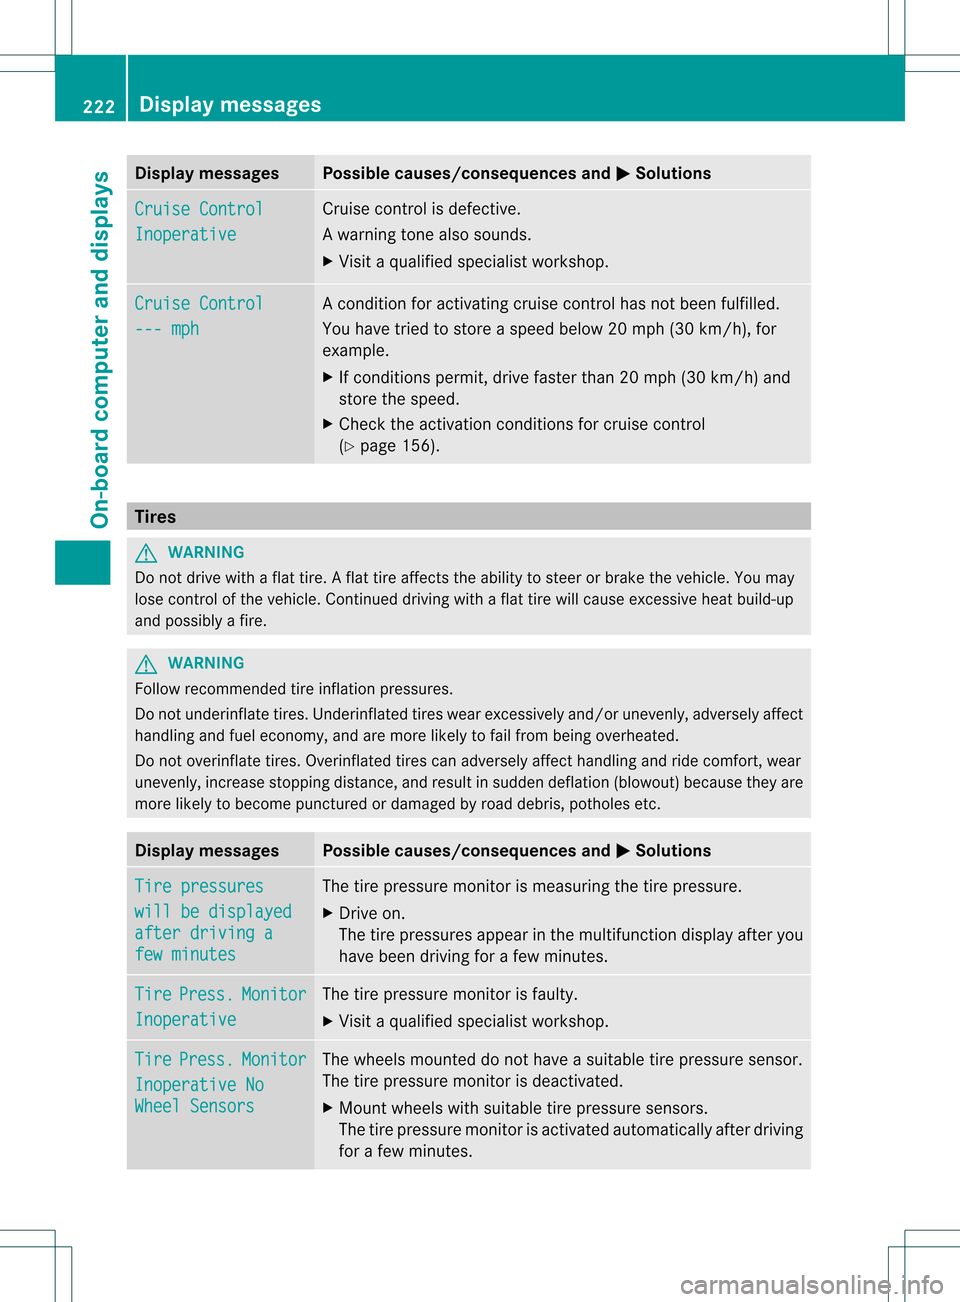
Display messages Possible causes/consequences and
0001 Solutions
Cruise Control
Inoperative Cruise control is defective.
Aw
arning tone also sounds.
X Visi taqualified specialist workshop. Cruise Control
--- mph Ac
ondition for activating cruise control has not been fulfilled.
You have tried to store aspeed below 20 mph (30 km/h), for
example.
X If conditions permit, drive faster than 20 mph (30 km/h) and
store the speed.
X Check the activation conditions for cruise control
(Y page 156). Tires
G
WARNING
Do not drive with a flat tire. A flat tire affects the ability to steer or brake the vehicle. You may
lose control of the vehicle. Continued driving with a flat tire will cause excessive heat build-up
and possibly a fire. G
WARNING
Follow recommended tire inflation pressures.
Do not underinflate tires .Underinflated tires wear excessively and/or unevenly, adversely affect
handling and fuel economy, and are more likely to fail from being overheated.
Do not overinflate tires. Overinflated tires can adversely affect handling and ride comfort, wear
unevenly, increase stopping distance, and resul tinsudden deflation (blowout) because they are
more likely to become punctured or damaged by road debris, potholes etc. Display messages Possible causes/consequences and
0001 Solutions
Tire pressures
will be displayed
after driving a
few minutes The tire pressure monito
ris measuring the tire pressure.
X Drive on.
The tire pressures appearint he multifunction displayafter you
have bee ndriving for a few minutes. Tire Press. Monitor
Inoperative The tire pressure monitor is faulty.
X
Visi taqualified specialist workshop. Tire Press. Monitor
Inoperative No
Wheel Sensors The wheels mounted do not have a suitable tire pressure sensor.
The tire pressure monitor is deactivated.
X
Mount wheels with suitable tire pressure sensors.
The tire pressure monitor is activated automatically after driving
for a few minutes. 222
Display messagesOn-board computer and displays
Page 225 of 334
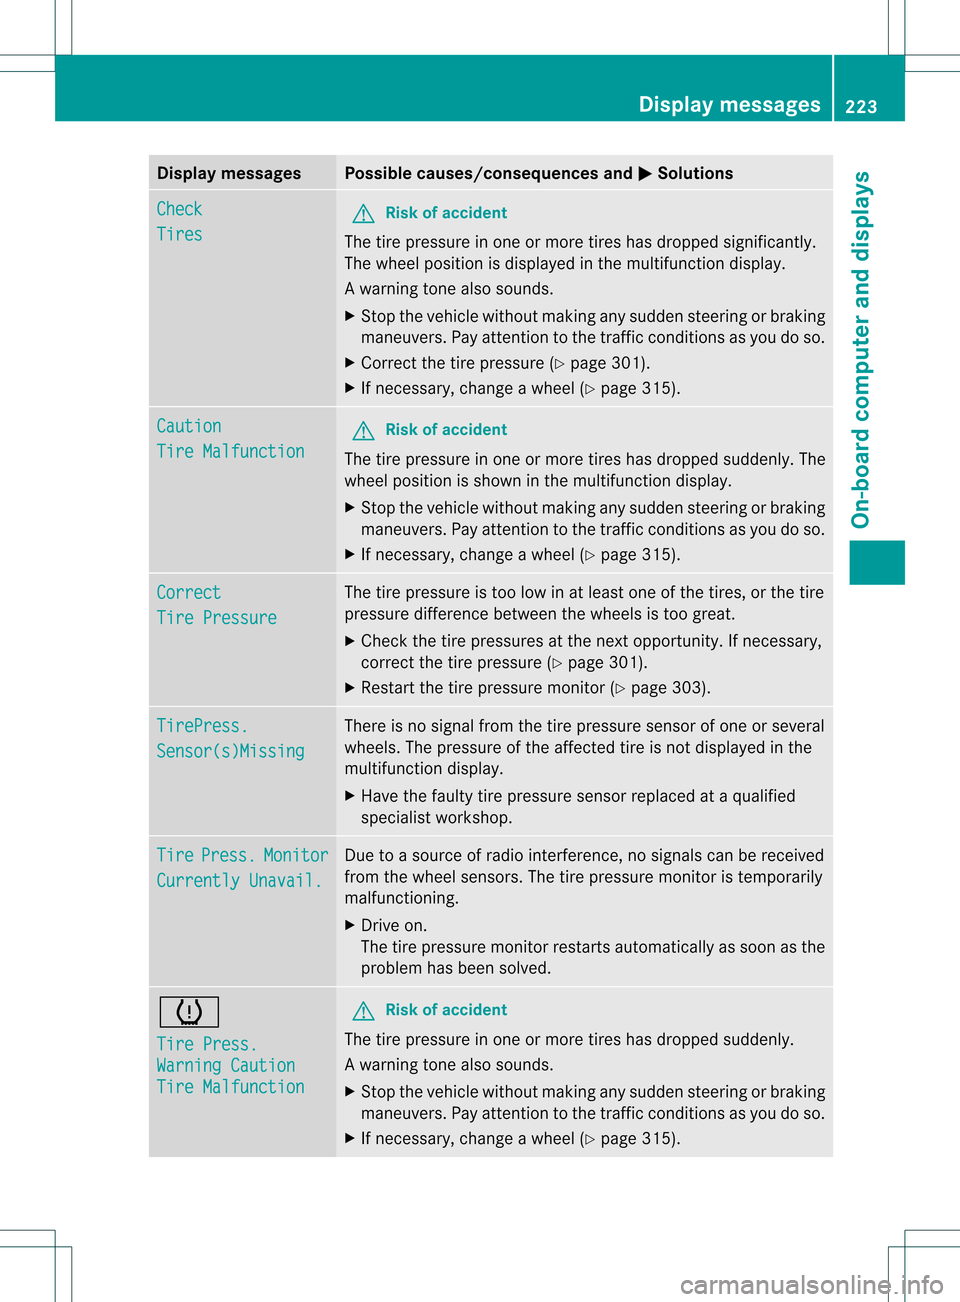
Display messages Possible causes/consequences and
0001 Solutions
Check
Tires G
Risk of accident
The tire pressure in one or more tires has dropped significantly.
The wheel position is displayed in the multifunction display.
Aw arning tone also sounds.
X Stop the vehicle without making any sudde nsteering or braking
maneuvers. Pay attentio nto the traffic conditions as you do so.
X Correct the tire pressure (Y page 301).
X If necessary, change a wheel (Y page 315).Caution
Tire Malfunction G
Risk of accident
The tire pressure in one or more tires has dropped suddenly. The
wheel position is shown in the multifunction display.
X Stop the vehicle without making any sudden steering or braking
maneuvers. Pay attention to the traffic conditions as you do so.
X If necessary, change a wheel (Y page 315).Correct
Tire Pressure The tire pressure is too low in at least one of the tires, or the tire
pressure difference between the wheels is too great.
X Check the tire pressures at the next opportunity. If necessary,
correct the tire pressure (Y page 301).
X Restart the tire pressure monitor (Y page 303).TirePress.
Sensor(s)Missing There is no signal from the tire pressure sensor of one or several
wheels. The pressure of the affected tire is not displayed in the
multifunction display.
X
Have the faulty tire pressure sensor replaced at a qualified
specialist workshop. Tire Press. Monitor
Currently Unavail. Due to a source of radio interference, no signals can be received
from the wheel sensors. The tire pressure monitor is temporarily
malfunctioning.
X
Drive on.
The tire pressure monitor restarts automatically as soon as the
problem has been solved. 0015
Tire Press.
Warning Caution
Tire Malfunction G
Risk of accident
The tire pressure in one or more tires has dropped suddenly.
Aw arning tone also sounds.
X Stop the vehicle without making any sudde nsteering or braking
maneuvers. Pay attentio nto the traffic conditions as you do so.
X If necessary, change a wheel (Y page 315). Display messages
223On-board computer and displays Z
Page 237 of 334
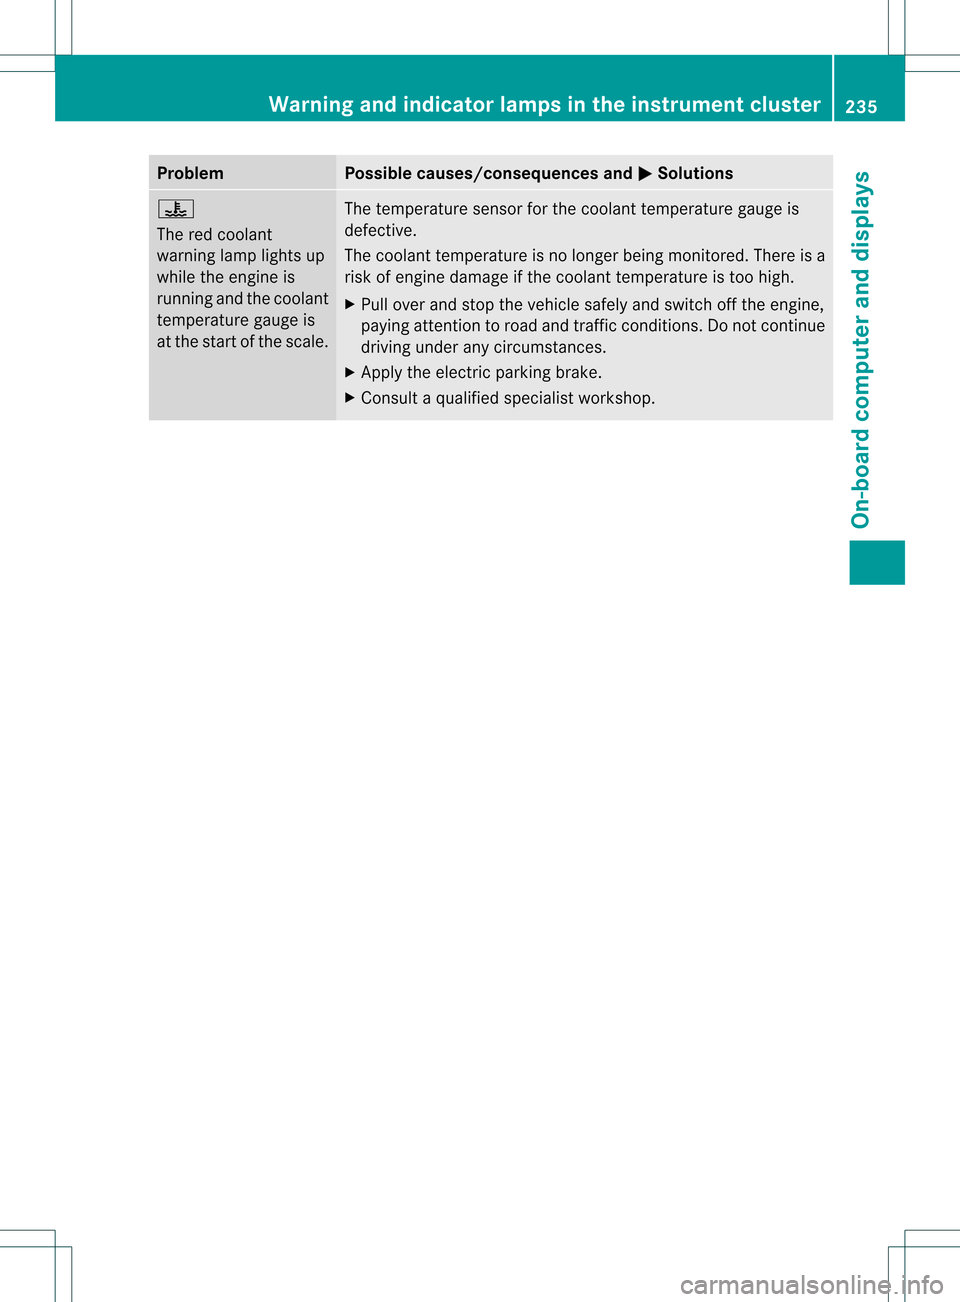
Problem Possible causes/consequences and
0001 Solutions
000C
The red coolant
warning lamp lights up
while the engine is
running and the coolant
temperature gauge is
at the start of the scale.
The temperature sensor for the coolant temperature gauge is
defective.
The coolant temperature is no longer being monitored. There is a
risk of engine damage if the coolant temperature is too high.
X
Pull over and stop the vehicle safely and switch off the engine,
paying attention to road and traffic conditions. Do not continue
driving under any circumstances.
X Apply the electric parking brake.
X Consult a qualified specialist workshop. Warning and indicator lamps in the instrument cluster
235On-board computer and displays Z
Page 271 of 334

shampoo. Cleaning cloths may be used as
well.
Cleaning the sensors X
Cleans ensors0002of the driving systems
with water, car shampoo and a soft cloth.
! If you clean the sensor swith a power
washer, make sure that you keep a
distance of at least 11. 8in(30 cm) between
the vehicle and the power washer nozzle.
Information about the correct distance is
available from the equipment
manufacturer.
Cleaning the exhaus tpipes Impurities combined with the effects of road
grit and corrosive environmental factors may
cause flash rust to form on the surface. You
can restore the original shine of the exhaust
tail pipe by cleaning it regularly, especially in
winter and after washing.
! Do not clean the exhaust tail pipes with
alkaline-based cleaning agents, such as
wheel cleaner.
X Clean the exhaust tail pipes with a chrome
care produc ttested and approved by
Mercedes-Benz. Interior care
Cleaning the display X
Before cleaning the display, make sure that
it is switched off and has cooled down.
X Clean the display surface using a
commercially-available microfiber cloth
and TFT/LCD display cleaner.
X Dry the display surface using a dry
microfiber cloth.
! For cleaning, do not use any of the
following:
R alcohol-based thinner or gasoline
R abrasive cleaning agents
R commercially-available household
cleaning agents
These may damage the display surface. Do
not put pressure on the display surface
when cleaning. This could lead to
irreparable damage to the display.
Cleaning the plastic trim G
WARNING
When cleaning the steering wheel boss and
dashboard, do not use cockpit sprays or
cleaning agents containing solvents. Cleaning
agents containing solvents cause the surface
to become porous, and as aresult, plastic
parts may break away and be thrown around
the interior when an air bag is deployed, which
may result in severe injuries.
! Do not affix the following to plastic
surfaces:
R stickers
R films
R scented oil bottles or similar items
You can otherwise damage the plastic.
! Do not allow cosmetics, insect repellent
or sunscreen to come into contact with the
plastic trim .This maintains the high-quality
look of the surfaces. Care
269Maintenance and care Z
Page 283 of 334

Lowering the vehicle
G
WARNING
Tire pressure that is too high or too low can
lead to a blowout of the mounted emergency
spare wheel/spare wheel, particularly when
driving with a heavy load and increasing
speed .There is a risk of accident.
Check the tire pressure of the emergency
spare wheel or spare wheel and adjust it.
When doing so, observe the specified tire
pressure.
! Inflate the collapsible spare wheel using
the tire inflation compressor before
lowering the vehicle. The wheel rim could
otherwise be damaged.
X Turn the crank of the jack counter-
clockwise until the vehicle is once again
standing firmly on the ground.
X Place the jack to one side. G
WARNING
The wheels could work loose if the wheel nuts
and bolts are not tightened to the specified
tightening torque. There is a risk of accident.
Have the tightening torque immediately
checked at a qualified specialist workshop
after a wheel is changed.
X Tighten the wheel bolts evenly in a
crosswise pattern in the sequence
indicated ( 0002to0020). The tightening torque
must be 96 lb-ft (130 Nm).
X Turn the jack back to its initial position and
store it together with the rest of the tire- change tool kit in the stowage well under
the trunk floor.
X Vehicles with AMG equipment: insert the
cover into the outer sill.
X Place the damaged wheel in the protective
covering (if available) from the tire-change
tool kit, and stow it in the trunk.
The roof must be closed when doing so.
i USA only: when you are driving with the
emergency spare wheel mounted, the tire
pressure monitoring system cannot
function reliably. Only restart the tire
pressure monitoring system when the
defective wheel has been replaced with a
new wheel.
All wheels mounted must be equipped with
functioning sensors. The defective wheel
should no longer be in the vehicle. MOExtended tires (tires with run-flat
properties)
With MOExtended tires (tires with run flat
characteristics), you can continue to drive
your vehicle even if there is a total loss of
pressure in one or more tires.
MOExtended tires may only be used in
conjunction with the activated tire pressure
loss warning system or with the activated tire
pressure monitoring system.
The driving distance in partially laden
condition is approximately 50 miles (80 km),
and approximately 18 miles (30 km) when
fully loaded.
In addition to the vehicle load, the driving
distance possible depends upon:
R speed
R road condition
R outside temperature
The driving distance possible in run-flat mode
may be reduced by extreme driving
conditions/maneuvers, or it can be increased
through a moderate style of driving. Flat tire
281Breakdown assistance Z
Page 303 of 334
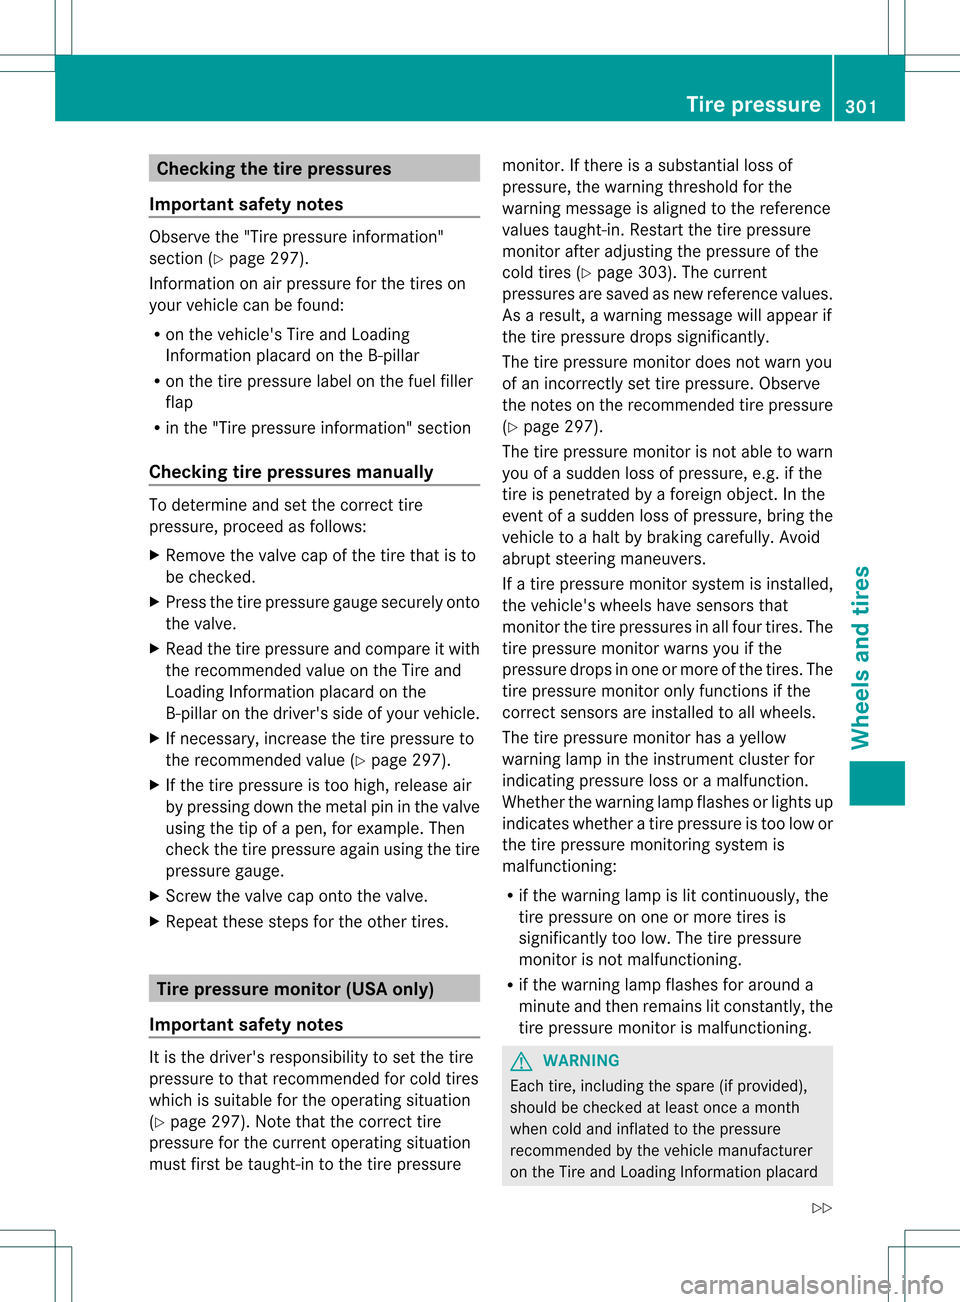
Checking the tire pressures
Important safety notes Observe the "Tire pressure information"
sectio n(Ypage 297).
Information on air pressure for the tires on
your vehicle can be found:
R on the vehicle's Tire and Loading
Information placard on the B-pillar
R on the tire pressure label on the fuel filler
flap
R in the "Tire pressure information" section
Checking tire pressures manually To determine and set the correct tire
pressure, proceed as follows:
X Remove the valve cap of the tire that is to
be checked.
X Press the tire pressure gauge securely onto
the valve.
X Read the tire pressure and compare it with
the recommended value on the Tire and
Loading Information placard on the
B-pillar on the driver's side of your vehicle.
X If necessary, increase the tire pressure to
the recommended value (Y page 297).
X If the tire pressure is too high, release air
by pressing down the metal pin in the valve
using the tip of a pen, for example. Then
chec kthe tire pressure again using the tire
pressure gauge.
X Screw the valve cap onto the valve.
X Repeatt hese steps for the other tires. Tire pressure monitor (USA only)
Important safety notes It is the driver's responsibility to set the tire
pressure to that recommended for cold tires
which is suitable for the operating situation
(Y page 297). Note that the correct tire
pressure for the current operating situation
must first be taught-in to the tire pressure monitor. If there is a substantial loss of
pressure, the warning threshold for the
warning message is aligned to the reference
values taught-in. Restart the tire pressure
monitor after adjusting the pressure of the
cold tires (Y page 303). The current
pressures are saved as new reference values.
As a result, a warning message will appearif
the tire pressure drops significantly.
The tire pressure monitor does not warn you
of an incorrectly set tire pressure. Observe
the notes on the recommended tire pressure
(Y page 297).
The tire pressure monitor is not able to warn
you of a sudden loss of pressure, e.g .ifthe
tire is penetrated by a foreign object. In the
event of a sudden loss of pressure, bring the
vehicle to a halt by braking carefully. Avoid
abrupt steering maneuvers.
If a tire pressure monitor system is installed,
the vehicle's wheels have sensors that
monitor the tire pressures in all four tires. The
tire pressure monitor warns you if the
pressure drops in one or more of the tires. The
tire pressure monitor only functions if the
correct sensors are installed to all wheels.
The tire pressure monitor has a yellow
warning lamp in the instrument cluster for
indicating pressure loss or amalfunction.
Whether the warning lamp flashes or lights up
indicates whether a tire pressure is too low or
the tire pressure monitoring system is
malfunctioning:
R if the warning lamp is lit continuously, the
tire pressure on one or more tires is
significantly too low. The tire pressure
monitor is not malfunctioning.
R if the warning lamp flashes for around a
minute and then remains lit constantly, the
tire pressure monito ris malfunctioning. G
WARNING
Each tire, including the spare (if provided),
should be checked at least once a month
when cold and inflated to the pressure
recommended by the vehicle manufacturer
on the Tire and Loading Information placard Tire pressure
301Wheels and tires
Z
Page 305 of 334
Checking tire pressure electronically
X
Make sure that the SmartKey is in
position 2(Ypage 131) in the ignition lock.
X Press the 0002or0005 button on the
steering wheel to selec tthe Service menu.
X Press the 0003or0004 button to select
Tire Pressure .
X Press the 000Cbutton.
The current tire pressure for each wheel will
be displayed in the multifunction display.
If the vehicle has been parked for longer than
20minutes, the Tire pressure will be displayed after driving a few
minutes message appears.
After a teach-in period, the tire pressure
monitor automatically recognizes new wheels
or new sensors. As long as a clear allocation
of the tire pressure values to the individual
wheels is not possible, the Tire PressureMonitor Active display message is shown
instead of the tire pressure display. The tire
pressures are already being monitored.
i If a spare wheel/emergency spare wheel
is mounted, the system may continue to
show the tire pressure of the wheel that has
been removed for a few minutes. If this
occurs, note that the value displayed for
the position where the spare tire is
mounted is not the same as the spare
wheel/emergency spare wheel's current
tire pressure.
Tire pressure monitor warning
messages If the tire pressure monitor detects a
significant pressure loss on one or more tires,
a warning message is shown in the
multifunction display. Awarning tone also
sounds and the tire pressure warning lamp
lights up in the instrumen tcluster.
Each tire that is affected by a significant loss
of pressure is highlighted with a color. If the
Correct tire pressure message
appears in the multifunction display:
X Check the tire pressure on all four wheels
and correct it if necessary.
i If the wheel positions on the vehicle are
interchanged, the tire pressures may be
displayed for the wrong positions for a
shor ttime. This is rectified after a few
minutes of driving, and the tire pressures
are displayed for the correc tpositions.
Restarting the tire pressure monitor When you restart the tire pressure monitor,
all existing warning messages are deleted and
the warning lamps go out. The monitor uses
the currently set tire pressures as the
reference values for monitoring. In most
cases, the tire pressure monitoring system
recognizes the new reference values
automatically.
However, you can also define reference
values manually as described here:
X
Set the tire pressure to the value
recommended for the corresponding
driving situation on the vehicle's Tire and
Loading Information placard on the driver's
side B-pillar(Y page 297).
Additional tire pressure values for driving
at high speeds or with heavy loads can be
found in the tire pressure table on the
inside of the fuel filler flap.
X Make sure that the tire pressure is correct
on all four wheels.
X Make sure that the SmartKey is in position
2 in the ignition lock.
X Press the 0002or0005 button on the
steering wheel to select the Service menu.
X Press the 0003or0004 button to select
Tire Pressure .
X Press the 000Cbutton.
The multifunction display shows the
current tire pressure of the individual tires
or the Tire pressure will be Tire pressure
303Wheels and tires Z
Page 324 of 334
Useful information
i This Operator's Manual describes all
models and all standard and optional
equipment of your vehicle available at the
time of publication of the Operator's
Manual. Country-specific differences are
possible. Please note that your vehicle may
not be equipped with all features
described. This also applies to safety-
related systems and functions.
i Please read the information on qualified
specialist workshops (Y page 23).Notes on technical data
i The data stated here specifically refers to
a vehicle with standard equipment .Consult
a Mercedes-Benz Center for the data for all
vehicle variants and trim levels. Genuine Mercedes-Benz parts
All Mercedes-Benz Centers maintain a supply
of genuine Mercedes-Benz parts for
necessary service and repair work. In
addition, strategically located parts delivery
centers provide for quick and reliable parts
service.
There are more than 300,000 different
genuine Mercedes-Benz parts available for
Mercedes-Benz models.
Genuine Mercedes-Benz parts are subject to
strictq uality control .Each part has been
specially developed, manufactured or
selected for Mercedes-Ben zvehicles and
fine-tuned for them.
Therefore, only genuine Mercedes-Benzp arts
should be used. G
WARNING
Driving safety may be impaired if non-
approved parts, tires and wheels or safety-
relevan taccessories are used. This could lead to malfunctions in safety-
relevant systems, e.g. the brake system. This
could cause you to lose control of your vehicle
and cause an accident.
For this reason, Mercedes-Benz recommends
that you use genuine Mercedes-Benz parts or
parts of equal quality
.Only use tires, wheels
and accessories tha thave been specifically
approved for your vehicle.
! Air bags and Emergency Tensioning
Devices, as well as control units and
sensors for these restraint systems may be
installed in the following areas of your
vehicle:
R doors
R door pillars
R door sills
R seats
R dashboard
R instrument cluster
R center console
Do no tinstall accessories such as audio
systems in these areas. Do not carry out
repairs or welding .You could impair the
operating efficiency of the restraint
systems.
Have aftermarket accessories installed at
a qualified specialist workshop. Mercedes-
Benz recommends that you use an
authorized Mercedes-Benz Center for this
purpose. H
Environmental note
Daimler AG also supplies reconditioned major
assemblies and parts which are of the same
quality as new parts. They are covered by the
same Limited Warranty entitlements as new
parts.
Always specify the vehicle identification
number (VIN) (Y page 323) and the engine
number (Y page 324) when ordering genuine
Mercedes-Benz parts. 322
Genuine Mercedes-Benz partsTechnical data