2012 MERCEDES-BENZ SLK55AMG sensor
[x] Cancel search: sensorPage 84 of 334
X
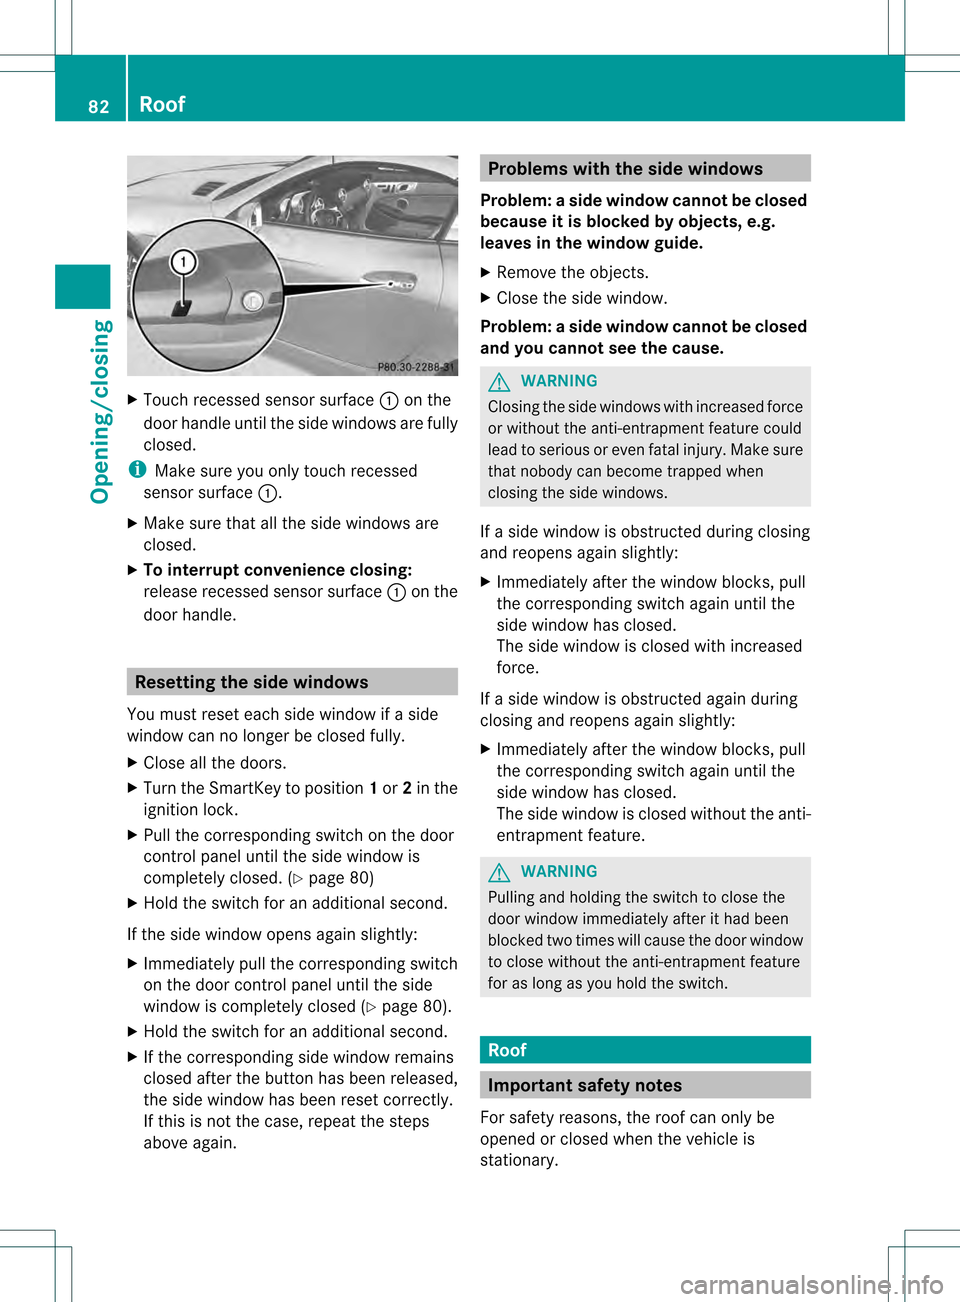
Touch recessed sensor surface 0002on the
door handle until the side windows are fully
closed.
i Make sure you only touch recessed
sensor surface 0002.
X Make sure that all the side windows are
closed.
X To interrupt convenience closing:
release recessed sensor surface 0002on the
door handle. Resetting the side windows
You must reset each side window if a side
window can no longer be closed fully.
X Close all the doors.
X Turn the SmartKey to position 1or 2in the
ignition lock.
X Pull the corresponding switch on the door
control panel until the side window is
completely closed. (Y page 80)
X Hold the switch for an additional second.
If the side window opens again slightly:
X Immediately pull the corresponding switch
on the door control panel until the side
window is completely closed (Y page 80).
X Hold the switch for an additional second.
X If the corresponding side window remains
closed after the button has been released,
the side window has been reset correctly.
If this is not the case, repeat the steps
above again. Problems with the side windows
Problem: aside window cannot be closed
because it is blocked by objects, e.g.
leaves in the window guide.
X Remove the objects.
X Close the side window.
Problem :aside window cannot be closed
and you cannot see the cause. G
WARNING
Closing the side windows with increased force
or without the anti-entrapment feature could
lead to serious or even fatal injury. Make sure
that nobody can become trapped when
closing the side windows.
If a side window is obstructed during closing
and reopens again slightly:
X Immediately afte rthe window blocks, pull
the corresponding switch again until the
side window has closed.
The side window is closed with increased
force.
If a side window is obstructed again during
closing and reopens again slightly:
X Immediately after the window blocks, pull
the corresponding switch again until the
side window has closed.
The side window is closed without the anti-
entrapment feature. G
WARNING
Pulling and holding the switch to close the
door window immediately after it had been
blocked two times will cause the door window
to close without the anti-entrapment feature
for as long as you hold the switch. Roof
Important safety notes
For safety reasons, the roof can only be
opened or closed when the vehicle is
stationary. 82
RoofOpening/closing
Page 101 of 334

The exterior mirrors are automatically heated
if the rear window defroster is switched on
and the outside temperature is low. X
Make sure that the SmartKey is in position
1 or 2in the ignition lock.
X Press button 0003for the right-hand exterior
mirror or button 0002for the left-hand
exterior mirror.
X Press adjustmen tbutton 0023up, down, or
to the left or right until you have adjusted
the exterior mirror to the correct position.
You should have a good overview of traffic
conditions.
Folding the exterior mirrors in or out
electrically X
Make sure that the SmartKey is in position
1 or 2in the ignition lock.
X Briefly press button 0002.
Both exterior mirrors fold in or out.
i Make sure that the exterior mirrors are
always folded out fully while driving .They
could otherwise vibrate. Folding the exterior mirrors in or out
automatically If the "Fold in mirrors when locking" function
is activated in the on-board computer
(Y
page 195):
R the exterior mirrors fold in automatically as
soon as you lock the vehicle from the
outside.
R the exterior mirrors fold out again
automatically as soon as you unlock the
vehicle and then open the driver's or front-
passenger door.
i If the exterior mirrors have been folded in
manually, they do not fold out.
Exterior mirror out of position If an exterior mirror has been pushed out of
position, proceed as follows:
X
Vehicles without electrically folding
exterior mirrors: move the exterior mirror
into the correct position manually.
X Vehicles with electrically folding
exterior mirrors: press the mirror-folding
button (Y page 99) repeatedly until you
hear the mirror engage in position.
The mirror housing is engaged again and
you can adjust the exterior mirrors as usual
(Y page 98). Automatic anti-glare mirrors
G
WARNING
If incident light from headlamps is prevented
from striking the sensor in the rear-view
mirror, for instance, by luggage piled too high
in the vehicle, the mirror's automatic anti-
glare function will not operate.
Incident light could then blind you. This may
distract you from the traffic conditions and,
as a result, you may cause an accident.
The rear-view mirror and the exterior mirror
on the driver's side automatically go into anti-
glare mode if the ignition is switched on and Mirrors
99Seats, steering wheel and mirrors Z
Page 102 of 334
incident light fro
mheadlamps strikes the
sensor in the rear-view mirror.
The mirrors do not go into anti-glare mode if
reverse gear is engaged or the interior lighting
is switched on. Parking position for the exterior
mirror on the front-passenger side
Setting and storing the parking position You can position the front-passenger side
exterior mirror in such a way that you can see
the rear wheel on that side as soon as you
engage reverse gear. You can store this
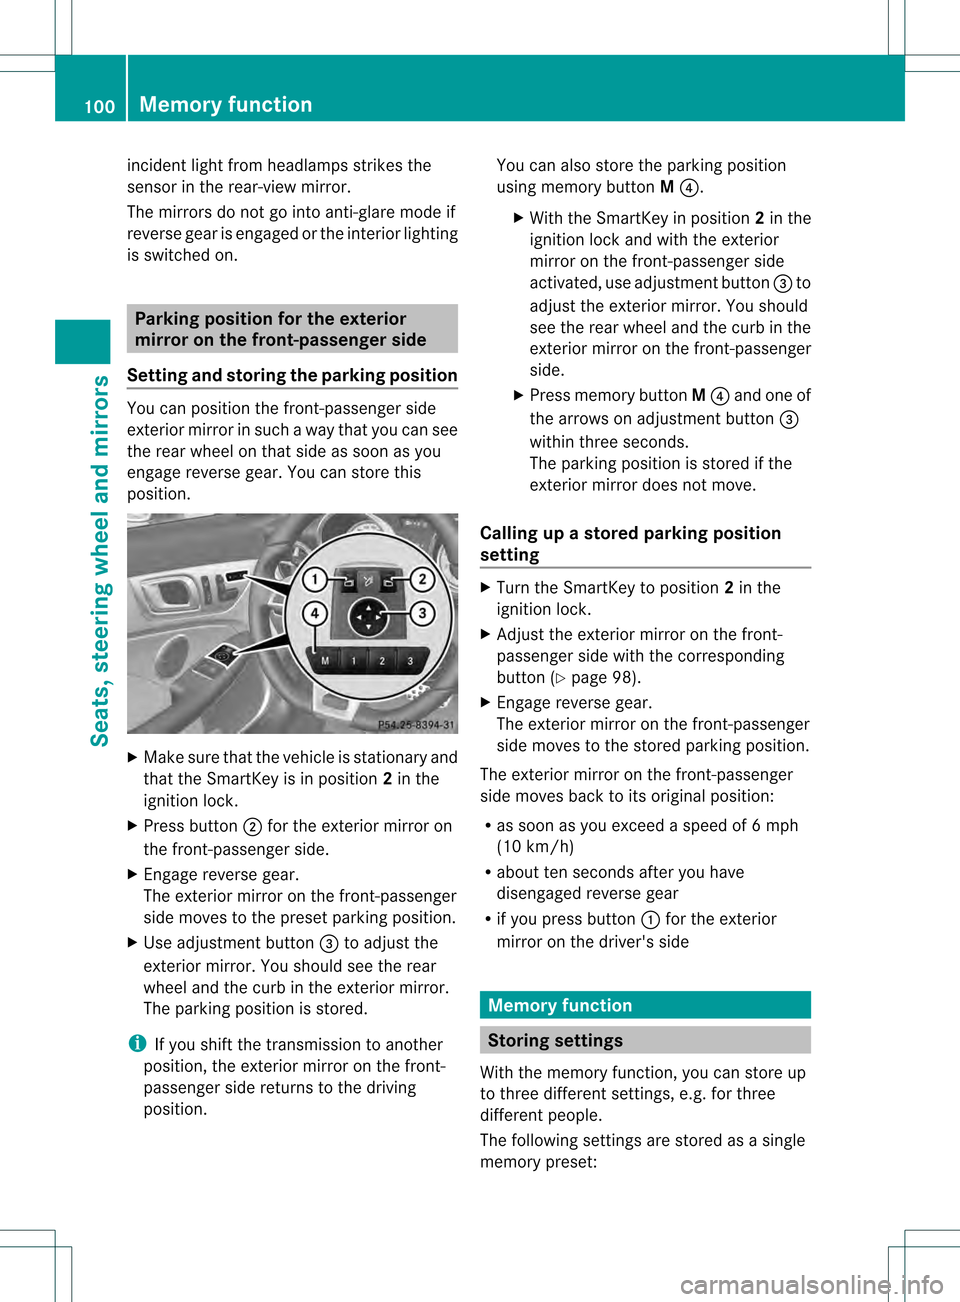
position. X
Make sure that the vehicle is stationary and
that the SmartKey is in position 2in the
ignition lock.
X Press button 0003for the exterior mirror on
the front-passenger side.
X Engage reverse gear.
The exterior mirror on the front-passenger
side moves to the preset parking position.
X Use adjustment button 0023to adjust the
exterior mirror .You should see the rear
wheel and the curb in the exterior mirror.
The parking position is stored.
i If you shift the transmission to another
position, the exterior mirror on the front-
passenger side returns to the driving
position. You can also store the parking position
using memory button
M0022.
X With the SmartKey in position 2in the
ignition lock and with the exterior
mirror on the front-passenger side
activated, use adjustmen tbutton 0023to
adjust the exterio rmirror. You should
see the rear wheel and the curb in the
exterior mirror on the front-passenger
side.
X Press memory button M0022 and one of
the arrows on adjustment button 0023
within three seconds.
The parking position is stored if the
exterior mirror does not move.
Calling up a stored parking position
setting X
Turn the SmartKey to position 2in the
ignition lock.
X Adjust the exterior mirror on the front-
passenger side with the corresponding
button (Y page 98).
X Engage reverse gear.
The exterior mirror on the front-passenger
side moves to the stored parking position.
The exterior mirror on the front-passenger
side moves back to its original position:
R as soon as you exceed a speed of 6mph
(10 km/h)
R about ten seconds after you have
disengaged reverse gear
R if you press button 0002for the exterior
mirror on the driver's side Memory function
Storing settings
With the memory function, you can store up
to three different settings, e.g. for three
differen tpeople.
The following settings are stored as a single
memory preset: 100
Memory functionSeats, steering wheel and mirrors
Page 115 of 334

Windshield wipers
Switching the windshield wipers on/
off G
WARNING
Wiper blades are components that are subject
to wea rand tear. Replace the wipe rblades
twice a year, preferably in the spring and fall.
Otherwise the windshield will not be wiped
properly. As a result, you may not be able to
observe surrounding traffic conditions and
could cause an accident.
! Do not operate the windshield wipers
when the windshield is dry, as this could
damage the wiper blades. Moreover, dust
that has collected on the windshield can
scratch the glass if wiping takes place when
the windshield is dry.
! If the windshield wipers leave smears on
the windshield after the vehicle has been
washed in an automatic car wash, wax or
other residues may be the reason for this.
Clean the windshield using washer fluid
after washing the vehicle in an automatic
car wash. Combination switch
0005
0009 Windshield wipers off
0006 0001 Intermittent wipe, low 5
0007 0002 Intermittent wipe, high 6
000C 0013 Continuous wipe, slow 000D
000E Continuous wipe, fast
0021 0003 Single wipe/ 0004To wipe the
windshield using washer fluid
X Switch on the ignition.
X Turn the combination switch to the
corresponding position.
! Vehicles with a rain sensor: if the
windshield becomes dirty in dry weather
conditions, the windshield wipers may be
activated inadvertently. This could then
damage the windshield wiper blades or
scratch the windshield.
For this reason, you should always switch
off the windshield wipers in dry weather.
In the 0001or0002 position, the appropriate
wiping frequency is set automatically
according to the intensity of the rain. In
the 0002 position, the rain sensor is more
sensitive than in the 0001position, causing
the windshield wipers to wipe more
frequently. Replacing the wiper blades
Important safety notes G
WARNING
For safety reasons, switch off the wipers and
remove the SmartKey from the starter switch
before replacing a wiper blade. Otherwise, the
wiper motor could suddenly turn on and cause
injury.
! To avoid damaging the wiper blades,
make sure that you touc honly the wiper
ar moft he wiper.
! Never open the hood if a windshield wiper
arm has been folded away from the
windshield.
Never fold a windshield wiper arm without
a wiper blade back onto the windshield.
5 Rain sensor set to low sensitivity.
6 Rain sensor set to high sensitivity. Windshield wipers
113Lights and windshield wipers Z
Page 160 of 334
Deactivating cruise control
There are several ways to deactivate cruise
control:
X
Briefly press the cruise control lever
forwards 0023.
or
X Brake.
Cruise control is automatically deactivated if:
R you engage the electric parking brake.
R you are driving at less than 20 mph
(30 km/h)
R ESP ®
intervenes or you deactivate ESP ®
.
R you shift into neutral in a vehicle with
manual transmissio nwhile driving or
depress the clutch pedal for longer than six
seconds.
R on vehicles with manual transmission, you
shift to a gear that is too high, and as a
result the engine speed is too low.
R on vehicles with automatic transmission,
you shift into position Nwhile driving.
If cruise control is deactivated, you will hear
a warning tone. You will see the CruiseControl Off message in the multifunction
display for approximately five seconds.
i When you switch off the engine, the last
speed stored is cleared. DISTRONIC PLUS
Important safety notes i
DISTRONIC PLUS is not available on AMG
vehicles.
DISTRONIC PLUS regulates the speed and
automatically helps you maintain the
distance to the vehicle detected in front.
DISTRONIC PLUS brakes automatically so
that the set speed is not exceeded.
On long and steep downhill gradients,
especially if the vehicle is laden, you must
select shift range 1,2or 3in good time. By
doing so, you will make use of the braking effect of the engine, which relieves the load
on the brake system and prevents the brakes
from overheating and wearing too quickly.
If DISTRONIC PLUS detects a slower-moving
vehicle in front, your vehicle is braked in order
to maintain the preset distance to the vehicle
in front.
G
WARNING
The DISTRONIC PLUS requires familiarity with
its operational characteristics. We strongly
recommend that you review the following
information carefully before operating the
system. G
WARNING
The DISTRONIC PLUS is a convenience
system. Its speed adjustment reduction
capability is intended to make cruise control
more effective and usable when traffic speeds
vary. It is not however, intended to, nor does
it, replace the need for extreme care.
The responsibility for the vehicle's speed,
distance to the preceding vehicle and, most
importantly, brake operation to ensure a safe
stopping distance, always remains with the
driver.
The DISTRONIC PLUS cannot take street and
traffic conditions into account.
Complex driving situations are not always
fully recognized by the DISTRONIC PLUS. This
could result in wrong or missing distance
warnings.
If you want DISTRONIC PLUS to assist you,
the radar sensor system must be activated
(Y page 194) and operational.
If there is no vehicle in front, DISTRONIC
PLUS operates in the same way as cruise
control in the speed range between 20 mph
(Canada: 30 km/h) and 120 mph (Canada:
200 km/h). If a vehicle is driving in front of
you, it operates in the speed range between
0 mph (0 km/h) and 120 mph (Canada:
200 km/h).
Do not use DISTRONIC PLUS while driving on
roads with steep gradients. 158
Driving systemsDriving and parking
Page 161 of 334
As DISTRONIC PLUS transmits radar waves,
it can resemble the radar detectors of the
responsible authorities. You can refer to the
relevant chapte rinthe Operator's Manual if
questions are asked about this.
i USA only:
This device has been approved by the FCC
as a “Vehicular RadarS ystem”.The radar
sensor is intended for use in an automotive
radar system only. Removal, tampering, or
altering of the device will void any
warranties, and is not permitted by the
FCC. Do not tamper with, alter, or use in
any non-approved way.
Any unauthorized modification to this
device could void the user’s authority to
operate the equipment.
i Canada only: This device complies with
RSS-210 of Industry Canada. Operation is
subject to the following two conditions:
1. This device may not cause interference,
and
2. this device must accept any interference
received, including interference that may
cause undesired operation of the device.
Removal, tampering, or altering of the
device will void any warranties and is not
permitted. Do not tamper with, alter, or use
the device in any non-approved way.
Any unauthorized modification to this
device could void the user's authority to
operate the equipment. G
WARNING
DISTRONIC PLUS distance is not a substitute
for the active intervention of the driver. It does
not detect pedestrians or stationary objects,
nor can it detect, recognize or predict the
road's course or the movements of vehicles
in front. DISTRONIC PLUS can only brake the
vehicle using 40% of the vehicle's maximum
available brake force.
DISTRONIC PLUS may not detect narrow
vehicles driving in front, e.g. motorcycles, or
vehicles driving in the lane beyond the lane next to your vehicle, especially if the vehicles
are not driving on the middle of their lane.
The driver must always pay careful attention
to the road, weather and traffic conditions.
The driver must drive, steer and brake in a
manner which will allow him to always have
control of the vehicle.
Sources of high-frequency radio waves, such
as toll stations, speed-measuring radar, etc.,
can cause DISTRONIC PLUS to fail
temporarily.
G
WARNING
The DISTRONIC PLUS cannot take road and
traffic conditions into account. Only use the
DISTRONIC PLUS if the road, weather and
traffic conditions make it advisable to travel
at a constant speed. G
WARNING
Use of the DISTRONIC PLUS can be
dangerous on slippery roads. Rapid changes
in tire traction can result in wheel spin and
loss of control.
The DISTRONIC PLUS does not function in
adverse sight and distance conditions. Do not
use the DISTRONIC PLUS during conditions of
fog, heavy rain, snow or sleet. G
WARNING
The DISTRONIC PLUS cannot take weather
conditions into account. Switch off the
DISTRONIC PLUS or do not switch it on if:
R roads are slippery or covered with snow or
ice. The wheels could lose traction while
braking or accelerating, and the vehicle
could skid.
R the DISTRONIC PLUS system sensor covers
are dirty or visibility is diminished due to
snow, rain or fog, for example. The distance
control system functionality could be
impaired.
Always pay attention to surrounding traffic
conditions even while the DISTRONIC PLUS is
switched on. Otherwise, you may not be able
to recognize dangerous situations until it is Driving systems
159Driving and parking
Z
Page 168 of 334

Deactivating DISTRONIC PLUS
There are several ways to deactivate
DISTRONIC PLUS:
X
Briefly press the cruise control lever
forwards 0002.
or
X Brake, unless the vehicle is stationary.
Whe nyou deactivate DISTRONIC PLUS, the
DISTRONIC PLUS Off message is shown in
the multifunction display for approximately
five seconds.
i The last speed stored remains stored until
you switch off the engine.
DISTRONIC PLUS is automatically
deactivated if:
R you engage the electric parking brake or if
the vehicle is automatically secured with
the electric parking brake
R you are driving slower than 15 mph
(25km/h) and there is no vehicle in front,
or if the vehicle in front is no longer
detected.
R ESP ®
intervenes or you deactivate ESP ®
.
R the transmission is in the P,Ror Nposition.
R you switch off the radar sensor system
(Y page 194).
R you pull the cruise control lever towards
you in order to pull away and the front-
passenger door is open.
R the vehicle has skidded.
If DISTRONIC PLUS is deactivated, you will
hear a warning tone. The DISTRONIC PLUS Off message is shown in the multifunction
display for approximately five seconds. G
WARNING
DISTRONIC PLUS is deactivated and releases
the brakes if the vehicle is slowed down to a
speed below 20 mph (30km/h) by the system,
provided that DISTRONIC PLUS does not
detec tavehicle directly in front. At this point,
the driver must apply the brakes in order to
slow down further and bring the vehicle to a
standstill.
Tips for driving with DISTRONIC PLUS Important safety notes
The following contains descriptions of certain
road and traffic conditions in which you must
be particularly attentive. In such situations,
brake if necessary. DISTRONIC PLUS is then
deactivated.
G
WARNING
The DISTRONIC PLUS works to maintain the
speed selected by the driver unless a moving
obstacle proceeding directly ahead of it in the
same travel directio nis detected (e.g.
following another vehicle ahead of you at your
set distance).
This means that:
R Your vehicle can pass another vehicle after
you have changed lanes.
R While in a sharp turn or if the preceding
vehicle is in a sharp turn, the DISTRONIC
PLUS could lose sight of the preceding
vehicle. Your vehicle could then accelerate
to the previously selected speed.
The DISTRONIC PLUS regulates only the
distance between your vehicle and those
directly ahead of it. It may not register
stationary objects in the road, e.g.:
R a stopped vehicle in a traffic jam
R a disabled vehicle
R an oncoming vehicle 166
Driving systemsDriving and parking
Page 172 of 334
multifunction display goes out. This
deactivates the HOLD function.
In vehicles with automatic transmission:
Shift to 'P' .
X Shift the transmission to position Pto
prevent the vehicle from rolling away.
The HOLD function is deactivated. The
warning message in the multifunction
display disappears.
Ah orn will also sound at regular intervals if
the HOLD function is activated and you:
R switch the engine off, open the driver's
door and remove your seat belt
R open the hood
The sounding of the horn alerts you to the fact
that the vehicle has been parked while the
HOLD function is still activated. If you attempt
to lock the vehicle, the tone becomes louder.
The vehicle is not locked until the HOLD
function is deactivated.
i If the engine has been switched off, it cant
be started again until the HOLD function
has been deactivated. PARKTRONIC
Important safety notes G
WARNING
The PARKTRONIC is a supplemental system.
It is not intended to, nor does it replace, the
need for extreme care. The responsibility
during parking and other critical maneuvers
always remains with the driver. G
WARNING
Make sure no persons or animals are in or
near the area in which you are parking/
maneuvering. Otherwise, they could be
injured.
PARKTRONIC is an electronic parking aid with
ultrasonic sensors. It indicates visually and
audibly the distance between your vehicle
and an object. PARKTRONIC is activated automatically when
you:
R
switch on the ignition
R move the selector lever to position D,Ror
N on vehicles with automatic transmission
R release the electric parking brake
PARKTRONIC is deactivated at speeds above
11 mph (18km/h). It is reactivated at lower
speeds.
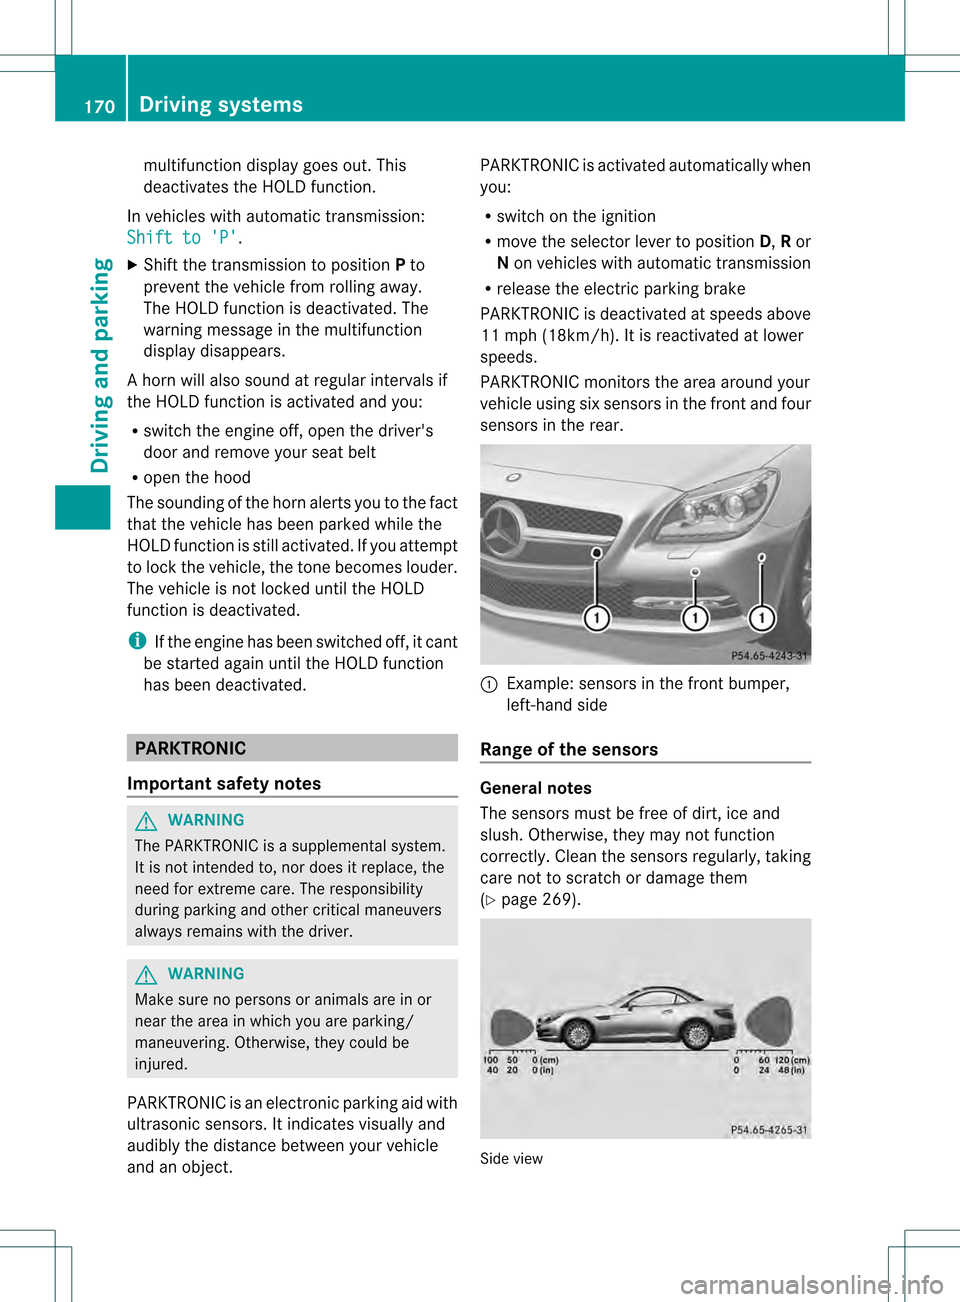
PARKTRONIC monitors the area around your
vehicle using six sensors in the front and four
sensors in the rear. 0002
Example: sensors in the front bumper,
left-hand side
Range of the sensors General notes
The sensors must be free of dirt, ice and
slush. Otherwise, they may not function
correctly. Clean the sensors regularly, taking
care not to scratch or damage them
(Y
page 269). Side view170
Driving systemsDriving and parking