2012 MERCEDES-BENZ SLK350 Button unlock
[x] Cancel search: Button unlockPage 89 of 334

Installing and removing th
ewind screen Preparing for installation
Preparing for installation from the left side of the
vehicle (example)
0002 Wind screen
0003 Locked latch
0023 Unlocked latch
X The following conditions must be fulfilled
for installation:
R unlocking buttons Rand Lpoint in the
direction of travel.
R latch 0023facing you is unlocked.
R latch 0003facing away from you is locked.
X To unlock the latch: press unlocking
button Ror Lon the locked latch.
X To lock th elatch: push the unlocked latch
upwards by hand until it engages.
Installing
X Stop the vehicle, paying attention to road
and traffic conditions.
X Take the wind screen out of the trunk. Installatio
nfrom the left side of the vehicle
(example)
X Prepare for installation (Y page 87).
X Hold wind screen 0002at an angle and slide
it with locked latch 0003in the direction of
arrow 0022into the bracket of the opposite
roll bar.
X Press wind screen 0002on the side of the
vehicle facing you downwards in the
directio nofarrow0020until it engages.
Make sure that studs 0021and latch 0023fit
into the respective brackets.
X Check whethe rwind screen 0002is fully
inserted into all four brackets and is sitting
securely.
X If this is not the case, remove wind
screen 0002again and repeat the steps
above.
Removing
X Stop the vehicle, paying attention to road
and traffic conditions. Removing fro
mthe left side of the vehicle
(example) Roof
87Opening/closing Z
Page 90 of 334

X
Press unlocking button L0002.Meanwhile,
pull wind screen 0003on the side of the
vehicle facing you upwards and tilt it. Removing from the left side of the vehicle
(example)
X
Pull wind screen 0003out of the bracket of
the opposite roll bar in the direction of the
arrow.
X Secure wind screen 0003to the trun kfloor by
the rubber strips (Y page 244).AIRGUIDE
General notes AIRGUIDE offers protection from the wind
when driving with the roof down.
G
WARNING
You could lose control of the vehicle and
injure yourself or others if you operate
AIRGUIDE while driving.
Only fold the AIRGUIDE discs out or in when
the vehicle is stationary.
! AIRGUID Ecan only be positioned
correctly by folding it in or out. AIRGUIDE
canno tbe dismantled. Do not try to remove
AIRGUIDE from its anchorage. Otherwise,
you could damage AIRGUID Eorthe vehicle.
AIRGUIDE can be folded out or back in from
the driver's side or passenger side.
Perform operations involving AIRGUIDE
preferably on the side facing away from
traffic, after you have stopped the vehicle, paying attention to road and traffic
conditions.
Operating AIRGUIDE X
Stop the vehicle, paying attention to road
and traffic conditions. Example: folding out from the left side of the
vehicle
X To fold out AIRGUIDE: turn disk0002
towards the center in the direction of the
arrow as far as it will go.
X Repeatt he process with disk 0003.
X To fold in AIRGUIDE: turn disks0002
and 0003respectively back to the stop behind
the roll bar.
i Disks 0002and 0003can be used
independently of one another, for example
if you are driving without a front passenger. MAGIC SKY CONTROL
General notes MAGIC SKY CONTROL is a glass roof, the
transparency of which can be changed by
applying electrical voltage.
MAGIC SKY CONTROL can be switched
between darkened and transparent states.
i
MAGIC SKY CONTROL darkens
automatically when you turn the SmartKey
to position 0in the ignition lock or remove
the SmartKey. 88
RoofOpening/closing
Page 98 of 334

Problems with the seat heating
The seat heating has switched itself off
prematurely. The vehicle's electrical system
voltage is too low because too many electrical
consumers are switched on.
X
Switch off electrical consumers that you do
not need, such as the rear window
defroster or interior lighting.
X Once the battery is sufficiently charged,
switch on the seat heating again. AIRSCARF
Switching on/off G
WARNING
Very hot air can flow out of the AIRSCARF
vents in the head restraints when AIRSCARF
is in operation. This can cause burns on
unprotected skin near the AIRSCARF vents.
Lower the heating output in good time, when
necessary.
The AIRSCARF function warms the head and
neck area of vehicle occupants with warm air.
The warm air flows out of the holes in the head
restraints.
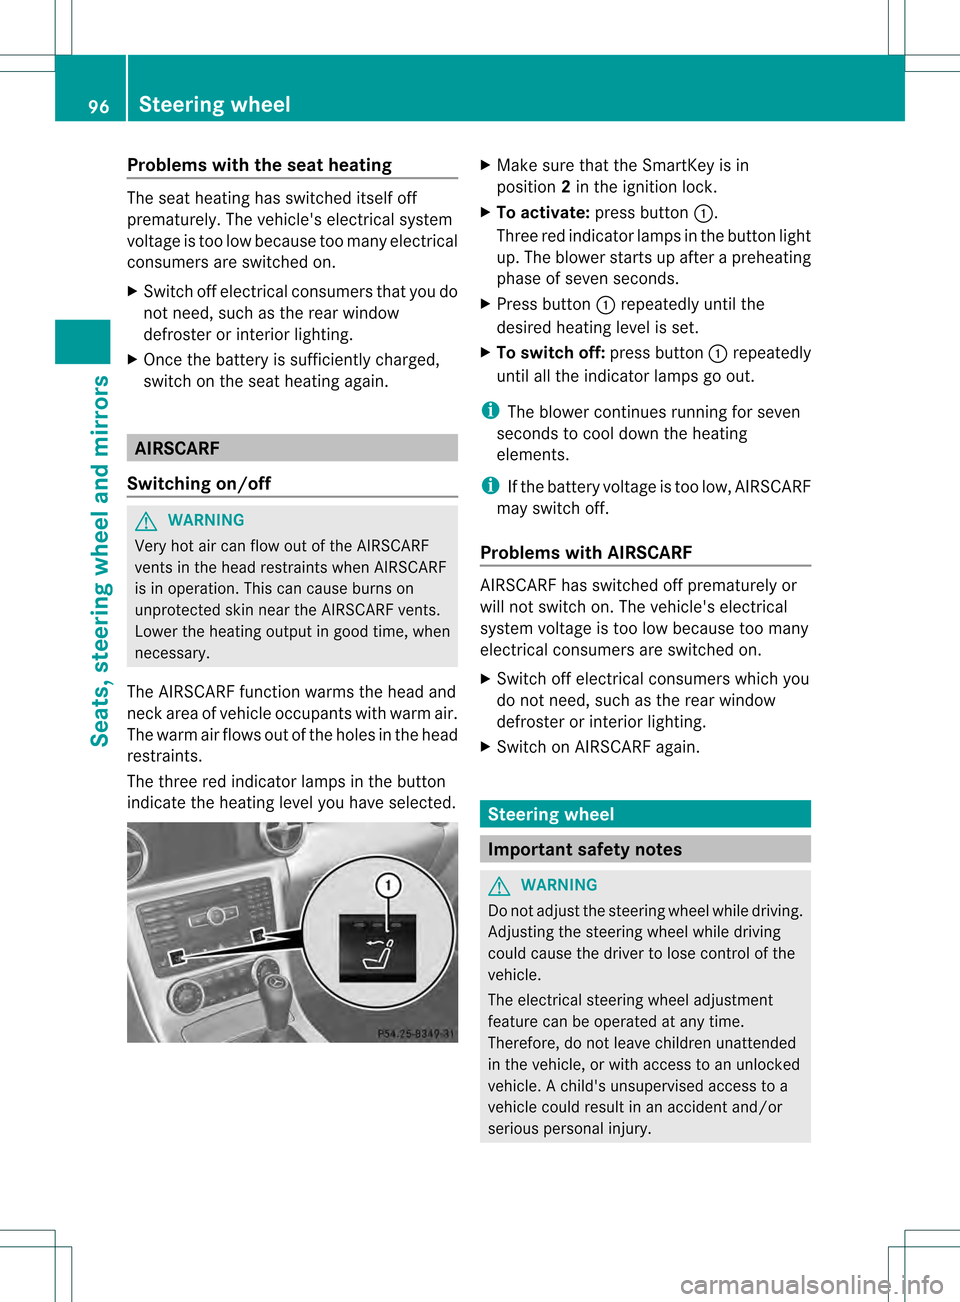
The three red indicator lamps in the button
indicate the heating level you have selected. X
Make sure that the SmartKey is in
position 2in the ignition lock.
X To activate: press button 0002.
Three red indicator lamps in the button light
up. The blower starts up after a preheating
phase of seven seconds.
X Press button 0002repeatedly until the
desired heating level is set.
X To switch off: press button0002repeatedly
until all the indicator lamps go out.
i The blower continues running for seven
seconds to cool down the heating
elements.
i If the battery voltage is too low, AIRSCARF
may switch off.
Problems with AIRSCARF AIRSCARF has switched off prematurely or
will not switch on. The vehicle's electrical
system voltage is too low because too many
electrical consumers are switched on.
X
Switch off electrical consumers which you
do not need, such as the rear window
defroster or interior lighting.
X Switch on AIRSCARF again. Steering wheel
Important safety notes
G
WARNING
Do not adjust the steering wheel while driving.
Adjusting the steering wheel while driving
could cause the driver to lose control of the
vehicle.
The electrical steering wheel adjustment
feature can be operated at any time.
Therefore, do not leave children unattended
in the vehicle, or with access to an unlocked
vehicle. Achild's unsupervised access to a
vehicle could result in an accident and/or
serious personal injury. 96
Steering wheelSeats, steering wheel and mirrors
Page 101 of 334

The exterior mirrors are automatically heated
if the rear window defroster is switched on
and the outside temperature is low. X
Make sure that the SmartKey is in position
1 or 2in the ignition lock.
X Press button 0003for the right-hand exterior
mirror or button 0002for the left-hand
exterior mirror.
X Press adjustmen tbutton 0023up, down, or
to the left or right until you have adjusted
the exterior mirror to the correct position.
You should have a good overview of traffic
conditions.
Folding the exterior mirrors in or out
electrically X
Make sure that the SmartKey is in position
1 or 2in the ignition lock.
X Briefly press button 0002.
Both exterior mirrors fold in or out.
i Make sure that the exterior mirrors are
always folded out fully while driving .They
could otherwise vibrate. Folding the exterior mirrors in or out
automatically If the "Fold in mirrors when locking" function
is activated in the on-board computer
(Y
page 195):
R the exterior mirrors fold in automatically as
soon as you lock the vehicle from the
outside.
R the exterior mirrors fold out again
automatically as soon as you unlock the
vehicle and then open the driver's or front-
passenger door.
i If the exterior mirrors have been folded in
manually, they do not fold out.
Exterior mirror out of position If an exterior mirror has been pushed out of
position, proceed as follows:
X
Vehicles without electrically folding
exterior mirrors: move the exterior mirror
into the correct position manually.
X Vehicles with electrically folding
exterior mirrors: press the mirror-folding
button (Y page 99) repeatedly until you
hear the mirror engage in position.
The mirror housing is engaged again and
you can adjust the exterior mirrors as usual
(Y page 98). Automatic anti-glare mirrors
G
WARNING
If incident light from headlamps is prevented
from striking the sensor in the rear-view
mirror, for instance, by luggage piled too high
in the vehicle, the mirror's automatic anti-
glare function will not operate.
Incident light could then blind you. This may
distract you from the traffic conditions and,
as a result, you may cause an accident.
The rear-view mirror and the exterior mirror
on the driver's side automatically go into anti-
glare mode if the ignition is switched on and Mirrors
99Seats, steering wheel and mirrors Z
Page 111 of 334

X
Have the headlamps checked at a qualified
specialist workshop. Interio
rlighting Overview of interior lighting
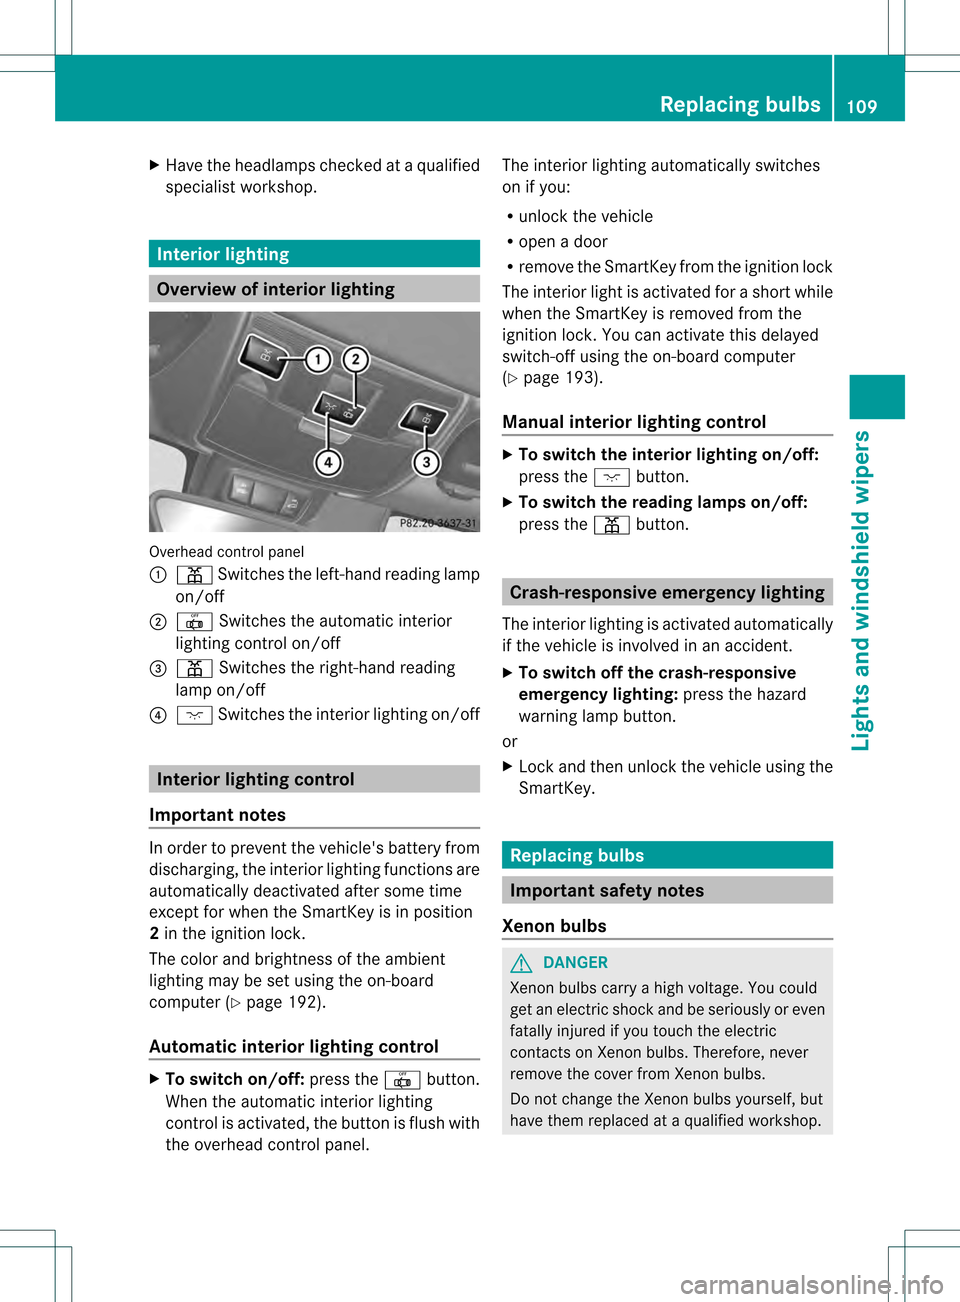
Overhead control panel
0002
0010 Switches the left-hand reading lamp
on/off
0003 0017 Switches the automatic interior
lighting control on/off
0023 0010 Switches the right-hand reading
lamp on/off
0022 0002 Switches the interior lighting on/off Interior lighting control
Important notes In order to prevent the vehicle's battery from
discharging, the interior lighting functions are
automatically deactivated after some time
except for when the SmartKey is in position
2 in the ignition lock.
The color and brightness of the ambient
lighting may be set using the on-board
computer (Y page 192).
Automatic interior lighting control X
To switch on/off: press the0017button.
When the automatic interior lighting
control is activated, the button is flush with
the overhead control panel. The interior lighting automatically switches
on if you:
R unloc kthe vehicle
R open a door
R remove the SmartKey from the ignition lock
The interior light is activated for a short while
when the SmartKey is removed from the
ignition lock. You can activate this delayed
switch-off using the on-board computer
(Y page 193).
Manual interior lighting control X
To switch the interior lighting on/off:
press the 0002button.
X To switch the reading lamps on/off:
press the 0010button. Crash-responsive emergency lighting
The interior lighting is activated automatically
if the vehicle is involved in an accident.
X To switch off the crash-responsive
emergency lighting: press the hazard
warning lamp button.
or
X Lock and then unlock the vehicle using the
SmartKey. Replacing bulbs
Important safety notes
Xenon bulbs G
DANGER
Xenon bulbs carry a high voltage. You could
get an electric shock and be seriously or even
fatally injured if you touch the electric
contacts on Xenon bulbs. Therefore, never
remove the cover from Xenon bulbs.
Do not change the Xenon bulbs yourself, but
have them replaced at a qualified workshop. Replacing bulbs
109Lights and windshield wipers Z
Page 133 of 334

G
WARNING
On slippery road surfaces, never downshift in
order to obtai nbraking action. This could
resul tind rive wheel slip and reduced vehicle
control. Your vehicle's ABS will not prevent
this type of loss of control. G
WARNING
Manual transmission: Waitu ntil the vehicle is
stationary before removing the SmartKey
from the starter switch .The vehicle cannot be
steered when the SmartKey is removed from
the starter switch. G
WARNING
It is dangerous to shift the automatic
transmission out of parking position Por
neutral position Nif the engine speed is
higher than idle speed. If your foot is not firmly
on the brake pedal, the vehicle could
accelerate quickly forward or in reverse. You
could lose control of the vehicle and hit
someone or something. Only shift into gear
when the engine is idling normally and when
your right foot is firmly on the brake pedal.
! Warm up the engine quickly. Do not use
the engine's full performance until it has
reached operating temperature.
Only shift the automatic transmission to
the desired drive position when the vehicle
is stationary.
Where possible, avoid spinning the drive
wheels when pulling away on slippery
roads. You could otherwise damage the
drive train.
! AMG vehicles: at low engine oil
temperatures below 68 ‡(+20 †), the
maximu mengine speed is restricted in
order to protect the engine .To protec tthe
engine and maintain smooth engine
operation, avoid driving at full throttle when
the engine is cold. SmartKey positions
SmartKey 000F
To remove the SmartKey
Vehicles with automatic transmission:
shift the transmission to position P
0005 Power supply for some consumers, such
as the windshield wipers
0006 Ignition (power supply for all consumers)
and drive position
0007 To start the engine
If the SmartKey is in position 0in the ignition
lock for an extended period of time, it can no
longer be turned in the ignition lock. The
steering is then locked. To unlock, remove the
SmartKey and reinsert it into the ignition lock.
The steering is locked when you remove the
SmartKey from the ignition lock.
i The SmartKey can be turned in the
ignition lock even if it is not the correct
SmartKey for the vehicle. The ignition is not
switched on. The engine cannot be started.
KEYLESS-GO General information
Vehicles with KEYLESS-GO are equipped with
aS
martKey featuring an integrated KEYLESS-
GO function and a detachable Start/Stop
button.
The Start/Stop button must be inserted into
the ignitio nlock and the SmartKey must be in
the vehicle. Driving
131Driving and parking Z
Page 135 of 334

Do not ru
nthe engine in confined areas (such
as a garage) which are not properly ventilated.
If you think that exhaust gas fumes are
entering the vehicle while driving, have the
cause determined and corrected
immediately. If you must drive under these
conditions, drive only with at least one
window fully open at all times.
! Do not depress the accelerator pedal
when starting the engine.
General information i
AMG vehicles: the exhaust flap of the
exhaust system will be checked after every
cold start. Aresulting noise can be heard
during this process.
i During a cold start, the engine runs at
higher speeds to enable the catalytic
converter to reach its operating
temperature. The sound of the engine may
change during this time.
Manual transmission X
Depress the brake pedal and keep it
depressed.
X Fully depress the clutch pedal.
X Shift to neutral N.
i You can only start the engine when the
clutch pedal is fully depressed.
Automatic transmission X
Shift the transmission to position P.
The transmission position display in the
multifunction display shows P.
i You can also start the engine when the
transmission is in position N.
Starting procedure with the SmartKey i
To start the engine using the SmartKey
instead of KEYLESS-GO, pull the Start/
Stop button out of the ignition lock. X
Turn the SmartKey to position 3in the
ignition lock (Y page 131)and release it as
soo nas the engine is running.
Using KEYLESS-GO to startt he engine G
WARNING
As long as the SmartKey is in you rvehicle, the
vehicle can be started. Therefore, never leave
children unattended in the vehicle, as they
could otherwise accidentally start the engine.
When leaving the vehicle, always take the
SmartKey with you and lock the vehicle. Do
not leave children unattended in the vehicle,
or with access to an unlocked vehicle. A
child's unsupervised access to a vehicle could
result in an acciden tand/o rserious personal
injury.
i The Start/Stop button can be used to
start the vehicle manually without inserting
the SmartKey into the ignition lock. The
Start/Stop button must be inserted into
the ignition lock and the SmartKey must be
in the vehicle. This mode for starting the
engine operates independently of the ECO
start/stop automatic engine start function.
X Depress the brake pedal and keep it
depressed.
X Press the Start/Stop button (Y page 131)
once.
The engine starts. Pulling away
Manual transmission X
Depress the brake pedal and keep it
depressed.
X Fully depress the clutch pedal.
X Shift to either first gear or reverse gear R.
X Release the electric parking brake
(Y page 150). Driving
133Driving and parking Z
Page 151 of 334

Problems with fuel and the fuel tank
Problem Possible causes/consequences and
0001 Solutions
Fuel is leaking from the
vehicle.
G
Risk of explosion or fire
The fuel line or the fuel tank is defective.
X Turn the SmartKey to position 0in the ignition lock immediately
and remove it (Y page 131).
X Do not restart the engine under any circumstances.
X Consult a qualified specialist workshop. The fuel filler flap
cannot be opened. The fuel filler flap cannot be unlocked using the button on the
SmartKey.
or
The SmartKey battery is discharged.
X
Unlock the vehicle using the mechanical key (Y page 70).The fuel filler flap is unlocked, but the opening mechanism is
jammed.
X
Consult a qualified specialist workshop. Parking
Important safety notes
G
WARNING
Do not park this vehicle in areas where
combustible materials such as grass, hay or
leaves can come into contact with the hot
exhaust system. Do not park the vehicle on
dry grassland or harvested grain fields. These
materials could be ignited by the hot exhaust
system and cause a vehicle fire.
Vehicle movement can cause serious
personal injury or damage to the vehicle or
the vehicle drivetrain. Therefore, always do
the following before turning off the engine and
leaving the vehicle:
R keep your right foot on the brake pedal.
R engage the parking brake.
R shift the manual transmission to firstgear
or reverse gear R.
R shift the automatic transmission to park
position P. R
slowly release the brake pedal.
R when parked on an incline, always turn the
front wheels towards the road curb.
R turn the SmartKey in the ignition lock to
position 0and remove the SmartKey from
the ignition lock.
R take the SmartKey with you and lock the
vehicle when leaving. G
WARNING
Manual transmission: Wait until the vehicle is
stationary before removing the SmartKey
from the starter switch. The vehicle cannot be
steered when the SmartKey is removed from
the starter switch. Parking
149Driving and parking Z