2012 MERCEDES-BENZ SLK250 trunk lock
[x] Cancel search: trunk lockPage 89 of 334

Installing and removing th
ewind screen Preparing for installation
Preparing for installation from the left side of the
vehicle (example)
0002 Wind screen
0003 Locked latch
0023 Unlocked latch
X The following conditions must be fulfilled
for installation:
R unlocking buttons Rand Lpoint in the
direction of travel.
R latch 0023facing you is unlocked.
R latch 0003facing away from you is locked.
X To unlock the latch: press unlocking
button Ror Lon the locked latch.
X To lock th elatch: push the unlocked latch
upwards by hand until it engages.
Installing
X Stop the vehicle, paying attention to road
and traffic conditions.
X Take the wind screen out of the trunk. Installatio
nfrom the left side of the vehicle
(example)
X Prepare for installation (Y page 87).
X Hold wind screen 0002at an angle and slide
it with locked latch 0003in the direction of
arrow 0022into the bracket of the opposite
roll bar.
X Press wind screen 0002on the side of the
vehicle facing you downwards in the
directio nofarrow0020until it engages.
Make sure that studs 0021and latch 0023fit
into the respective brackets.
X Check whethe rwind screen 0002is fully
inserted into all four brackets and is sitting
securely.
X If this is not the case, remove wind
screen 0002again and repeat the steps
above.
Removing
X Stop the vehicle, paying attention to road
and traffic conditions. Removing fro
mthe left side of the vehicle
(example) Roof
87Opening/closing Z
Page 114 of 334

X
Switch off the lights.
X Ope nthe hood.
X Turn housing cover 0002counter-clockwise
and pull it out.
X Push the bulb upwards by the holder,
disconnectita nd pull it outofbulb
holder 0003.
X Inser tthe new bulb into bulb holder 0003,
push it down and secure it in place.
X Attach housing cover 0002and turn it
clockwise until it engages.
Parking lamps/standing lamps
(halogen headlamps) Due to their location, have the bulbs in the
side marker lamp changed at a qualified
specialist workshop.
Turn signal lamp (halogen headlamps) X
Switch off the lights.
X Open the hood.
X Turn bulb holder 0002counterclockwise and
pull it out.
X Take the bulb out of bulb holder 0002.
X Insert the new bulb into bulb holder 0002.
X Insert bulb holder 0002and turn it clockwise
until it engages. Changing the rear bulbs
Backup lamp X
Switch off the lights.
X Make sure the roof is closed.
X Open the trunk.
X Turn and pull out buffer stop 0003.
X Unclip catch 0002for side paneling 0023. X
Reach upwards into side paneling 0023,
loosen and pull downwards until
holder 0022of the backup lamp is easily
accessible.
X Pull out bulb holder 0022.
X Pull out the bulb.
X Insert the new bulb into bulb holder 0022.
X Insert bulb holder 0022until it engages.
X Install side paneling 0023precisely.
X Clip in catch 0002for side paneling 0023.
X Push in and tighten buffer stop 0003.112
Replacing bulbsLights and windshield wipers
Page 226 of 334
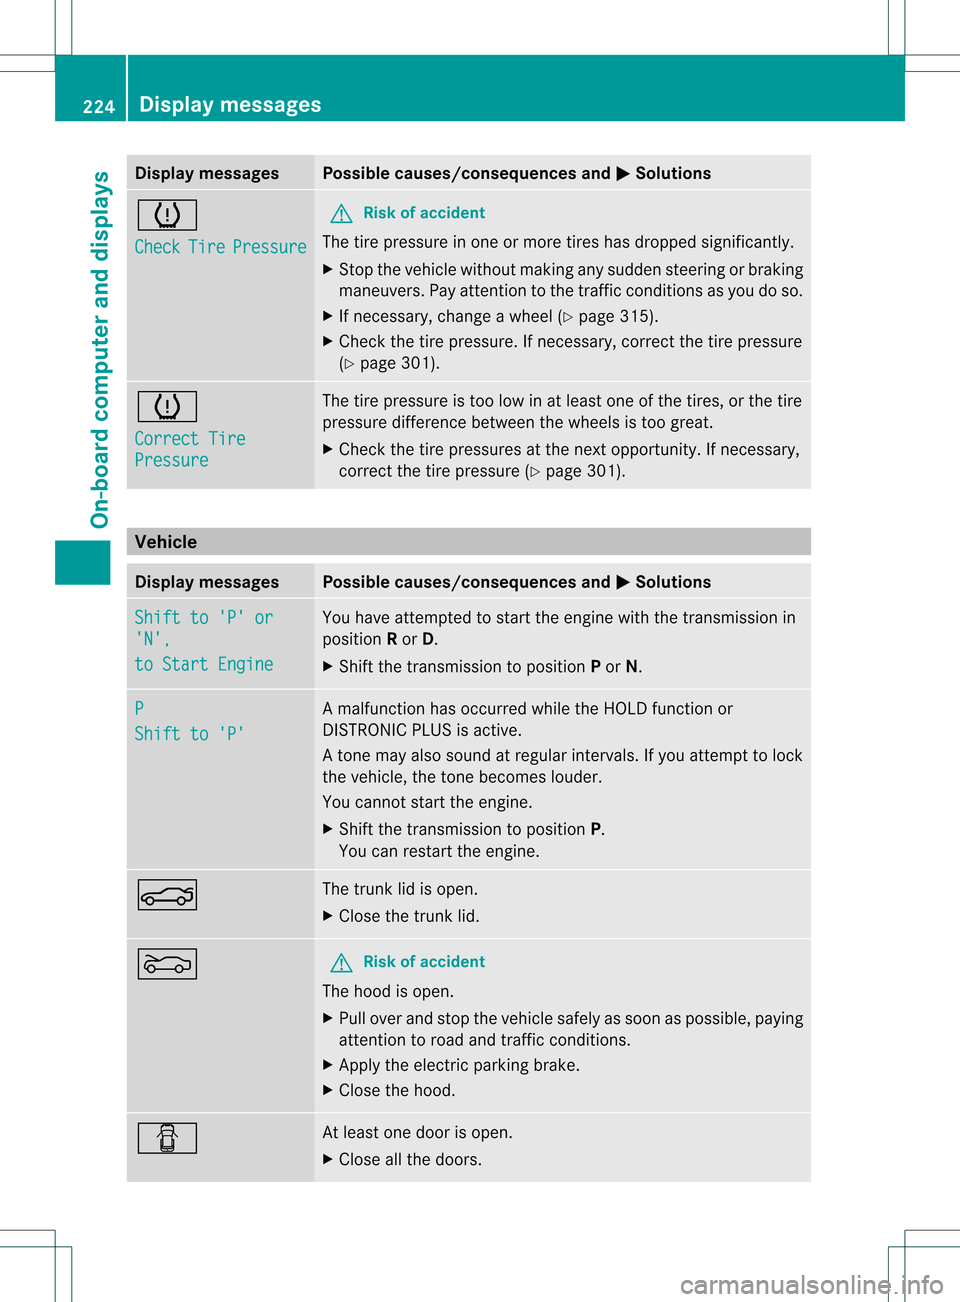
Display messages Possible causes/consequences and
0001 Solutions
0015
Check
Tire Pressure G
Risk of accident
The tire pressure in one or more tires has dropped significantly.
X Stop the vehicle without making any sudden steering or braking
maneuvers .Pay attentio nto the traffic conditions as you do so.
X If necessary, change a wheel (Y page 315).
X Check the tire pressure. If necessary, correct the tire pressure
(Y page 301). 0015
Correct Tire
Pressure The tire pressure is too low in at least one of the tires, or the tire
pressure difference between the wheels is too great.
X
Check the tire pressures at the next opportunity. If necessary,
correct the tire pressure (Y page 301).Vehicle
Display messages Possible causes/consequences and
0001 Solutions
Shift to 'P' or
'N',
to Start Engine You have attempted to start the engine with the transmission in
position
Ror D.
X Shift the transmission to position Por N. P
Shift to 'P' A malfunction has occurred while the HOLD function or
DISTRONIC PLUS is active.
At
one may also sound at regular intervals. If you attempt to lock
the vehicle, the tone becomes louder.
You cannot start the engine.
X Shift the transmission to position P.
You can restart the engine. 0013 The trunk lid is open.
X
Close the trunk lid. 0012 G
Risk of accident
The hood is open.
X Pull over and stop the vehicle safely as soon as possible, paying
attention to road and traffic conditions.
X Apply the electric parking brake.
X Close the hood. 0004 At least one door is open.
X
Close all the doors. 224
Display messagesOn-board computer and displays
Page 227 of 334
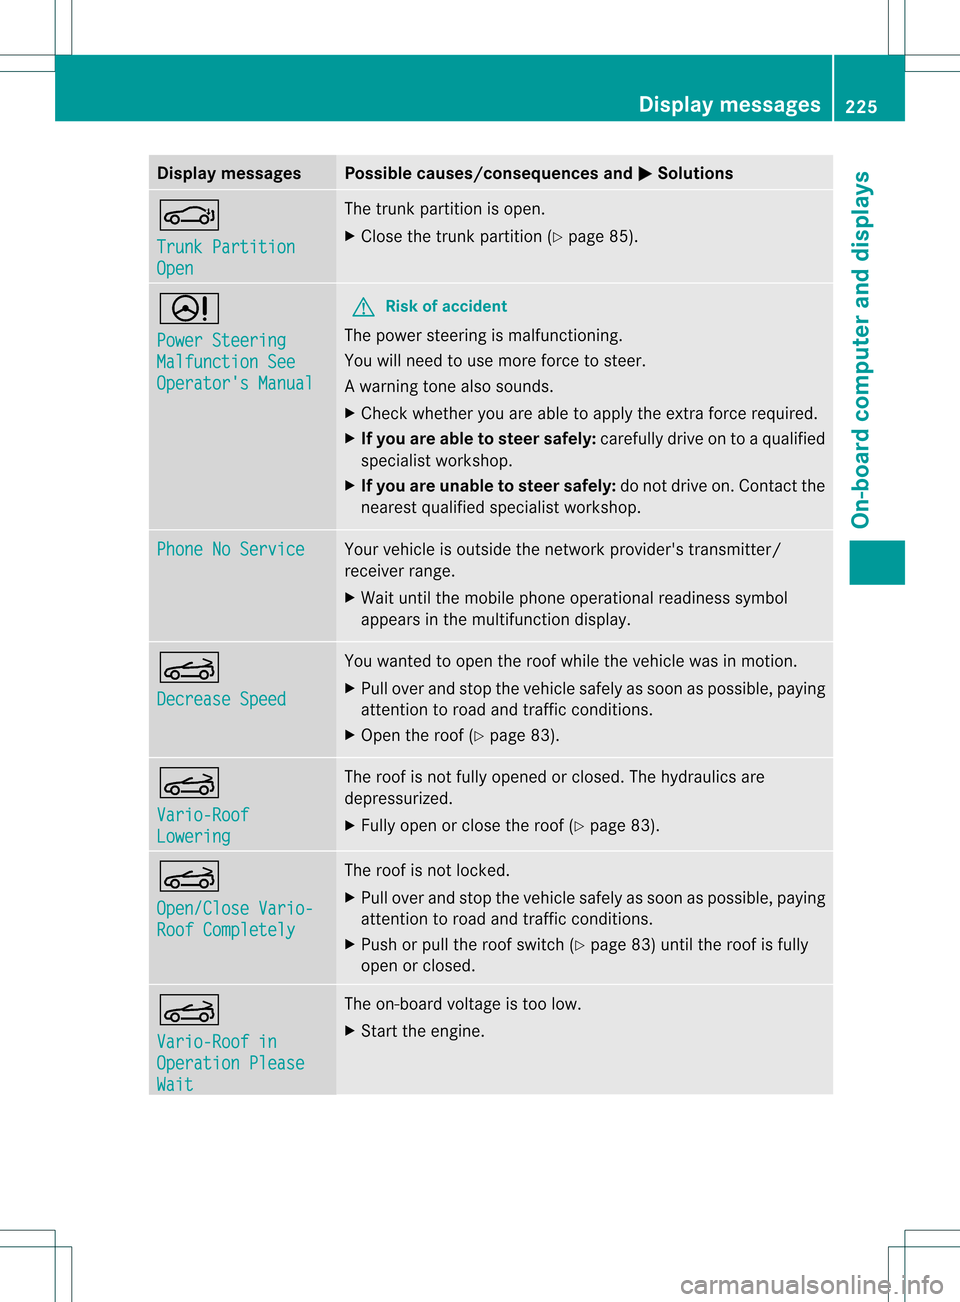
Display messages Possible causes/consequences and
0001 Solutions
0007
Trunk Partition
Open The trunk partition is open.
X
Close the trunk partition (Y page 85).0005
Power Steering
Malfunction See
Operator's Manual G
Risk of accident
The powe rsteering is malfunctioning.
You will need to use more force to steer.
Aw arning tone also sounds.
X Chec kwhether you are able to apply the extra force required.
X If you are able to steer safely: carefully drive on to a qualified
specialist workshop.
X If you are unable to steer safely: do not drive on. Contact the
nearest qualified specialist workshop. Phone No Service Your vehicle is outside the network provider's transmitter/
receiver range.
X
Wait until the mobile phone operational readiness symbol
appears in the multifunction display. 0008
Decrease Speed You wanted to open the roof while the vehicle was in motion.
X
Pull over and stop the vehicle safely as soon as possible, paying
attention to road and traffic conditions.
X Open the roof (Y page 83). 0008
Vario-Roof
Lowering The roof is not fully opened or closed. The hydraulics are
depressurized.
X
Fully open or close the roof (Y page 83).0008
Open/Close Vario-
Roof Completely The roof is not locked.
X
Pull over and stop the vehicle safely as soon as possible, paying
attention to road and traffic conditions.
X Push or pull the roof switch (Y page 83) until the roof is fully
open or closed. 0008
Vario-Roof in
Operation Please
Wait The on-board voltage is too low.
X
Start the engine. Display messages
225On-board computer and displays Z
Page 255 of 334
Destinatio
nDownload gives you access to a
database with over 15 million points of
interest (POIs)/important destinations that
can be downloaded onto the navigation
system of your vehicle. If you know the
destination, you can download the address or
obtain the location of points of interest
(POIs)/important destinations in the
surrounding area.
You are prompted to confirm route guidance
to the address entered.
X Select Yes with the
0002or0005 buttons
on COMAND.
X Press the 0003button on COMAND to
confirm.
The system calculates the route and
subsequently starts the route guidance with
the address entered.
i If you select No , the address can be stored
in the address book.
i The Destination Download function is
available if the corresponding mobile
phone network is available and data
transfer is possible.
Route Assistance
This service is part of the mbrace PLUS
Package and cannot be purchased
separately.
i You can also use the Route Assistance
function if your vehicle is not equipped with
a navigation system.
Within the framework of this service, you
receive a professional and reliable form of
navigation support without having to leave
your vehicle.
The customer service representative
determines a suitable driving route based on
your current vehicle position and the desired
destination and guides you live through the
current sections of the route. Search
&Send "Search & Send" is a destination entry
service. You can find further information on
"Search
&Send" in the separate COMAND
operating instructions.
Vehicle remote opening If you have unintentionally locked your
vehicle (e.g. the SmartKey is still in the
vehicle) and a replacemen
tSmartKey is not
available, the vehicle can be opened by a
Mercedes-Benz Customer Assistance Center.
The vehicle can be opened remotely up to four
days after the ignitio nwas last switched off.
X Contac tthe following service hotlines:
R USA: Mercedes-Ben zCustomer
Assistance Cente rat
1-800-FOR-MERCedes
(1-800-367-6372) or 1-888-990-9007
R Canada: Customer Service at
1-888-923-8367
You will be asked for you rpassword.
X Return to your vehicle at the time agreed
upon with the Mercedes-Ben zCustomer
Assistance Center.
X Pull on the trunk lid handle for at least
20 seconds until the indicator lamp in the
SOS button (Y page 249) flashes.
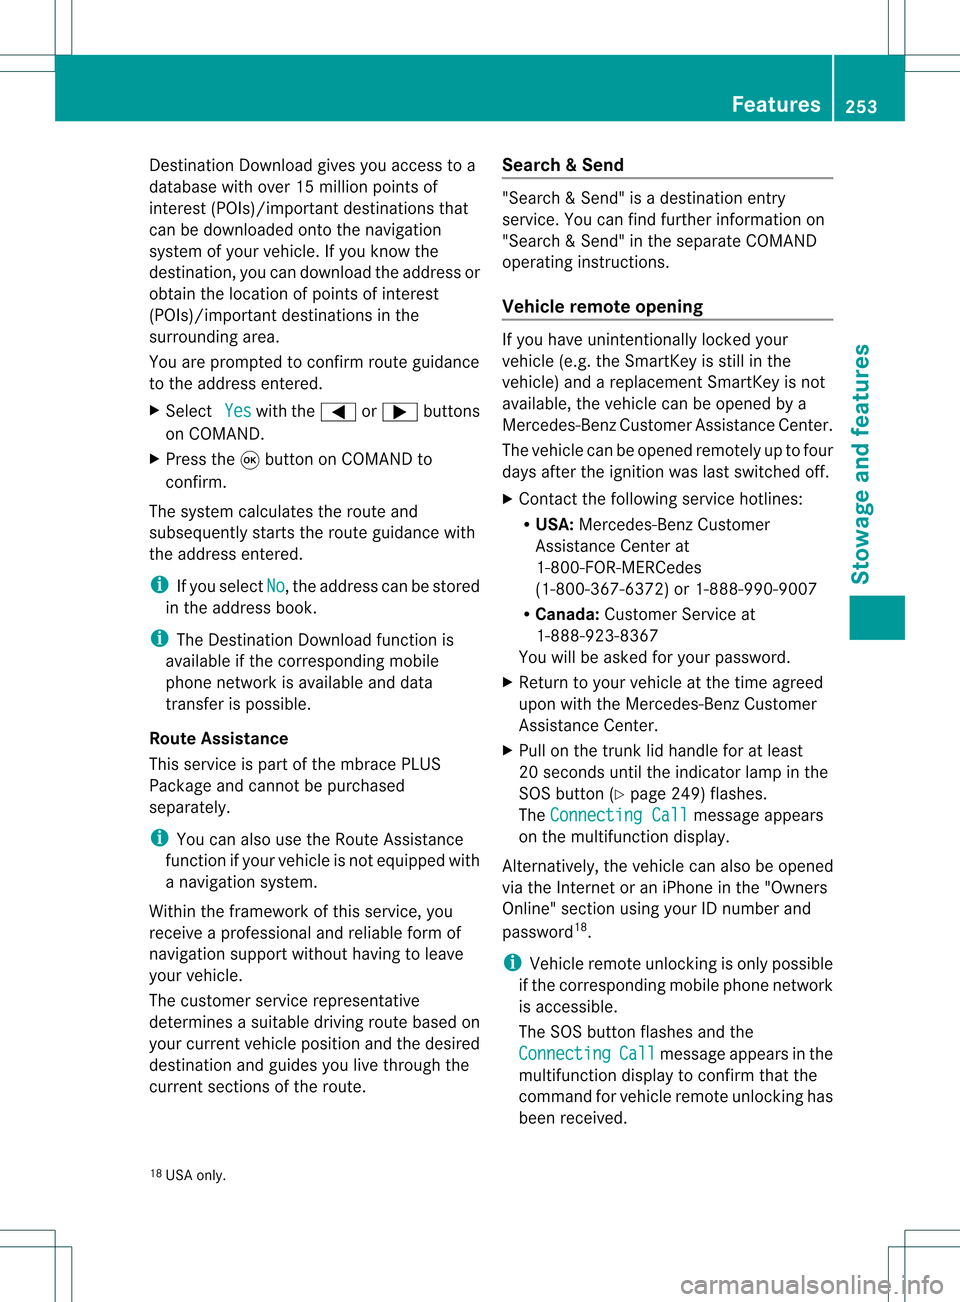
The Connecting Call message appears
on the multifunction display.
Alternatively, the vehicle can also be opened
via the Internet or an iPhone in the "Owners
Online" section using your ID number and
password 18
.
i Vehicle remote unlocking is only possible
if the corresponding mobile phone network
is accessible.
The SO Sbutton flashes and the
Connecting Call message appears in the
multifunction display to confirm that the
command for vehicle remote unlocking has
been received.
18 USA only. Features
253Stowage and featu res Z
Page 256 of 334
If you pull on the trunk handle for more than
20 seconds before receiving authorization
for remote unlocking, you must wait
15 minutes before you can pull on the trunk
lid handle again.
Vehicle remote closing If you forget to lock your vehicle but are no
longer in the vicinity of the vehicle, it can be
locked for you by the Mercedes-Benz
Customer Assistance Center.
The vehicle can be locked remotely up to four
days after the ignition was last switched off.
X
Contact the following service hotlines:
R
USA: Mercedes-Benz Customer
Assistance Center under 1-800-FOR-
MERCedes(1-800-367-6372 )or
1-888-990-9007
R Canada: Customer Service at
1-888-923-8367
You will be asked for your PIN.
The next time you are in your vehicle and
switch on the ignition, the Tele Aid: Doors
Locked by Remote message appears in the
multifunction display.
Alternatively, the vehicle can also be locked
via the Internet or an iPhone in the "Owners
Online" section using your ID number and
password.
i The vehicle valet locking feature is
available when the relevant mobile phone
network is available and data connection is
possible.
Stolen vehicle recovery service If your vehicle has been stolen:
X Notify the police.
The police will issue a numbered incident
report.
X This number will be forwarded to the
Mercedes-Benz Customer Assistance
Center together with your PIN.
The Mercedes-Benz Customer Assistance
Center then attempts to locate the mbrace system. The Mercedes-Benz Customer
Assistance Center contacts you and the
local law enforcement agency if the vehicle
is located. However, only the law
enforcement agency is informed of the
location of the vehicle.
i If the anti-theft alarm system is active for
longer than 30 seconds, mbrace
automatically informs the Mercedes-Benz
Customer Assistance Center. Garage door opener
Important safety notes The HomeLink
®
garage door opener
integrated in the rear-view mirror allows you
to operate up to three different door and gate
systems.
i Certain garage door drives are
incompatible with the integrated garage
door opener. If you have difficulty
programming the integrated garage door
opener, contact an authorized Mercedes-
Benz Center or call one of the following
telephone hotlines:
R USA: Mercedes-Benz Customer
Assistance Center at
1-800-FOR-MERCedes
R Canada: Customer Service at
1-800-387-0100 G
WARNING
Before programming the integrated remote
control to a garage door opener or gate
operator, make sure people and objects are
out of the way of the device to prevent
potential harm or damage. When
programming a garage door opener, the door
moves up or down. When programming a gate
operator, the gate opens or closes.
Do not use the integrated remote control with
any garage door opener that lacks safety stop
and reverse features as required by U.S.
federal safety standards (this includes any
garage door opener model manufactured 254
FeaturesStowage and features
Page 276 of 334
Useful information
i This Operator's Manual describes all
models and all standard and optional
equipment of your vehicle available at the
time of publication of the Operator's
Manual. Country-specific differences are
possible. Please note that your vehicle may
not be equipped with all features
described. This also applies to safety-
related systems and functions.
i Please read the information on qualified
specialist workshops (Y page 23).Where will I find...?
First-aid kit
X Open the trun klid. X
Lift the trunk floor up.
X Remove first-aid kit 0002.
i Check the expiration date on the first-aid
kit at least once a year. Replace the
contents if necessary, and replace missing
items. Vehicle tool kit
The vehicle tool kit can be found in the
stowage well under the trunk floor.
X Vehicles with a TIREFIT kit: lift the trunk
floor up. X
Lift the trunk floor up.
X Remove the collapsible spare wheel
(Y page 274).
X AMG vehicles: loosen the central screw of
the bracket counter-clockwise and remove
it together with the bracket. 0002
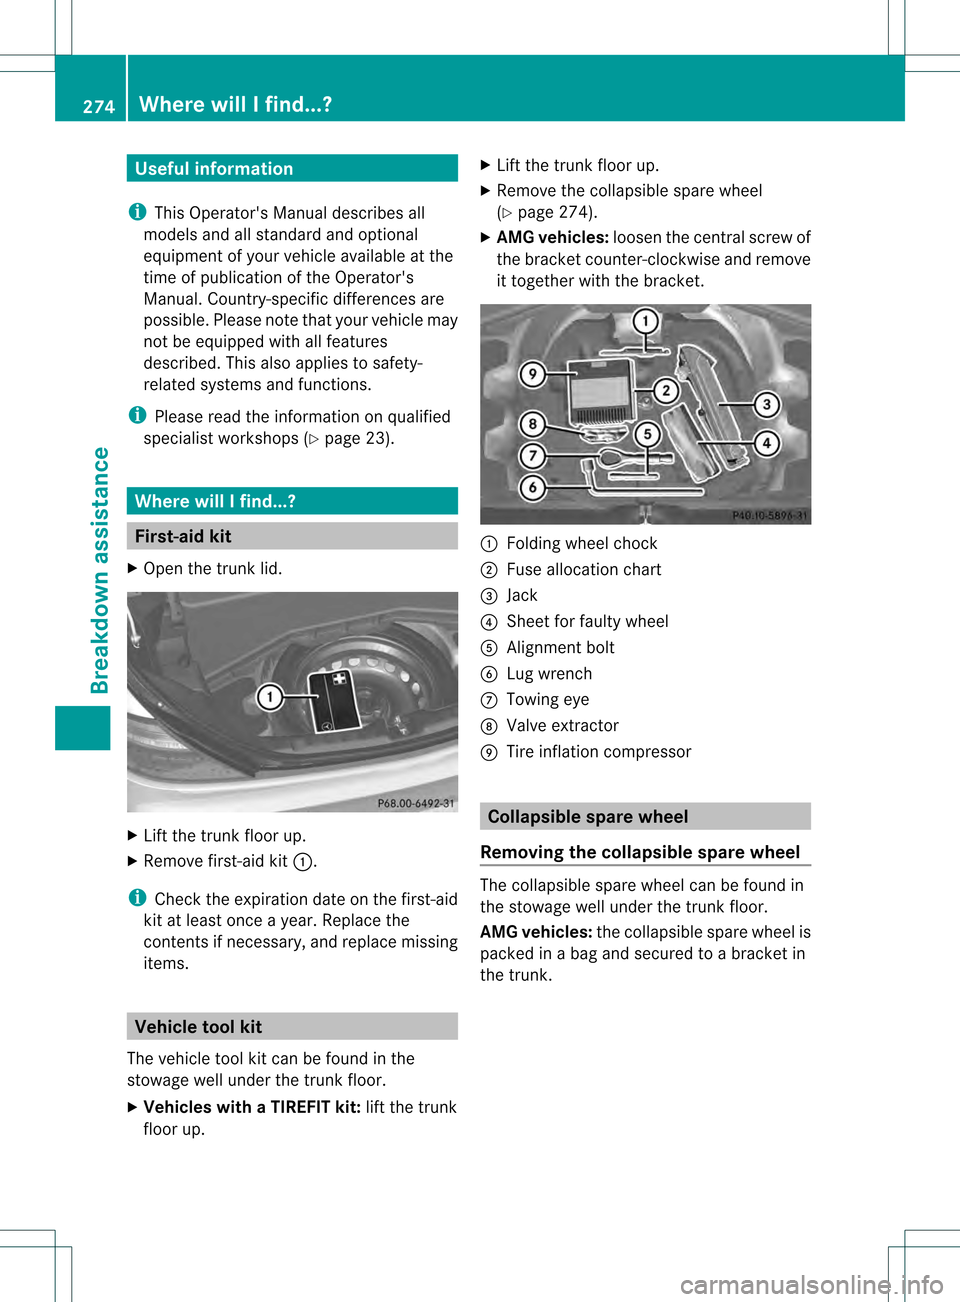
Folding wheel chock
0003 Fuse allocation chart
0023 Jack
0022 Shee tfor faulty wheel
0020 Alignmen tbolt
0021 Lug wrench
0014 Towing eye
0015 Valve extractor
0016 Tire inflation compressor Collapsible spare wheel
Removing the collapsible sparew heel The collapsible spare wheel can be found in
the stowage well unde
rthe trunk floor.
AMG vehicles: the collapsible spare wheel is
packed in a bag and secured to a bracket in
the trunk. 274
Where will I find...?Breakdown assistance
Page 277 of 334
Example
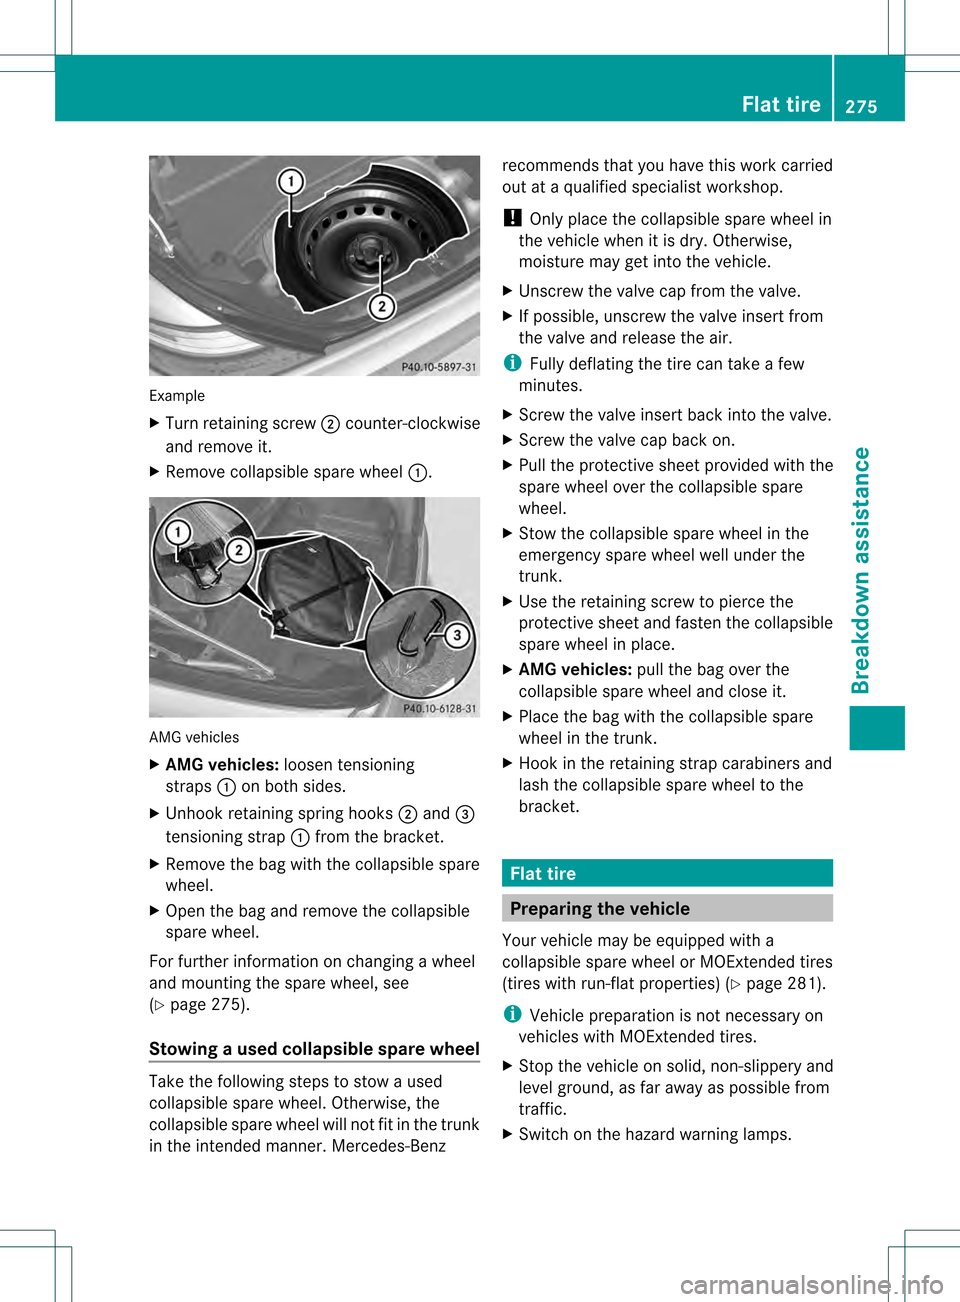
X
Turn retaining screw 0003counter-clockwise
and remove it.
X Remove collapsible spare wheel 0002.AMG vehicles
X
AM Gvehicles: loosentensioning
straps 0002on both sides.
X Unhook retaining spring hooks 0003and 0023
tensioning strap 0002from the bracket.
X Remove the bag with the collapsible spare
wheel.
X Open the bag and remove the collapsible
spare wheel.
For further information on changing a wheel
and mounting the spare wheel, see
(Y page 275).
Stowing aused collapsible spare wheel Take the following steps to stow a used
collapsible spare wheel. Otherwise, the
collapsible spare wheel will not fit in the trunk
in the intended manner. Mercedes-Benz recommends that you have this work carried
out at a qualified specialist workshop.
!
Only place the collapsible spare wheel in
the vehicle when it is dry. Otherwise,
moisture may get into the vehicle.
X Unscrew the valve cap from the valve.
X If possible, unscrew the valve insert from
the valve and release the air.
i Fully deflating the tire can take a few
minutes.
X Screw the valve insert back into the valve.
X Screw the valve cap back on.
X Pull the protective sheet provided with the
spare wheel over the collapsible spare
wheel.
X Stow the collapsible spare wheel in the
emergency spare wheel well under the
trunk.
X Use the retaining screw to pierce the
protective sheet and fasten the collapsible
spare wheel in place.
X AMG vehicles: pull the bag over the
collapsible spare wheel and close it.
X Place the bag with the collapsible spare
wheel in the trunk.
X Hook in the retaining strap carabiners and
lash the collapsible spare wheel to the
bracket. Flat tire
Preparing the vehicle
Your vehicle may be equipped with a
collapsible spare wheel or MOExtended tires
(tires with run-flat properties) (Y page 281).
i Vehicle preparation is not necessary on
vehicles with MOExtended tires.
X Stop the vehicle on solid, non-slippery and
level ground, as far away as possible from
traffic.
X Switch on the hazard warning lamps. Flat tire
275Breakdown assistance