2012 MERCEDES-BENZ SLK250 trunk lock
[x] Cancel search: trunk lockPage 72 of 334

If you pull on the handle of the trunk lid, only
the trunk of the vehicle is unlocked.
Changing the settings of the locking
system
You can change the settings of the locking
system so that when unlocking, only the
driver's door, the lockabl estowage
compartments in the vehicle interior and the
fuel filler flap are unlocked. This is useful if
you frequently travel on your own.
X To change the setting: press and hold
down the 0010and000F buttons
simultaneously for approximately
si xs econds until the battery chec klamp
flashes twice ( Ypage 71).
i If the setting of the locking system is
changed within the signal range of the
vehicle, pressing the 000For0010 button
locks or unlocks the vehicle.
The SmartKey now functions as follows:
X To unlock the driver's door: press the
0010 button once.
X To unlock centrally: press the0010
butto ntwice.
X To lock centrally: press the000Fbutton.
The KEYLESS-GO function is changed as
follows:
X To unlock the driver's door: touch the
inner surface of the door handle on the
driver's door.
X To unlock centrally: touch the inner
surface of the front-passenger door handle.
X To lock centrally: touch the outersensor
surface on one of the door handles. Restoring the factory settings
X Press the 0010and000F buttons
simultaneously for approximately
six seconds until the battery chec klamp
flashes twice. Mechanical key
General notes If the vehicle can no longer be locked or
unlocked with the SmartKey, use the
mechanical key.
If you use the mechanical key to unlock and
open the driver's door or the trunk lid, the
anti-thef talarm system will be triggered
(Y page 65).
There are several ways to tur noff the alarm:
X To turn the alarm off with the
SmartKey: press the0010or000F button
on the SmartKey.
or
X Insert the SmartKey into the ignition lock.
or
X To deactivate the alarm with KEYLESS-
GO: press the Start/Stop button in the
ignition lock. The SmartKey must be in the
vehicle.
or
X Lock or unlock the vehicle using KEYLESS-
GO. The SmartKey must be outside the
vehicle.
If you unlock the vehicle using the mechanical
key, the fuel filler fla pwill not be unlocked
automatically.
X To unlock the fuel filler flap: insert the
SmartKey in the ignition lock.
Removing the mechanical key 70
SmartKeyOpening/closing
Page 78 of 334

X
To deactivate: press and hold button 0002
for abou tfive seconds until a tone sounds.
X To activate: press and hold button 0003for
about five seconds until a tone sounds.
i If you press one of the two buttons and
do not hear a tone, the relevant setting has
already been selected.
You can also switch the automatic locking
function on and off using the on-board
computer (Y page 193). Unlocking the driver's door
(mechanical key)
If the vehicle can no longer be unlocked with
the SmartKey, use the mechanical key.
If you use the mechanical key to unloc kand
open the driver's door, the anti-thef talarm
system will be triggered ( Ypage 65).
X Take the mechanical key out of the
SmartKey (Y page 70).
X Insert the mechanical key into the lock of
the driver's door as far as it will go. X
Turn the mechanical key counter-clockwise
to position 0005.
The door is unlocked.
X Turn the mechanical key back and remove
it.
X Insert the mechanical key into the
SmartKey. Locking the vehicle (mechanical key)
If the vehicle can no longer be locked with the
SmartKey, use the mechanical key.
X Open the driver's door.
X Close the front-passenger door and the
trunk lid.
X Press the locking button (Y page 75).
X Check whether the locking knob on the
front-passenger door is still visible. Press
down the locking knob by hand, if
necessary.
X Close the driver's door.
X Take the mechanical key out of the
SmartKey (Y page 70).
X Insert the mechanical key into the lock of
the driver's door as far as it will go. X
Turn the mechanical key clockwise as far
as it will go to position 0005.
X Turn the mechanical key back and remove
it.
X Make sure that the doors and the trunk lid
are locked.
X Insert the mechanical key into the
SmartKey. 76
DoorsOpening/closing
Page 79 of 334

i
If you lock the vehicle as described above,
the fuel filler flap is not locked. The anti-
theft alarm system is not armed. Trunk
Important safety notes
Do not leave the SmartKey in the trunk. You
could otherwise lock yourself out. G
WARNING
When leaving the vehicle, always remove the
SmartKey from the ignition lock. Always take
the SmartKey with you and lock the vehicle.
Do not leave childre nunsupervised in the
vehicle, eve nifthey are secured in a child
restraint system, and do not give them access
to an unlocked vehicle. Achild's unsupervised
access to a vehicle could result in an accident
and/or serious personal injury. They could:
R injure themselves on vehicle parts
R be seriously or fatally injured by extreme
heat or cold
R injure themselves or have an accident with
vehicle equipment that may still be in
operation even after the SmartKey has
been removed from the ignition, such as the
seat adjustment, steering wheel
adjustment or memory function.
If children open a door, they could cause
severe or even fatal injury to other persons; if
they get out of the vehicle, they could injure
themselves when doing so or be seriously or
even fatally injured by any passing traffic.
Do not expose the child restraint system to
direct sunlight. The child restraint system's
metal parts, for example, could become very
hot, and a child could be burned on these
parts. G
WARNING
Do not carry heavy or hard objects in the
passenger compartmentort runk unless they
are firmly secured in place. Unsecured or improperly positioned cargo
increases a child's risk of injury in the event
of
R
strong braking maneuvers
R sudden changes of direction
R an accident G
WARNING
Make sure the trunk lid is closed when the
engine is running and while driving. Among
other dangers, deadly carbon monoxide (CO)
gases may enter the vehicle interior resulting
in unconsciousness and death.
! The trunk lid swings upwards when
opened .Therefore, make sure that there is
sufficient clearance above the trunk lid.
To open the trunk lid completely, a minimum
clearance of 5.90 ft (1.80 m) above the
ground is necessary.
The trunk lid can be:
R opened and closed manually from outside
R opened automatically from outside
R locked separately
R unlocked with the mechanical key
R opened with the emergency release button Opening and closing manually
Opening You can only unlock the trunk lid when the
vehicle is stationary and the roof is fully
opened or closed.
X
Press the 0010button on the SmartKey. Trunk
77Opening/closing Z
Page 80 of 334

X
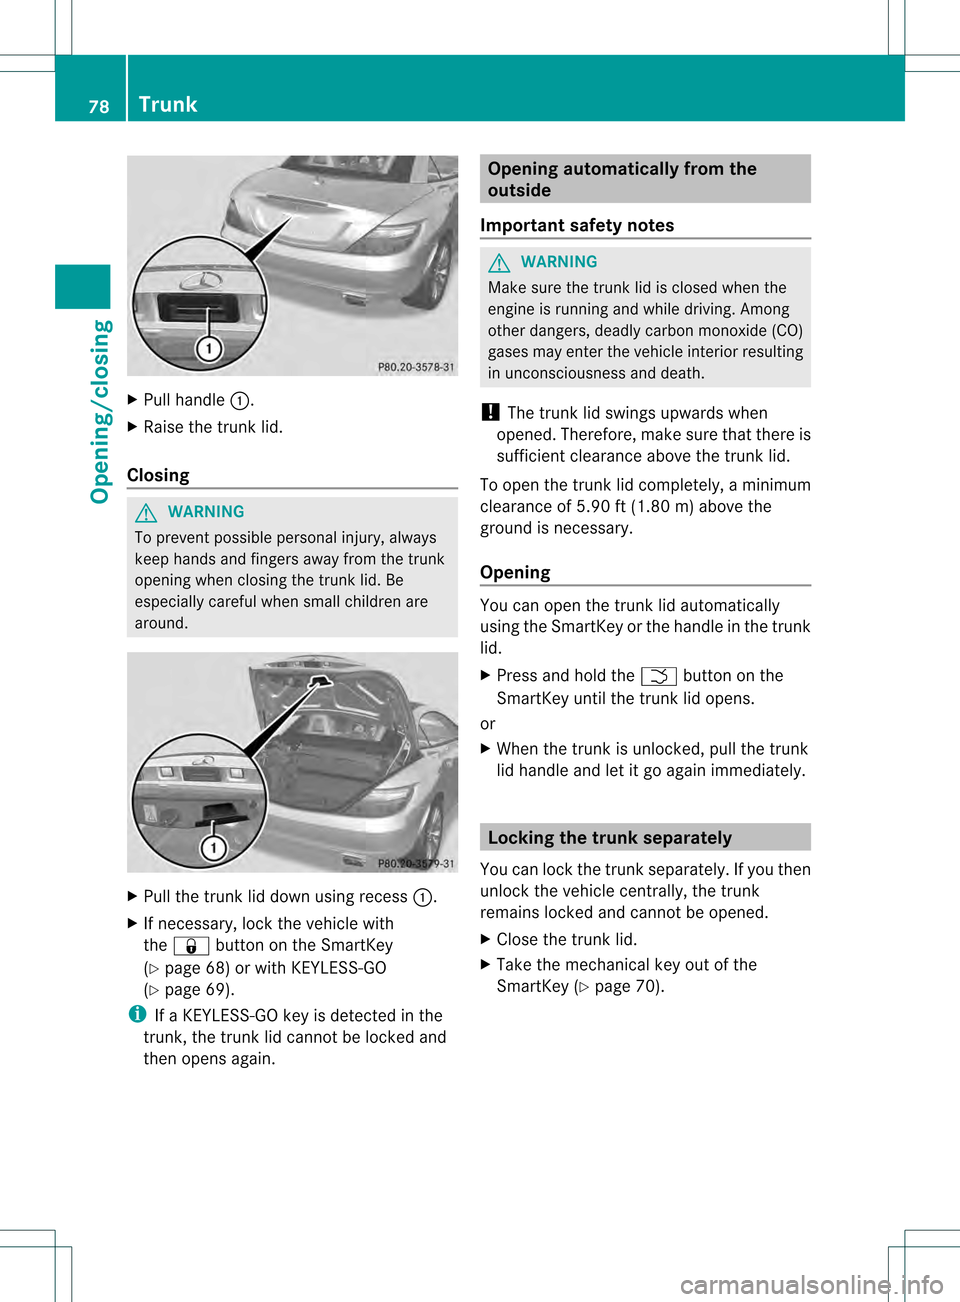
Pull handle 0002.
X Raise the trunkl id.
Closing G
WARNING
To prevent possible personal injury, always
keep hands and fingers away fro mthe trunk
opening when closing the trunk lid. Be
especially careful when small children are
around. X
Pull the trunk lid down using recess 0002.
X If necessary, lock the vehicle with
the 000F button on the SmartKey
(Y page 68) or with KEYLESS-GO
(Y page 69).
i If a KEYLESS-GO key is detected in the
trunk, the trunk lid cannot be locked and
then opens again. Opening automatically from the
outside
Important safety notes G
WARNING
Make sure the trunk lid is closed when the
engine is running and while driving. Among
other dangers, deadly carbon monoxide (CO)
gases may enter the vehicle interior resulting
in unconsciousness and death.
! The trunk lid swings upwards when
opened. Therefore, make sure that there is
sufficient clearance above the trunk lid.
To open the trunk lid completely, a minimum
clearance of 5.90 ft (1.80 m) above the
ground is necessary.
Opening You can open the trunk lid automatically
using the SmartKey or the handle in the trunk
lid.
X
Press and hold the 0006button on the
SmartKey until the trunk lid opens.
or
X When the trunk is unlocked, pull the trunk
lid handle and let it go again immediately. Locking the trunk separately
You can lock the trunk separately.Ify ou then
unlock the vehicle centrally, the trunk
remains locked and cannot be opened.
X Close the trunk lid.
X Take the mechanical key out of the
SmartKey (Y page 70).78
TrunkOpening/closing
Page 81 of 334

X
Insert the mechanical key into the trunk lid
lock as far as the stop.
X Turn the mechanical key clockwise from
position 0005to position 0006.
X Remove the mechanical key.
X Insert the mechanical key into the
SmartKey. Unlocking the trunk (mechanical key)
! The trunk lid swings upwards when
opened. Therefore, make sure that there is
sufficient clearance above the trunk lid.
If the trunk cannot be unlocked with the
SmartKey or KEYLESS-GO, use the
mechanical key.
If you use the mechanical key to unlock and
open the trunk lid, the anti-theft alarm system
will be triggered (Y page 65).
X Take the mechanical key out of the
SmartKey (Y page 70).
X Insert the mechanical key into the trunk lid
lock as far as the stop. X
Turn the mechanical key counter-clockwise
from position 0005as far as it will go to
position 0006and pull the trunk lid handle.
The trunk is unlocked.
X Turn the mechanical key back to position
0005 and remove it.
X Insert the mechanical key into the
SmartKey. Trunk emergency release
You can open the trunk lid from inside the
vehicle with the emergency release button. X
Briefly press emergency release
button 0002.
The trunk lid unlocks and opens.
The trunk lid can be unlocked and opened
with the trunk lid emergency release when
the vehicle is stationary or while driving.
Trunk lid emergency release light:
R emergency release button 0002flashes for
30 minutes after the trunk lid is opened
R emergency release button 0002flashes for
60 minutes after the trunk lid is closed.
The trunk lid emergency release does not
open the trunk lid if the battery is
disconnected or discharged. Trunk
79Opening/closing Z
Page 85 of 334

G
WARNING
Only drive with the roof fully open or closed.
If the roof does not open or close fully, the
roof hydraulics are depressurized and the soft
top is lowered:
R after about seven minutes if the ignitio nis
switched on
R after about 15 seconds if the ignition is
switched off
Aw arning tone sounds shortly beforehand.
The 0008 symbol and the Retractable Roof Lowering message appears in the
multifunction display.
Lock the roof again before driving on.
Otherwise, the unlocked roo fcould open
during the journey and cause you to lose
control of your vehicle. You or other persons
could be injured as a result. G
WARNING
Closing the roof manually is a complex,
technically challenging procedure.
Attempting to manually close the roof may
cause damage to the roof and/or injury.
For this reason, the manual closing process
should only be carried out at a qualified
specialist workshop.
! Never sit on the rear shelf or store heavy
objects there. You will otherwise damage
the roof and the rear shelf of your vehicle.
! Do not forget that the weather can
change abruptly. Make certain that the roof
is closed when you leave the vehicle. The
vehicle electronics can be damaged if
water enters the vehicle interior.
! When opening and closing the roof, make
sure that:
R there is sufficient upward clearance, as
the roof swings upwards.
R there is sufficient clearance behind the
vehicle, as the trunk lid swings
backwards beyond the bumper.
R the trunk is only loaded to below the
trunk partition. R
the trunk partition is not pushed up by
the load.
R the trunk partition is closed.
R the trunk lid is closed.
R the outside temperature is above
+5 ‡ (−15 †).
You could otherwise damage the roof,
trunk and other parts of the vehicle.
i Make sure that the roof and rear window
are clean and dry before opening the roof.
Otherwise, water or dirt could enter the
vehicle interior or trunk. Opening and closing with the roof
switch
Important safety notes G
WARNING
Before operating the retractable hardtop
(vario-roof), make sure there is no danger of
anyone being injured by the moving parts
(retractable hardtop, roof frame, and trunk
lid).
Hands must never be placed near the roof
frame, upper windshield area, hardtop, shelf
behind roll bars, or trunk lid while the
retractable hardtop is being raised or
lowered. Serious personal injury may occur.
If potential danger exists, release the
retractable hardtop switch or the 0010or
000F button on the SmartKey. This
immediately interrupts the raising or lowering
procedure. You can then operate the
retractable hardtop switch or press the
0010 or000F button on the SmartKey to raise
or lower the retractable hardtop away from
the danger zone. Roof
83Opening/closing Z
Page 86 of 334

Opening and closing
X
Close the trun kpartition (Y page 85).
X Close the trunk lid.
X Turn the SmartKey to position 2in the
ignition lock.
X Open the cover on the lower sectio nofthe
center console.
Roof switch 0002is located under the cover.
X To open: pull roof switch 0002until the roof
has been fully retracted into the trunk and
the Vario-Roof in Operation message
disappears from the multifunction display.
All of the side windows open.
X To close: press roof switch 0002until the roof
is fully closed and the Vario-Roof inOperation message disappears from the
multifunction display.
All of the side windows open.
X To close all side windows, pull the switch
under the cover on the center console
(Y page 80).
i If you operate the roof switch and the
Trunk partition Open message appears
in the multifunction display, the trunk
partition has not been closed correctly. Opening and closing with the
SmartKey
Important safety notes G
WARNING
Before operating the retractable hardtop
(vario-roof), make sure there is no danger of
anyone being injured by the moving parts
(retractable hardtop, roof frame, and trunk
lid).
Hands must never be placed near the roof
frame, upper windshield area, hardtop, shelf
behind roll bars, or trunk lid while the
retractable hardtop is being raised or
lowered. Serious personal injury may occur.
If potential danger exists, release the
retractable hardtop switch or the 0010or
000F button on the SmartKey. This
immediately interrupts the raising or lowering
procedure. You can then operate the
retractable hardtop switch or press the
0010 or000F button on the SmartKey to raise
or lower the retractable hardtop away from
the danger zone.
Opening and closing i
The SmartKey must be close to the
driver's door handle.
X Close the trunk partition (Y page 85).
X Close the trunk lid.
X Point the tip of the SmartKey at the driver's
door handle.
X To open: press and hold the 0010button
on the SmartKey until the roof is fully
opened.
The roof and the rear side windows open.
The front side windows close.
X To interrupt the opening procedure:
release the 0010button.
X To open the front side windows: press
and hold the 0010button on the SmartKey
again. 84
RoofOpening/closing
Page 87 of 334

X
To close: press and hold the 000Fbutton
on the SmartKey until the roof is fully
closed.
The roo fand the side windows close.
X To interrupt the closing procedure:
release the 000Fbutton.
i Whe nthe roof is closed and the trunk
partition is open, the roof cannot be
opened using the SmartKey functions.
Instead, all side windows open or close
simultaneously (Y page 80). Additionally,
the Trunk partition Open message
appears in the multifunction display. Locking the roof again
G
WARNING
Stop the vehicle in a safe location or as soon
as it is safe to do so and lock the retractable
hardtop before continuing to drive. You could
otherwise endanger yourself and others.
The roof is not locked when:
R the 0008 symbol and the Vario-Roof in
Operation / Retractable Roof in
Operation message appearint
he
multifunction display
R the 0008 symbol and the Retractable Roof Not Open/Close Completely
appearint
he multifunction display and a
warning tone is heard
R you hear a warning tone for up to ten
seconds when pulling away or while driving.
You can lock the roof again if it is not locked
fully.
X Stop the vehicle immediately, paying
attention to road and traffic conditions.
X Make sure that the SmartKey is in position
2 in the ignition lock.
X Press the roof switch (Y page 84). Trunk partition
General notes The trunk partition can be used to cover
luggage and loads in the trunk.
!
To avoid damaging the roof or luggage
when folding back the roof, you should:
R only load the trunk to below the trunk
partition
R not place any objects on or in front of the
trunk partition
R not place any objects on the cover
behind the roll bars
R not allow the cargo to push the trunk
partition upwards
Opening and closing X
To close: pull back trunk partition 0002by
the handle in the direction of the arrow until
it engages on both sides in the eyelets on
the trunk sill.
X To open: grip the handle of trunk
partition 0002.
X Press the release button in the handle of
trunk partition 0002.
Trunk partition 0002is released.
X Pull trunk partition 0002up out of the eyelets
on the trunk sill.
X Push trunk partition 0002forwards against
the direction of the arrow by the handle. Roof
85Opening/closing Z