2012 MERCEDES-BENZ SLK ROADSTER keyless
[x] Cancel search: keylessPage 10 of 321
Switching on/of
f........................... 117
Switching residual hea ton/off ......122
Switching the rear window heat-
ing on/off ...................................... 120
Switching the ZONE function on/
off .................................................. 119
THERMOTRONIC (2-zone) auto-
matic climate control .....................116
Cockpit
Overview .......................................... 26
see Instrument cluster
Collapsible emergency spare
wheel
see Emergency spare wheel
COMAND Online
see separate operating instructions
Combination switch ..........................103
Constant headlamp mode see Daytime driving lamps
Consumption statistics (on-board
computer) .......................................... 183
Convenience closing feature ..............77
Convenience opening/closing (air-
recirculation mode) ........................... 121
Convenience opening feature see Side windows
Coolan t(engine)
Checkin gthe level ......................... 251
Display message ............................ 211
Notes ............................................. 308
Temperature (on-board computer) .195
Temperature gauge ........................ 178
Warning lamp ................................. 231
Cooling
see Climate control
Cornering light function
Function/notes ............................. 104
Cornering light function (display
message) ............................................ 208
Crash-responsive emergency light-
ing ....................................................... 106
Cruise control Cruise control leve r....................... 151
Deactivating ................................... 153
Display message ............................ 217
Driving system ............................... 151
Important safety notes ..................151LIM indicator lamp
.........................151
Selecting ........................................ 152
Setting aspeed .............................. 153
Storing and maintaining current
speed ............................................. 152
Cup holder ......................................... 239 D
Dashboard see Cockpit
Data
see Technical data
Daytime driving lights
Display message ............................ 210
Switching on/off (on-board com-
puter) ............................................. 191
Switching on/off (switch) ..............101
Dealership
see Qualified specialist workshop
Delaye dswitch-off
Exterio rlighting (on-board com-
puter )............................................. 192
Interior lighting .............................. 193
Diagnostics connection ......................22
Diesel ................................................. .305
Diesel particle filter ..........................148
Digital speedometer .........................184
Dipped-beam headlamps Changing bulbs .............................. 108
Display message ............................ 208
Setting for driving abroad (sym-
metrical) ........................................ 100
Setting for driving on the right/
left ................................................. 192
Switching on/off ........................... 101
Display (cleaning instructions) ........257
Display message General information .......................199
Hiding (on-board computer) ...........199
KEYLESS-GO .................................. 222
Display messages
ASSYST PLUS service interval dis-
play................................................ 252
Calling up (on-board computer) .....199
Driving systems ............................. 213
Engine ............................................ 211
Key ................................................ 222 Index
7
Page 12 of 321
Running-in tips ..............................
.126
Snow chains .................................. 289
Symmetrical dipped bea m............. 100
Tyr egrip ........................................ 150
Wet road surface ........................... 149
DVD audio (on-board computer) ......186
Dynamic handling package Function/notes ............................. 164 E
EASY-ENTRY feature Activating/deactivating .................194
Function/notes ................................ 93
EASY-EXIT feature
Crash-responsive ............................. 93
Function/notes ................................ 93
Switching on/off ........................... 194
EBD (electronic brake force distri-
bution)
Display message ............................ 202
Function/notes ................................ 59
ECO start/stop function
Deactivating/activating .................132
General information .......................131
Important safety notes ..................130
Electrical fuses
see Fuses
Electronic brake force distribution
see EBD (electronic brake force
distribution)
Electronic Brake force Distribution
see EBD (Electronic Brake force
Distribution)
Electronic Stability Program
see ESP ®
(Electroni cStability Program)
Electronic Traction System
see ETS (Electronic Traction System)
Emergenc ykey
Unlocking the driver's door ..............73
Emergency key element
Function/notes ................................ 68
Locking vehicle ................................ 73
Emergency release
Driver's door .................................... 73Emergency spare wheel
Inflating the collapsible spare
wheel ............................................. 270
Notes/data .................................... 297
Storage location ............................ 262
Stowing .......................................... 262
Emergency unlocking
Boot ................................................. 75
Vehicle ............................................. 73
Engine
Display message ............................ 211
ECO start/stop function ................130
Engine number ............................... 303
Jump-starting ................................. 277
Running irregularl y......................... 134
Starting problems ..........................134
Starting the engine with the key ....129
Starting with KEYLESS GO .............129
Stopping ........................................ 146
Tow-starting (vehicle) ..................... 281
Warning lamp (engine diagnos-
tics) ............................................... 231
Engine electronics
Notes ............................................. 301
Problem (fault) ............................... 134
Engine oil
Additives ........................................ 308
Checking the oil level ..................... 250
Checking the oil level using the
dipstick .......................................... 250
Display message ............................ 212
Filling capacity ............................... 307
Notes about oil grades ................... 307
Notes on oil level/consumption ....250
Temperature (on-board computer) .195
Topping up ..................................... 250
Viscosity ........................................ 308
Environmental protection
Note ................................................ .20
Returning an end-of-life vehicle .......20
ESP ®
(Electronic Stability Pro-
gram) AMG menu (on-board computer) ...196
Deactivating/activating (AMG
vehicles) .......................................... 57
Deactivating/activating (notes;
except AMG vehicles) ......................56
Display message ............................ 200 Index
9
Page 15 of 321
Convenience opening feature
..........77
Display message ............................ 222
Door central locking/unlocking .......66
Emergency key element ................... 68
Loss ................................................. 70
Modifying the programming .............67
Opening/closing the roof ................80
Positions (ignition lock) .................127
Problem (malfunction) .....................70
Starting the engine ........................129
KEYLESS-GO
Convenience closing ........................77
Display message ............................ 222
Locking ............................................ 67
Start/Stop button .......................... 127
Starting the engine ........................129
Unlocking ......................................... 67
Keyp ositions
Key ................................................ 127
KEYLESS GO .................................. 127
Kickdown
Driving tips .................................... 138
Manual drive program ....................141 L
Lamps see Warning and indicator lamps
Lap time (RACETIMER) ......................196
Licence plate lamp (display mes-
sage) ................................................... 210
Lighting see Lights
Lights
Activating/deactivating the Intel-
ligent Ligh tSystem ........................ 191
Activating/deactivating the inte-
rior lighting delayed switch-off .......193
Active light function .......................104
Automatic headlamp mode ............101
Cornering light function .................104
Dipped-bea mheadlamps ............... 101
Display message ............................ 208
Driving abroad ............................... 100
Foglamps ....................................... 101
Foglamps (extended range) ...........105
Hazard warning lamps ...................103
Headlamp flasher ........................... 103 Headlamp range
............................ 102
Ligh tswitc h................................... 100
Main-beam headlamps ................... 103
Motorway mode ............................. 104
Parking lamps ................................ 100
Rea rfoglamp ................................. 102
Setting the ambient lighting
brightness (on-board computer) ....192
Switching the daytime driving
lights on/off (on-board computer) .191
Switching the daytime driving
lights on/off (switch) .....................101
Switching the exterio rlighting
delayed switch-off on/off (on-
board computer )............................ 192
Switching the surround lighting
on/off (on-board computer) ..........192
Turn signals ................................... 103
see Changing bulbs
see Interior lighting
Light sensor (display message) .......211
LIM indicator lamp Cruise control ................................ 151
DISTRONI CPLUS ........................... 157
Variabl eSPEEDTRONIC .................154
Limiting the speed
see SPEEDTRONIC
Locking
see Centra llocking
Locking (doors)
Automatic ........................................ 72
Emergency locking ........................... 73
From inside (central locking but-
ton) .................................................. 72
Locking centrally
see Centra llocking
Locking verification signal (on-
board computer) ............................... 193
Luggage cover see Boot separator
Luggage net ....................................... 238
Lumbar support ................................... 90 M
M+S tyres ........................................... 288
MAGIC SKY CONTROL .........................8412
Index
Page 64 of 321
R
a narrow vehicle travelling in front, e.g. a
motorbike
R a vehicle travelling in front on a different
line G
WARNING
PRE-SAFE ®
Brake does not react:
R to people or animals
R to oncoming vehicles
R to crossing traffic
R when cornering
As a result, PRE-SAFE ®
Brake may not give
warnings or intervene in critical situations.
There is a ris kofanaccident. Always pay
careful attention to the traffi csituation and be
ready to brake.
In order to maintain the appropriate distance
to the vehicle in front and thus prevent a col-
lision, you must apply the brakes yourself.
X To activate/deactivate: activate or deac-
tivate PRE-SAFE ®
Brake in the on-board
computer (Y page 189).
The Ä symbol appears in the multifunc-
tion display as long as the HOL Dfunction
is not activated (Y page 165).
On vehicles with parking guidance, the
Ä symbol is displayed when Pis
engaged or you are driving faste rthan
35 km/h.
Vehicles with COMAND and navigation sys-
tem: the radar sensor system is switched off
automatically in the vicinity of radio telescope
facilities (Y page 312).
Vehicles without COMAND and a navigation
system and vehicles for Australia: the radar
sensor system and on-board computer must
be switched off in the vicinity of radio tele-
scope facilities (Y page 194).
For PRE-SAFE ®
Brake to assist you when driv-
ing, the radar sensor system must be
switched on (Y page 194) and be opera-
tional.
Following damage to the front end of the vehi-
cle, have the configuration and operation of the radar sensors checked at a qualified spe-
cialist workshop. This also applies to colli-
sions at slow speeds where there is no visible
damage to the front of the vehicle. Anti-theft systems
Immobiliser
The immobiliser prevents your vehicle from
being started without the correct key.
X To activate with the key: remove the key
from the ignition lock.
X To activate with KEYLESS-GO: switch the
ignition off and open the driver's door.
X To deactivate: switch on the ignition.
i The immobiliser is always deactivated
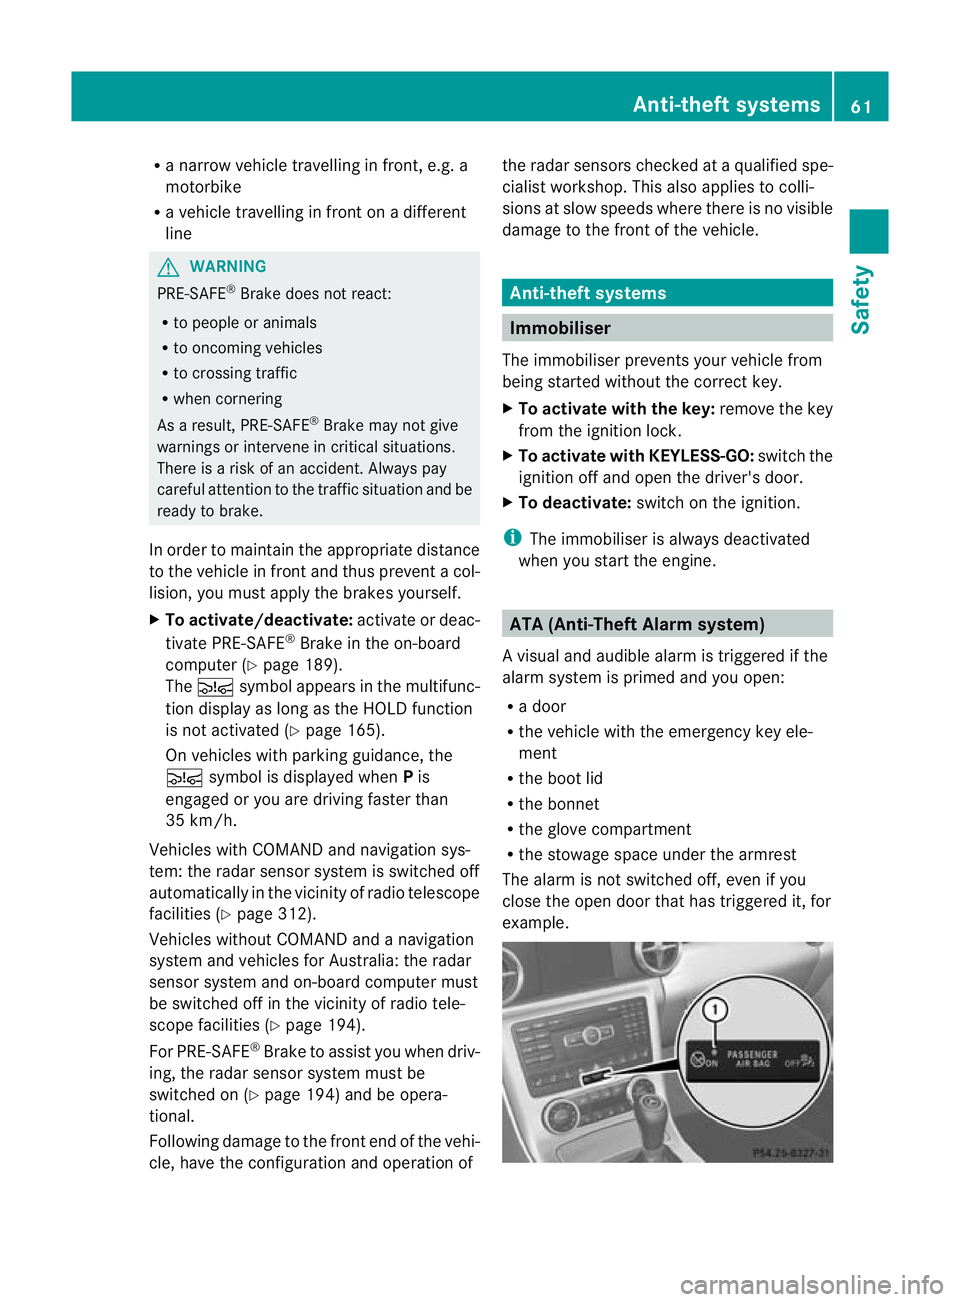
when you start the engine. ATA (Anti-Theft Alarm system)
Av isual and audible alarm is triggered if the
alarm system is primed and you open:
R a door
R the vehicle with the emergency key ele-
ment
R the boot lid
R the bonnet
R the glove compartment
R the stowage space under the armrest
The alarm is not switched off, even if you
close the open door that has triggered it, for
example. Anti-theft systems
61Safety Z
Page 65 of 321
X
To prime: lock the vehicle with the key or
KEYLESS-GO.
Indicato rlamp :flashes. The alarm sys-
te mi s primed after approximately
15 seconds.
X To switch off: unlock the vehicle with the
key or KEYLESS-GO.
X To stop the alarm using the key: insert
the key into the ignition lock.
The alarm is switched off.
or
X Press the %or& button on the key.
The alarm is switched off.
X To stop the alarm using KEYLESS-GO:
grasp the outside door handle. The key
must be outside the vehicle.
The alarm is switched off.
or
X Press the Start/Stop button on the dash-
board. The key must be inside the vehicle.
The alarm is switched off. Tow-away protection
An audible and visual alarm is triggered if your
vehicle's angle of inclination is altered while
tow-away protection is primed. This occurs if
the vehicle is jacked up on one side, for exam-
ple.
X To prime: lock the vehicle with the key or
KEYLESS-GO.
Tow-away protection is primed after
approximately 30 seconds.
X To switch off: unlock the vehicle with the
key or KEYLESS-GO.
Tow-away protection is switched off auto-
matically. To prevent a false alarm, deactivate tow-away
protection manually if your vehicle:
R
is being transported
R is being loaded onto a ferry or car trans-
porter, for example
R is parked on a movable surface, e.g. in a
split-level garage
Deactivating:
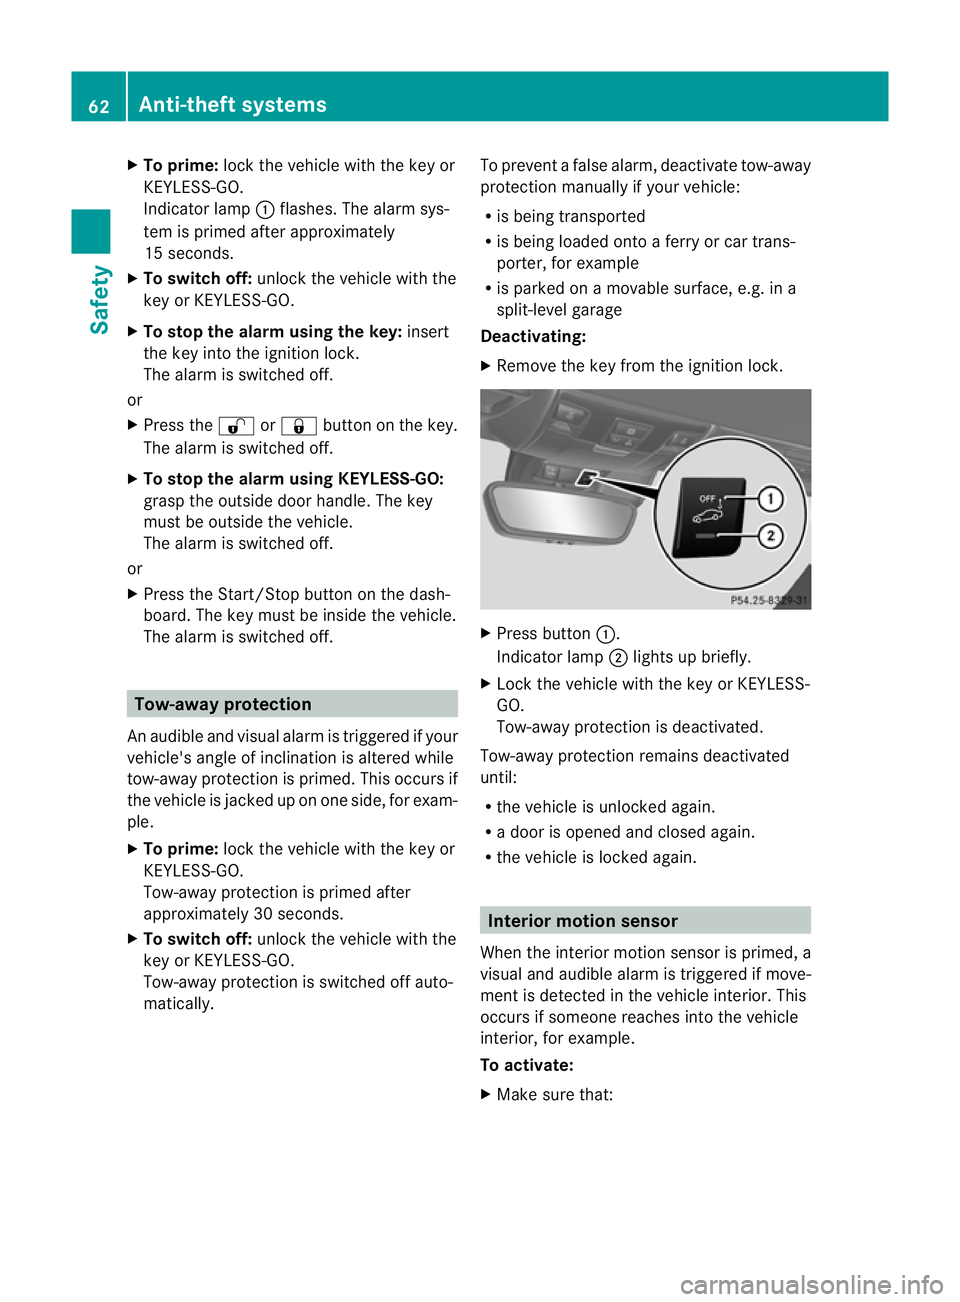
X Remove the key from the ignition lock. X
Press button :.
Indicator lamp ;lights up briefly.
X Lock the vehicle with the key or KEYLESS-
GO.
Tow-away protection is deactivated.
Tow-away protection remains deactivated
until:
R the vehicle is unlocked again.
R a door is opened and closed again.
R the vehicle is locked again. Interior motion sensor
When the interior motion sensor is primed, a
visual and audible alarm is triggered if move-
ment is detected in the vehicle interior. This
occurs if someone reaches into the vehicle
interior, for example.
To activate:
X Make sure that: 62
Anti-theft systemsSafety
Page 66 of 321
R
the side windows are closed.
R the stowage compartment under the
armrest is closed.
This will prevent false alarms.
X Make sure tha tthe roof is closed.
The interior motion sensor can only be
primed when the roof is closed (with the
exception of vehicles in the Netherlands).
Vehicles in the Netherlands: the interior
motion sensor is primed even when the
roof is open. However, the roof should be
closed so as to prevent afalse alarm.
X Make sure that the boot lid is closed.
Only then can the interio rmotion sensor be
primed.
X Lock the vehicle with the key or KEYLESS-
GO.
The interior motion sensor is primed after
approximately 30 seconds.
To deactivate:
X Unlock the vehicle with the key or KEY-
LESS-GO.
The interior motion sensor is switched off
automatically.
To prevent a false alarm, deactivate the inte-
rior motion sensor if you lock your vehicle
and:
R people or animals remain in the vehicle.
R the side windows remain open.
Deactivating:
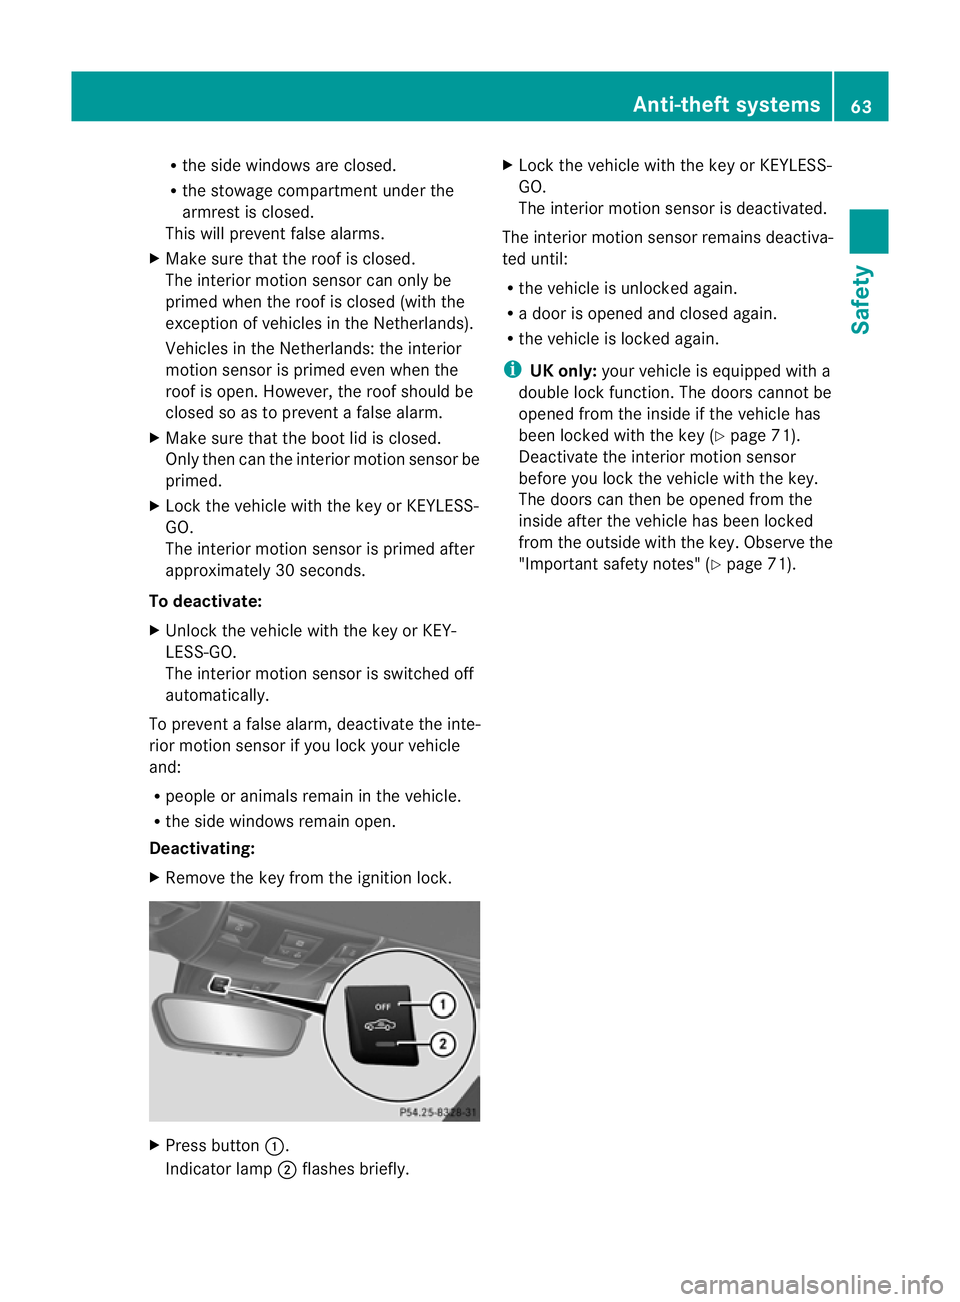
X Remove the key from the ignition lock. X
Press button :.
Indicator lamp ;flashes briefly. X
Lock the vehicle with the key or KEYLESS-
GO.
The interior motion sensor is deactivated.
The interior motion sensor remains deactiva-
ted until:
R the vehicle is unlocked again.
R a door is opened and closed again.
R the vehicle is locked again.
i UK only: your vehicle is equipped with a
double lock function. The doors cannot be
opened from the inside if the vehicle has
been locked with the key (Y page 71).
Deactivate the interior motion sensor
before you lock the vehicle with the key.
The doors can then be opened from the
inside after the vehicle has been locked
from the outside with the key. Observe the
"Important safety notes" (Y page 71). Anti-theft systems
63Safety Z
Page 70 of 321
When it is dark, the surround lighting also
comes on if it is activated in the on-board
computer (Y page 192).
You can also set an audible signal to confirm
that the vehicle has been locked. The audible
signal can be activated and deactivated using
the on-board computer (Y page 193).
X To unlock centrally: press the%but-
ton.
If you do not open the vehicle within approx-
imately 40 seconds of unlocking:
R the vehicle is locked again.
R the anti-theft system is primed again.
X To lock centrally: press the&button. KEYLESS-GO
Important notes on the use of KEYLESS-
GO R
Do not keep the KEYLESS-GO key together
with:
- electronic devices, e.g. a mobile phone
or another key
- metallic objects, e.g. coins or metal foil
This can affect the functionality of KEY-
LESS-GO.
R Bear in mind that the engine can be started
by any of the vehicle occupants if there is
a KEYLESS-GO key in the vehicle.
Locking and unlocking centrally You can start, lock or unlock the vehicle using
KEYLESS-GO. To do this, you only need carry
the key with you. You can combine the KEY-
LESS-GO functions with those of a conven-
tional key, e.g. using KEYLESS-GO to unlock
and pressing the &button to lock.
When locking or unlocking with KEYLESS-GO,
the distance between the key and the corre-
sponding door handle must not be greater
than 1 m. KEYLESS-GO checks whether a valid key is in
the vehicle by periodically establishing a radio
connection between the vehicle and the key.
This happens:
R when the external door handles are
touched
R when starting the engine
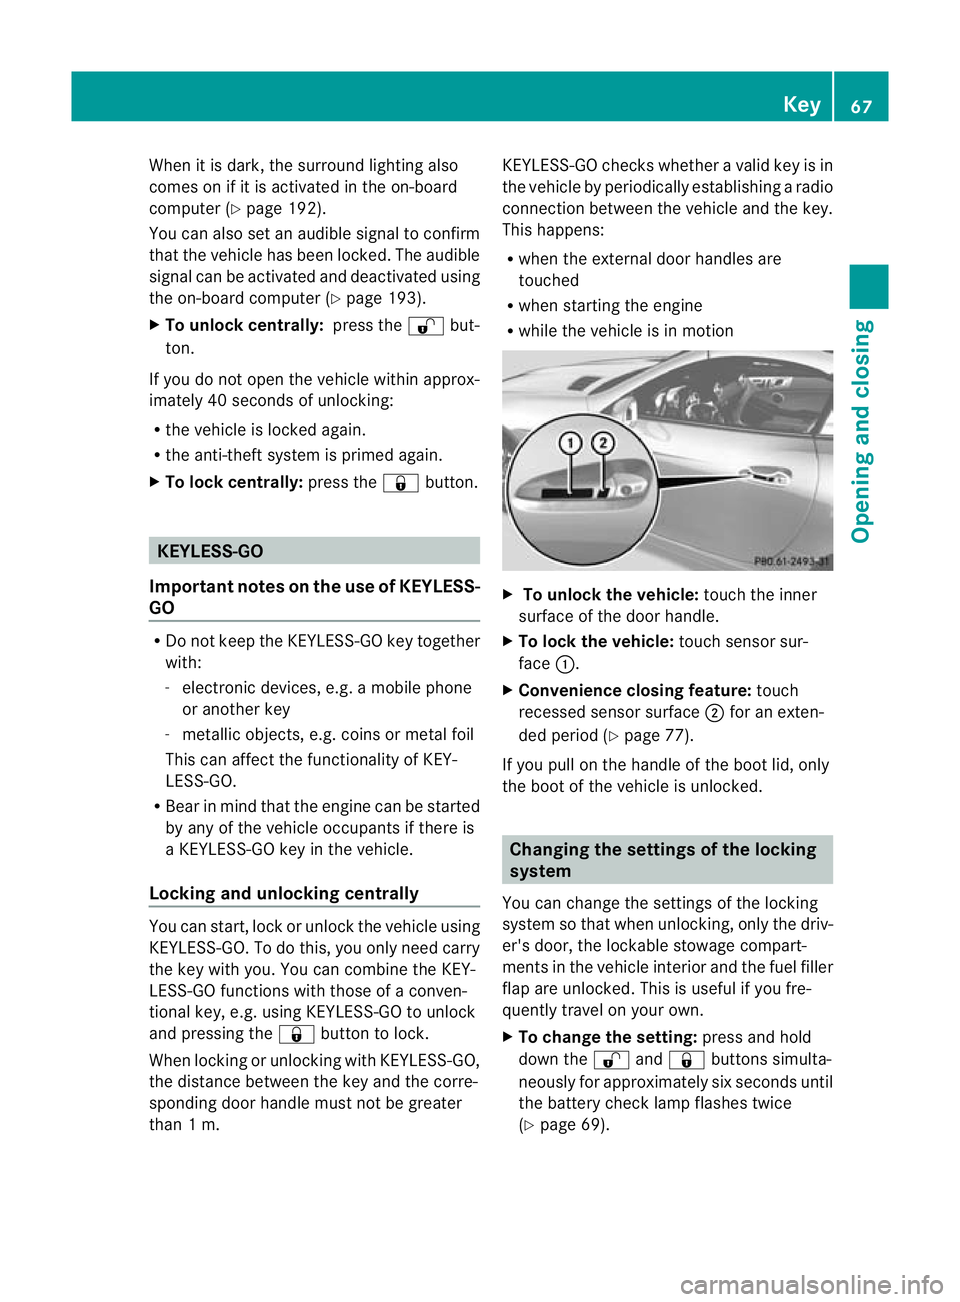
R while the vehicle is in motion X
To unlock the vehicle: touch the inner
surface of the door handle.
X To lock the vehicle: touch sensor sur-
face :.
X Convenience closing feature: touch
recessed sensor surface ;for an exten-
ded period (Y page 77).
If you pull on the handle of the boot lid, only
the boot of the vehicle is unlocked. Changing the settings of the locking
system
You can change the settings of the locking
system so that when unlocking, only the driv-
er's door, the lockable stowage compart-
ments in the vehicle interior and the fuel filler
flap are unlocked. This is useful if you fre-
quently travel on your own.
X To change the setting: press and hold
down the %and& buttons simulta-
neously for approximately six seconds until
the battery check lamp flashes twice
(Y page 69). Key
67Opening and closing Z
Page 71 of 321
i
If the setting of the locking system is
changed within the signal range of the vehi-
cle, pressing the &or% button locks
or unlocks the vehicle.
The key now functions as follows:
X To unlock the driver's door: press the
% button once.
X To unlockc entrally:press the %but-
ton twice.
X To lock centrally: press the&button.
The KEYLESS-GO function is changed as fol-
lows:
X To unlock the driver's door: touch the
inner surface of the door handle on the
driver's door.
X To unlock centrally: touch the inner sur-
face of the front-passenger door handle.
X To lock centrally: touch the outersensor
surface on one of the door handles. Restoring factor
ysettings
X Press the %and& buttons simulta-
neously for approximately six seconds until
the battery check lamp flashes twice. Emergency key element
General notes If the vehicle can no longer be locked or
unlocked with the key, use the emergency
key element.
If you use the emergency key element to
unlock and open the driver's door or the boot
lid, the anti-thef talarm system will be trig-
gered (Y page 61).
There are several ways to tur noff the alarm:
X To turn the alarm off with the key: press
the % or& button on the key.
or
X Insert the key into the ignition lock.
or X
To deactivate the alarm with KEYLESS-
GO: press the Start/Stop button in the igni-
tion lock. The key must be in the vehicle.
or
X Lock or unlock the vehicle using KEYLESS-
GO. The key must be outside the vehicle.
If you unlock the vehicle using the emergency
key element, the fuel filler flap will not be
unlocked automatically.
X To unlock the fuel filler flap: insert the
key in the ignition lock.
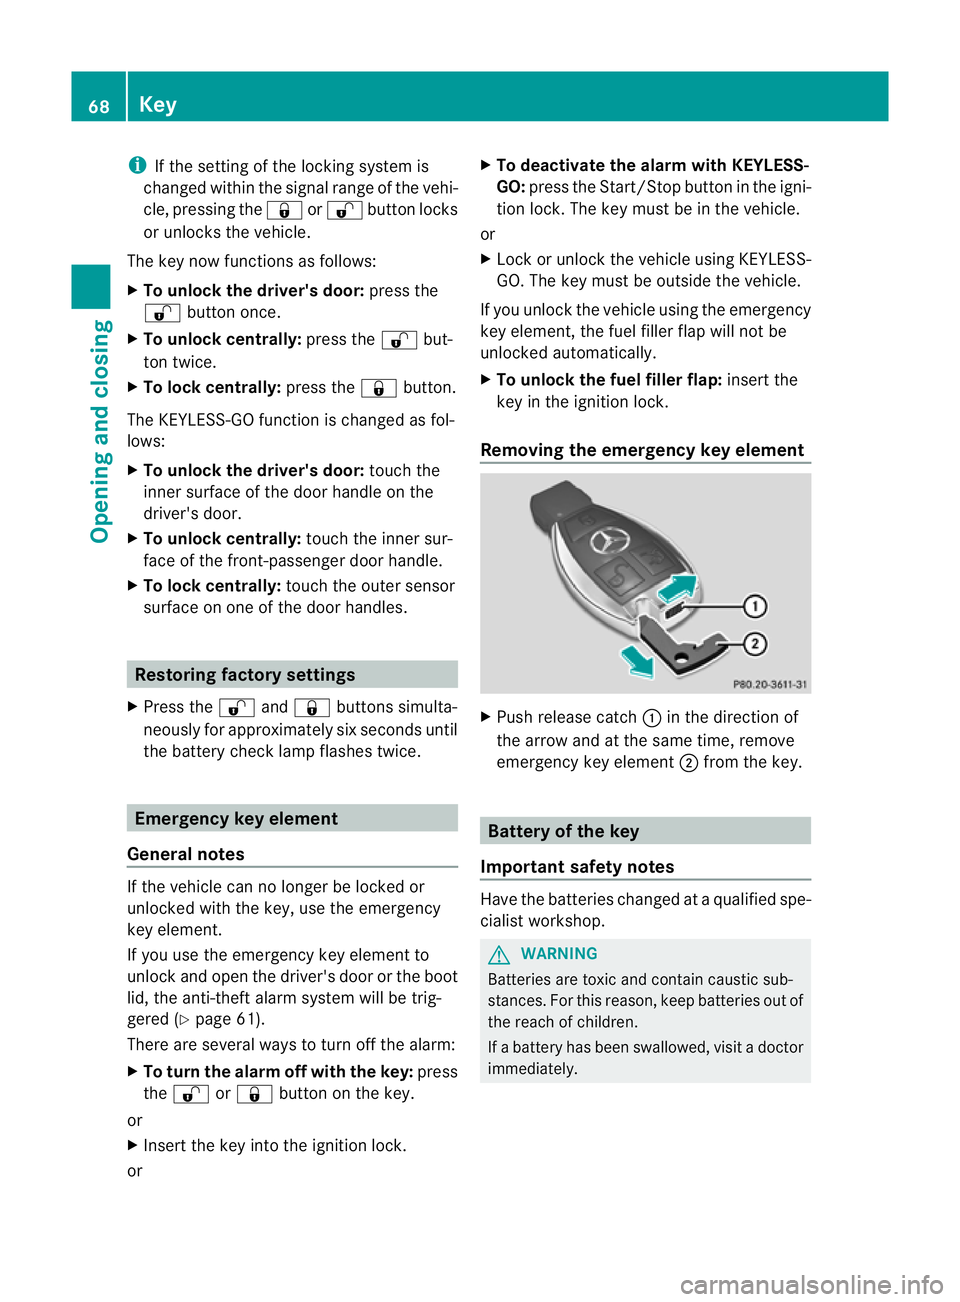
Removing the emergency key element X
Push release catch :in the direction of
the arrow and at the same time, remove
emergency key element ;from the key. Battery of the key
Important safety notes Have the batteries changed at a qualified spe-
cialist workshop. G
WARNING
Batteries are toxic and contain caustic sub-
stances. For this reason, keep batteries out of
the reach of children.
If a battery has been swallowed, visi tadoctor
immediately. 68
KeyOpening and closing