2012 MERCEDES-BENZ SLK-CLASS ROADSTER transmission
[x] Cancel search: transmissionPage 168 of 336
Deactivating DISTRONIC PLUS
There are several ways to deactivate
DISTRONIC PLUS:
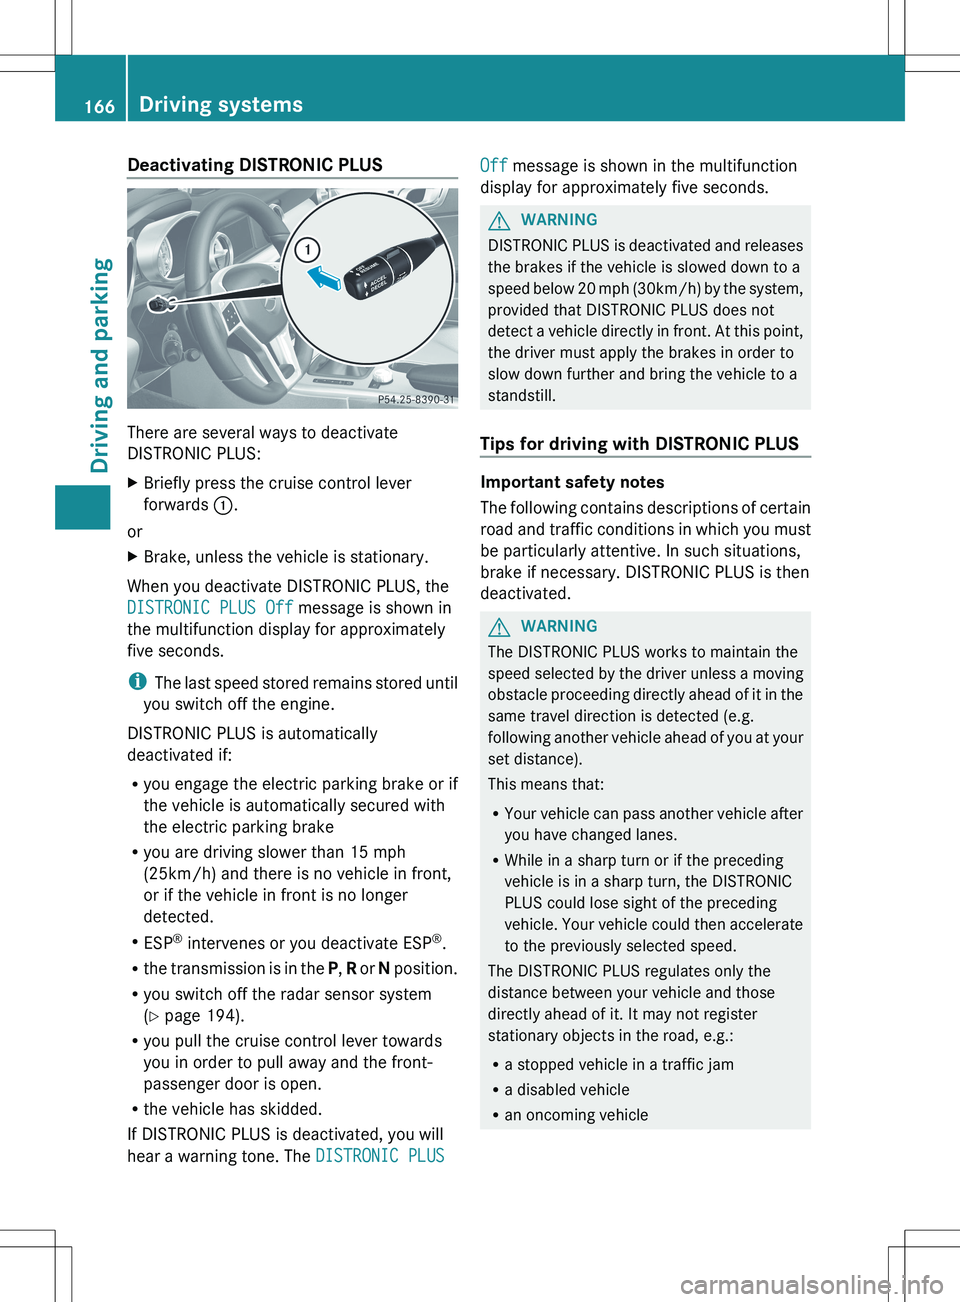
XBriefly press the cruise control lever
forwards :.
or
XBrake, unless the vehicle is stationary.
When you deactivate DISTRONIC PLUS, the
DISTRONIC PLUS Off message is shown in
the multifunction display for approximately
five seconds.
i The last speed stored remains stored until
you switch off the engine.
DISTRONIC PLUS is automatically
deactivated if:
R you engage the electric parking brake or if
the vehicle is automatically secured with
the electric parking brake
R you are driving slower than 15 mph
(25km/h) and there is no vehicle in front,
or if the vehicle in front is no longer
detected.
R ESP ®
intervenes or you deactivate ESP ®
.
R the transmission is in the P, R or N position.
R you switch off the radar sensor system
( Y page 194).
R you pull the cruise control lever towards
you in order to pull away and the front-
passenger door is open.
R the vehicle has skidded.
If DISTRONIC PLUS is deactivated, you will
hear a warning tone. The DISTRONIC PLUS
Off message is shown in the multifunction
display for approximately five seconds.GWARNING
DISTRONIC PLUS is deactivated and releases
the brakes if the vehicle is slowed down to a
speed below 20 mph ( 30km/h) by the system,
provided that DISTRONIC PLUS does not
detect a vehicle directly in front. At this point,
the driver must apply the brakes in order to
slow down further and bring the vehicle to a
standstill.
Tips for driving with DISTRONIC PLUS
Important safety notes
The following contains descriptions of certain
road and traffic conditions in which you must
be particularly attentive. In such situations,
brake if necessary. DISTRONIC PLUS is then
deactivated.
GWARNING
The DISTRONIC PLUS works to maintain the
speed selected by the driver unless a moving
obstacle proceeding directly ahead of it in the
same travel direction is detected (e.g.
following another vehicle ahead of you at your
set distance).
This means that:
R Your vehicle can pass another vehicle after
you have changed lanes.
R While in a sharp turn or if the preceding
vehicle is in a sharp turn, the DISTRONIC
PLUS could lose sight of the preceding
vehicle. Your vehicle could then accelerate
to the previously selected speed.
The DISTRONIC PLUS regulates only the
distance between your vehicle and those
directly ahead of it. It may not register
stationary objects in the road, e.g.:
R a stopped vehicle in a traffic jam
R a disabled vehicle
R an oncoming vehicle
166Driving systemsDriving and parking
Page 171 of 336
Rthe driver's door is closed or your seat belt
is fastened.
R the electric parking brake is released.
R the hood is closed.
R the selector lever is in position D, R or N on
vehicles with automatic transmission.
R DISTRONIC PLUS is deactivated.
Activating the HOLD functionXMake sure that the activation conditions
are met.XDepress the brake pedal.XQuickly depress the brake pedal further
until ë appears in the multifunction
display.
The HOLD function is activated. You can
release the brake pedal.
i If depressing the brake pedal the first
time does not activate the HOLD function,
wait briefly and then try again.
GWARNING
The vehicle's brakes are applied when the
HOLD function is activated. For this reason,
deactivate the HOLD function if the vehicle is
to be set in motion by other means (e.g. in a
car wash or by towing).
Deactivating the HOLD function
The HOLD function is deactivated
automatically if:
R you accelerate. On vehicles with automatic
transmission: only when the transmission
is in position D or R.
R you shift the transmission to position P on
vehicles with automatic transmission.
R you depress the brake pedal again with a
certain amount of pressure until ë
disappears from the multifunction display.
R you secure the vehicle using the electric
parking brake.
R you activate DISTRONIC PLUS.
i After a time, the electric parking brake
secures the vehicle and relieves the service
brake.GWARNING
Never get out of the vehicle when the HOLD
function is activated.
The HOLD function must never be operated
or deactivated by a passenger or from outside
the vehicle.
The HOLD function does not replace the
electric parking brake and must not be used
for parking.
The braking effect of the HOLD function is
canceled and the vehicle could roll away if:
R the HOLD function is deactivated by
depressing the accelerator pedal or the
brake pedal.
R there is a malfunction in the system or an
interruption in the power supply, e.g.
battery failure.
R the electrical system in the engine
compartment, the battery or the fuses are
tampered with.
R the battery is disconnected.
If you leave the vehicle or park it, deactivate
the HOLD function and secure the vehicle
against rolling away.
The electric parking brake automatically
secures the vehicle if the HOLD function is
activated and:
R the driver's door is open and the driver's
seat belt is unfastened.
R the engine is switched off.
R the hood is opened.
R a system malfunction occurs.
R the power supply is not sufficient.
If there is a malfunction in the vehicle
electronics, a warning message may also
appear in the multifunction display.
Brake Immediately
XImmediately depress the brake pedal firmly
until the warning message in theDriving systems169Driving and parkingZ
Page 172 of 336
multifunction display goes out. This
deactivates the HOLD function.
In vehicles with automatic transmission:
Shift to 'P' .
XShift the transmission to position P to
prevent the vehicle from rolling away.
The HOLD function is deactivated. The
warning message in the multifunction
display disappears.
A horn will also sound at regular intervals if
the HOLD function is activated and you:
R switch the engine off, open the driver's
door and remove your seat belt
R open the hood
The sounding of the horn alerts you to the fact
that the vehicle has been parked while the
HOLD function is still activated. If you attempt
to lock the vehicle, the tone becomes louder.
The vehicle is not locked until the HOLD
function is deactivated.
i If the engine has been switched off, it cant
be started again until the HOLD function
has been deactivated.
PARKTRONIC
Important safety notes
GWARNING
The PARKTRONIC is a supplemental system.
It is not intended to, nor does it replace, the
need for extreme care. The responsibility
during parking and other critical maneuvers
always remains with the driver.
GWARNING
Make sure no persons or animals are in or
near the area in which you are parking/
maneuvering. Otherwise, they could be
injured.
PARKTRONIC is an electronic parking aid with
ultrasonic sensors. It indicates visually and
audibly the distance between your vehicle
and an object.
PARKTRONIC is activated automatically when
you:
R switch on the ignition
R move the selector lever to position D, R or
N on vehicles with automatic transmission
R release the electric parking brake
PARKTRONIC is deactivated at speeds above
11 mph (18km/h). It is reactivated at lower
speeds.
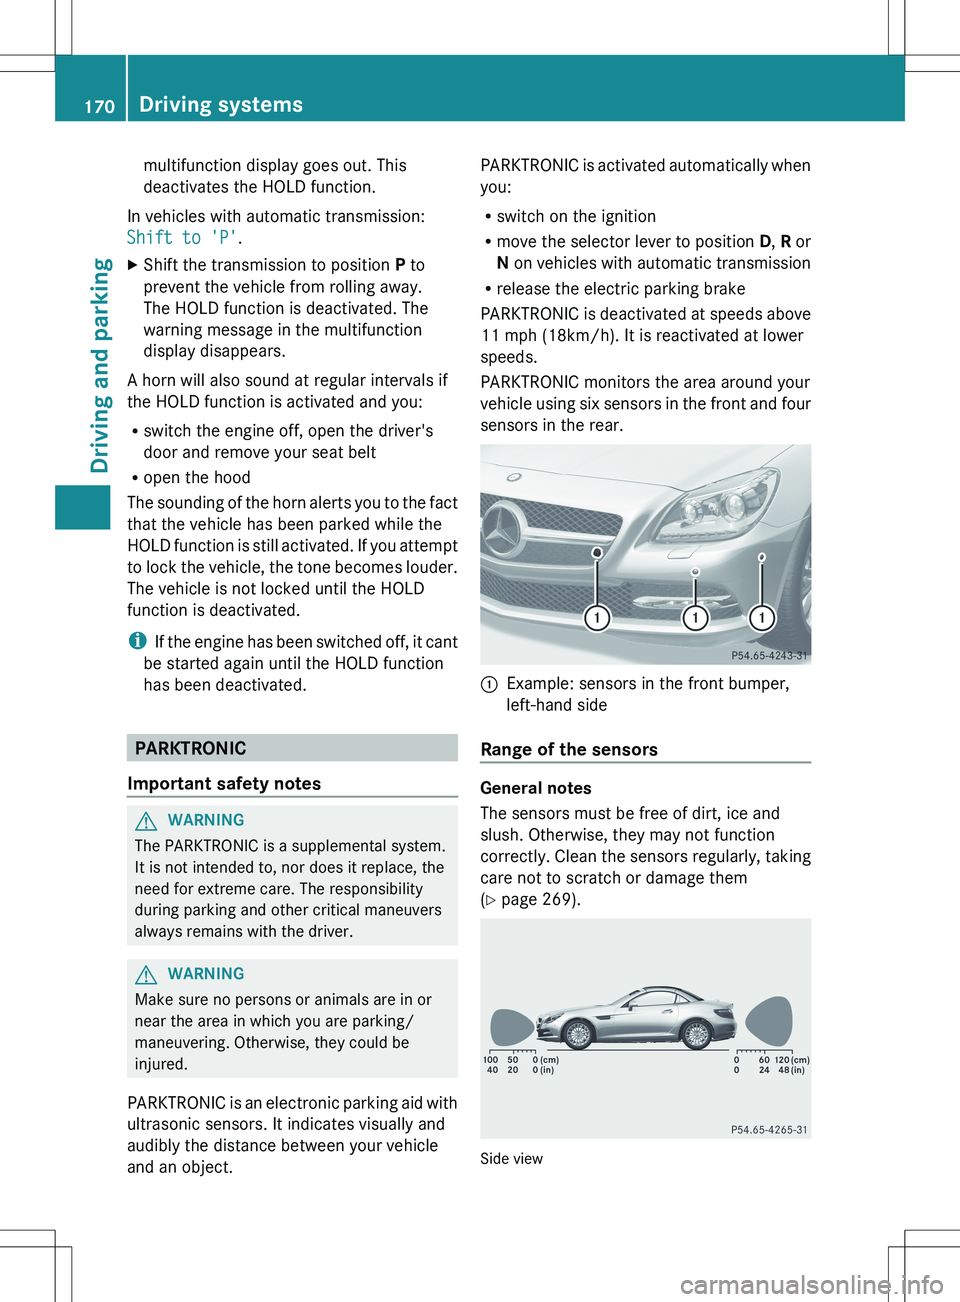
PARKTRONIC monitors the area around your
vehicle using six sensors in the front and four
sensors in the rear.:Example: sensors in the front bumper,
left-hand side
Range of the sensors
General notes
The sensors must be free of dirt, ice and
slush. Otherwise, they may not function
correctly. Clean the sensors regularly, taking
care not to scratch or damage them
( Y page 269).
Side view
170Driving systemsDriving and parking
Page 173 of 336
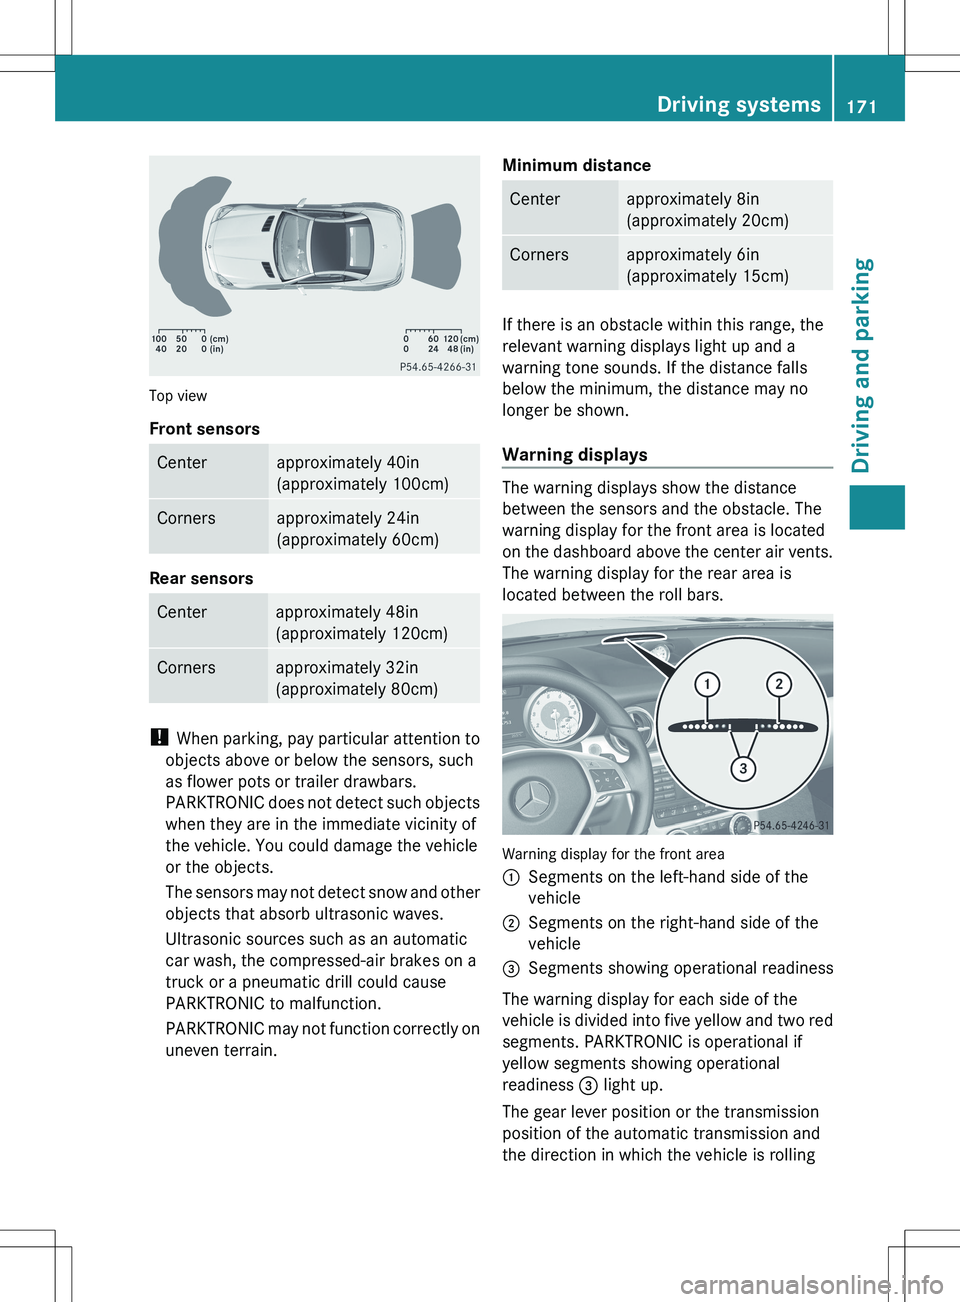
Top view
Front sensors
Centerapproximately 40in
(approximately 100cm)Cornersapproximately 24in
(approximately 60cm)
Rear sensors
Centerapproximately 48in
(approximately 120cm)Cornersapproximately 32in
(approximately 80cm)
! When parking, pay particular attention to
objects above or below the sensors, such
as flower pots or trailer drawbars.
PARKTRONIC does not detect such objects
when they are in the immediate vicinity of
the vehicle. You could damage the vehicle
or the objects.
The sensors may not detect snow and other
objects that absorb ultrasonic waves.
Ultrasonic sources such as an automatic
car wash, the compressed-air brakes on a
truck or a pneumatic drill could cause
PARKTRONIC to malfunction.
PARKTRONIC may not function correctly on
uneven terrain.
Minimum distanceCenterapproximately 8in
(approximately 20cm)Cornersapproximately 6in
(approximately 15cm)
If there is an obstacle within this range, the
relevant warning displays light up and a
warning tone sounds. If the distance falls
below the minimum, the distance may no
longer be shown.
Warning displays
The warning displays show the distance
between the sensors and the obstacle. The
warning display for the front area is located
on the dashboard above the center air vents.
The warning display for the rear area is
located between the roll bars.
Warning display for the front area
:Segments on the left-hand side of the
vehicle;Segments on the right-hand side of the
vehicle=Segments showing operational readiness
The warning display for each side of the
vehicle is divided into five yellow and two red
segments. PARKTRONIC is operational if
yellow segments showing operational
readiness = light up.
The gear lever position or the transmission
position of the automatic transmission and
the direction in which the vehicle is rolling
Driving systems171Driving and parkingZ
Page 174 of 336
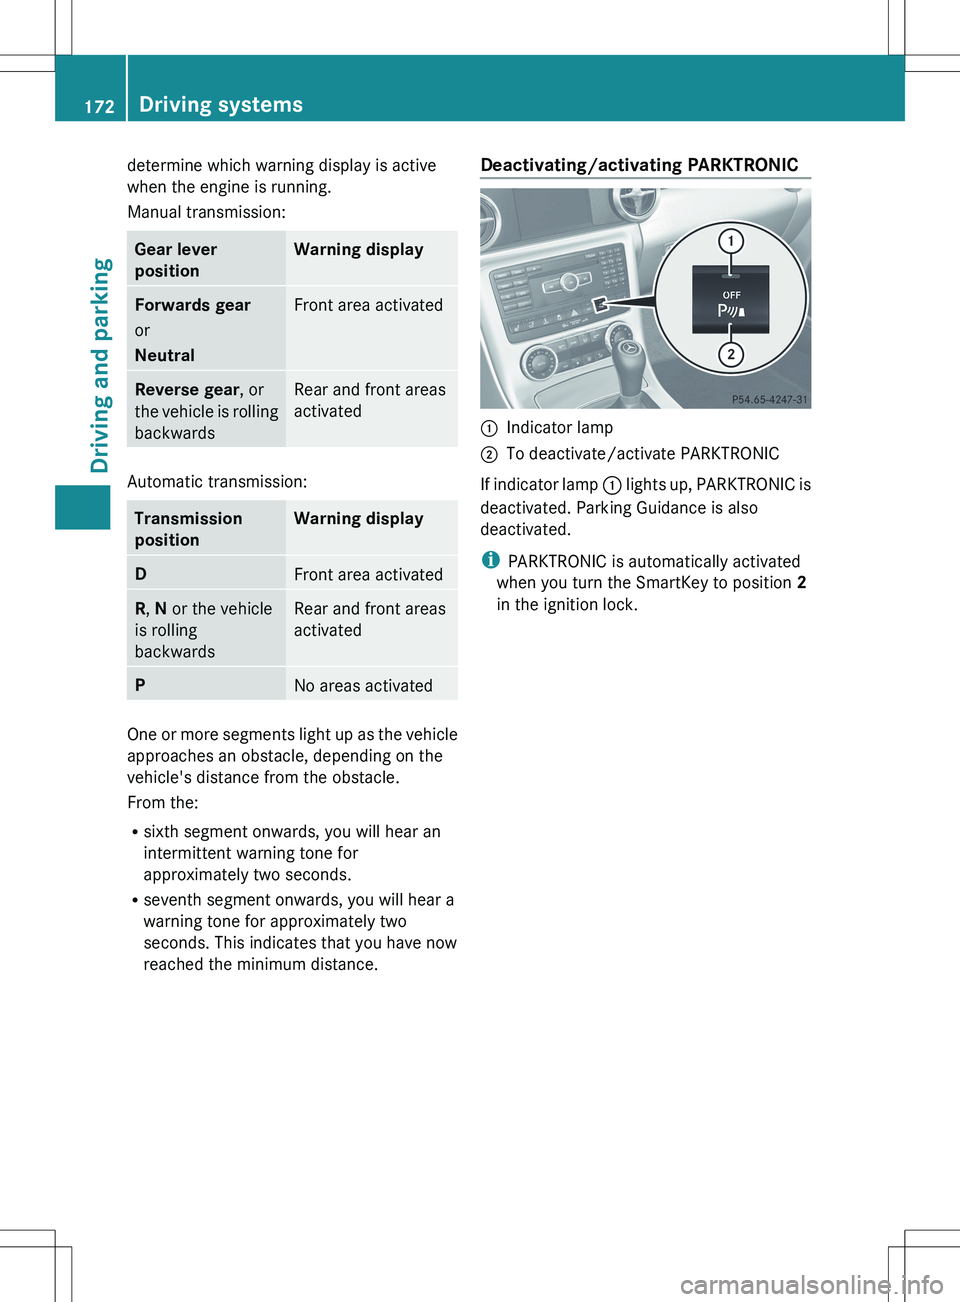
determine which warning display is active
when the engine is running.
Manual transmission:Gear lever
positionWarning displayForwards gear
or
NeutralFront area activatedReverse gear , or
the vehicle is rolling
backwardsRear and front areas
activated
Automatic transmission:
Transmission
positionWarning displayDFront area activatedR , N or the vehicle
is rolling
backwardsRear and front areas
activatedPNo areas activated
One or more segments light up as the vehicle
approaches an obstacle, depending on the
vehicle's distance from the obstacle.
From the:
R sixth segment onwards, you will hear an
intermittent warning tone for
approximately two seconds.
R seventh segment onwards, you will hear a
warning tone for approximately two
seconds. This indicates that you have now
reached the minimum distance.
Deactivating/activating PARKTRONIC:Indicator lamp;To deactivate/activate PARKTRONIC
If indicator lamp : lights up, PARKTRONIC is
deactivated. Parking Guidance is also
deactivated.
i PARKTRONIC is automatically activated
when you turn the SmartKey to position 2
in the ignition lock.
172Driving systemsDriving and parking
Page 177 of 336
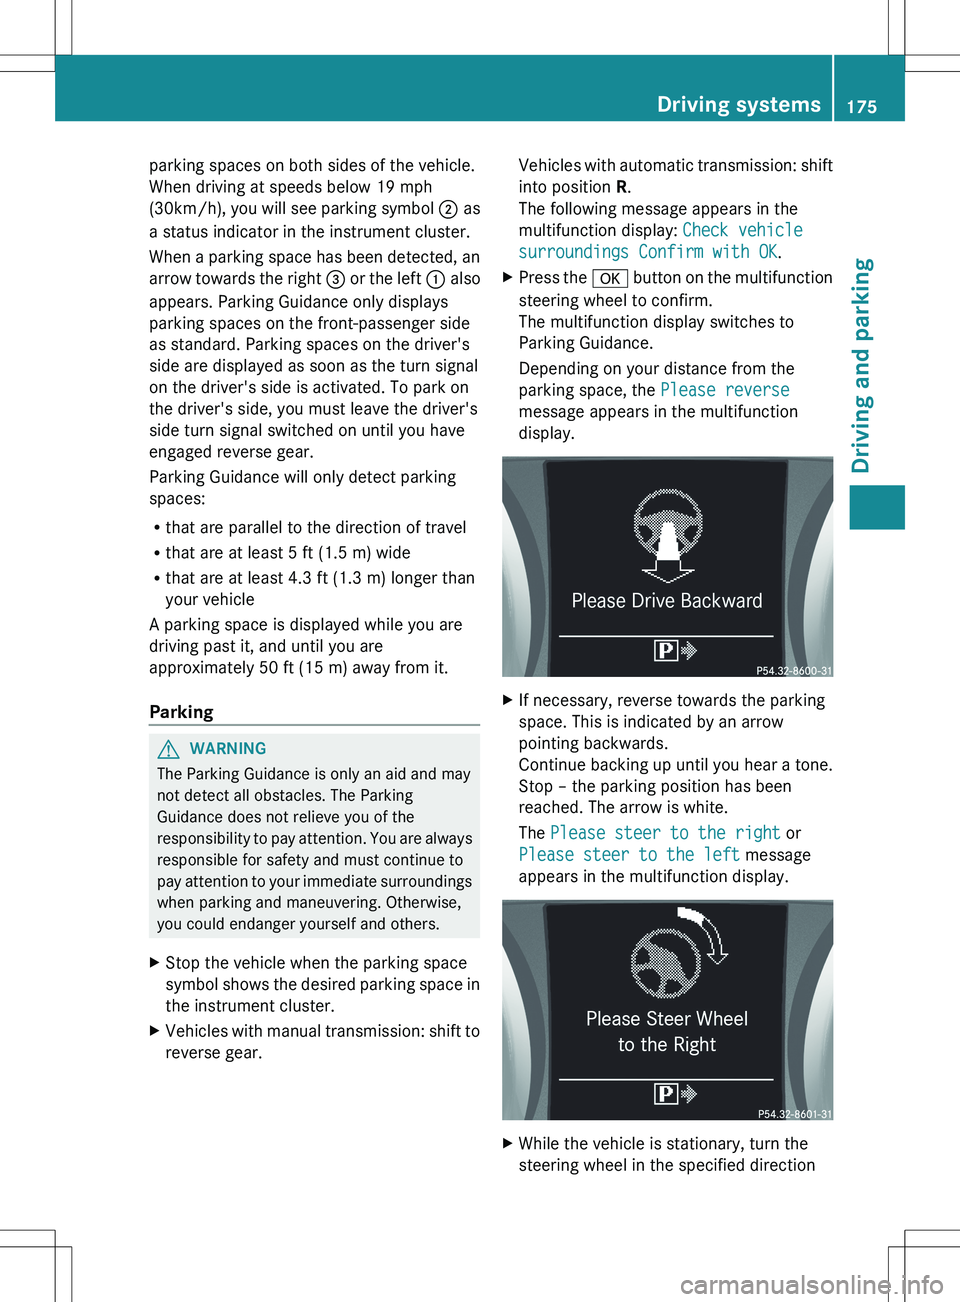
parking spaces on both sides of the vehicle.
When driving at speeds below 19 mph
(30 km/h), you will see parking symbol ; as
a status indicator in the instrument cluster.
When a parking space has been detected, an
arrow towards the right = or the left : also
appears. Parking Guidance only displays
parking spaces on the front-passenger side
as standard. Parking spaces on the driver's
side are displayed as soon as the turn signal
on the driver's side is activated. To park on
the driver's side, you must leave the driver's
side turn signal switched on until you have
engaged reverse gear.
Parking Guidance will only detect parking
spaces:
R that are parallel to the direction of travel
R that are at least 5 ft (1.5 m) wide
R that are at least 4.3 ft (1.3 m) longer than
your vehicle
A parking space is displayed while you are
driving past it, and until you are
approximately 50 ft (15 m) away from it.
ParkingGWARNING
The Parking Guidance is only an aid and may
not detect all obstacles. The Parking
Guidance does not relieve you of the
responsibility to pay attention. You are always
responsible for safety and must continue to
pay attention to your immediate surroundings
when parking and maneuvering. Otherwise,
you could endanger yourself and others.
XStop the vehicle when the parking space
symbol shows the desired parking space in
the instrument cluster.XVehicles with manual transmission: shift to
reverse gear.Vehicles with automatic transmission: shift
into position R.
The following message appears in the
multifunction display: Check vehicle
surroundings Confirm with OK .XPress the a button on the multifunction
steering wheel to confirm.
The multifunction display switches to
Parking Guidance.
Depending on your distance from the
parking space, the Please reverse
message appears in the multifunction
display.XIf necessary, reverse towards the parking
space. This is indicated by an arrow
pointing backwards.
Continue backing up until you hear a tone.
Stop – the parking position has been
reached. The arrow is white.
The Please steer to the right or
Please steer to the left message
appears in the multifunction display.XWhile the vehicle is stationary, turn the
steering wheel in the specified directionDriving systems175Driving and parkingZ
Page 185 of 336
Back button%Press briefly:
R Back
R Switches off the Voice Control
System; see the separate
operating instructions
R Hides display messages or calls
up the last Trip menu function
used
R Exits the telephone book/redial
memory%Press and hold:
R Calls up the standard display in
the Trip menu
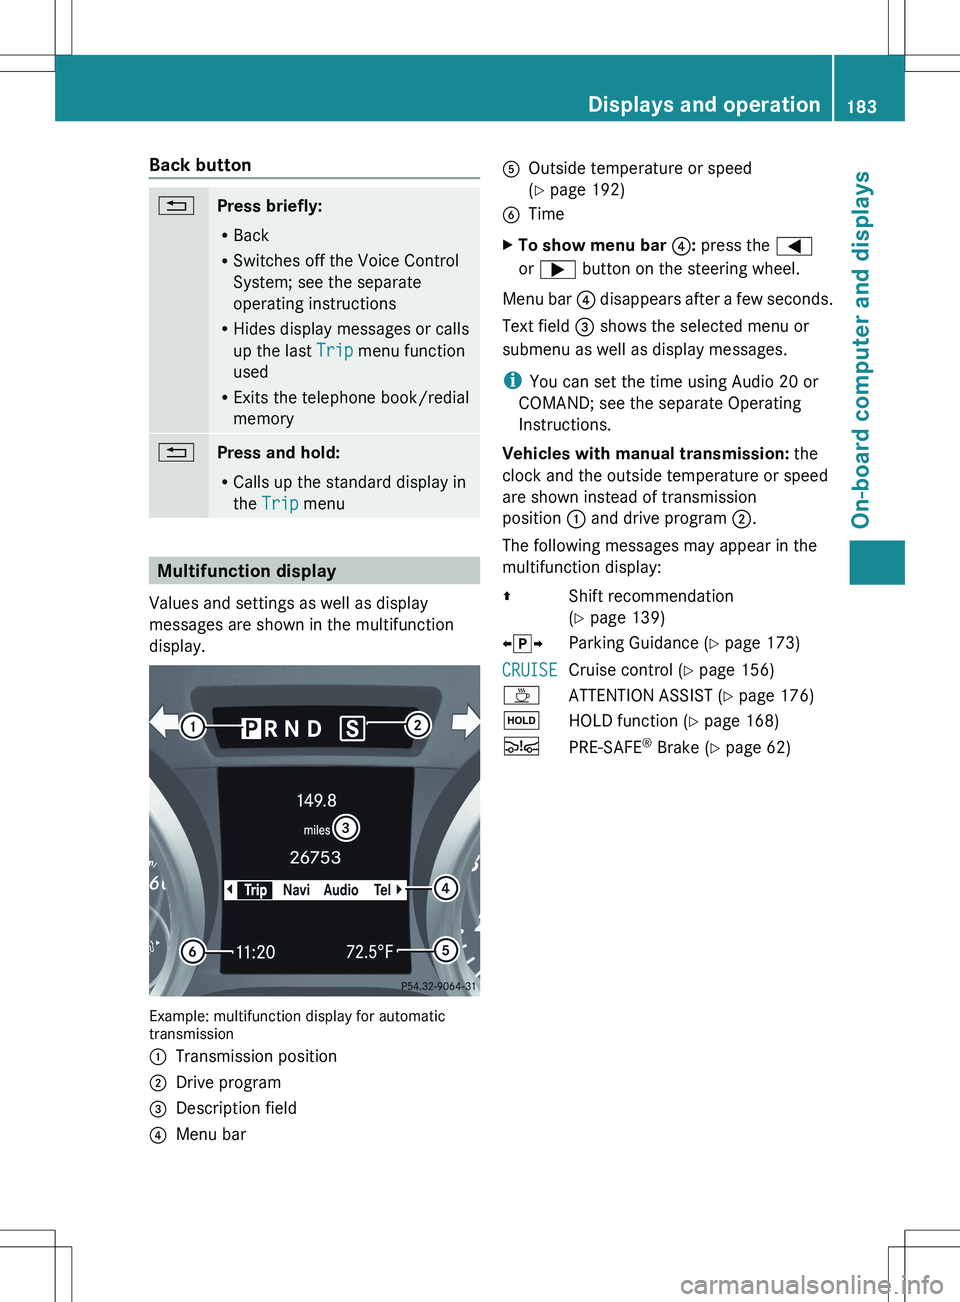
Multifunction display
Values and settings as well as display
messages are shown in the multifunction
display.
Example: multifunction display for automatic
transmission
:Transmission position;Drive program=Description field?Menu barAOutside temperature or speed
( Y page 192)BTimeXTo show menu bar ?: press the =
or ; button on the steering wheel.
Menu bar ? disappears after a few seconds.
Text field = shows the selected menu or
submenu as well as display messages.
i You can set the time using Audio 20 or
COMAND; see the separate Operating
Instructions.
Vehicles with manual transmission: the
clock and the outside temperature or speed
are shown instead of transmission
position : and drive program ;.
The following messages may appear in the
multifunction display:
ZShift recommendation
( Y page 139)Xj YParking Guidance ( Y page 173)CRUISECruise control ( Y page 156)ÀATTENTION ASSIST ( Y page 176)ëHOLD function ( Y page 168)ÄPRE-SAFE ®
Brake ( Y page 62)Displays and operation183On-board computer and displaysZ
Page 194 of 336
XPress the : or 9 button to select the
Display Unit Speed-/Odometer:
function.
You will see the selected setting: km or
miles .XPress the a button to save the setting.
Switching the additional speedometer on
or off
Only vehicles with manual transmission have
this function.
The Additional Speedometer function
allows you to choose whether the status area
of the multifunction display shows the speed
in km/h (USA) or mph (Canada) instead of the
outside temperature.
XPress the = or ; button on the
steering wheel to select the Settings
menu.XPress the : or 9 button to select the
Instr. cluster submenu.XPress the a button to confirm.XPress the : or 9 button to select the
Additional Speedometer function.
You will see the selected setting: On or
Off .XPress the a button to save the setting.
Selecting the permanent display function
Only vehicles with automatic transmission
have this function.
The Permanent Display: function allows
you to choose whether the multifunction
display always shows the outside
temperature or the speed in km/h (USA) or
mph (Canada).
XPress the = or ; button on the
steering wheel to select the Settings
menu.XPress the : or 9 button to select the
Instr. cluster submenu.XPress the a button to confirm.XPress the : or 9 button to select the
Permanent display function.
You will see the selected setting Outside
Temperature or Speedometer [km/h]: .XPress the a button to save the setting.
Lights
Switching the daytime running lamps on/
off
This function is not available in Canada.
If you have activated the Daytime Running
Lights: function and the light switch is in the
c or à position, the daytime running
lamps are switched on automatically when
the engine is running.
Depending on the ambient light, the following
will additionally light up:
R low-beam headlamps
R parking lamps
R tail lamps
R license plate lamp
R side marker lamps
XPress the = or ; button on the
steering wheel to select the Settings
menu.XPress the : or 9 button to select the
Light submenu.XPress the a button to confirm.XPress the : or 9 button to select the
Daytime running lights function.
You will see the selected setting: on or
off .XPress the a button to save the setting.
Setting the brightness of the ambient
lighting
XPress the = or ; button on the
steering wheel to select the Settings
menu.XPress the : or 9 button to select the
Lights submenu.XPress the a button to confirm.192Menus and submenusOn-board computer and displays