2012 MERCEDES-BENZ SLK-CLASS ROADSTER flat tire
[x] Cancel search: flat tirePage 276 of 336

Useful information
i This Operator's Manual describes all
models and all standard and optional
equipment of your vehicle available at the
time of publication of the Operator's
Manual. Country-specific differences are
possible. Please note that your vehicle may
not be equipped with all features
described. This also applies to safety-
related systems and functions.
i Please read the information on qualified
specialist workshops ( Y page 23).
Where will I find...?
First-aid kit
XOpen the trunk lid.XLift the trunk floor up.XRemove first-aid kit :.
i
Check the expiration date on the first-aid
kit at least once a year. Replace the
contents if necessary, and replace missing
items.
Vehicle tool kit
The vehicle tool kit can be found in the
stowage well under the trunk floor.
XVehicles with a TIREFIT kit: lift the trunk
floor up.XLift the trunk floor up.XRemove the collapsible spare wheel
( Y page 274).XAMG vehicles: loosen the central screw of
the bracket counter-clockwise and remove
it together with the bracket.:Folding wheel chock;Fuse allocation chart=Jack?Sheet for faulty wheelAAlignment boltBLug wrenchCTowing eyeDValve extractorETire inflation compressor
Collapsible spare wheel
Removing the collapsible spare wheel
The collapsible spare wheel can be found in
the stowage well under the trunk floor.
AMG vehicles: the collapsible spare wheel is
packed in a bag and secured to a bracket in
the trunk.
274Where will I find...?Breakdown assistance
Page 277 of 336
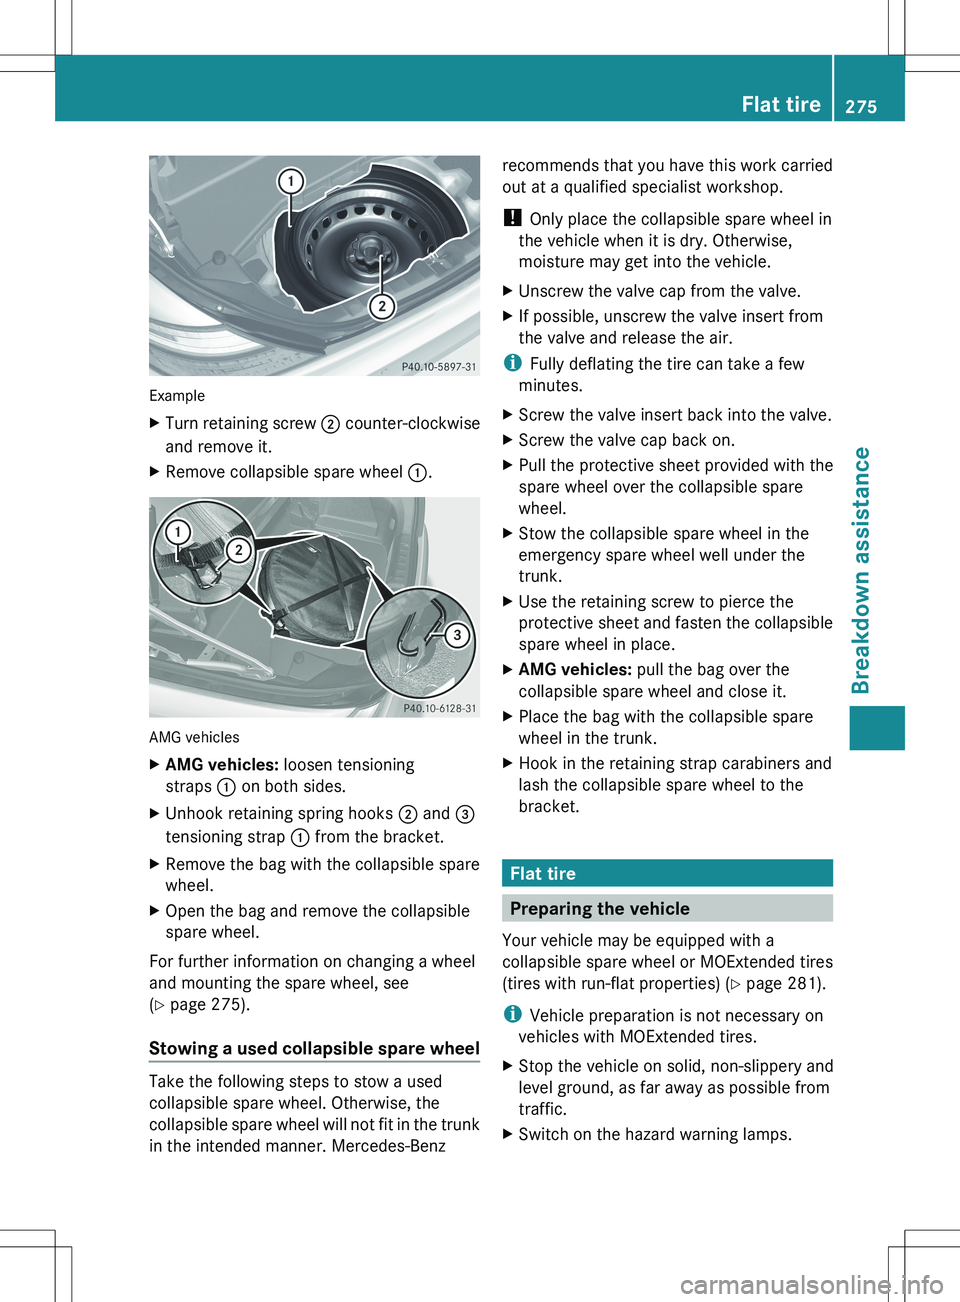
Example
XTurn retaining screw ; counter-clockwise
and remove it.XRemove collapsible spare wheel :.
AMG vehicles
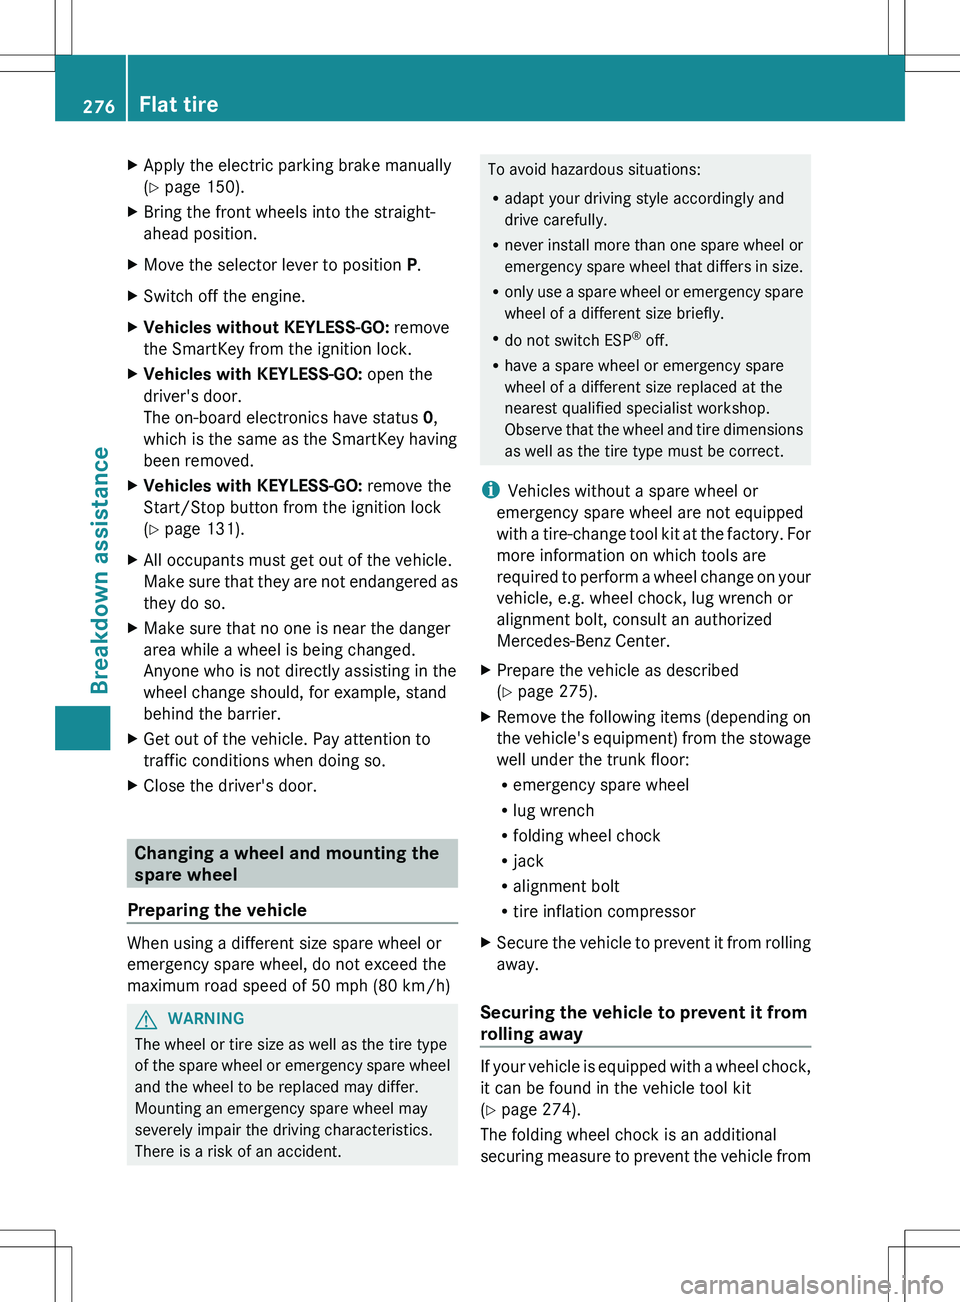
XAMG vehicles: loosen tensioning
straps : on both sides.XUnhook retaining spring hooks ; and =
tensioning strap : from the bracket.XRemove the bag with the collapsible spare
wheel.XOpen the bag and remove the collapsible
spare wheel.
For further information on changing a wheel
and mounting the spare wheel, see
( Y page 275).
Stowing a used collapsible spare wheel
Take the following steps to stow a used
collapsible spare wheel. Otherwise, the
collapsible spare wheel will not fit in the trunk
in the intended manner. Mercedes-Benz
recommends that you have this work carried
out at a qualified specialist workshop.
! Only place the collapsible spare wheel in
the vehicle when it is dry. Otherwise,
moisture may get into the vehicle.XUnscrew the valve cap from the valve.XIf possible, unscrew the valve insert from
the valve and release the air.
i Fully deflating the tire can take a few
minutes.
XScrew the valve insert back into the valve.XScrew the valve cap back on.XPull the protective sheet provided with the
spare wheel over the collapsible spare
wheel.XStow the collapsible spare wheel in the
emergency spare wheel well under the
trunk.XUse the retaining screw to pierce the
protective sheet and fasten the collapsible
spare wheel in place.XAMG vehicles: pull the bag over the
collapsible spare wheel and close it.XPlace the bag with the collapsible spare
wheel in the trunk.XHook in the retaining strap carabiners and
lash the collapsible spare wheel to the
bracket.
Flat tire
Preparing the vehicle
Your vehicle may be equipped with a
collapsible spare wheel or MOExtended tires
(tires with run-flat properties) ( Y page 281).
i Vehicle preparation is not necessary on
vehicles with MOExtended tires.
XStop the vehicle on solid, non-slippery and
level ground, as far away as possible from
traffic.XSwitch on the hazard warning lamps.Flat tire275Breakdown assistance
Page 278 of 336
XApply the electric parking brake manually
( Y page 150).XBring the front wheels into the straight-
ahead position.XMove the selector lever to position P.XSwitch off the engine.XVehicles without KEYLESS-GO: remove
the SmartKey from the ignition lock.XVehicles with KEYLESS-GO: open the
driver's door.
The on-board electronics have status 0,
which is the same as the SmartKey having
been removed.XVehicles with KEYLESS-GO: remove the
Start/Stop button from the ignition lock
( Y page 131).XAll occupants must get out of the vehicle.
Make sure that they are not endangered as
they do so.XMake sure that no one is near the danger
area while a wheel is being changed.
Anyone who is not directly assisting in the
wheel change should, for example, stand
behind the barrier.XGet out of the vehicle. Pay attention to
traffic conditions when doing so.XClose the driver's door.
Changing a wheel and mounting the
spare wheel
Preparing the vehicle
When using a different size spare wheel or
emergency spare wheel, do not exceed the
maximum road speed of 50 mph (80 km/h)
GWARNING
The wheel or tire size as well as the tire type
of the spare wheel or emergency spare wheel
and the wheel to be replaced may differ.
Mounting an emergency spare wheel may
severely impair the driving characteristics.
There is a risk of an accident.
To avoid hazardous situations:
R adapt your driving style accordingly and
drive carefully.
R never install more than one spare wheel or
emergency spare wheel that differs in size.
R only use a spare wheel or emergency spare
wheel of a different size briefly.
R do not switch ESP ®
off.
R have a spare wheel or emergency spare
wheel of a different size replaced at the
nearest qualified specialist workshop.
Observe that the wheel and tire dimensions
as well as the tire type must be correct.
i Vehicles without a spare wheel or
emergency spare wheel are not equipped
with a tire-change tool kit at the factory. For
more information on which tools are
required to perform a wheel change on your
vehicle, e.g. wheel chock, lug wrench or
alignment bolt, consult an authorized
Mercedes-Benz Center.XPrepare the vehicle as described
( Y page 275).XRemove the following items (depending on
the vehicle's equipment) from the stowage
well under the trunk floor:
R emergency spare wheel
R lug wrench
R folding wheel chock
R jack
R alignment bolt
R tire inflation compressorXSecure the vehicle to prevent it from rolling
away.
Securing the vehicle to prevent it from
rolling away
If your vehicle is equipped with a wheel chock,
it can be found in the vehicle tool kit
( Y page 274).
The folding wheel chock is an additional
securing measure to prevent the vehicle from
276Flat tireBreakdown assistance
Page 279 of 336
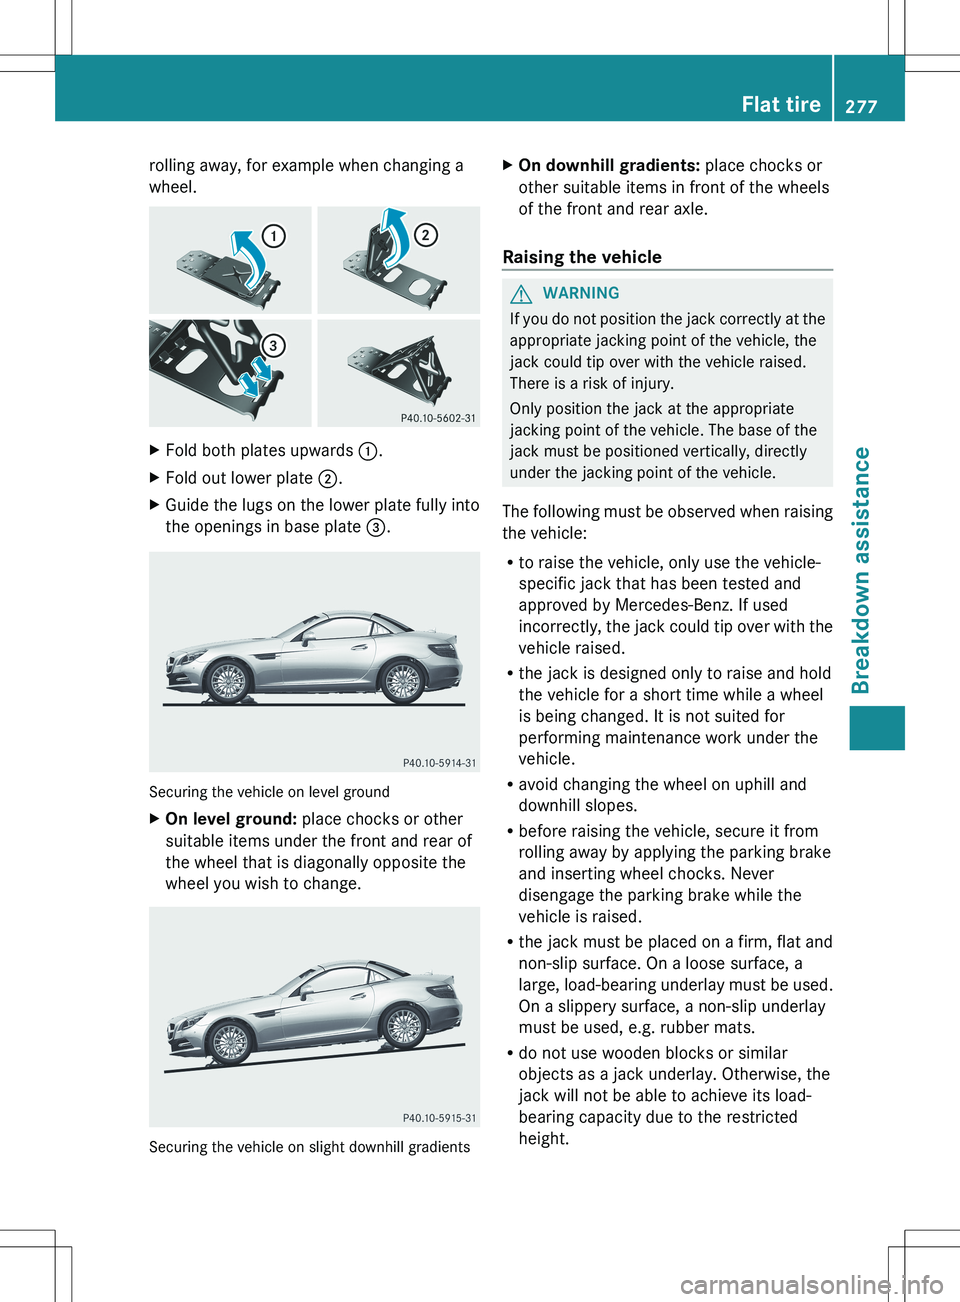
rolling away, for example when changing a
wheel.XFold both plates upwards :.XFold out lower plate ;.XGuide the lugs on the lower plate fully into
the openings in base plate =.
Securing the vehicle on level ground
XOn level ground: place chocks or other
suitable items under the front and rear of
the wheel that is diagonally opposite the
wheel you wish to change.
Securing the vehicle on slight downhill gradients
XOn downhill gradients: place chocks or
other suitable items in front of the wheels
of the front and rear axle.
Raising the vehicle
GWARNING
If you do not position the jack correctly at the
appropriate jacking point of the vehicle, the
jack could tip over with the vehicle raised.
There is a risk of injury.
Only position the jack at the appropriate
jacking point of the vehicle. The base of the
jack must be positioned vertically, directly
under the jacking point of the vehicle.
The following must be observed when raising
the vehicle:
R to raise the vehicle, only use the vehicle-
specific jack that has been tested and
approved by Mercedes-Benz. If used
incorrectly, the jack could tip over with the
vehicle raised.
R the jack is designed only to raise and hold
the vehicle for a short time while a wheel
is being changed. It is not suited for
performing maintenance work under the
vehicle.
R avoid changing the wheel on uphill and
downhill slopes.
R before raising the vehicle, secure it from
rolling away by applying the parking brake
and inserting wheel chocks. Never
disengage the parking brake while the
vehicle is raised.
R the jack must be placed on a firm, flat and
non-slip surface. On a loose surface, a
large, load-bearing underlay must be used.
On a slippery surface, a non-slip underlay
must be used, e.g. rubber mats.
R do not use wooden blocks or similar
objects as a jack underlay. Otherwise, the
jack will not be able to achieve its load-
bearing capacity due to the restricted
height.
Flat tire277Breakdown assistanceZ
Page 280 of 336

RThe maximum clearance between the
underside of the tire and the ground must
be 1.2 in (3 cm).
R never place your hands and feet under the
raised vehicle.
R never lie under the raised vehicle.
R never start the engine when the vehicle is
raised.
R never open or close a door or the trunk lid
when the vehicle is raised.
R make sure that no persons are present in
the vehicle when the vehicle is raised.XUsing lug wrench :, loosen the bolts on
the wheel you wish to change by about one
full turn. Do not unscrew the bolts
completely.
The jacking points are located just behind the
wheel housings of the front wheels and just
in front of the wheel housings of the rear
wheels (arrows).
AMG vehicles and vehicles with AMG
equipment: to protect the vehicle body, the
vehicle has covers next to the jacking points
on the outer sills.
Covers, front (example: vehicles with AMG
equipment)
XVehicles with AMG equipment: fold
cover ; upwards.
!
The jack is designed exclusively for
jacking up the vehicle at the jacking points.
Otherwise, your vehicle could be damaged.
XPosition jack ? at jacking point =.278Flat tireBreakdown assistance
Page 281 of 336
XMake sure that the base of the jack is
positioned directly under the jacking point.XTurn crank A clockwise until jack ? sits
completely on jacking point = and the
base of the jack lies evenly on the ground.XTurn handle A until the tire is 1.2 in
(3 cm) from the ground at most.
Removing a wheel
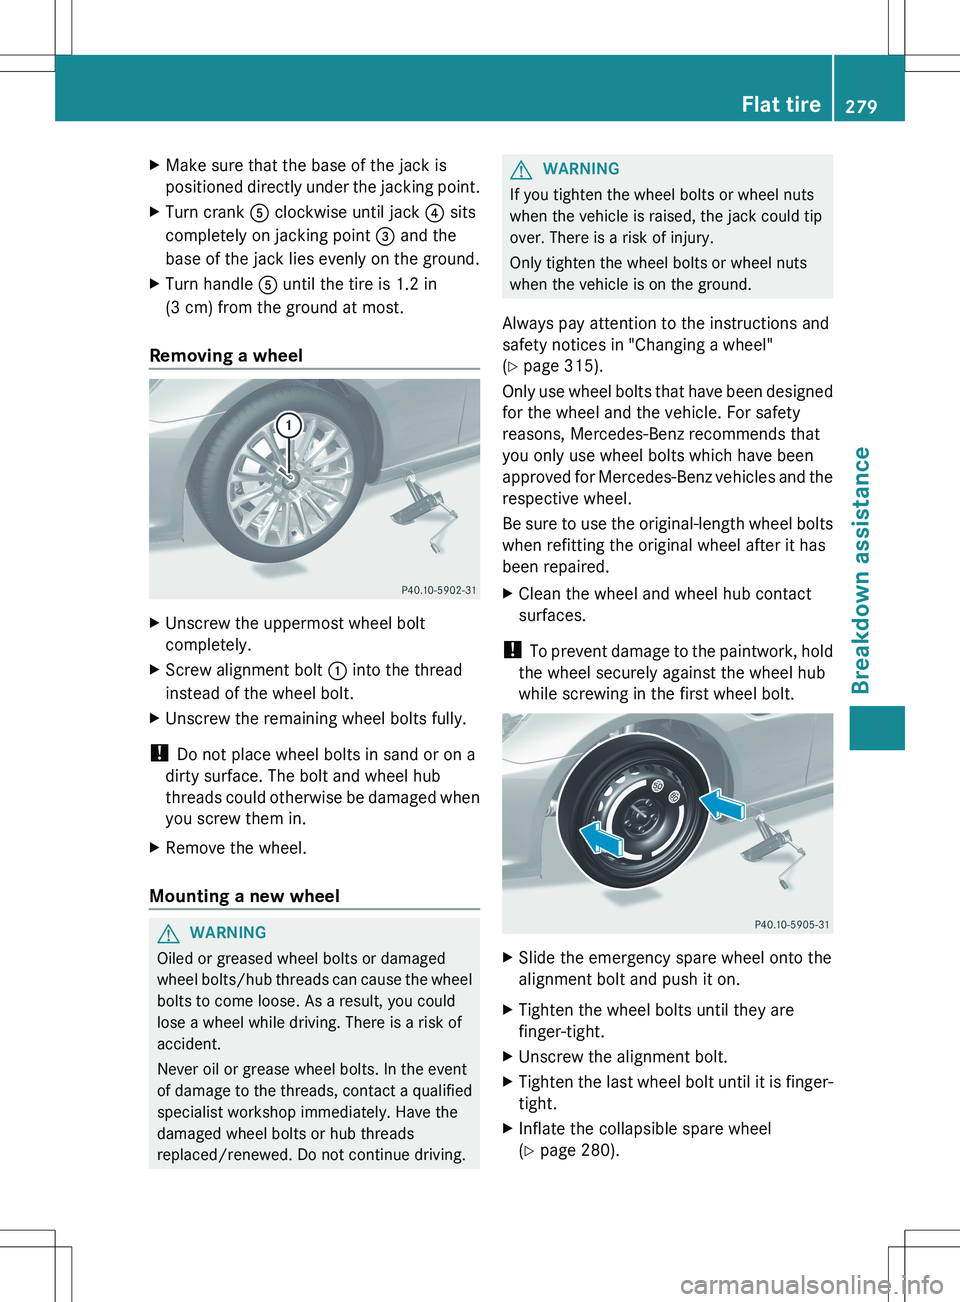
XUnscrew the uppermost wheel bolt
completely.XScrew alignment bolt : into the thread
instead of the wheel bolt.XUnscrew the remaining wheel bolts fully.
! Do not place wheel bolts in sand or on a
dirty surface. The bolt and wheel hub
threads could otherwise be damaged when
you screw them in.
XRemove the wheel.
Mounting a new wheel
GWARNING
Oiled or greased wheel bolts or damaged
wheel bolts/hub threads can cause the wheel
bolts to come loose. As a result, you could
lose a wheel while driving. There is a risk of
accident.
Never oil or grease wheel bolts. In the event
of damage to the threads, contact a qualified
specialist workshop immediately. Have the
damaged wheel bolts or hub threads
replaced/renewed. Do not continue driving.
GWARNING
If you tighten the wheel bolts or wheel nuts
when the vehicle is raised, the jack could tip
over. There is a risk of injury.
Only tighten the wheel bolts or wheel nuts
when the vehicle is on the ground.
Always pay attention to the instructions and
safety notices in "Changing a wheel"
( Y page 315).
Only use wheel bolts that have been designed
for the wheel and the vehicle. For safety
reasons, Mercedes-Benz recommends that
you only use wheel bolts which have been
approved for Mercedes-Benz vehicles and the
respective wheel.
Be sure to use the original-length wheel bolts
when refitting the original wheel after it has
been repaired.
XClean the wheel and wheel hub contact
surfaces.
! To prevent damage to the paintwork, hold
the wheel securely against the wheel hub
while screwing in the first wheel bolt.
XSlide the emergency spare wheel onto the
alignment bolt and push it on.XTighten the wheel bolts until they are
finger-tight.XUnscrew the alignment bolt.XTighten the last wheel bolt until it is finger-
tight.XInflate the collapsible spare wheel
( Y page 280).Flat tire279Breakdown assistanceZ
Page 282 of 336
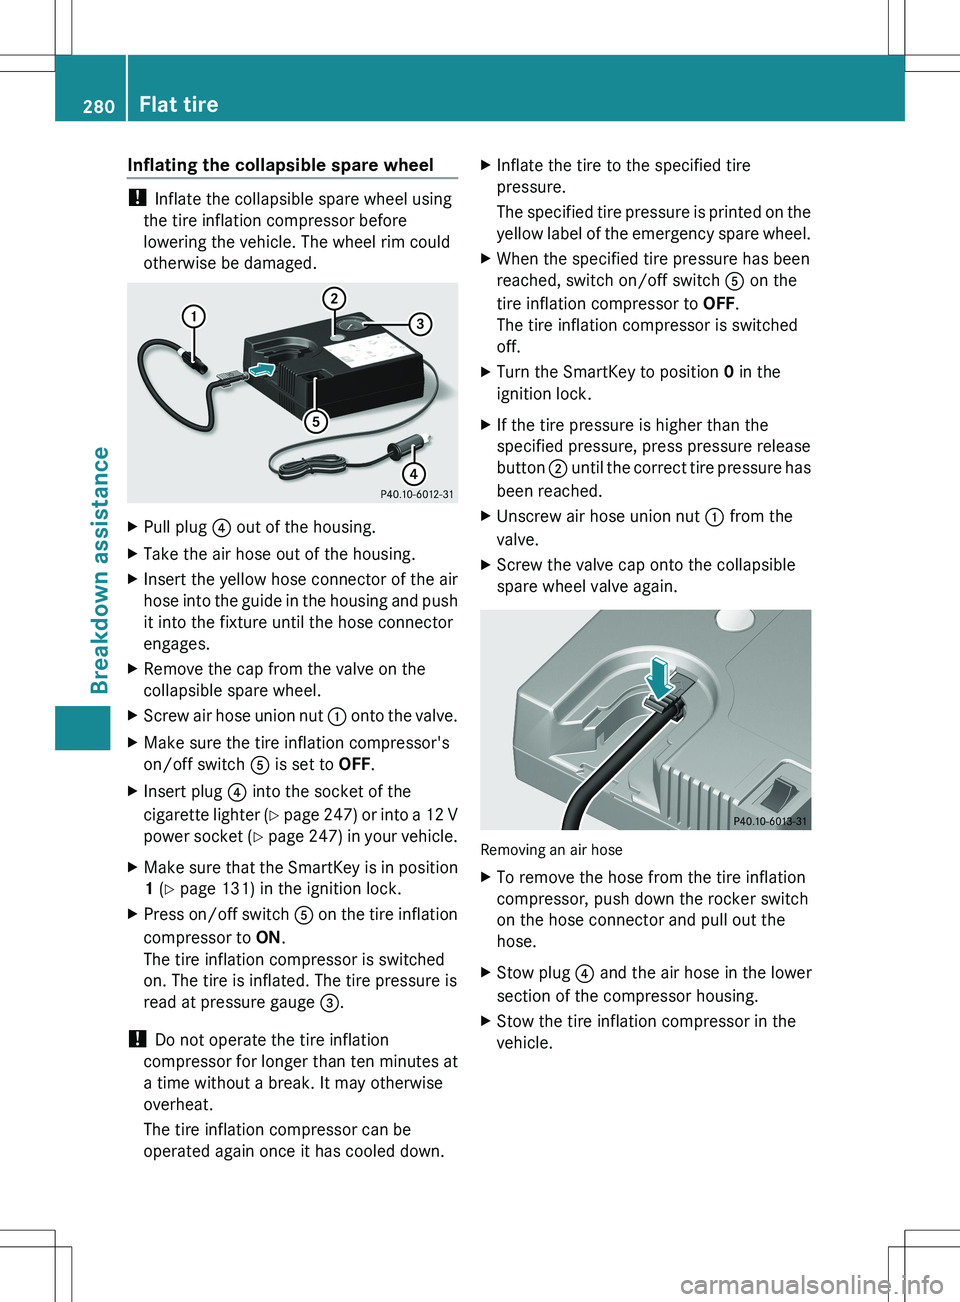
Inflating the collapsible spare wheel
! Inflate the collapsible spare wheel using
the tire inflation compressor before
lowering the vehicle. The wheel rim could
otherwise be damaged.
XPull plug ? out of the housing.XTake the air hose out of the housing.XInsert the yellow hose connector of the air
hose into the guide in the housing and push
it into the fixture until the hose connector
engages.XRemove the cap from the valve on the
collapsible spare wheel.XScrew air hose union nut : onto the valve.XMake sure the tire inflation compressor's
on/off switch A is set to OFF.XInsert plug ? into the socket of the
cigarette lighter (Y page 247) or into a 12 V
power socket (Y page 247) in your vehicle.XMake sure that the SmartKey is in position
1 (Y page 131) in the ignition lock.XPress on/off switch A on the tire inflation
compressor to ON.
The tire inflation compressor is switched
on. The tire is inflated. The tire pressure is
read at pressure gauge =.
!
Do not operate the tire inflation
compressor for longer than ten minutes at
a time without a break. It may otherwise
overheat.
The tire inflation compressor can be
operated again once it has cooled down.
XInflate the tire to the specified tire
pressure.
The specified tire pressure is printed on the
yellow label of the emergency spare wheel.XWhen the specified tire pressure has been
reached, switch on/off switch A on the
tire inflation compressor to OFF.
The tire inflation compressor is switched
off.XTurn the SmartKey to position 0 in the
ignition lock.XIf the tire pressure is higher than the
specified pressure, press pressure release
button ; until the correct tire pressure has
been reached.XUnscrew air hose union nut : from the
valve.XScrew the valve cap onto the collapsible
spare wheel valve again.
Removing an air hose
XTo remove the hose from the tire inflation
compressor, push down the rocker switch
on the hose connector and pull out the
hose.XStow plug ? and the air hose in the lower
section of the compressor housing.XStow the tire inflation compressor in the
vehicle.280Flat tireBreakdown assistance
Page 283 of 336
Lowering the vehicleGWARNING
Tire pressure that is too high or too low can
lead to a blowout of the mounted emergency
spare wheel/spare wheel, particularly when
driving with a heavy load and increasing
speed. There is a risk of accident.
Check the tire pressure of the emergency
spare wheel or spare wheel and adjust it.
When doing so, observe the specified tire
pressure.
! Inflate the collapsible spare wheel using
the tire inflation compressor before
lowering the vehicle. The wheel rim could
otherwise be damaged.
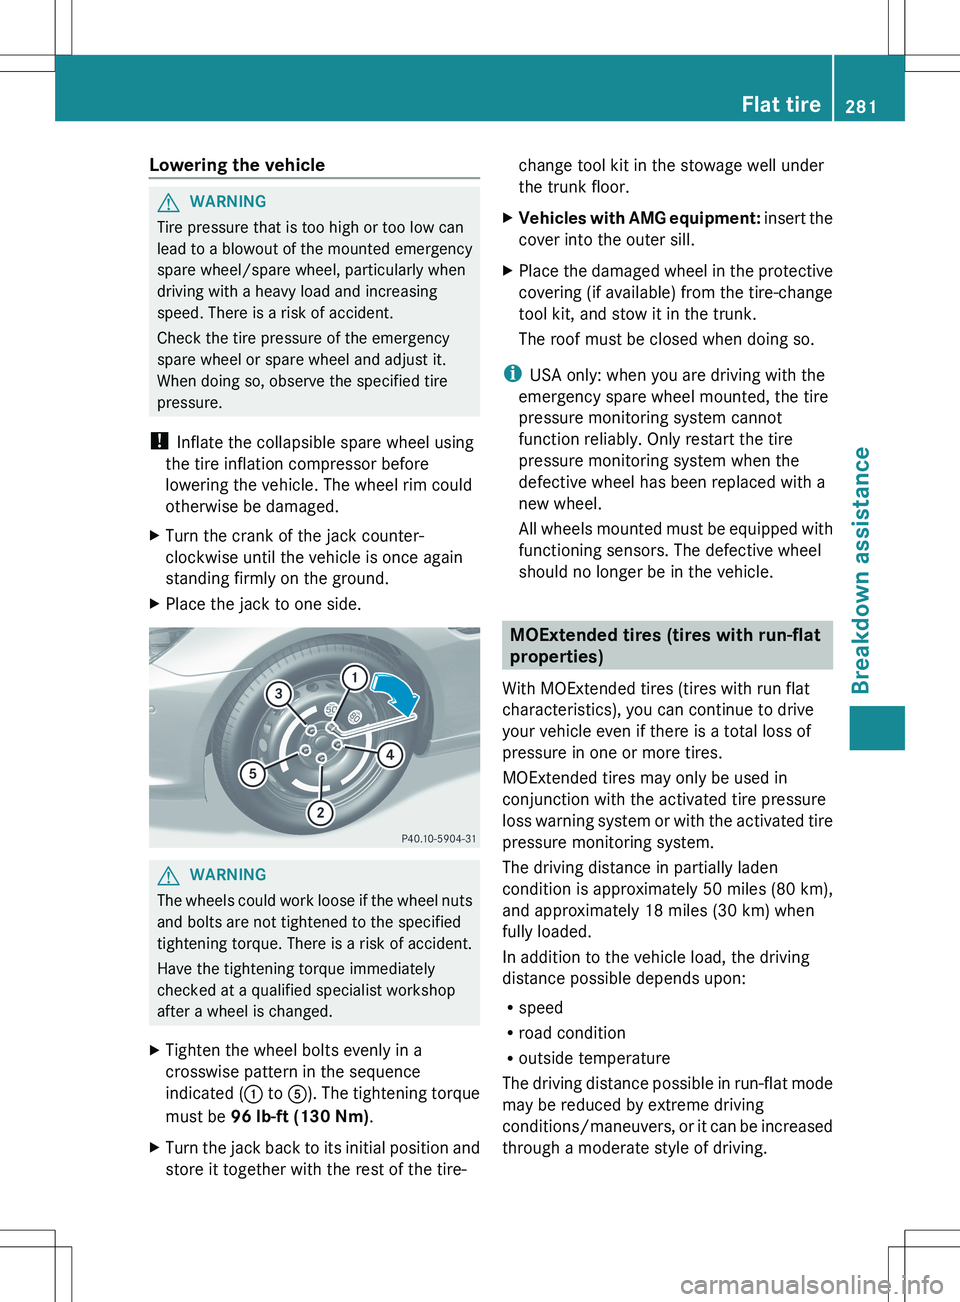
XTurn the crank of the jack counter-
clockwise until the vehicle is once again
standing firmly on the ground.XPlace the jack to one side.GWARNING
The wheels could work loose if the wheel nuts
and bolts are not tightened to the specified
tightening torque. There is a risk of accident.
Have the tightening torque immediately
checked at a qualified specialist workshop
after a wheel is changed.
XTighten the wheel bolts evenly in a
crosswise pattern in the sequence
indicated ( : to A). The tightening torque
must be 96 lb-ft (130 Nm) .XTurn the jack back to its initial position and
store it together with the rest of the tire-change tool kit in the stowage well under
the trunk floor.XVehicles with AMG equipment: insert the
cover into the outer sill.XPlace the damaged wheel in the protective
covering (if available) from the tire-change
tool kit, and stow it in the trunk.
The roof must be closed when doing so.
i USA only: when you are driving with the
emergency spare wheel mounted, the tire
pressure monitoring system cannot
function reliably. Only restart the tire
pressure monitoring system when the
defective wheel has been replaced with a
new wheel.
All wheels mounted must be equipped with
functioning sensors. The defective wheel
should no longer be in the vehicle.
MOExtended tires (tires with run-flat
properties)
With MOExtended tires (tires with run flat
characteristics), you can continue to drive
your vehicle even if there is a total loss of
pressure in one or more tires.
MOExtended tires may only be used in
conjunction with the activated tire pressure
loss warning system or with the activated tire
pressure monitoring system.
The driving distance in partially laden
condition is approximately 50 miles (80 km),
and approximately 18 miles (30 km) when
fully loaded.
In addition to the vehicle load, the driving
distance possible depends upon:
R speed
R road condition
R outside temperature
The driving distance possible in run-flat mode
may be reduced by extreme driving
conditions/maneuvers, or it can be increased
through a moderate style of driving.
Flat tire281Breakdown assistanceZ