2012 MERCEDES-BENZ SLK-CLASS ROADSTER wheel
[x] Cancel search: wheelPage 279 of 336
rolling away, for example when changing a
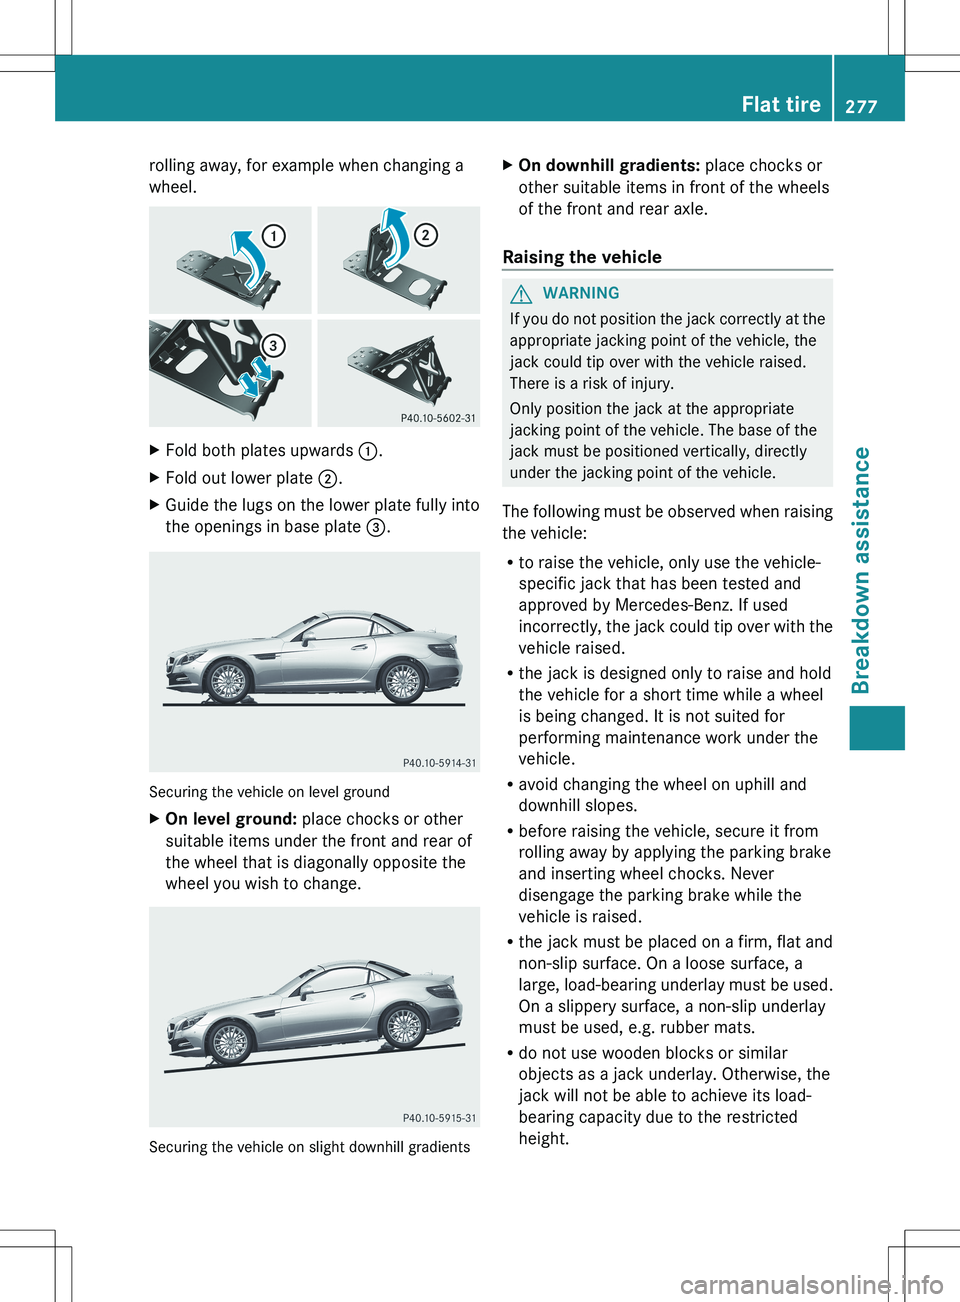
wheel.XFold both plates upwards :.XFold out lower plate ;.XGuide the lugs on the lower plate fully into
the openings in base plate =.
Securing the vehicle on level ground
XOn level ground: place chocks or other
suitable items under the front and rear of
the wheel that is diagonally opposite the
wheel you wish to change.
Securing the vehicle on slight downhill gradients
XOn downhill gradients: place chocks or
other suitable items in front of the wheels
of the front and rear axle.
Raising the vehicle
GWARNING
If you do not position the jack correctly at the
appropriate jacking point of the vehicle, the
jack could tip over with the vehicle raised.
There is a risk of injury.
Only position the jack at the appropriate
jacking point of the vehicle. The base of the
jack must be positioned vertically, directly
under the jacking point of the vehicle.
The following must be observed when raising
the vehicle:
R to raise the vehicle, only use the vehicle-
specific jack that has been tested and
approved by Mercedes-Benz. If used
incorrectly, the jack could tip over with the
vehicle raised.
R the jack is designed only to raise and hold
the vehicle for a short time while a wheel
is being changed. It is not suited for
performing maintenance work under the
vehicle.
R avoid changing the wheel on uphill and
downhill slopes.
R before raising the vehicle, secure it from
rolling away by applying the parking brake
and inserting wheel chocks. Never
disengage the parking brake while the
vehicle is raised.
R the jack must be placed on a firm, flat and
non-slip surface. On a loose surface, a
large, load-bearing underlay must be used.
On a slippery surface, a non-slip underlay
must be used, e.g. rubber mats.
R do not use wooden blocks or similar
objects as a jack underlay. Otherwise, the
jack will not be able to achieve its load-
bearing capacity due to the restricted
height.
Flat tire277Breakdown assistanceZ
Page 280 of 336

RThe maximum clearance between the
underside of the tire and the ground must
be 1.2 in (3 cm).
R never place your hands and feet under the
raised vehicle.
R never lie under the raised vehicle.
R never start the engine when the vehicle is
raised.
R never open or close a door or the trunk lid
when the vehicle is raised.
R make sure that no persons are present in
the vehicle when the vehicle is raised.XUsing lug wrench :, loosen the bolts on
the wheel you wish to change by about one
full turn. Do not unscrew the bolts
completely.
The jacking points are located just behind the
wheel housings of the front wheels and just
in front of the wheel housings of the rear
wheels (arrows).
AMG vehicles and vehicles with AMG
equipment: to protect the vehicle body, the
vehicle has covers next to the jacking points
on the outer sills.
Covers, front (example: vehicles with AMG
equipment)
XVehicles with AMG equipment: fold
cover ; upwards.
!
The jack is designed exclusively for
jacking up the vehicle at the jacking points.
Otherwise, your vehicle could be damaged.
XPosition jack ? at jacking point =.278Flat tireBreakdown assistance
Page 281 of 336
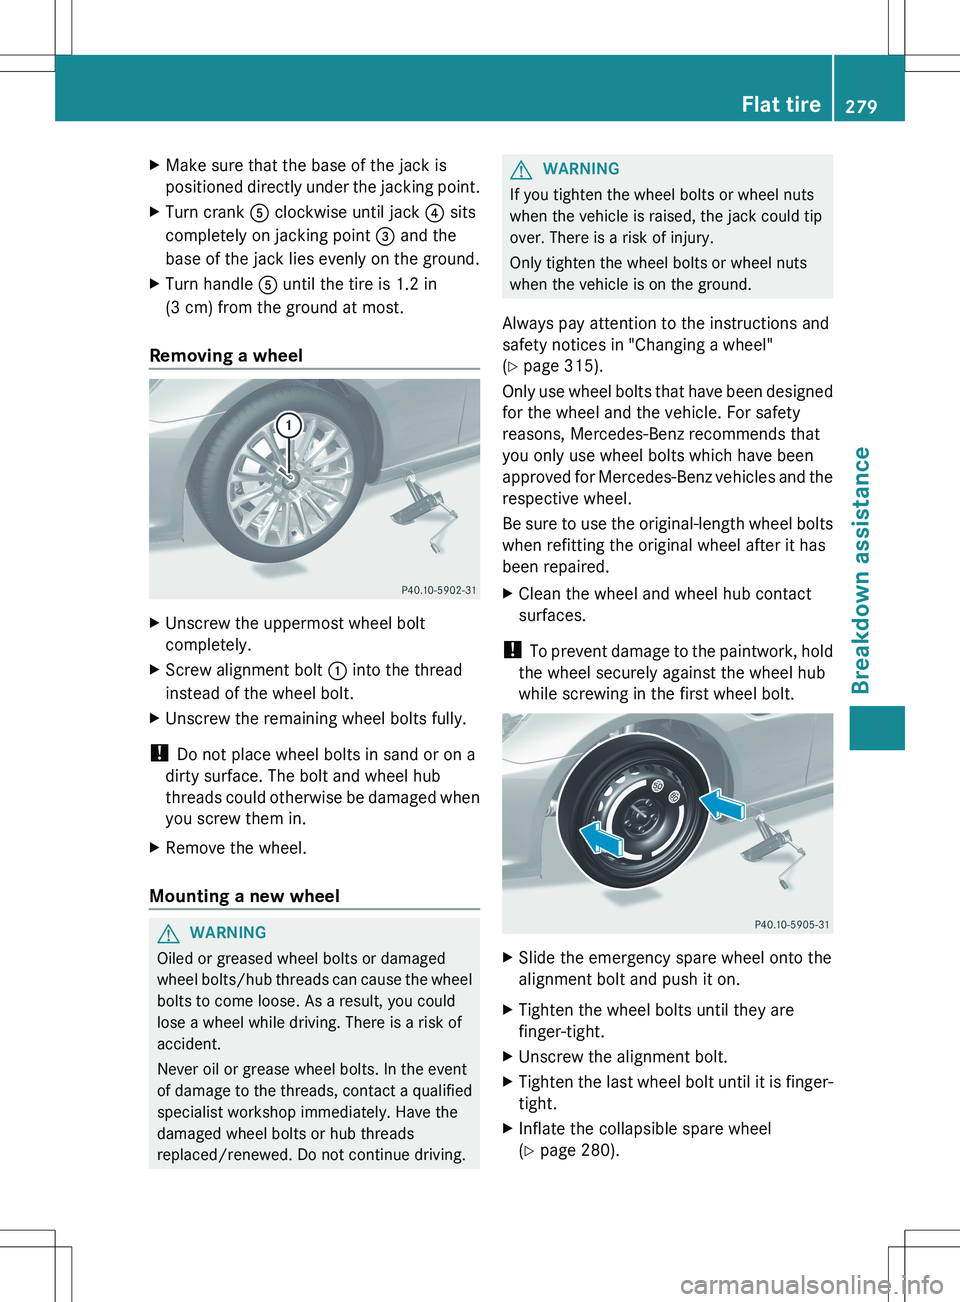
XMake sure that the base of the jack is
positioned directly under the jacking point.XTurn crank A clockwise until jack ? sits
completely on jacking point = and the
base of the jack lies evenly on the ground.XTurn handle A until the tire is 1.2 in
(3 cm) from the ground at most.
Removing a wheel
XUnscrew the uppermost wheel bolt
completely.XScrew alignment bolt : into the thread
instead of the wheel bolt.XUnscrew the remaining wheel bolts fully.
! Do not place wheel bolts in sand or on a
dirty surface. The bolt and wheel hub
threads could otherwise be damaged when
you screw them in.
XRemove the wheel.
Mounting a new wheel
GWARNING
Oiled or greased wheel bolts or damaged
wheel bolts/hub threads can cause the wheel
bolts to come loose. As a result, you could
lose a wheel while driving. There is a risk of
accident.
Never oil or grease wheel bolts. In the event
of damage to the threads, contact a qualified
specialist workshop immediately. Have the
damaged wheel bolts or hub threads
replaced/renewed. Do not continue driving.
GWARNING
If you tighten the wheel bolts or wheel nuts
when the vehicle is raised, the jack could tip
over. There is a risk of injury.
Only tighten the wheel bolts or wheel nuts
when the vehicle is on the ground.
Always pay attention to the instructions and
safety notices in "Changing a wheel"
( Y page 315).
Only use wheel bolts that have been designed
for the wheel and the vehicle. For safety
reasons, Mercedes-Benz recommends that
you only use wheel bolts which have been
approved for Mercedes-Benz vehicles and the
respective wheel.
Be sure to use the original-length wheel bolts
when refitting the original wheel after it has
been repaired.
XClean the wheel and wheel hub contact
surfaces.
! To prevent damage to the paintwork, hold
the wheel securely against the wheel hub
while screwing in the first wheel bolt.
XSlide the emergency spare wheel onto the
alignment bolt and push it on.XTighten the wheel bolts until they are
finger-tight.XUnscrew the alignment bolt.XTighten the last wheel bolt until it is finger-
tight.XInflate the collapsible spare wheel
( Y page 280).Flat tire279Breakdown assistanceZ
Page 282 of 336
Inflating the collapsible spare wheel
! Inflate the collapsible spare wheel using
the tire inflation compressor before
lowering the vehicle. The wheel rim could
otherwise be damaged.
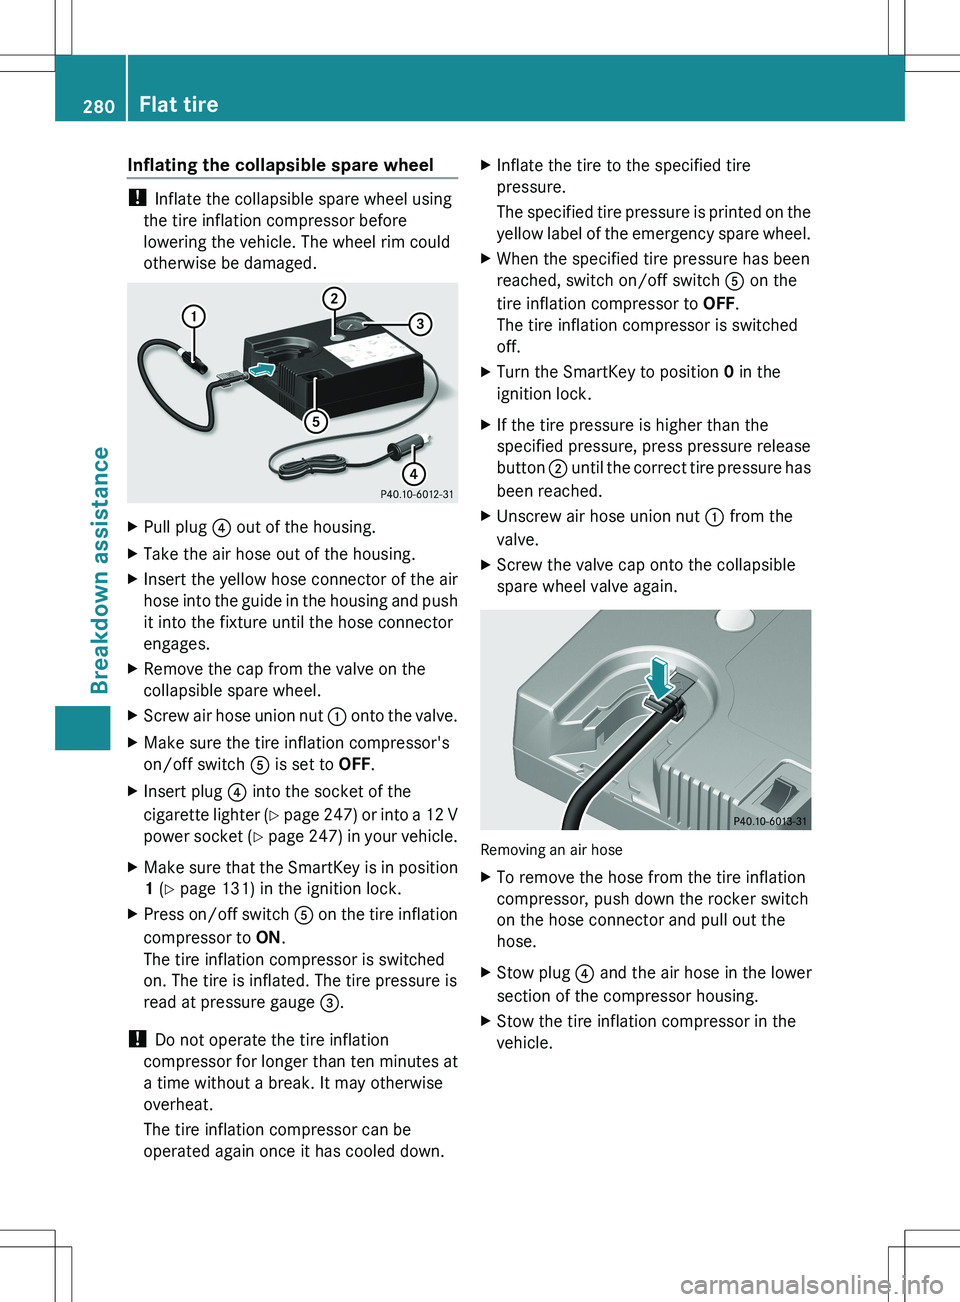
XPull plug ? out of the housing.XTake the air hose out of the housing.XInsert the yellow hose connector of the air
hose into the guide in the housing and push
it into the fixture until the hose connector
engages.XRemove the cap from the valve on the
collapsible spare wheel.XScrew air hose union nut : onto the valve.XMake sure the tire inflation compressor's
on/off switch A is set to OFF.XInsert plug ? into the socket of the
cigarette lighter (Y page 247) or into a 12 V
power socket (Y page 247) in your vehicle.XMake sure that the SmartKey is in position
1 (Y page 131) in the ignition lock.XPress on/off switch A on the tire inflation
compressor to ON.
The tire inflation compressor is switched
on. The tire is inflated. The tire pressure is
read at pressure gauge =.
!
Do not operate the tire inflation
compressor for longer than ten minutes at
a time without a break. It may otherwise
overheat.
The tire inflation compressor can be
operated again once it has cooled down.
XInflate the tire to the specified tire
pressure.
The specified tire pressure is printed on the
yellow label of the emergency spare wheel.XWhen the specified tire pressure has been
reached, switch on/off switch A on the
tire inflation compressor to OFF.
The tire inflation compressor is switched
off.XTurn the SmartKey to position 0 in the
ignition lock.XIf the tire pressure is higher than the
specified pressure, press pressure release
button ; until the correct tire pressure has
been reached.XUnscrew air hose union nut : from the
valve.XScrew the valve cap onto the collapsible
spare wheel valve again.
Removing an air hose
XTo remove the hose from the tire inflation
compressor, push down the rocker switch
on the hose connector and pull out the
hose.XStow plug ? and the air hose in the lower
section of the compressor housing.XStow the tire inflation compressor in the
vehicle.280Flat tireBreakdown assistance
Page 283 of 336
Lowering the vehicleGWARNING
Tire pressure that is too high or too low can
lead to a blowout of the mounted emergency
spare wheel/spare wheel, particularly when
driving with a heavy load and increasing
speed. There is a risk of accident.
Check the tire pressure of the emergency
spare wheel or spare wheel and adjust it.
When doing so, observe the specified tire
pressure.
! Inflate the collapsible spare wheel using
the tire inflation compressor before
lowering the vehicle. The wheel rim could
otherwise be damaged.
XTurn the crank of the jack counter-
clockwise until the vehicle is once again
standing firmly on the ground.XPlace the jack to one side.GWARNING
The wheels could work loose if the wheel nuts
and bolts are not tightened to the specified
tightening torque. There is a risk of accident.
Have the tightening torque immediately
checked at a qualified specialist workshop
after a wheel is changed.
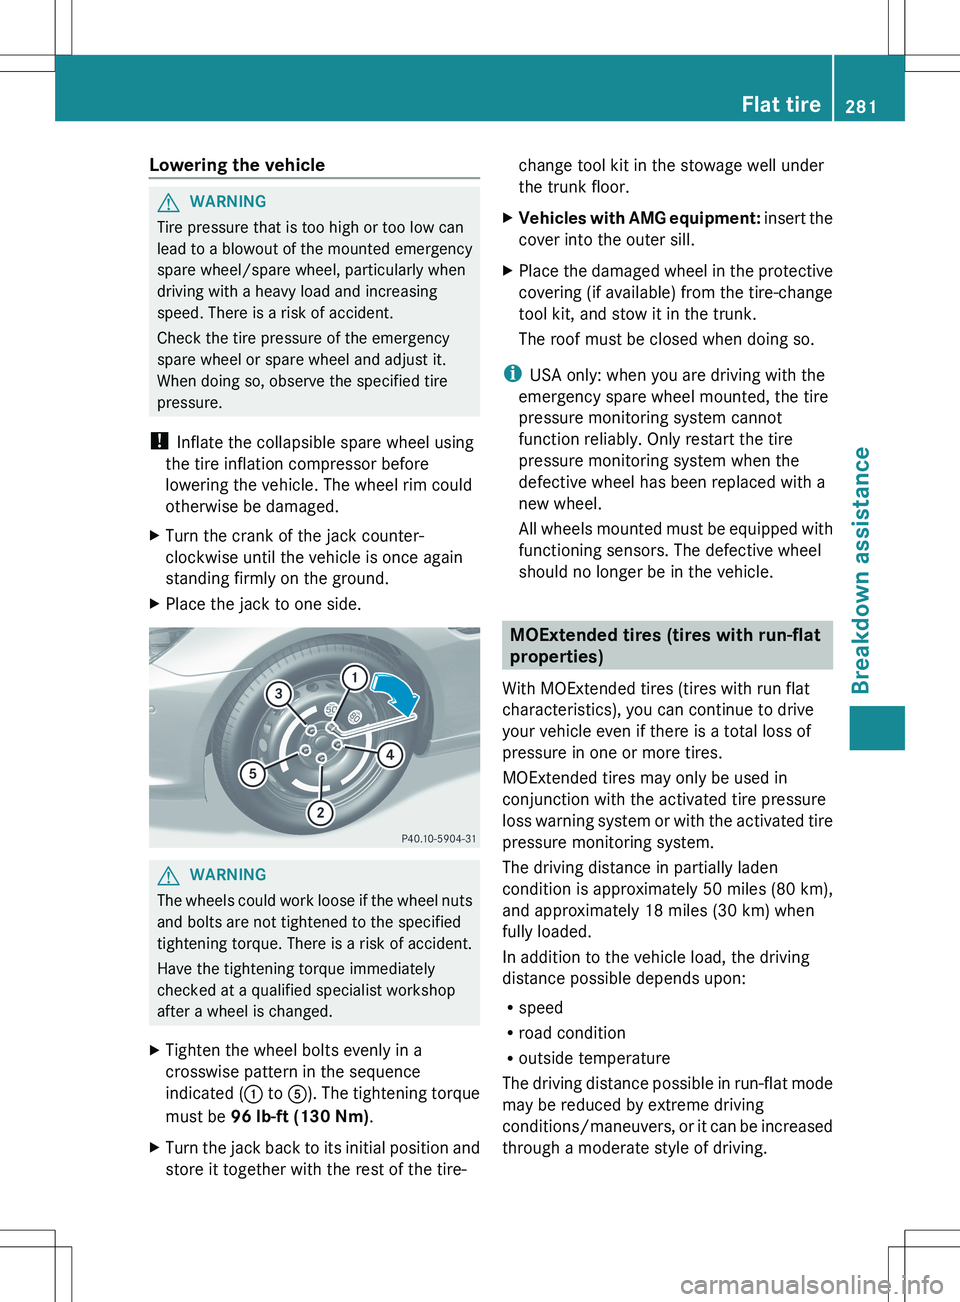
XTighten the wheel bolts evenly in a
crosswise pattern in the sequence
indicated ( : to A). The tightening torque
must be 96 lb-ft (130 Nm) .XTurn the jack back to its initial position and
store it together with the rest of the tire-change tool kit in the stowage well under
the trunk floor.XVehicles with AMG equipment: insert the
cover into the outer sill.XPlace the damaged wheel in the protective
covering (if available) from the tire-change
tool kit, and stow it in the trunk.
The roof must be closed when doing so.
i USA only: when you are driving with the
emergency spare wheel mounted, the tire
pressure monitoring system cannot
function reliably. Only restart the tire
pressure monitoring system when the
defective wheel has been replaced with a
new wheel.
All wheels mounted must be equipped with
functioning sensors. The defective wheel
should no longer be in the vehicle.
MOExtended tires (tires with run-flat
properties)
With MOExtended tires (tires with run flat
characteristics), you can continue to drive
your vehicle even if there is a total loss of
pressure in one or more tires.
MOExtended tires may only be used in
conjunction with the activated tire pressure
loss warning system or with the activated tire
pressure monitoring system.
The driving distance in partially laden
condition is approximately 50 miles (80 km),
and approximately 18 miles (30 km) when
fully loaded.
In addition to the vehicle load, the driving
distance possible depends upon:
R speed
R road condition
R outside temperature
The driving distance possible in run-flat mode
may be reduced by extreme driving
conditions/maneuvers, or it can be increased
through a moderate style of driving.
Flat tire281Breakdown assistanceZ
Page 284 of 336
The maximum permissible distance which
can be driven in run-flat mode is counted from
the moment the tire pressure loss warning
appears in the multifunction display.
Do not exceed a vehicle speed of 50 mph
(80 km/h).GWARNING
When driving in emergency mode, the driving
characteristics deteriorate, e.g. when
cornering, accelerating quickly and when
braking. There is a risk of an accident.
Do not exceed the stated maximum speed.
Avoid abrupt steering and driving maneuvers,
and driving over obstacles (curbs, potholes,
off-road). This applies in particular to a laden
vehicle.
Stop driving in emergency mode if:
R you hear banging noises.
R the vehicle starts to shake.
R you see smoke and smell rubber.
R ESP ®
is intervening constantly.
R there are tears in the sidewalls of the tire.
After driving in emergency mode, have the
wheel rims checked at a qualified specialist
workshop with regard to their further use. The
defective tire must be replaced in every case.
i When replacing one or all tires, make sure
that you only use tires marked
MOExtended. Also ensure that they are of
the specified size for the vehicle.
Battery
Important safety notes
In order for the battery to achieve the
maximum possible service life, it must always
be sufficiently charged.
! Have the battery checked regularly at a
qualified specialist workshop.
Observe the service intervals in the
Maintenance Booklet or contact a qualified
specialist workshop for more information.
Have the battery charge level checked more
frequently if you use the vehicle mainly for
short trips or if you leave it standing idle for
a lengthy period.
Only replace a battery with a battery that has
been recommended by Mercedes-Benz.
Consult a qualified specialist workshop if you
wish to leave your vehicle parked for a long
period of time.GWARNING
Comply with safety precautions and take
protective measures when handling batteries.
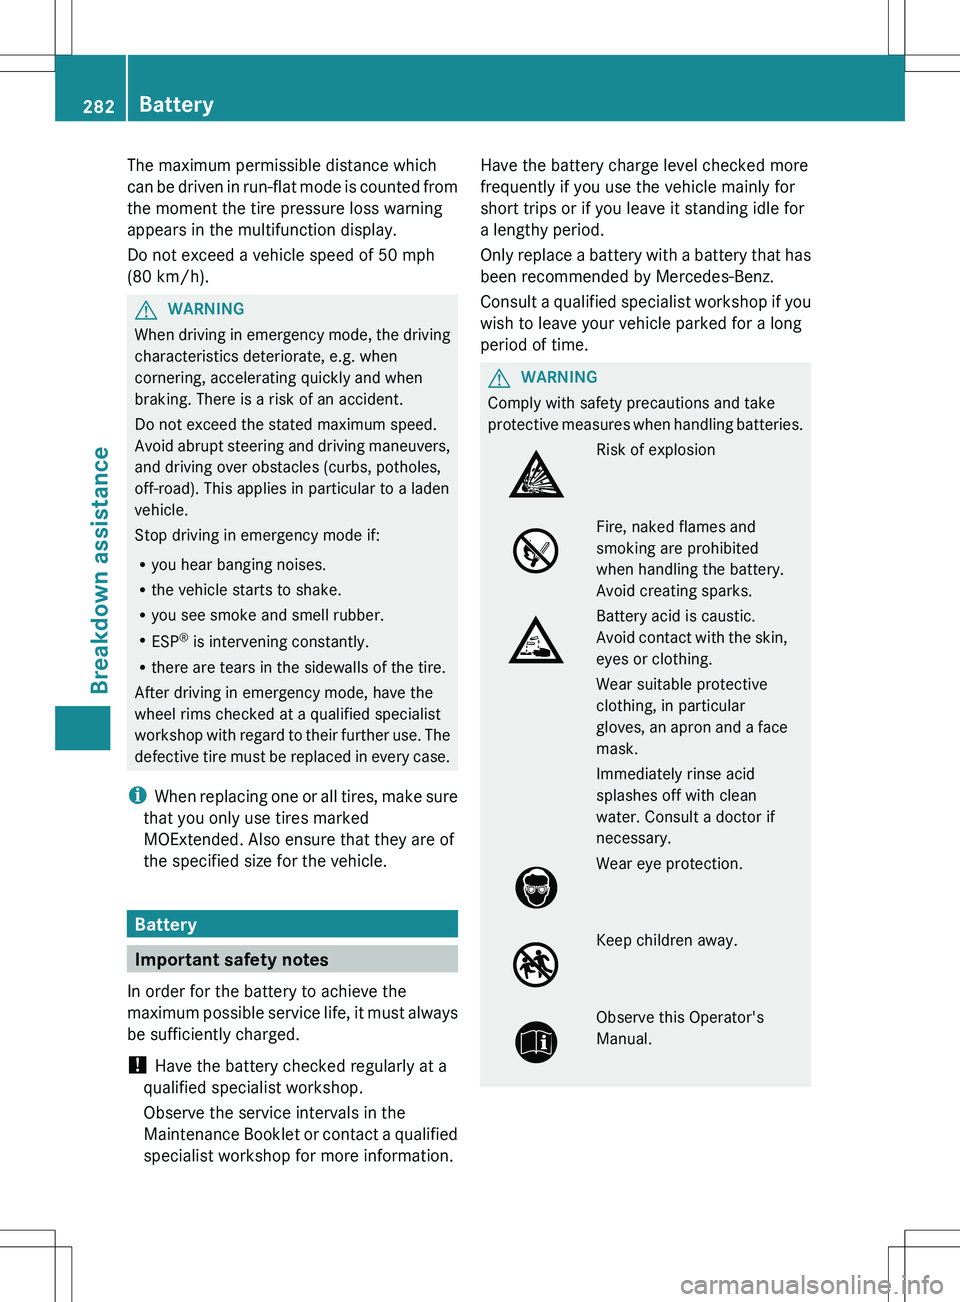
Risk of explosionFire, naked flames and
smoking are prohibited
when handling the battery.
Avoid creating sparks.Battery acid is caustic.
Avoid contact with the skin,
eyes or clothing.
Wear suitable protective
clothing, in particular
gloves, an apron and a face
mask.
Immediately rinse acid
splashes off with clean
water. Consult a doctor if
necessary.Wear eye protection.Keep children away.Observe this Operator's
Manual.282BatteryBreakdown assistance
Page 291 of 336
Transporting the vehicle
The towing eye can be used to pull the vehicle
onto a trailer or transporter for transporting
purposes.XVehicles with manual transmission:
shift to neutral.XVehicles with automatic transmission:
turn the SmartKey to position 2 in the
ignition lock.XMove the selector lever to N.
As soon as the vehicle is loaded:
XPrevent the vehicle from rolling away by
applying the parking brake.XVehicles with manual transmission:
shift to first gear or reverse gear.XVehicles with automatic transmission:
move the selector lever to P.XTurn the SmartKey to position 0 in the
ignition lock and remove the SmartKey
from the ignition lock.XSecure the vehicle.
! Only lash the vehicle down by the wheels
or wheel rims, not by parts of the vehicle
such as axle or steering components.
Otherwise, the vehicle could be damaged.
Tow-starting (emergency starting)
When tow-starting your vehicle, it is
important that you follow the safety
instructions ( Y page 287).
! Vehicles with automatic transmission
must not be started by tow-starting. This
could otherwise damage the transmission.
For further information on "Jump-starting"
see ( Y page 285).
Before tow-starting the following conditions
must be fulfilled:
R the battery is connected.
R the engine has cooled down.
R the catalytic converter has cooled down.
XSwitch on the hazard warning lamps
( Y page 108).XInstall the towing eye ( Y page 287).XSecure the rigid towing bar or the towing
rope.XDepress and hold the brake pedal.XTurn the SmartKey to position 2 in the
ignition lock.XDepress the clutch pedal and keep it
depressed.XShift to neutral.XRelease the brake pedal.XTow-start the vehicle.XShift to second gear.XRelease the clutch pedal slowly; do not
depress the accelerator pedal while doing
so.
The engine is started.XDepress the clutch pedal and shift to
neutral.XStop at a suitable place.XDepress the parking brake.XRemove the rigid towing bar or towing rope.XRemove the towing eye ( Y page 288).XSwitch off the hazard warning lamps.
Fuses
Important safety notes
GWARNING
Only use fuses that have been approved for
Mercedes-Benz vehicles and that have the
correct fuse rating for the systems
concerned. Do not attempt to repair or bridge
faulty fuses. Using fuses that have not been
approved or attempting to repair or bridge
faulty fuses could cause the fuse to be
overloaded and result in a fire. Have the cause
traced and rectified at a qualified specialist
workshop.
The fuses in your vehicle serve to close down
faulty circuits. If a fuse blows, all the
Fuses289Breakdown assistanceZ
Page 295 of 336
Useful information ............................294
Important safety notes ....................294
Operation ........................................... 294
Winter operation ............................... 296
Tire pressure ..................................... 297
Loading the vehicle ..........................304
Maximum load rating .......................307
Uniform Tire Quality Grading
Standards .......................................... 307
Tire labeling ....................................... 309
Definition of terms for tires and
loading ............................................... 312
Changing a wheel ............................. 315
Wheel and tire combinations ...........316293Wheels and tires