2012 MERCEDES-BENZ SLK-CLASS ROADSTER buttons
[x] Cancel search: buttonsPage 17 of 336
Notes ............................................. 264
Service messages ..........................264
Service menu (on-board computer) . 191
Service products Brake fluid ..................................... 327
Coolant (engine) ............................ 327
Engine oil ....................................... 326
Fuel ................................................ 325
Important safety notes ..................324
Washer fluid ................................... 328
Settings
Factory (on-board computer) .........195
On-board computer .......................191
Setting the air distribution ............... 123
Setting the airflow ............................ 123
SETUP (on-board computer) ............. 196
Side impact air bag ............................. 40
Side marker lamp (display
message) ............................................ 215
Side windows Convenience closing feature ............81
Important safety information ...........80
Opening/closing (all) .......................80
Opening/closing (front) ...................80
Problem (malfunction) .....................82
Resetting ......................................... 82
SmartKey
Changing the battery .......................71
Changing the programming .............70
Checking the battery .......................71
Convenience opening feature ..........81
Display message ............................ 226
Door central locking/unlocking .......68
Important safety notes ....................68
Loss ................................................. 73
Mechanical key ................................ 70
Opening/closing the roof ................84
Positions (ignition lock) .................131
Problem (malfunction) .....................73
Starting the engine ........................133
Snow chains ...................................... 297
Sockets Center console .............................. 248
Points to observe before use .........247
Under the armrest .........................248
Spare wheel
Notes/data .................................... 318Storage location ............................ 274
Stowing .......................................... 275
see Emergency spare wheel
Specialist workshop ............................ 23
Speed, controlling see Cruise control
Speedometer
Activating/deactivating the
additional speedometer .................192
Digital ............................................ 186
In the Instrument cluster .................27
Segments ...................................... 181
Selecting the unit of
measurement ................................ 191
see Instrument cluster
SPORT handling mode
Activating/deactivating (AMG
vehicles) .......................................... 60
Warning lamp ................................. 232
SRS (Supplemental Restraint
System) Display message ............................ 208
Introduction ..................................... 36
Warning lamp ................................. 233
Warning lamp (function) ................... 36
Standing lamps
Changing bulbs .............................. 112
Display message ............................ 215
Switching on/off ........................... 104
Starting (engine) ................................ 132
Station see Radio
Steering (display message) .............. 225
Steering wheel Adjusting (electrically) .....................97
Adjusting (manually) ........................97
Button overview ............................... 29
Buttons (on-board
computer) ...................................... 181
Cleaning ......................................... 270
Important safety notes ....................96
Paddle shifters ............................... 142
Storing settings (memory
function) ........................................ 100
Steering wheel paddle shifters ........ 142
Stopwatch (RACETIMER) ................... 196
Stowage areas ................................... 242Index15
Page 34 of 336
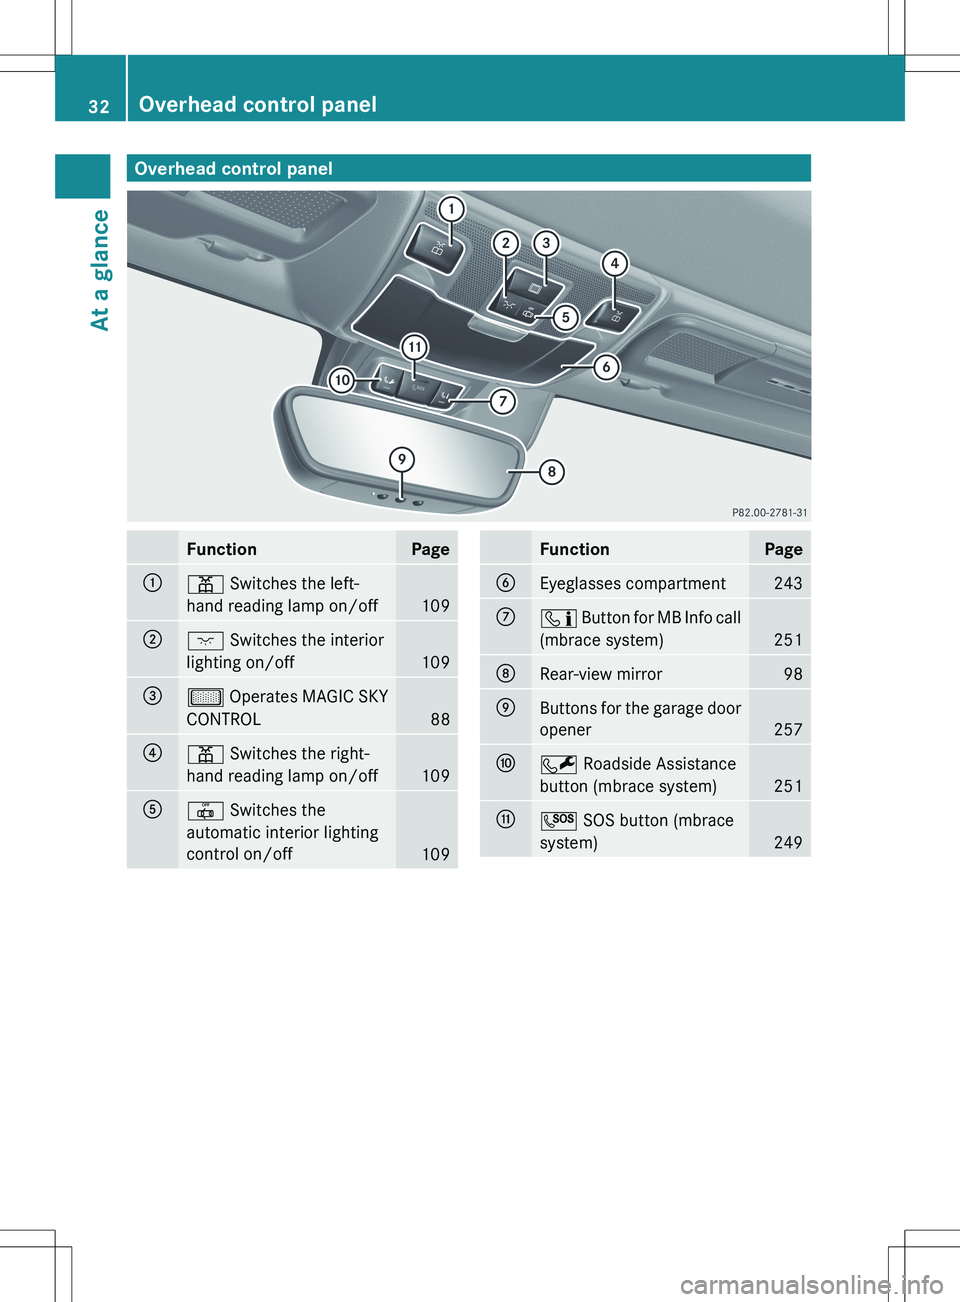
Overhead control panelFunctionPage:p Switches the left-
hand reading lamp on/off
109
;c Switches the interior
lighting on/off
109
=µ Operates MAGIC SKY
CONTROL
88
?p Switches the right-
hand reading lamp on/off
109
A| Switches the
automatic interior lighting
control on/off
109
FunctionPageBEyeglasses compartment243Cï Button for MB Info call
(mbrace system)
251
DRear-view mirror98EButtons for the garage door
opener
257
FF Roadside Assistance
button (mbrace system)
251
GG SOS button (mbrace
system)
249
32Overhead control panelAt a glance
Page 72 of 336
If you pull on the handle of the trunk lid, only
the trunk of the vehicle is unlocked.
Changing the settings of the locking
system
You can change the settings of the locking
system so that when unlocking, only the
driver's door, the lockable stowage
compartments in the vehicle interior and the
fuel filler flap are unlocked. This is useful if
you frequently travel on your own.
XTo change the setting: press and hold
down the % and & buttons
simultaneously for approximately
six seconds until the battery check lamp
flashes twice ( Y page 71).
i
If the setting of the locking system is
changed within the signal range of the
vehicle, pressing the & or % button
locks or unlocks the vehicle.
The SmartKey now functions as follows:
XTo unlock the driver's door: press the
% button once.XTo unlock centrally: press the %
button twice.XTo lock centrally: press the & button.
The KEYLESS-GO function is changed as
follows:
XTo unlock the driver's door: touch the
inner surface of the door handle on the
driver's door.XTo unlock centrally: touch the inner
surface of the front-passenger door handle.XTo lock centrally: touch the outer sensor
surface on one of the door handles.
Restoring the factory settings
XPress the % and & buttons
simultaneously for approximately
six seconds until the battery check lamp
flashes twice.Mechanical key
General notes
If the vehicle can no longer be locked or
unlocked with the SmartKey, use the
mechanical key.
If you use the mechanical key to unlock and
open the driver's door or the trunk lid, the
anti-theft alarm system will be triggered
( Y page 65).
There are several ways to turn off the alarm:
XTo turn the alarm off with the
SmartKey: press the % or & button
on the SmartKey.
or
XInsert the SmartKey into the ignition lock.
or
XTo deactivate the alarm with KEYLESS-
GO: press the Start/Stop button in the
ignition lock. The SmartKey must be in the
vehicle.
or
XLock or unlock the vehicle using KEYLESS-
GO. The SmartKey must be outside the
vehicle.
If you unlock the vehicle using the mechanical
key, the fuel filler flap will not be unlocked
automatically.
XTo unlock the fuel filler flap: insert the
SmartKey in the ignition lock.
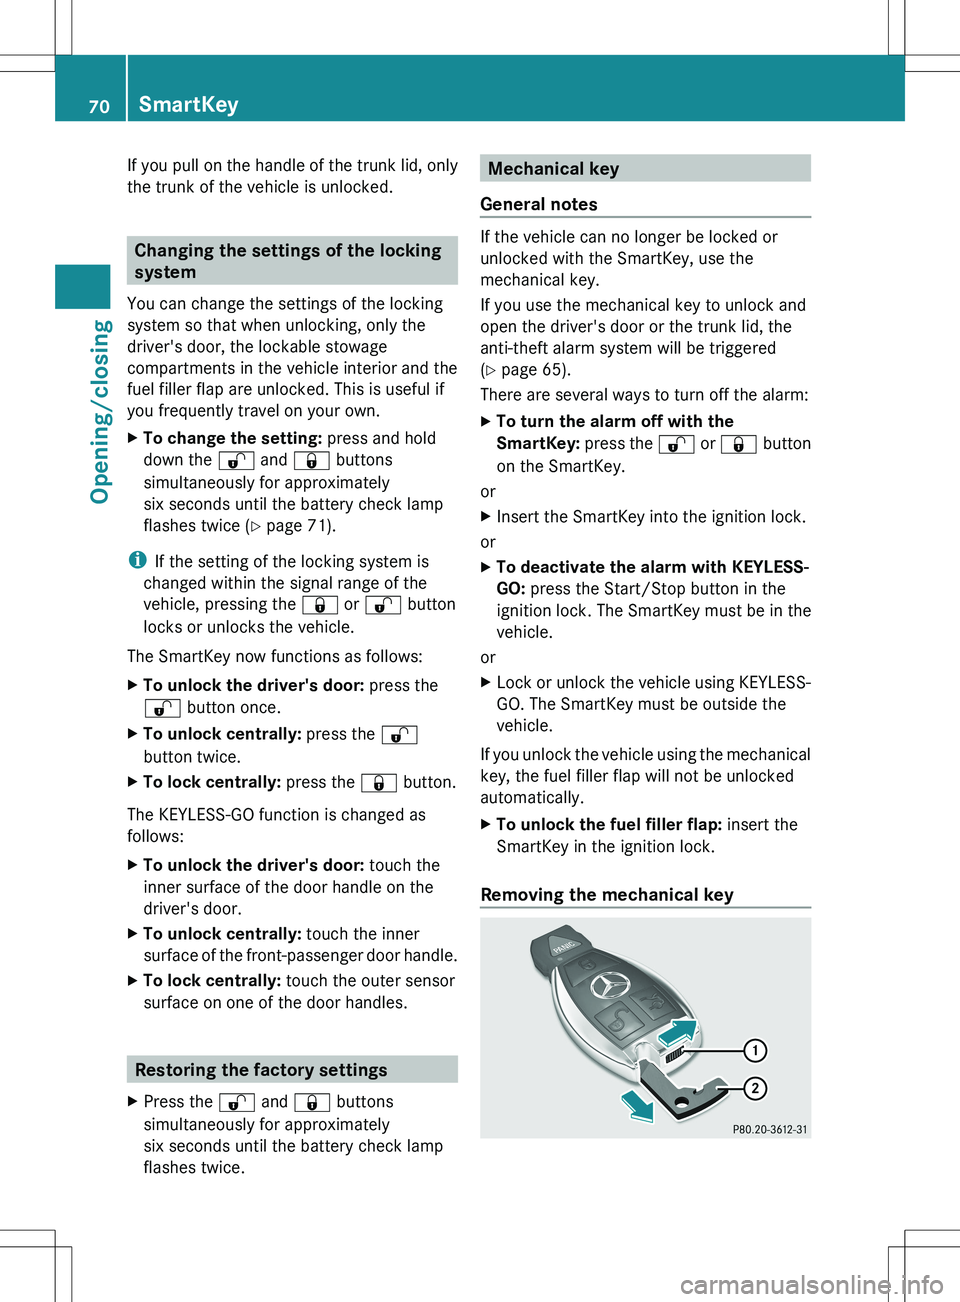
Removing the mechanical key
70SmartKeyOpening/closing
Page 74 of 336
XMake sure that the surface of the battery is
free from lint, grease and all other forms of
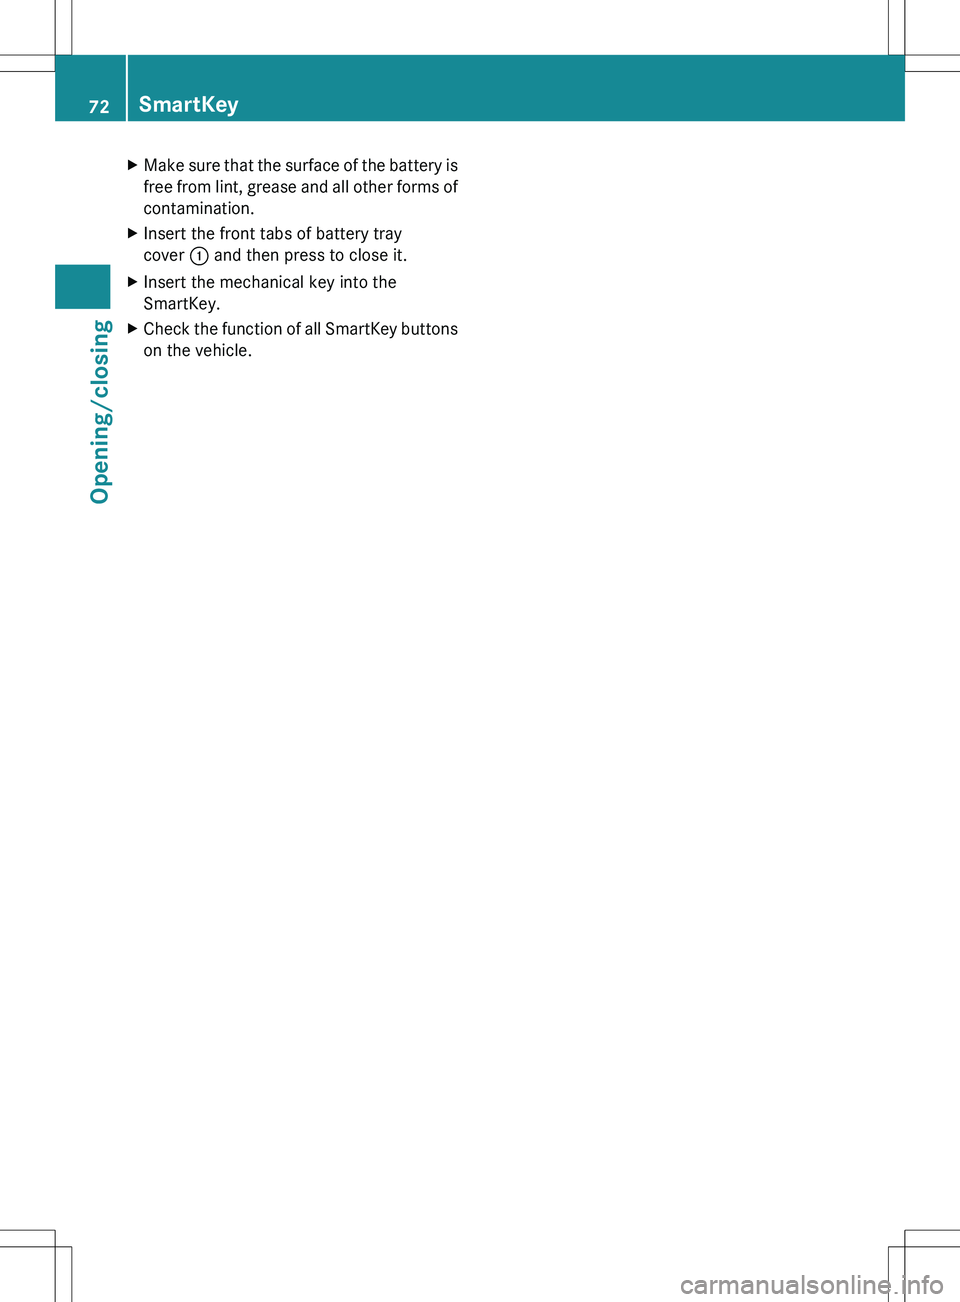
contamination.XInsert the front tabs of battery tray
cover : and then press to close it.XInsert the mechanical key into the
SmartKey.XCheck the function of all SmartKey buttons
on the vehicle.72SmartKeyOpening/closing
Page 78 of 336
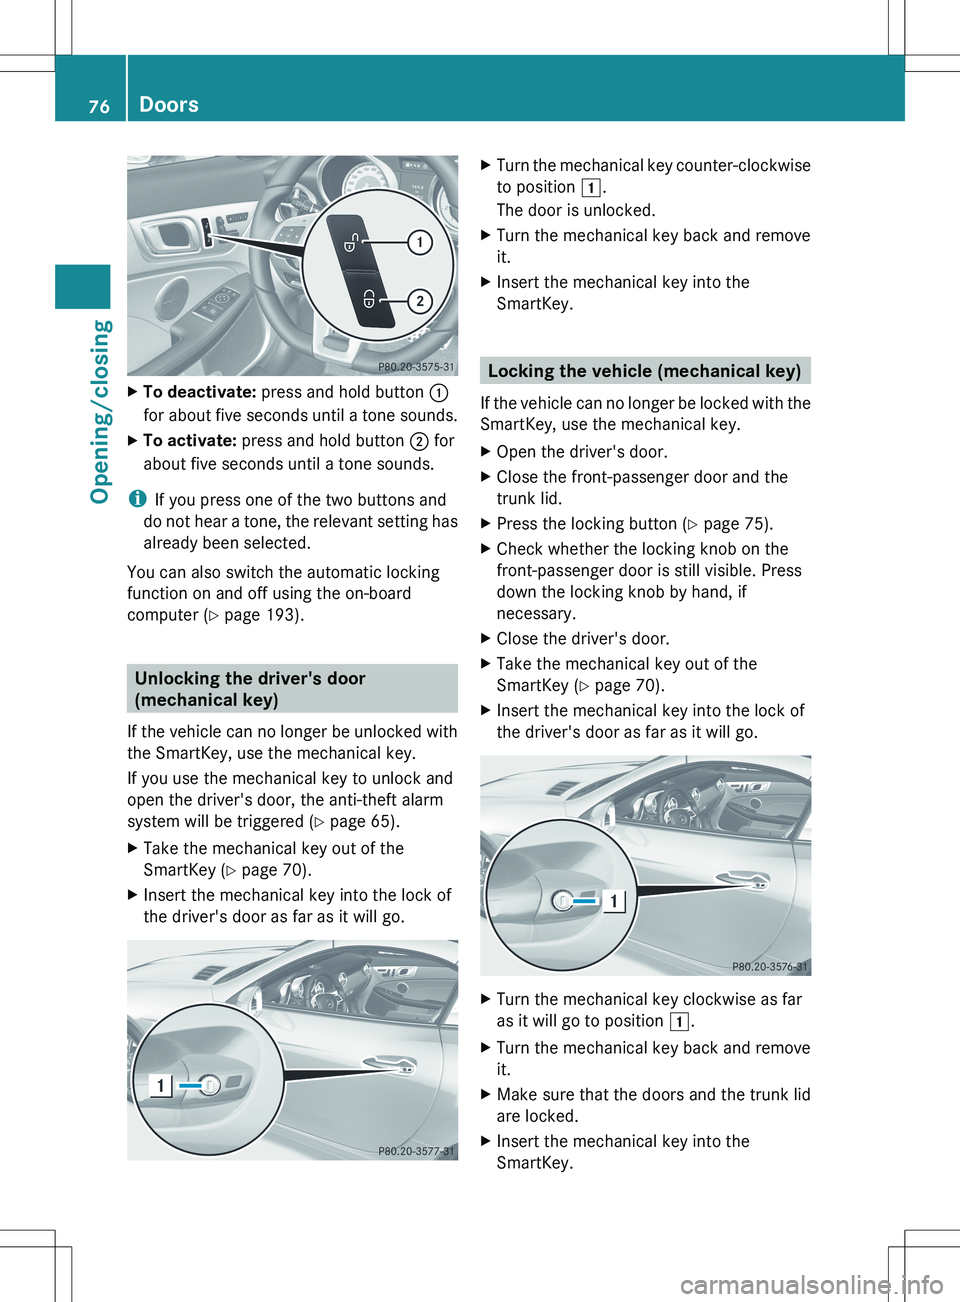
XTo deactivate: press and hold button :
for about five seconds until a tone sounds.XTo activate: press and hold button ; for
about five seconds until a tone sounds.
i If you press one of the two buttons and
do not hear a tone, the relevant setting has
already been selected.
You can also switch the automatic locking
function on and off using the on-board
computer ( Y page 193).
Unlocking the driver's door
(mechanical key)
If the vehicle can no longer be unlocked with
the SmartKey, use the mechanical key.
If you use the mechanical key to unlock and
open the driver's door, the anti-theft alarm
system will be triggered ( Y page 65).
XTake the mechanical key out of the
SmartKey ( Y page 70).XInsert the mechanical key into the lock of
the driver's door as far as it will go.XTurn the mechanical key counter-clockwise
to position 1.
The door is unlocked.XTurn the mechanical key back and remove
it.XInsert the mechanical key into the
SmartKey.
Locking the vehicle (mechanical key)
If the vehicle can no longer be locked with the
SmartKey, use the mechanical key.
XOpen the driver's door.XClose the front-passenger door and the
trunk lid.XPress the locking button ( Y page 75).XCheck whether the locking knob on the
front-passenger door is still visible. Press
down the locking knob by hand, if
necessary.XClose the driver's door.XTake the mechanical key out of the
SmartKey ( Y page 70).XInsert the mechanical key into the lock of
the driver's door as far as it will go.XTurn the mechanical key clockwise as far
as it will go to position 1.XTurn the mechanical key back and remove
it.XMake sure that the doors and the trunk lid
are locked.XInsert the mechanical key into the
SmartKey.76DoorsOpening/closing
Page 89 of 336
Installing and removing the wind screen
Preparing for installation
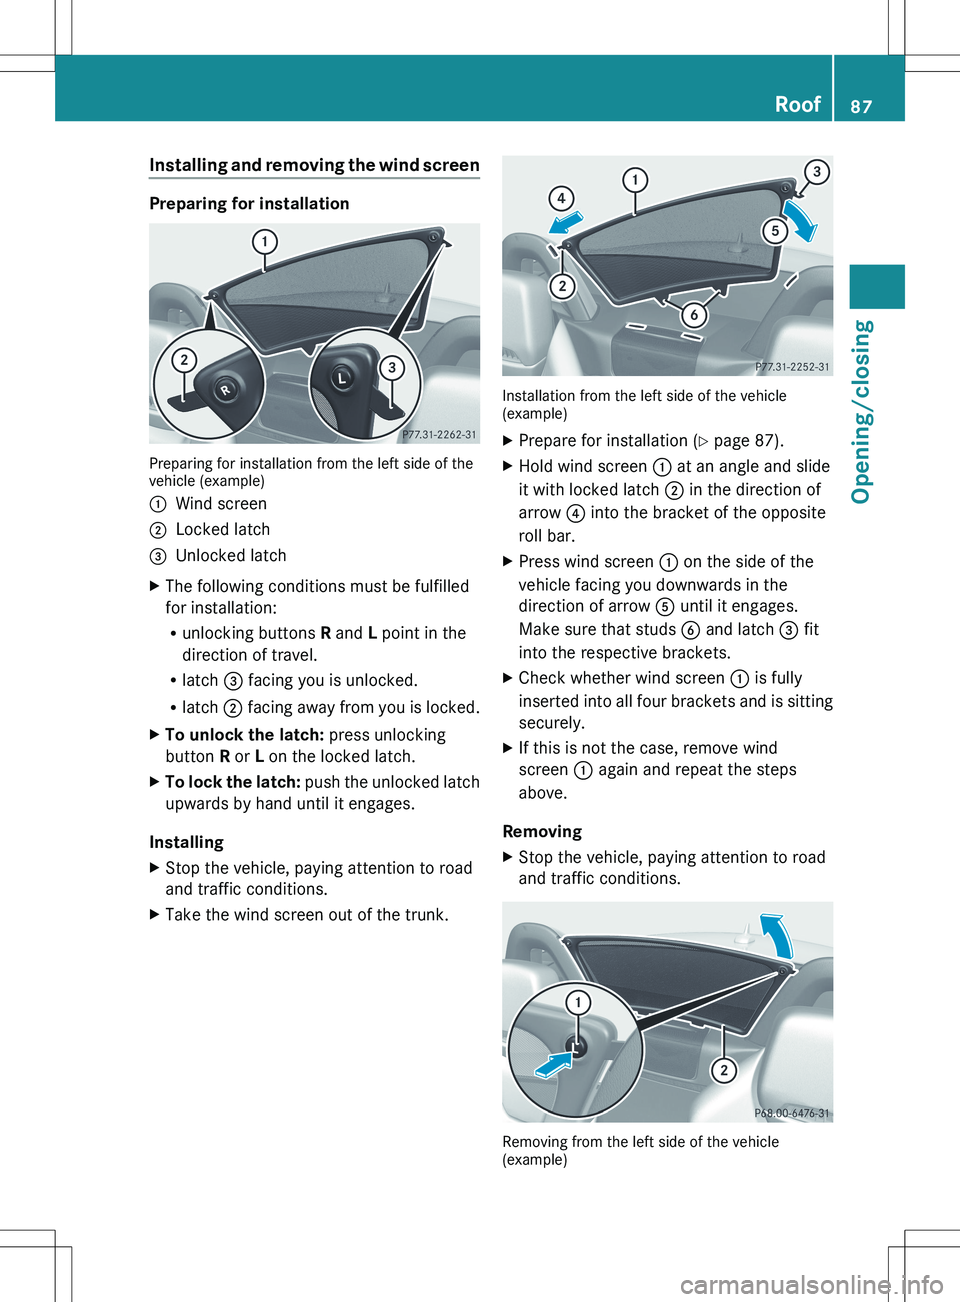
Preparing for installation from the left side of the
vehicle (example)
:Wind screen;Locked latch=Unlocked latchXThe following conditions must be fulfilled
for installation:
R unlocking buttons R and L point in the
direction of travel.
R latch = facing you is unlocked.
R latch ; facing away from you is locked.XTo unlock the latch: press unlocking
button R or L on the locked latch.XTo lock the latch: push the unlocked latch
upwards by hand until it engages.
Installing
XStop the vehicle, paying attention to road
and traffic conditions.XTake the wind screen out of the trunk.
Installation from the left side of the vehicle
(example)
XPrepare for installation ( Y page 87).XHold wind screen : at an angle and slide
it with locked latch ; in the direction of
arrow ? into the bracket of the opposite
roll bar.XPress wind screen : on the side of the
vehicle facing you downwards in the
direction of arrow A until it engages.
Make sure that studs B and latch = fit
into the respective brackets.XCheck whether wind screen : is fully
inserted into all four brackets and is sitting
securely.XIf this is not the case, remove wind
screen : again and repeat the steps
above.
Removing
XStop the vehicle, paying attention to road
and traffic conditions.
Removing from the left side of the vehicle
(example)
Roof87Opening/closingZ
Page 103 of 336
Rseat and backrest position
R driver's side: steering wheel position
R driver's side: position of the exterior
mirrors on the driver's and front-passenger
sidesGWARNING
Do not activate the memory function while
driving. Activating the memory function while
driving could cause the driver to lose control
of the vehicle.
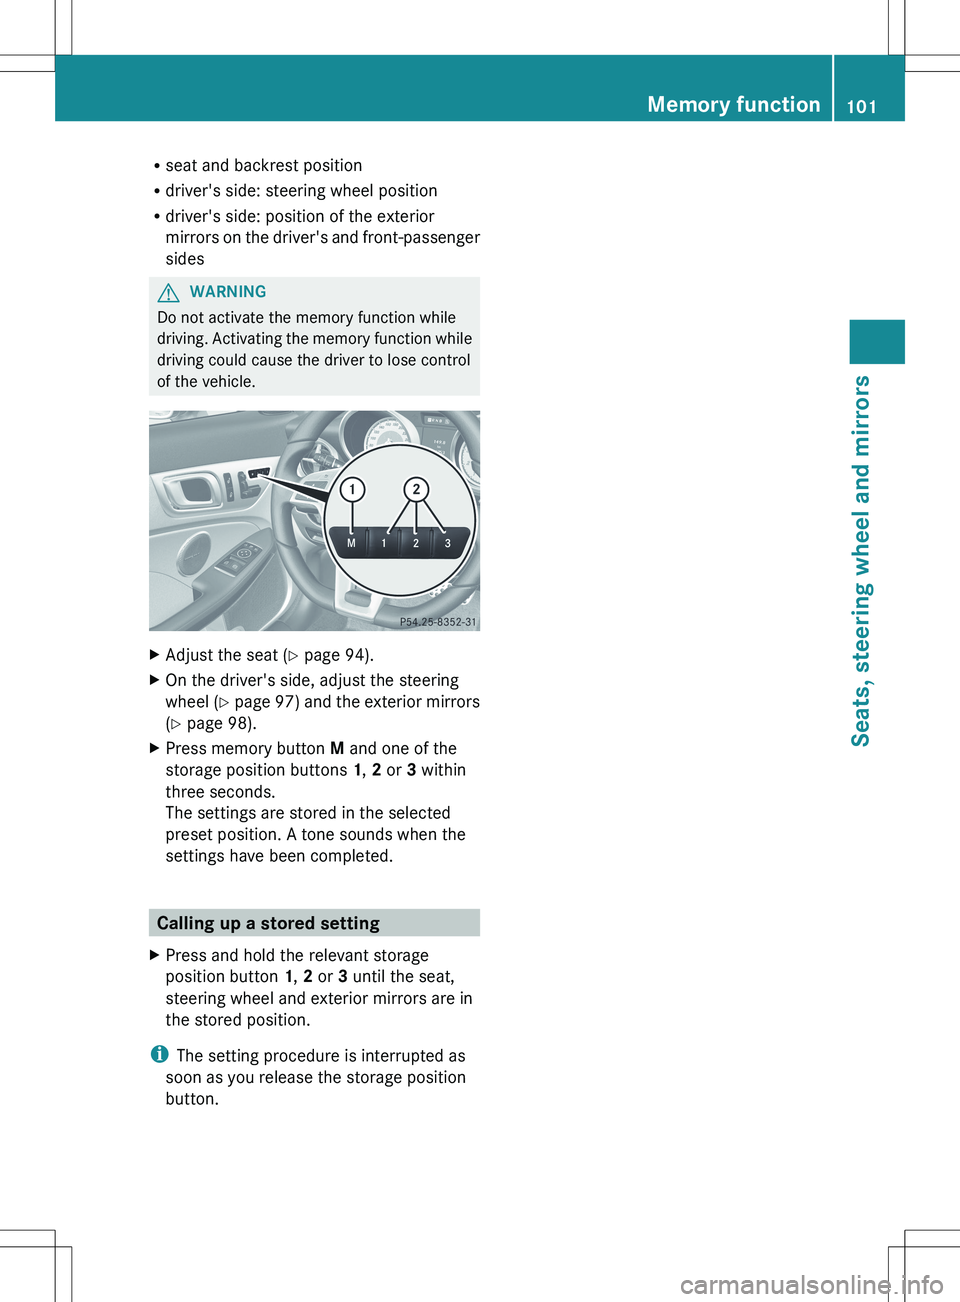
XAdjust the seat ( Y page 94).XOn the driver's side, adjust the steering
wheel ( Y page 97) and the exterior mirrors
( Y page 98).XPress memory button M and one of the
storage position buttons 1, 2 or 3 within
three seconds.
The settings are stored in the selected
preset position. A tone sounds when the
settings have been completed.
Calling up a stored setting
XPress and hold the relevant storage
position button 1, 2 or 3 until the seat,
steering wheel and exterior mirrors are in
the stored position.
i The setting procedure is interrupted as
soon as you release the storage position
button.
Memory function101Seats, steering wheel and mirrorsZ
Page 122 of 336
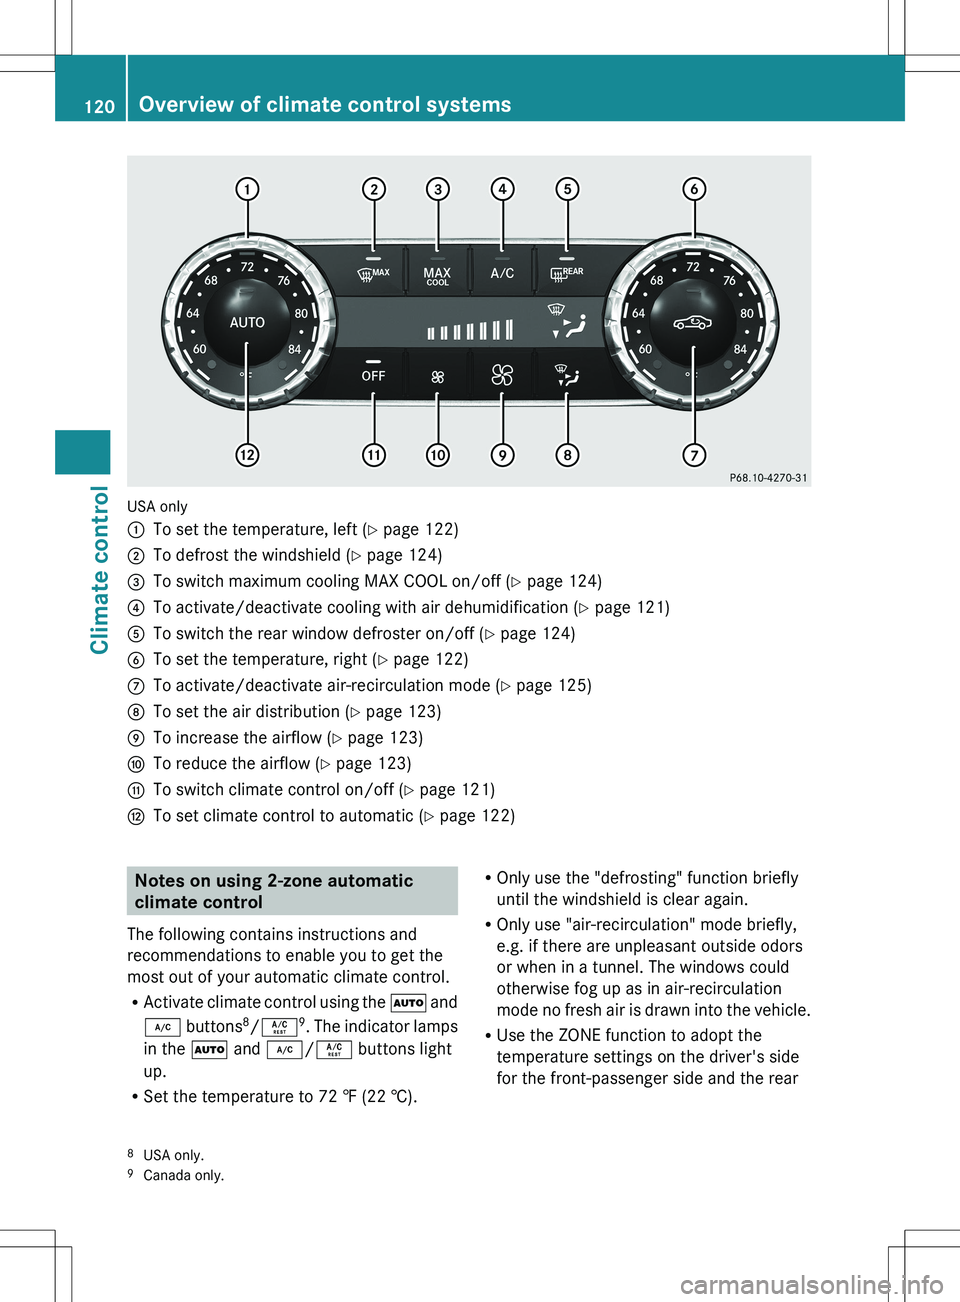
USA only
:To set the temperature, left (Y page 122);To defrost the windshield ( Y page 124)=To switch maximum cooling MAX COOL on/off ( Y page 124)?To activate/deactivate cooling with air dehumidification ( Y page 121)ATo switch the rear window defroster on/off ( Y page 124)BTo set the temperature, right ( Y page 122)CTo activate/deactivate air-recirculation mode ( Y page 125)DTo set the air distribution ( Y page 123)ETo increase the airflow ( Y page 123)FTo reduce the airflow ( Y page 123)GTo switch climate control on/off ( Y page 121)HTo set climate control to automatic ( Y page 122)Notes on using 2-zone automatic
climate control
The following contains instructions and
recommendations to enable you to get the
most out of your automatic climate control.
R Activate climate control using the à and
¿ buttons 8
/ Á 9
. The indicator lamps
in the à and ¿ /Á buttons light
up.
R Set the temperature to 72 ‡ (22 †).ROnly use the "defrosting" function briefly
until the windshield is clear again.
R Only use "air-recirculation" mode briefly,
e.g. if there are unpleasant outside odors
or when in a tunnel. The windows could
otherwise fog up as in air-recirculation
mode no fresh air is drawn into the vehicle.
R Use the ZONE function to adopt the
temperature settings on the driver's side
for the front-passenger side and the rear8 USA only.
9 Canada only.120Overview of climate control systemsClimate control